Are you running out of storage on your iPhone and struggling to manage your precious photo memories? At dfphoto.net, we understand the importance of preserving your visual stories. We’ll explore various options to store your iPhone photos, from iCloud to external drives, ensuring your memories are safe and accessible.
1. Why is iPhone Photo Storage Important?
iPhone photography has revolutionized how we capture and share our lives. The convenience of having a high-quality camera in our pockets has led to an explosion of digital images. However, this also presents a challenge: where do we store all these photos?
- Preserving Memories: Photos capture fleeting moments, milestones, and experiences. Storing them securely ensures that these memories aren’t lost due to device failure or accidental deletion.
- Freeing Up Device Space: High-resolution photos and videos consume significant storage space on your iPhone, leading to performance issues and preventing you from downloading new apps or content.
- Accessibility: Storing photos in the cloud or on external devices allows you to access them from multiple devices, making it easier to share and enjoy your memories.
- Backup and Disaster Recovery: Having a backup strategy for your photos protects you from data loss in case your iPhone is lost, stolen, or damaged.
2. Understanding Your iPhone Storage
Before exploring storage options, it’s crucial to understand how your iPhone uses storage space.
2.1 Checking iPhone Storage Usage
-
Go to Settings: Open the Settings app on your iPhone.
-
Tap General: Scroll down and tap on “General.”
-
Tap iPhone Storage: Select “iPhone Storage” to see a detailed breakdown of your storage usage.
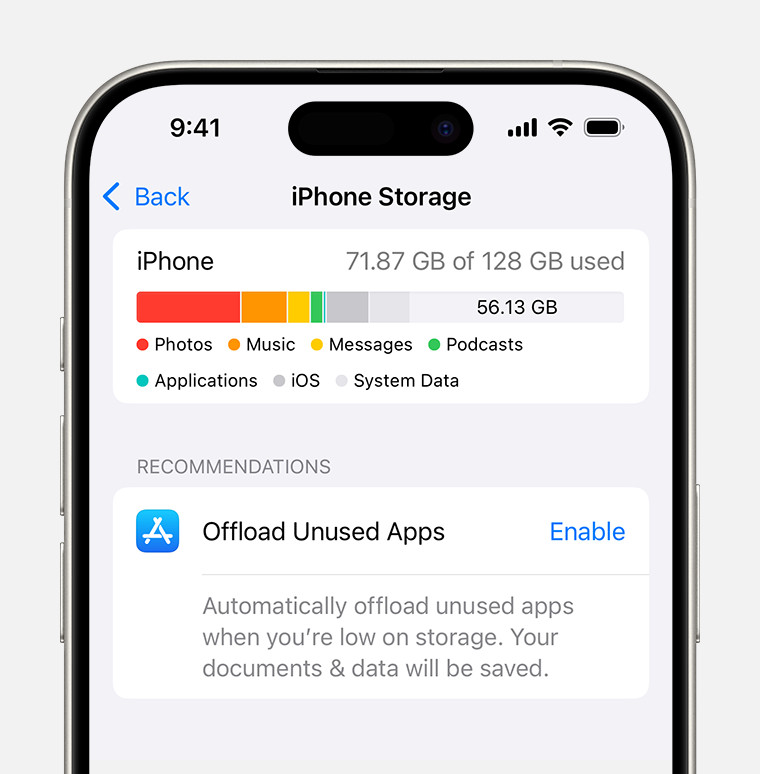 iPhone storage section of Settings displaying a recommendation to Offload Unused Apps
This screen displays a color-coded bar graph showing how much space is being used by different categories, such as:
- Photos: The amount of storage occupied by your photos and videos.
- Apps: The space used by installed apps and their data.
- Media: Storage consumed by music, movies, and other media files.
- iOS: The space occupied by the operating system.
- Other: Miscellaneous files, caches, and data.
2.2 Identifying Storage Hogs
Pay close attention to the “Photos” category. If it’s consuming a large portion of your storage, it’s a clear indication that you need to explore alternative storage solutions. Also, check the list of apps below the graph to identify any other storage-intensive apps.
2.3 Understanding iCloud Storage
iCloud is Apple’s cloud storage service, offering a convenient way to back up your photos, videos, and other data.
-
Go to Settings: Open the Settings app on your iPhone.
-
Tap Your Name: Tap on your name at the top of the screen.
-
Tap iCloud: Select “iCloud” to view your iCloud storage details.
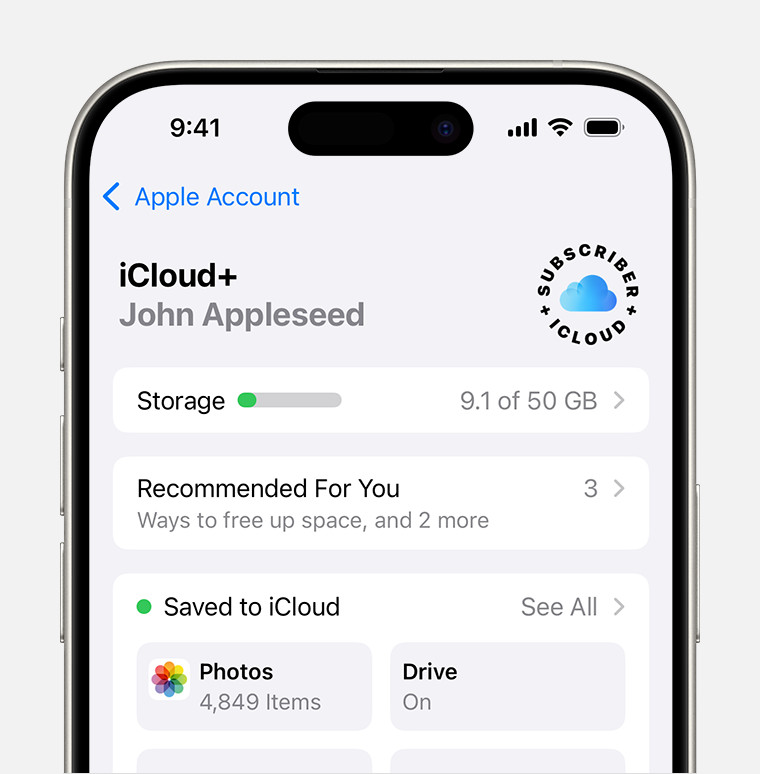 iCloud storage section of Settings showing recommendations and app options
This screen shows how much iCloud storage you have available and how it’s being used by different apps and services. Apple provides 5GB of free iCloud storage, which may be insufficient for storing a large photo library. You can upgrade your iCloud storage plan for a monthly fee.
3. Exploring Your iPhone Photo Storage Options
Now that you understand your iPhone storage usage, let’s explore the various options available for storing your photos.
3.1 iCloud Photos: Seamless Integration with Apple Ecosystem
iCloud Photos is Apple’s built-in cloud storage solution for photos and videos. It offers seamless integration with your iPhone, iPad, and Mac, making it a convenient option for Apple users.
3.1.1 How iCloud Photos Works
When you enable iCloud Photos, your photos and videos are automatically uploaded to iCloud. You can then access them from any device logged in to your Apple ID. iCloud Photos also offers features like:
- Automatic Backup: Your photos are automatically backed up to iCloud, ensuring they’re safe even if your iPhone is lost or damaged.
- Synchronization: Changes you make to your photos on one device (e.g., editing, deleting) are automatically synced across all your devices.
- Shared Albums: You can create shared albums and invite others to view and contribute photos and videos.
- Optimized Storage: iCloud Photos can optimize storage on your iPhone by storing full-resolution photos in the cloud and keeping smaller, space-saving versions on your device.
3.1.2 Enabling iCloud Photos
-
Go to Settings: Open the Settings app on your iPhone.
-
Tap Your Name: Tap on your name at the top of the screen.
-
Tap iCloud: Select “iCloud.”
-
Tap Photos: Choose “Photos.”
-
Toggle iCloud Photos: Turn on the “Sync this iPhone” switch.
-
Optimize iPhone Storage: Select “Optimize iPhone Storage” to save space on your device.
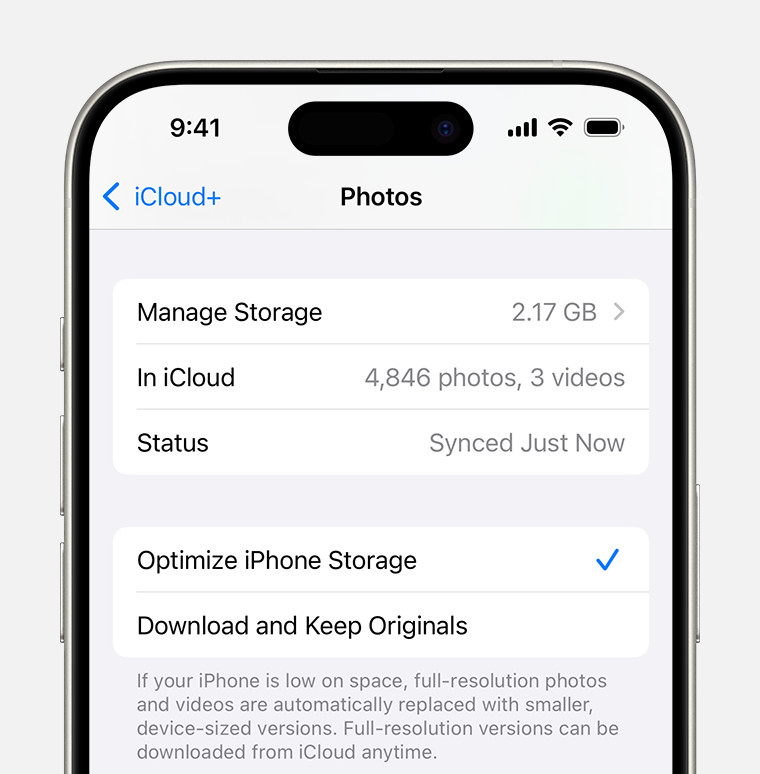 iCloud Photos section of iCloud settings showing status and photo storage options
3.1.3 Pros and Cons of iCloud Photos
| Pros | Cons |
|---|---|
| Seamless integration with Apple devices | Requires a paid iCloud storage plan for large photo libraries |
| Automatic backup and synchronization | Can be slow to upload and download photos, depending on internet speed |
| Optimized storage option to save space on your iPhone | Limited control over where your photos are stored |
| Easy sharing with family and friends through Shared Albums | Privacy concerns regarding storing photos in the cloud |
3.1.4 Is iCloud Photos Right for You?
If you’re deeply invested in the Apple ecosystem and value seamless integration and automatic backup, iCloud Photos is an excellent option. However, if you’re concerned about privacy or prefer more control over your storage, you might want to consider other alternatives.
3.2 Google Photos: A Versatile Cloud Storage Alternative
Google Photos is a popular cloud storage service that offers a compelling alternative to iCloud Photos.
3.2.1 How Google Photos Works
Google Photos allows you to upload your photos and videos to Google’s cloud storage. It offers features like:
- Free Storage (with limitations): Google Photos used to offer unlimited free storage for “High quality” photos, but this has changed. Now, all photos and videos count towards your Google account storage, which is 15 GB shared across Google Drive, Gmail, and Google Photos.
- Automatic Backup: You can set Google Photos to automatically back up your photos and videos from your iPhone.
- Cross-Platform Compatibility: Google Photos is available on iOS, Android, and web browsers, making it accessible from virtually any device.
- Advanced Features: Google Photos offers features like facial recognition, object recognition, and automatic album creation.
- Editing Tools: Google Photos provides a range of editing tools to enhance your photos.
3.2.2 Setting Up Google Photos
- Download the App: Download the Google Photos app from the App Store.
- Sign In: Sign in to your Google account.
- Enable Backup: Follow the prompts to enable automatic backup of your photos and videos.
- Choose Upload Size: Select the upload size for your photos and videos. “Storage saver” (previously “High quality”) compresses your photos slightly, while “Original quality” uploads them in their original resolution, counting towards your Google account storage.
3.2.3 Pros and Cons of Google Photos
| Pros | Cons |
|---|---|
| Cross-platform compatibility (iOS, Android, web) | Limited free storage (15 GB shared across Google services) |
| Advanced features like facial recognition and automatic album creation | Privacy concerns regarding storing photos in the cloud |
| Powerful search capabilities | Requires a Google account |
| Editing tools for enhancing photos | “Storage saver” option compresses photos, potentially reducing quality |
3.2.4 Is Google Photos Right for You?
Google Photos is a great option if you’re looking for a cross-platform cloud storage solution with advanced features. However, the limited free storage might be a concern if you have a large photo library.
3.3 External Hard Drives: Portable and Secure Storage
External hard drives offer a physical storage solution for your iPhone photos. They provide more control over your data and don’t rely on an internet connection.
3.3.1 How External Hard Drives Work
You can connect an external hard drive to your computer and transfer your iPhone photos to the drive. This creates a backup of your photos that you can access anytime, anywhere.
3.3.2 Connecting an External Hard Drive to Your Computer
- Connect the Drive: Connect the external hard drive to your computer using a USB cable.
- Transfer Photos: Transfer your iPhone photos to the external hard drive using Finder (on Mac) or File Explorer (on Windows).
3.3.3 Transferring Photos from iPhone to Computer
- Using Finder (Mac):
- Connect your iPhone to your Mac using a Lightning cable.
- Open Finder.
- Select your iPhone in the Finder sidebar.
- Click on the “Photos” tab.
- Select the photos you want to transfer and drag them to a folder on your external hard drive.
- Using File Explorer (Windows):
- Connect your iPhone to your Windows computer using a Lightning cable.
- Open File Explorer.
- Select your iPhone in the File Explorer sidebar.
- Navigate to the “Internal Storage” folder, then “DCIM.”
- Copy the photos you want to transfer to a folder on your external hard drive.
3.3.4 Pros and Cons of External Hard Drives
| Pros | Cons |
|---|---|
| More control over your data | Requires manual backup and transfer of photos |
| No reliance on internet connection | Can be lost, stolen, or damaged |
| No monthly fees | Not easily accessible from multiple devices |
| Larger storage capacity compared to free cloud storage | Requires a computer to transfer photos |
3.3.5 Is an External Hard Drive Right for You?
If you prioritize control over your data and don’t want to rely on cloud storage, an external hard drive is a good option. It’s also a cost-effective solution for storing large photo libraries.
3.4 NAS (Network Attached Storage): Centralized Home Storage
A NAS device is a centralized storage solution that connects to your home network, allowing you to store and access your photos and other files from multiple devices.
3.4.1 How NAS Works
A NAS device is essentially a mini-computer with one or more hard drives. It connects to your router and provides a shared storage space for all devices on your network.
3.4.2 Setting Up a NAS Device
- Connect the NAS: Connect the NAS device to your router using an Ethernet cable.
- Install Software: Install the NAS software on your computer.
- Configure Settings: Configure the NAS settings, including user accounts and shared folders.
- Transfer Photos: Transfer your iPhone photos to the NAS device using a computer or a mobile app.
3.4.3 Accessing Photos on NAS from iPhone
Most NAS devices offer mobile apps that allow you to access your photos and videos from your iPhone. You can also use a file manager app that supports network shares.
3.4.4 Pros and Cons of NAS
| Pros | Cons |
|---|---|
| Centralized storage for all devices on your network | Requires technical knowledge to set up and maintain |
| Accessible from multiple devices | Can be expensive |
| More control over your data | Requires a home network |
| Can be used for other purposes, such as media streaming and file sharing | Performance depends on network speed and NAS device specifications |
3.4.5 Is NAS Right for You?
If you have multiple devices and want a centralized storage solution for your photos and other files, a NAS device is a good option. However, it requires some technical knowledge to set up and maintain.
3.5 Flash Drives: Compact and Convenient
Flash drives, also known as USB drives or thumb drives, are small, portable storage devices that can be used to store and transfer your iPhone photos.
3.5.1 How Flash Drives Work
You can connect a flash drive to your computer and transfer your iPhone photos to the drive. Some flash drives are specifically designed for iPhones and have a Lightning connector for direct connection.
3.5.2 Transferring Photos to a Flash Drive
- Connect the Flash Drive: Connect the flash drive to your computer using a USB port. If you have a flash drive with a Lightning connector, connect it directly to your iPhone.
- Transfer Photos: Transfer your iPhone photos to the flash drive using Finder (on Mac) or File Explorer (on Windows). If you’re using a flash drive with a Lightning connector, you’ll need to use a file management app to transfer the photos.
3.5.3 Pros and Cons of Flash Drives
| Pros | Cons |
|---|---|
| Small and portable | Limited storage capacity compared to hard drives and cloud storage |
| Easy to use | Can be easily lost or misplaced |
| No reliance on internet connection | Requires manual backup and transfer of photos |
| Relatively inexpensive | Not easily accessible from multiple devices |
3.5.4 Is a Flash Drive Right for You?
If you need a small, portable storage solution for a limited number of photos, a flash drive is a good option. It’s also useful for transferring photos between devices.
3.6 Professional Photography Services: Archiving and Security
For professional photographers or those with extremely valuable photo collections, professional photography services offer secure archiving and long-term storage solutions.
3.6.1 How Professional Photography Services Work
These services specialize in preserving and protecting valuable photos and negatives. They often offer climate-controlled storage facilities, professional scanning and digitization, and archival-quality printing.
3.6.2 Finding a Professional Photography Service
Search online for “professional photography services” or “photo archiving services” in your area. Look for services that offer:
- Climate-Controlled Storage: Ensures that your photos are stored in a stable environment with controlled temperature and humidity.
- Professional Scanning: Provides high-quality scanning and digitization of your photos.
- Archival-Quality Printing: Creates prints that are designed to last for generations.
- Secure Storage: Offers secure storage facilities with advanced security measures.
3.6.3 Pros and Cons of Professional Photography Services
| Pros | Cons |
|---|---|
| Secure and long-term storage | Can be expensive |
| Professional scanning and digitization | Not easily accessible for everyday viewing |
| Archival-quality printing | Requires entrusting your photos to a third-party service |
| Peace of mind knowing your photos are being properly preserved |
3.6.4 Is a Professional Photography Service Right for You?
If you have a valuable photo collection that you want to preserve for future generations, a professional photography service is a worthwhile investment.
4. Optimizing Your iPhone Photo Storage
Regardless of which storage solution you choose, there are several steps you can take to optimize your iPhone photo storage.
4.1 Delete Unnecessary Photos and Videos
Regularly review your photo library and delete any blurry, duplicate, or unwanted photos and videos. This is the easiest way to free up storage space on your iPhone.
4.2 Use Optimized Storage Options
If you’re using iCloud Photos or Google Photos, enable the optimized storage option. This will store full-resolution photos in the cloud and keep smaller, space-saving versions on your device.
4.3 Compress Photos and Videos
You can use apps to compress your photos and videos, reducing their file size without significantly affecting their quality.
4.4 Turn Off Live Photos
Live Photos take a short video clip along with your photo, which can consume a lot of storage space. Consider turning off Live Photos for everyday shots.
4.5 Adjust Video Recording Resolution
Reduce the video recording resolution on your iPhone. Lower resolutions take up less storage space.
4.6 Use HEIF/HEVC Format
Enable the HEIF/HEVC format in your iPhone settings. This format provides better compression than JPEG and H.264, resulting in smaller file sizes.
4.7 Offload Unused Apps
iOS can automatically offload apps that you haven’t used in a while, freeing up storage space. You can re-download the apps later if you need them.
5. Best Practices for iPhone Photo Storage
- Develop a Backup Strategy: Implement a comprehensive backup strategy that includes both cloud storage and local storage.
- Regularly Back Up Your Photos: Don’t wait until your iPhone is full to back up your photos. Make it a habit to back them up regularly.
- Organize Your Photos: Organize your photos into albums and folders to make them easier to find and manage.
- Label Your Photos: Add captions and keywords to your photos to make them searchable.
- Protect Your Photos: Implement security measures to protect your photos from unauthorized access.
6. Maintaining Your Photos: From Capture to Storage
Taking great photos is just the beginning. To truly preserve your memories, you need a solid workflow from capture to storage.
6.1 Capturing High-Quality Images
- Clean Your Lens: Regularly clean your iPhone’s lens to ensure sharp, clear photos.
- Use Good Lighting: Good lighting is essential for taking great photos. Avoid harsh sunlight and use natural light whenever possible.
- Experiment with Composition: Experiment with different angles, perspectives, and compositions to create visually appealing photos.
- Focus Carefully: Tap on the screen to focus on your subject.
- Use Burst Mode: Use burst mode to capture a series of photos in quick succession, increasing your chances of getting the perfect shot.
6.2 Editing and Enhancing Your Photos
- Use Editing Apps: Use editing apps to enhance your photos, adjust brightness, contrast, and color.
- Crop and Straighten: Crop your photos to improve composition and straighten crooked horizons.
- Apply Filters: Use filters to add a unique look to your photos.
- Be Subtle: Avoid over-editing your photos. The goal is to enhance them, not to distort them.
6.3 Storing and Backing Up Your Edited Photos
- Choose the Right Storage Solution: Choose a storage solution that meets your needs and budget.
- Back Up Regularly: Back up your edited photos regularly to prevent data loss.
- Organize Your Photos: Organize your edited photos into albums and folders to make them easier to find and manage.
7. Understanding Data Security for iPhone Photos
Protecting your iPhone photos from unauthorized access is crucial, especially if you’re storing them in the cloud.
7.1 Cloud Storage Security Measures
- Strong Passwords: Use strong, unique passwords for your cloud storage accounts.
- Two-Factor Authentication: Enable two-factor authentication to add an extra layer of security to your accounts.
- Privacy Settings: Review and adjust the privacy settings for your cloud storage accounts.
- Be Careful What You Share: Be careful about what photos you share publicly.
7.2 Physical Security Measures
- Keep Your iPhone Safe: Keep your iPhone in a safe place and avoid leaving it unattended in public.
- Use a Strong Passcode: Use a strong passcode to protect your iPhone from unauthorized access.
- Enable Find My iPhone: Enable Find My iPhone to track your iPhone if it’s lost or stolen.
- Be Careful with USB Drives: Be careful about plugging unknown USB drives into your computer.
7.3 Encryption
Encryption is a process of encoding data so that it can only be accessed by authorized users.
- Enable Encryption on Your iPhone: iOS automatically encrypts your data when you set up a passcode.
- Use Encrypted Cloud Storage: Some cloud storage providers offer encryption for your data.
8. How dfphoto.net Can Help You With Your Photography Journey
At dfphoto.net, we’re passionate about photography and committed to helping you improve your skills and preserve your memories. We offer a wealth of resources, including:
- Detailed Tutorials: Step-by-step guides on various photography techniques, from basic composition to advanced editing.
- Inspiring Photo Galleries: A curated collection of stunning photos from talented photographers around the world.
- Equipment Reviews: In-depth reviews of cameras, lenses, and other photography equipment.
- Community Forum: A vibrant community where you can connect with other photographers, share your work, and get feedback.
9. iPhone Photography Trends in the USA
The USA has always been at the forefront of photography trends, and iPhone photography is no exception. Here are some of the current trends in the US:
- Mobile Storytelling: Using iPhone photos and videos to tell stories on social media platforms like Instagram and TikTok.
- Street Photography: Capturing candid moments in urban environments.
- Food Photography: Taking mouth-watering photos of food for social media and blogs.
- Travel Photography: Documenting travel adventures with stunning iPhone photos and videos.
- Portrait Photography: Capturing portraits of friends, family, and strangers using the iPhone’s portrait mode.
10. The Future of iPhone Photo Storage
The future of iPhone photo storage is likely to be shaped by advancements in cloud storage, artificial intelligence, and augmented reality.
- Cloud Storage: Cloud storage will become even more affordable and reliable, making it the primary storage solution for most iPhone users.
- Artificial Intelligence: AI will play a greater role in organizing, editing, and managing your photos.
- Augmented Reality: AR will be used to enhance your photos and create immersive experiences.
FAQ: Your iPhone Photo Storage Questions Answered
-
Q1: What’s the best way to store my iPhone photos?
The best way to store your iPhone photos depends on your individual needs and preferences. Consider factors like storage capacity, cost, accessibility, and security. Cloud storage, external hard drives, and NAS devices are all viable options. -
Q2: How much iCloud storage do I need?
The amount of iCloud storage you need depends on the size of your photo library and other data you store in iCloud. Apple provides 5GB of free storage, but you may need to upgrade to a paid plan if you have a large photo library. -
Q3: Is Google Photos safe for storing my photos?
Google Photos employs industry-standard security measures to protect your photos. However, as with any cloud storage service, there are inherent privacy risks. Review Google’s privacy policy and adjust your privacy settings accordingly. -
Q4: How do I transfer photos from my iPhone to an external hard drive?
You can transfer photos from your iPhone to an external hard drive using Finder (on Mac) or File Explorer (on Windows). Connect your iPhone to your computer, select the photos you want to transfer, and drag them to a folder on your external hard drive. -
Q5: What is a NAS device and how does it work?
A NAS (Network Attached Storage) device is a centralized storage solution that connects to your home network, allowing you to store and access your photos and other files from multiple devices. It’s essentially a mini-computer with one or more hard drives. -
Q6: How can I optimize storage on my iPhone?
You can optimize storage on your iPhone by deleting unnecessary photos and videos, using optimized storage options in iCloud Photos or Google Photos, compressing photos and videos, turning off Live Photos, and adjusting video recording resolution. -
Q7: What is HEIF/HEVC format?
HEIF (High Efficiency Image File Format) and HEVC (High Efficiency Video Coding) are modern image and video compression formats that provide better quality at smaller file sizes compared to JPEG and H.264. -
Q8: How do I enable HEIF/HEVC format on my iPhone?
To enable HEIF/HEVC format on your iPhone, go to Settings > Camera > Formats and select “High Efficiency.” -
Q9: What are some good photo editing apps for iPhone?
Some popular photo editing apps for iPhone include Adobe Lightroom Mobile, VSCO, Snapseed, and Darkroom. -
Q10: How can dfphoto.net help me with my photography?
dfphoto.net provides detailed tutorials, inspiring photo galleries, equipment reviews, and a community forum to help you improve your photography skills and connect with other photographers.
Conclusion: Choosing the Right iPhone Photo Storage Solution
Choosing the right iPhone photo storage solution is a personal decision that depends on your individual needs and preferences. Consider factors like storage capacity, cost, accessibility, security, and ease of use. Whether you opt for cloud storage, external hard drives, NAS devices, or a combination of these, make sure to implement a comprehensive backup strategy to protect your precious memories.
Ready to take your photography to the next level? Visit dfphoto.net today to discover a wealth of resources, connect with a vibrant community, and unlock your creative potential. Explore our detailed tutorials, browse inspiring photo galleries, and find the perfect equipment to capture your vision. Don’t let storage limitations hold you back – start preserving your memories and sharing your unique perspective with the world!
For additional information, feel free to contact us:
Address: 1600 St Michael’s Dr, Santa Fe, NM 87505, United States
Phone: +1 (505) 471-6001
Website: dfphoto.net.
