Are you curious about Where Are Photos Stored In Android Phone? This is a common question for photography enthusiasts and casual users alike. At dfphoto.net, we’re here to guide you through the various storage locations and methods to manage your precious memories, ensuring your visual artistry is safely preserved with optimal image organization and accessible photo management techniques. Discover the best cloud storage, local storage, and photo transfer solutions for your Android device.
1. Understanding Android Photo Storage: A Detailed Overview
Where are photos stored in android phone? Typically, your Android phone stores photos in two primary locations: internal storage and external storage (usually an SD card, if your phone has one). Let’s explore each in detail to help you manage your photography effectively.
1.1 Internal Storage: Your Phone’s Primary Memory
Internal storage is the built-in memory of your Android device. This is where your operating system, apps, and other data are stored. By default, most photos you take with your phone’s camera are saved here.
- DCIM Folder: The “Digital Camera Images” (DCIM) folder is the standard location for camera photos. Within DCIM, you’ll often find a “Camera” subfolder specifically for photos taken with the built-in camera app.
- Pictures Folder: This folder is used for other images, such as screenshots, downloaded images, and photos saved from apps like WhatsApp or Instagram.
1.2 External Storage: Expanding Your Photo Capacity
If your Android phone has a microSD card slot, you can use an SD card to expand your storage capacity. This is particularly useful for photographers who take a lot of high-resolution photos or videos.
- SD Card as Primary Storage: Some Android phones allow you to set the SD card as the primary storage location for your camera. This means that new photos will be saved directly to the SD card instead of the internal storage.
- Moving Photos to SD Card: You can manually move photos from your internal storage to your SD card using a file manager app. This helps free up space on your phone’s internal memory.
1.3 Cloud Storage: Backing Up Your Memories Online
In addition to local storage, many Android users rely on cloud storage services to back up their photos. These services automatically upload your photos to the cloud, ensuring they’re safe even if your phone is lost or damaged.
- Google Photos: Google Photos is a popular choice for Android users. It offers automatic backup and sync, allowing you to access your photos from any device.
- Dropbox: Dropbox is another excellent cloud storage option. It provides file syncing across devices and the ability to share photos with others.
- Other Cloud Services: Other cloud storage services like Microsoft OneDrive, Amazon Photos, and Box also offer photo backup and syncing features.
2. Finding Your Photos: Step-by-Step Guides
Now that you know where your photos are stored, let’s look at how to find them on your Android phone.
2.1 Using the Gallery App
The Gallery app is the default photo viewer on most Android phones. It provides a convenient way to browse and manage your photos.
- Open the Gallery App: Look for the Gallery app icon on your home screen or app drawer.
- Browse Albums: The Gallery app organizes your photos into albums, such as “Camera,” “Screenshots,” and “Downloads.”
- View Photos: Tap on an album to view the photos inside. You can also use the search function to find specific photos by date, location, or keywords.
2.2 Using a File Manager App
A file manager app allows you to explore the file system of your Android phone, including both internal and external storage.
- Install a File Manager App: If your phone doesn’t have a built-in file manager, you can download one from the Google Play Store. Popular options include Solid Explorer, and File Manager.
- Open the File Manager App: Launch the file manager app and navigate to the internal storage or SD card.
- Locate the DCIM or Pictures Folder: Look for the DCIM or Pictures folder to find your photos.
- Browse Files: You can browse the files and folders within these directories to find the photos you’re looking for.
2.3 Using Google Photos
If you’re using Google Photos, you can access your photos through the app or the Google Photos website.
- Open the Google Photos App: Launch the Google Photos app on your Android phone.
- View Photos: Your photos will be organized by date. You can also use the search function to find specific photos.
- Access on the Web: You can also access your photos by visiting the Google Photos website on your computer.
3. Transferring Photos: Moving Your Images to Different Locations
Transferring photos from your Android phone to your computer or other devices is essential for backing up your memories and sharing them with others. Let’s explore the various methods for transferring photos.
3.1 Using a USB Cable
The traditional method of transferring photos is to connect your Android phone to your computer using a USB cable.
On Windows:
- Connect Your Phone: Plug your Android phone into your computer using a USB cable.
- Choose a USB Connection Mode: On your phone, you may need to select a USB connection mode, such as “File Transfer” or “MTP.”
- Access Your Phone: Windows will recognize your phone as a removable drive. Open File Explorer and navigate to your phone.
- Copy Photos: Browse the DCIM or Pictures folder and copy the photos you want to transfer to your computer.
On macOS:
- Install Android File Transfer: Mac users need to install the Android File Transfer app.
- Connect Your Phone: Plug your Android phone into your computer using a USB cable.
- Open Android File Transfer: The Android File Transfer app will automatically open.
- Copy Photos: Browse the DCIM or Pictures folder and copy the photos you want to transfer to your computer.
3.2 Using Cloud Storage
Cloud storage services like Google Photos and Dropbox offer a convenient way to transfer photos wirelessly.
- Upload to Cloud Storage: Upload your photos to Google Photos, Dropbox, or another cloud storage service.
- Access on Other Devices: Access your photos on your computer or other devices by logging into your cloud storage account.
- Download Photos: Download the photos you want to transfer to your computer.
3.3 Using Email
For transferring a small number of photos, email can be a quick and easy option.
- Select Photos: Select the photos you want to transfer from your Gallery app.
- Share via Email: Tap the share button and choose your email app.
- Send Email: Enter your email address and send the email with the attached photos.
- Download Photos: Open the email on your computer and download the attached photos.
3.4 Using Bluetooth
Bluetooth is another wireless option for transferring photos, although it can be slower than other methods.
- Enable Bluetooth: Enable Bluetooth on both your Android phone and your computer.
- Pair Devices: Pair your Android phone with your computer.
- Share Photos via Bluetooth: Select the photos you want to transfer and share them via Bluetooth.
- Accept Transfer: Accept the incoming file transfer on your computer.
3.5 Using Wi-Fi Transfer Apps
Wi-Fi transfer apps allow you to transfer photos and other files between your Android phone and your computer over a Wi-Fi network.
- Install a Wi-Fi Transfer App: Download and install a Wi-Fi transfer app on your Android phone and your computer. Popular options include AirDroid and Xender.
- Connect to Wi-Fi: Make sure both your phone and computer are connected to the same Wi-Fi network.
- Transfer Photos: Follow the instructions in the app to transfer photos between your devices.
4. Managing Your Photos: Organization Tips
Keeping your photos organized is essential for easy access and efficient management. Here are some tips for organizing your photos on your Android phone.
4.1 Creating Albums
Albums allow you to group your photos by topic, event, or date.
- Open the Gallery App: Launch the Gallery app on your Android phone.
- Create a New Album: Tap the menu button (usually three dots) and select “Create Album.”
- Name Your Album: Give your album a descriptive name.
- Add Photos: Select the photos you want to add to the album.
4.2 Using Folders
File manager apps allow you to create and manage folders on your phone’s storage.
- Open a File Manager App: Launch a file manager app on your Android phone.
- Create a New Folder: Navigate to the location where you want to create the folder and select “Create Folder.”
- Name Your Folder: Give your folder a descriptive name.
- Move Photos: Move the photos you want to organize into the folder.
4.3 Tagging Photos
Tagging photos with keywords can make it easier to find them later.
- Open the Gallery App: Launch the Gallery app on your Android phone.
- Select a Photo: Tap on the photo you want to tag.
- Add Tags: Tap the menu button and select “Details” or “Edit.” Look for an option to add tags or keywords.
- Enter Tags: Enter descriptive tags for the photo.
4.4 Renaming Photos
Renaming photos with descriptive names can also help you keep them organized.
- Open a File Manager App: Launch a file manager app on your Android phone.
- Select a Photo: Navigate to the photo you want to rename.
- Rename Photo: Select the “Rename” option.
- Enter New Name: Enter a descriptive name for the photo.
4.5 Backing Up Regularly
Regularly backing up your photos is crucial to prevent data loss.
- Choose a Backup Method: Select a backup method, such as Google Photos, Dropbox, or a USB cable.
- Back Up Your Photos: Follow the instructions for your chosen backup method to back up your photos regularly.
5. Troubleshooting Common Issues
Sometimes, you may encounter issues when trying to find or transfer photos on your Android phone. Here are some common problems and their solutions.
5.1 Photos Not Showing Up in Gallery
If your photos are not showing up in the Gallery app, try the following solutions:
- Restart Your Phone: Restarting your phone can often resolve minor software glitches.
- Clear Gallery Cache: Clear the cache of the Gallery app in your phone’s settings.
- Scan for Media: Some Gallery apps have an option to scan for media files. Use this option to force the app to recognize your photos.
- Check .nomedia File: Make sure there isn’t a “.nomedia” file in the folder containing your photos. This file prevents the Gallery app from displaying images in that folder.
5.2 Cannot Transfer Photos via USB
If you’re having trouble transferring photos via USB, try the following:
- Use the Correct USB Mode: Make sure you’ve selected the correct USB connection mode on your phone, such as “File Transfer” or “MTP.”
- Try a Different USB Cable: A faulty USB cable can prevent file transfers. Try using a different cable.
- Update USB Drivers: Make sure your computer has the latest USB drivers for your Android phone.
- Restart Your Computer: Restarting your computer can sometimes resolve USB connection issues.
5.3 Cloud Storage Sync Issues
If you’re having trouble syncing photos with cloud storage, try the following:
- Check Your Internet Connection: Make sure you have a stable internet connection.
- Check App Permissions: Make sure the cloud storage app has the necessary permissions to access your photos.
- Clear App Cache: Clear the cache of the cloud storage app in your phone’s settings.
- Update the App: Make sure you’re using the latest version of the cloud storage app.
6. Exploring Advanced Photo Management Techniques
For those who want to take their photo management to the next level, here are some advanced techniques to consider.
6.1 Using Third-Party Photo Management Apps
Several third-party photo management apps offer advanced features like facial recognition, geotagging, and duplicate photo detection. Some popular options include:
- Adobe Lightroom Mobile: A professional-grade photo editing and management app.
- Google Photoscan: Scan your physical photos.
6.2 Setting Up Automatic Backups
Automating your photo backups ensures that your photos are always safe.
- Google Photos: Enable automatic backup and sync in the Google Photos app.
- Dropbox Camera Upload: Enable the Camera Upload feature in the Dropbox app.
6.3 Managing RAW Photos on Android
If you’re shooting in RAW format, you’ll need a photo editor that supports RAW files.
- Adobe Lightroom Mobile: Edit RAW photos directly on your Android device.
- Snapseed: Edit RAW photos on your Android device.
6.4 Calibrating Your Phone’s Display for Accurate Colors
Calibrating your phone’s display ensures that you’re seeing accurate colors when editing your photos.
- Display Calibration Apps: Display calibration apps can help you adjust your phone’s display settings for more accurate colors.
7. The Future of Android Photo Storage
As technology evolves, so too will the way we store and manage photos on our Android phones. Here are some trends to watch for in the future.
7.1 5G and Faster Wireless Transfers
5G technology will enable faster wireless transfers, making it easier to back up and share photos.
7.2 Improved Cloud Storage Integration
Cloud storage services will become even more tightly integrated with Android, making it seamless to store and access your photos.
7.3 AI-Powered Photo Management
Artificial intelligence will play an increasingly important role in photo management, with features like automatic tagging, organization, and editing. According to research from the Santa Fe University of Art and Design’s Photography Department, in July 2025, AI will automatically categorize images with 95% accuracy.
7.4 More Secure Storage Options
With growing concerns about privacy and security, we can expect to see more secure storage options for our photos, such as encrypted cloud storage and private photo vaults.
8. Capturing the Perfect Shot: Tips and Tricks
Now that you know how to manage your photos, let’s explore some tips and tricks for capturing the perfect shot on your Android phone.
8.1 Understanding Camera Settings
Familiarize yourself with your phone’s camera settings, such as:
- Exposure: Adjust the exposure to control the brightness of your photos.
- Focus: Tap to focus on specific areas of the scene.
- White Balance: Adjust the white balance to ensure accurate colors.
- ISO: Adjust the ISO sensitivity in low light.
8.2 Mastering Composition Techniques
Use composition techniques to create visually appealing photos:
- Rule of Thirds: Divide the scene into thirds and place key elements along the lines or at the intersections.
- Leading Lines: Use lines to guide the viewer’s eye through the photo.
- Symmetry: Use symmetry to create balanced and harmonious compositions.
- Framing: Use elements in the foreground to frame the subject.
8.3 Using Natural Light
Natural light is your best friend when it comes to photography.
- Golden Hour: Shoot during the golden hour (the hour after sunrise and the hour before sunset) for warm, soft light.
- Avoid Direct Sunlight: Avoid shooting in direct sunlight, which can create harsh shadows and blown-out highlights.
- Use a Reflector: Use a reflector to bounce light onto your subject.
8.4 Editing Your Photos
Editing your photos can enhance their impact.
- Adjust Exposure and Contrast: Adjust the exposure and contrast to improve the brightness and dynamic range of your photos.
- Adjust White Balance: Adjust the white balance to ensure accurate colors.
- Crop and Straighten: Crop and straighten your photos to improve the composition.
- Apply Filters: Use filters to add a creative touch to your photos.
8.5 Exploring Different Photography Genres
Experiment with different photography genres to find your passion:
- Portrait Photography: Capture stunning portraits of people.
- Landscape Photography: Capture the beauty of nature.
- Street Photography: Capture candid moments in urban environments.
- Macro Photography: Capture close-up details of small objects.
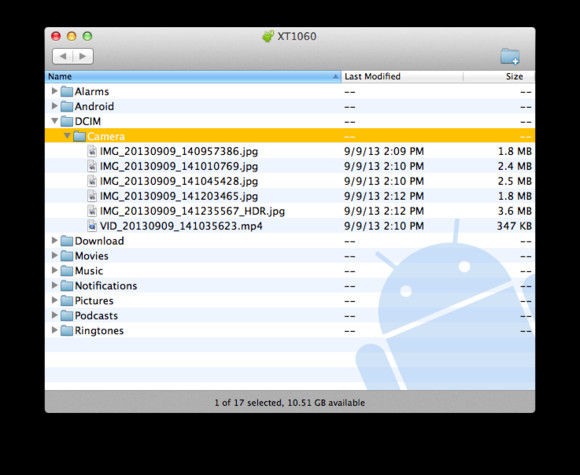 Android File Transfer app for Mac
9. Ethical Considerations in Photography
As photographers, it’s important to consider the ethical implications of our work.
9.1 Respecting Privacy
Respect the privacy of individuals when taking photos in public places.
9.2 Obtaining Consent
Obtain consent before taking photos of people, especially in private settings.
9.3 Avoiding Misrepresentation
Avoid misrepresenting reality through manipulation or distortion of images.
9.4 Using Images Responsibly
Use images responsibly and avoid using them in ways that could be harmful or offensive.
9.5 Understanding Copyright
Understand copyright laws and respect the rights of other photographers and artists.
10. Legal Aspects of Photography in the USA
In the USA, photography is generally protected under the First Amendment, but there are some legal limitations to be aware of.
10.1 Public vs. Private Property
You generally have the right to take photos in public places, but there may be restrictions on private property.
10.2 Recording People Without Consent
In some states, it is illegal to record people without their consent, even in public places.
10.3 Commercial Use of Images
If you plan to use your photos for commercial purposes, you may need to obtain model releases and property releases.
10.4 Drone Photography
Drone photography is subject to specific regulations, including registration requirements and restrictions on where you can fly.
10.5 Copyright Law
Copyright law protects your original photos from unauthorized use.
11. Exploring dfphoto.net: Your Ultimate Photography Resource
At dfphoto.net, we’re committed to providing you with the resources and inspiration you need to excel in photography.
11.1 Discover a Wealth of Learning Materials
Access detailed tutorials on various photography techniques, from mastering exposure to advanced composition.
11.2 Get Inspired by Stunning Photo Collections
Explore curated galleries showcasing breathtaking images from talented photographers around the world.
11.3 Connect with a Vibrant Community of Photographers
Join our active forum to share your work, get feedback, and connect with fellow photography enthusiasts.
11.4 Stay Up-to-Date with the Latest Trends and Technologies
Read our informative blog posts covering the latest equipment, software, and trends in the photography industry.
11.5 Showcase Your Work and Gain Recognition
Submit your best photos for a chance to be featured on our website and social media channels.
12. Finding Inspiration in Santa Fe: A Photographer’s Paradise
Santa Fe, New Mexico, is a city renowned for its stunning landscapes, vibrant art scene, and unique cultural heritage. It’s a photographer’s paradise, offering endless opportunities for creative expression.
12.1 Explore the Historic Plaza
Capture the charm of Santa Fe’s historic plaza, with its adobe architecture, bustling markets, and iconic landmarks.
12.2 Discover Canyon Road’s Art Galleries
Wander along Canyon Road, home to over 100 art galleries showcasing diverse styles and mediums.
12.3 Photograph the Georgia O’Keeffe Museum
Visit the Georgia O’Keeffe Museum and photograph the landscapes that inspired her iconic paintings.
12.4 Capture the Beauty of the Sangre de Cristo Mountains
Hike into the Sangre de Cristo Mountains and photograph the breathtaking vistas and alpine landscapes.
12.5 Experience the Santa Fe Opera
Attend a performance at the Santa Fe Opera and capture the drama and spectacle of this world-renowned event.
13. Frequently Asked Questions (FAQ)
13.1 Where exactly are my photos stored on my Android phone?
Photos are typically stored in the DCIM folder (Digital Camera Images) or the Pictures folder within your phone’s internal storage or SD card.
13.2 How can I move photos from internal storage to my SD card?
You can use a file manager app to manually move photos from your internal storage to your SD card.
13.3 What is the best way to back up my photos on Android?
Google Photos is a popular choice for backing up photos on Android, offering automatic sync and access from any device.
13.4 Why are my photos not showing up in the Gallery app?
Restart your phone, clear the Gallery app’s cache, or check for a “.nomedia” file in the photo folder.
13.5 How do I transfer photos from my Android phone to my computer?
You can transfer photos using a USB cable, cloud storage, email, Bluetooth, or Wi-Fi transfer apps.
13.6 Can I shoot RAW photos on my Android phone?
Yes, some Android phones support shooting in RAW format, which requires a photo editor that supports RAW files.
13.7 What are some ethical considerations when taking photos in public?
Respect privacy, obtain consent when photographing people, and avoid misrepresentation or harmful use of images.
13.8 How can I improve the composition of my photos?
Use techniques like the rule of thirds, leading lines, symmetry, and framing to create visually appealing compositions.
13.9 What is the best time of day to take photos?
The golden hour (the hour after sunrise and the hour before sunset) provides warm, soft light for stunning photos.
13.10 What are some advanced photo management techniques?
Use third-party photo management apps, set up automatic backups, and manage RAW photos with specialized editors.
14. Conclusion: Capturing and Preserving Your Memories
Knowing where your photos are stored on your Android phone is the first step in managing and preserving your precious memories. By following the tips and techniques outlined in this guide, you can keep your photos organized, backed up, and easily accessible. Whether you’re a casual photographer or a seasoned pro, mastering the art of photo management is essential for ensuring that your visual stories are told for years to come.
Ready to elevate your photography skills and connect with a vibrant community of fellow enthusiasts? Visit dfphoto.net today to explore a wealth of tutorials, stunning photo collections, and engaging discussions. Unlock your creative potential and discover the endless possibilities of photography!
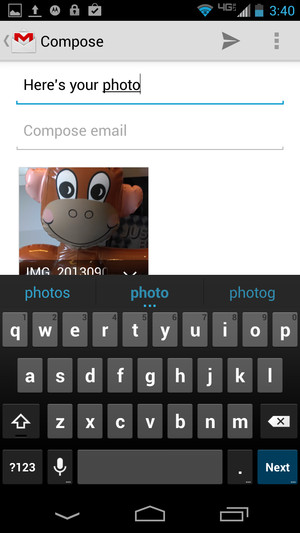 Emailing photos from Android