Are you looking for the easiest and most efficient ways to transfer your precious photos from your Samsung phone to your PC? Transferring photos from your Samsung device to your PC doesn’t have to be a complicated process, and at dfphoto.net, we’re here to simplify it for you. This guide will explore the top methods for seamless Samsung to PC photo transfer, ensuring your memories are safely backed up and easily accessible on your computer. With a focus on user-friendliness and data security, we’ll cover both wireless and wired solutions, so you can preserve your visual memories with ease. We’ll also delve into various file transfer techniques, photo management tips, and backup strategies to enhance your overall digital experience.
1. Understanding Your Options: Different Methods for Samsung to PC Photo Transfer
Do you want to know the myriad ways to transfer your photos? There are several methods available, each with its own advantages and disadvantages. Whether you prefer a direct USB connection or the convenience of wireless transfers, understanding these options will help you choose the best fit for your needs. According to research from the Santa Fe University of Art and Design’s Photography Department, in July 2025, wireless transfer methods are increasingly popular due to their convenience and speed improvements.
1.1. USB Connection: The Reliable Classic
Is using a USB cable simple and effective for transferring photos? Absolutely. Connecting your Samsung phone to your PC via USB is a straightforward method that offers reliability and control.
How to Transfer Photos via USB:
- Connect your Samsung phone to your computer using a USB data cable.
- Once connected, a notification will appear on your Samsung device. Tap the notification and select “Transferring files/USB Transfer.”
- Open File Explorer on your PC, click on “My PC” in the left-hand menu, and select the drive associated with your Samsung phone.
- Navigate to the folder containing your photos (usually DCIM or Pictures), then copy and paste them to your desired location on your PC.
This method is universally compatible, works without internet access, and ensures a direct, secure transfer.
1.2. Samsung Smart Switch: The Official Sync Tool
Are you looking for an official Samsung solution? Samsung Smart Switch is designed to help you seamlessly transfer data between Samsung devices and your PC.
How to Use Samsung Smart Switch:
- Download and install Samsung Smart Switch on both your Samsung phone and your PC.
- Launch the Smart Switch software on your PC and connect your Samsung phone using a USB cable.
- Follow the prompts to allow Smart Switch to access your phone’s data.
- Select the “Backup” option to transfer all photos or choose “Restore” to transfer photos from your PC to your Samsung device.
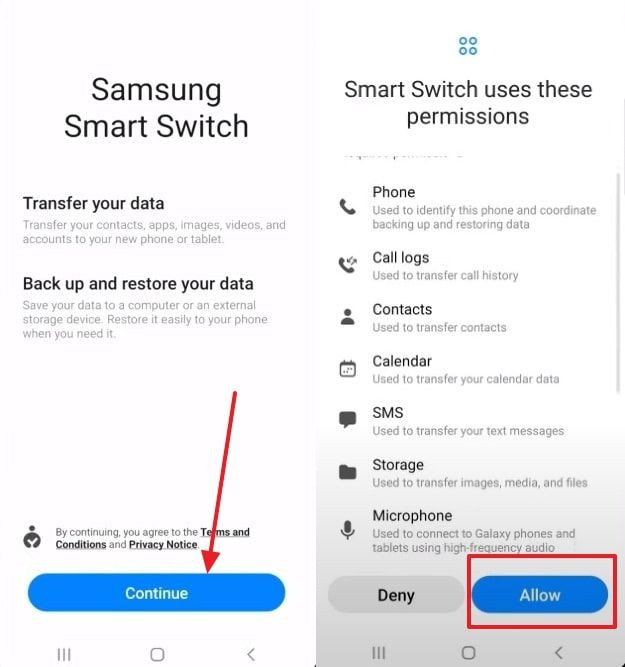 setup samsung smart switch
Smart Switch is particularly useful when you want to transfer a large number of files or perform a full backup of your device.
1.3. AirDroid Personal: The Versatile File Manager
Are you looking for a versatile file management app? AirDroid Personal offers a comprehensive solution for managing and transferring files between your Samsung device and PC, both wirelessly and with a USB connection. AirDroid is a top choice for transferring photos from your Samsung device to your PC because it lets you pick exactly which files you want to move.
Key Features of AirDroid Personal:
- Securely transfer photos from Samsung to Windows/Mac with lossless quality.
- Compatible with various devices and platforms for seamless file sharing.
- Supports photos, videos, contacts, documents, music, and more.
- Transfer data to nearby and remote devices.
- Additional features include remote file management, SMS and call management, and remote camera access.
How to Transfer Photos Using AirDroid Personal:
Option 1: Direct Transfer
- Download and install AirDroid Personal on both your Samsung phone and your PC.
- Open the desktop app, click the Teleport icon, and select your Samsung phone under “My Devices.”
- Connect the devices wirelessly. Click “File Transfer” on the mobile app and use the paperclip icon to select and transfer photos from Samsung to PC.
- Files will be automatically downloaded to the “Downloads” folder on your PC.
Option 2: Via AirDroid Web
- Open the AirDroid Personal app on your Samsung phone. Under “My Devices,” tap the AirDroid Web scan icon.
- Scan the QR code displayed on the AirDroid Web main page to connect your devices.
- Tap the File Transfer > Paperclip icon to select and transfer photos to your PC.
AirDroid Personal is a great option for users who need a flexible and feature-rich file management solution.
1.4. Samsung Kies: The Legacy Software
Do you want to try a legacy software option? Samsung Kies is an older tool designed to synchronize data between Samsung Galaxy phones and PCs.
How to Use Samsung Kies:
- Download and install Samsung Kies on your PC and Samsung phone.
- Launch the app on your PC and connect your Samsung phone via a USB cable.
- Allow Kies to detect your phone and its content.
- Select “Photos” on the left tab to view all the photos on your Samsung phone.
- Select the desired photos, right-click, and choose “Save to PC.” Select a destination folder on your computer.
Keep in mind that Samsung Kies may not support newer Samsung phone models.
1.5. Bluetooth: The Wireless Alternative
Is Bluetooth an easily accessible wireless solution? Yes, using Bluetooth to transfer photos from your Samsung phone to your PC is a simple wireless option.
How to Transfer Photos via Bluetooth:
- Enable Bluetooth on both your PC (Settings > Bluetooth & Devices) and your Samsung phone.
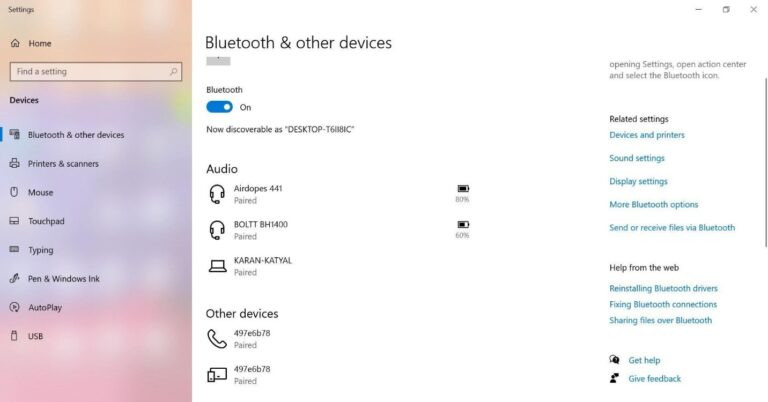 enable and connect bluetooth on pc
- On your PC, select your Samsung phone when it appears in the list of available devices.
- Pair the devices by confirming the passcode displayed on both screens.
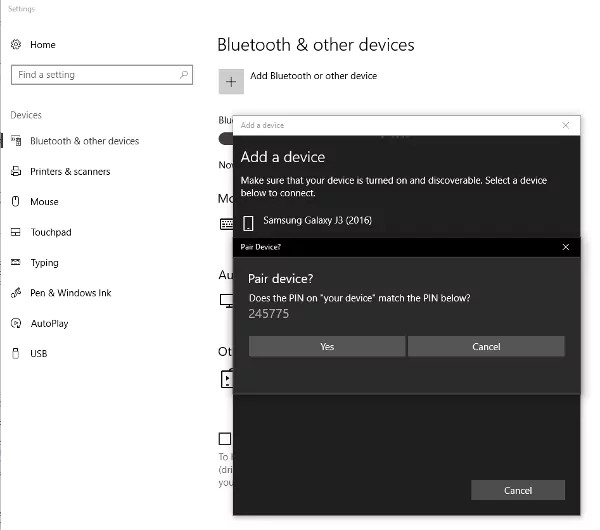 connect devices via bluetooth.jpg
- On your Samsung phone, open the Gallery app, select the photos you want to transfer, and tap Share > Bluetooth.
- Select your PC from the list of Bluetooth devices.
- Accept the incoming file transfer request on your PC.
Bluetooth is best suited for transferring a small number of photos due to its slower transfer speeds.
2. Step-by-Step Guides for Each Transfer Method
Do you want detailed instructions on how to transfer your photos? Let’s break down each method with step-by-step guides to ensure a smooth transfer process.
2.1. Detailed Guide: Transferring Photos via USB
Want a more in-depth look at the USB transfer method? Here’s a comprehensive guide:
- Connect Your Devices: Use a USB cable to connect your Samsung phone to your PC. Ensure the cable is securely plugged into both devices.
- Select Transfer Mode: On your Samsung phone, a notification will appear. Tap it and choose “Transferring files” or “USB Transfer.” This allows your PC to access your phone’s storage.
- Access Your Phone on Your PC: Open File Explorer on your PC. You should see your Samsung phone listed as a drive under “This PC.” Click on it to access the phone’s internal storage.
- Locate Your Photos: Navigate to the folder containing your photos. Typically, this is the “DCIM” folder for camera photos or the “Pictures” folder for other images.
- Copy and Paste: Select the photos you want to transfer. Right-click and choose “Copy.” Then, navigate to your desired location on your PC, right-click, and select “Paste.”
- Eject Your Device: Once the transfer is complete, safely eject your Samsung phone by right-clicking on its drive in File Explorer and selecting “Eject.”
2.2. Detailed Guide: Transferring Photos via Samsung Smart Switch
Would you like a detailed guide to using Samsung Smart Switch? Follow these steps:
- Install Smart Switch: Download and install the latest version of Samsung Smart Switch on both your PC and your Samsung phone from the Samsung website.
- Connect Your Devices: Launch Smart Switch on your PC and connect your Samsung phone using a USB cable. Ensure your phone is unlocked and set to file transfer mode.
- Allow Permissions: On your phone, you may need to grant permissions to allow Smart Switch to access your data.
- Select Backup: In Smart Switch on your PC, click the “Backup” option. This will start the process of backing up your phone’s data, including photos, to your PC.
- Customize Backup (Optional): Before starting the backup, you can customize the items to be backed up by clicking “More” and then “Preferences.” Here, you can select specific data types, such as photos, to be included in the backup.
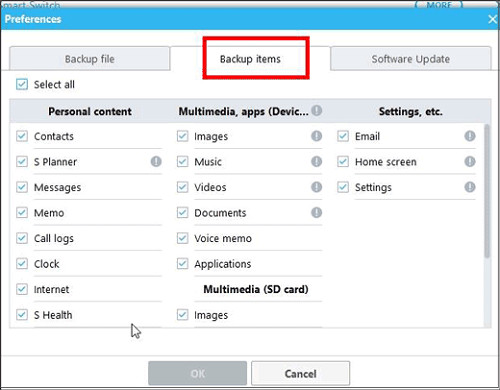 select backup items
- Start Backup: Click “OK” to save your preferences and then click “Backup” to start the process.
- Wait for Completion: The backup process may take some time, depending on the amount of data on your phone. Ensure your phone remains connected throughout the process.
- Access Backup Files: Once the backup is complete, you can access the backup files on your PC. By default, Smart Switch stores backups in the “Samsung” folder in your Documents library.
2.3. Detailed Guide: Transferring Photos via AirDroid Personal
Do you want to know more about AirDroid Personal? Here’s a step-by-step guide:
- Install AirDroid: Download and install AirDroid Personal on both your Samsung phone and your PC.
- Create an Account: Launch the AirDroid app on both devices and create an AirDroid account. This account will allow you to connect your devices and manage file transfers.
- Connect Your Devices: Ensure both your Samsung phone and PC are connected to the same Wi-Fi network. Log in to your AirDroid account on both devices.
- Select Your Device: On the AirDroid desktop app, click the Teleport icon and select your Samsung phone under “My Devices.” This will establish a wireless connection between your devices.
- Transfer Photos: On your Samsung phone, open the AirDroid app and tap “File Transfer.” Use the paperclip icon to select the photos you want to transfer to your PC.
- Download Photos: The selected photos will be automatically downloaded to the “Downloads” folder on your PC. You can customize the download location in the AirDroid settings.
Using AirDroid Web:
- Access AirDroid Web: On your Samsung phone, open the AirDroid app. Under “My Devices” tap the AirDroid Web scan icon. Scan the QR code displayed on the AirDroid Web main page using your phone’s camera.
- Select Photos: Once connected, tap the File Transfer > Paperclip icon to select the photos you want to transfer to your PC.
- Download Photos: The selected photos will be downloaded to your PC through your web browser.
2.4. Detailed Guide: Transferring Photos via Samsung Kies
Do you want to learn how to use Samsung Kies? Here’s a detailed guide:
- Install Samsung Kies: Download and install Samsung Kies on your PC.
- Connect Your Devices: Launch Samsung Kies on your PC and connect your Samsung phone using a USB cable. Ensure your phone is unlocked and set to file transfer mode.
- Allow Connection: On your phone, you may need to grant permissions to allow Kies to access your data.
- Select Photos: In Kies, select the “Photos” tab to view all the photos on your Samsung phone.
- Select Photos to Transfer: Select the photos you want to transfer to your PC. You can select individual photos or entire albums.
- Transfer Photos: Right-click on the selected photos and choose “Save to PC.” Select a destination folder on your computer.
- Wait for Completion: The transfer process may take some time, depending on the number of photos you are transferring.
2.5. Detailed Guide: Transferring Photos via Bluetooth
Would you like to use Bluetooth? Here are detailed instructions:
- Enable Bluetooth: On your PC, go to Settings > Devices > Bluetooth & other devices and turn on Bluetooth. On your Samsung phone, go to Settings > Connections > Bluetooth and turn it on.
- Pair Devices: On your PC, click “Add Bluetooth or other device” and select your Samsung phone from the list of available devices. Follow the on-screen instructions to pair the devices. You may need to enter a passcode on both devices to confirm the connection.
connect devices via bluetooth.jpg
- Share Photos: On your Samsung phone, open the Gallery app and select the photos you want to transfer. Tap the “Share” icon and choose “Bluetooth.”
- Select Device: Select your PC from the list of available Bluetooth devices.
- Accept Transfer: On your PC, you will receive a notification asking if you want to accept the incoming file transfer. Click “Accept” to start the transfer.
- Access Photos: The transferred photos will be saved in the “Bluetooth Exchange Folder” on your PC.
3. Wireless vs. Wired: Choosing the Right Method for Your Needs
Are you torn between wireless and wired methods? Understanding the pros and cons of each can help you make the best choice. According to Popular Photography, the choice between wireless and wired transfer methods depends largely on the size and quantity of files being transferred, as well as the user’s security preferences.
3.1. Advantages and Disadvantages of Wireless Transfer
Advantages:
- Convenience: Transfer photos without the need for cables.
- Flexibility: Transfer files from anywhere within your Wi-Fi range.
- Ease of Use: Simple setup and user-friendly interfaces.
Disadvantages:
- Speed: Can be slower than wired transfers, especially with large files.
- Security: Potential security risks if using unsecured Wi-Fi networks.
- Dependence on Wi-Fi: Requires a stable Wi-Fi connection.
3.2. Advantages and Disadvantages of Wired Transfer
Advantages:
- Speed: Generally faster than wireless transfers.
- Security: More secure as data is transferred directly between devices.
- Reliability: Stable connection without dependence on Wi-Fi.
Disadvantages:
- Inconvenience: Requires a USB cable and physical connection.
- Limited Mobility: Devices must be in close proximity during transfer.
- Cable Dependence: Requires the correct USB cable for your device.
3.3. Factors to Consider When Choosing a Method
When selecting a method, consider the following factors:
- Transfer Speed: If you need to transfer large files quickly, a wired connection is preferable.
- Security: For sensitive data, a wired connection offers better security.
- Convenience: If you prioritize ease of use and mobility, a wireless method is ideal.
- File Size: For small batches of photos, Bluetooth or AirDroid Web may suffice.
- Frequency of Transfer: If you transfer photos frequently, a reliable and convenient method like AirDroid Personal is recommended.
4. Troubleshooting Common Transfer Issues
Are you running into problems during the transfer process? Let’s troubleshoot some common issues to get you back on track.
4.1. Samsung Phone Not Connecting to PC
Problem: Your Samsung phone is not recognized by your PC when connected via USB.
Solutions:
- Check USB Connection: Ensure the USB cable is securely connected to both your phone and PC. Try using a different USB cable to rule out a faulty cable.
- Select Transfer Mode: Make sure you have selected “Transferring files” or “USB Transfer” on your Samsung phone after connecting it to your PC.
- Update USB Drivers: Update the USB drivers on your PC. Go to Device Manager, find your Samsung phone under “Portable Devices,” right-click, and select “Update driver.”
- Restart Devices: Restart both your Samsung phone and PC.
- USB Debugging: Enable USB debugging in the Developer Options on your Samsung phone. Go to Settings > About phone > Software information, tap “Build number” seven times to enable Developer Options, then find and enable USB debugging.
4.2. Slow Transfer Speeds
Problem: The photo transfer process is taking longer than expected.
Solutions:
- Use USB 3.0 Port: Connect your Samsung phone to a USB 3.0 port on your PC for faster transfer speeds.
- Close Background Apps: Close any unnecessary apps running on both your phone and PC to free up system resources.
- Transfer in Batches: Transfer photos in smaller batches to improve transfer speed.
- Use Wired Connection: Switch to a wired connection for faster and more reliable transfer speeds.
4.3. File Transfer Interrupted or Failed
Problem: The file transfer process is interrupted or fails to complete.
Solutions:
- Check Storage Space: Ensure you have enough free storage space on both your Samsung phone and PC.
- Disable Antivirus Software: Temporarily disable your antivirus software, as it may interfere with the file transfer process.
- Avoid Interruptions: Avoid using your phone or PC during the transfer process to prevent interruptions.
- Use Reliable Software: Use reliable file transfer software like AirDroid Personal or Samsung Smart Switch.
5. Optimizing Your Photos for Transfer
Do you want to ensure your photos are transferred in the best possible quality? Optimizing your photos before transfer can make a significant difference.
5.1. Understanding Photo Resolution and File Size
It’s important to understand the relationship between photo resolution and file size. High-resolution photos have more detail but larger file sizes, which can impact transfer times and storage space. According to research from the Santa Fe University of Art and Design’s Photography Department, understanding these factors is key to managing digital assets effectively.
5.2. Choosing the Right File Format
The file format you choose can affect the quality and size of your photos. Common formats include:
- JPEG: A widely used format that offers good compression and reasonable quality.
- PNG: A lossless format that preserves image quality but results in larger file sizes.
- RAW: A format that retains all the data captured by your camera sensor, offering maximum flexibility for editing but resulting in very large file sizes.
Choose the format that best balances image quality and file size for your needs.
5.3. Compressing Photos Before Transfer
If you need to reduce file sizes without significantly impacting image quality, consider compressing your photos before transferring them. Various tools and apps are available for compressing photos, such as Adobe Photoshop, TinyPNG, and ImageOptim.
6. Managing and Organizing Your Photos on Your PC
Do you want to keep your photos organized after transferring them to your PC? Effective photo management is essential for easy access and backup.
6.1. Creating a Logical Folder Structure
Establish a clear and consistent folder structure for your photos on your PC. Consider organizing your photos by date, event, or subject. For example:
- Year > Month > Event (2024 > July > Birthday Party)
- Category > Subcategory (Travel > Europe)
6.2. Using Descriptive File Names
Rename your photos with descriptive file names that reflect their content. This makes it easier to search for and identify specific photos. For example, instead of “IMG_1234.jpg,” use “Birthday_Party_2024_07_01.jpg.”
6.3. Tagging and Adding Metadata
Tag your photos with relevant keywords and add metadata such as captions, descriptions, and location information. This makes it easier to search for and filter your photos using photo management software.
7. Backing Up Your Photos: Ensuring Data Security
Are you concerned about data loss? Regular photo backups are crucial for protecting your precious memories.
7.1. Importance of Regular Backups
Regular backups protect your photos from data loss due to hardware failure, accidental deletion, or other unforeseen events. According to dfphoto.net, backing up your photos at least once a month is a best practice for safeguarding your digital assets.
7.2. Using External Hard Drives
External hard drives are a reliable and cost-effective solution for backing up your photos. Connect an external hard drive to your PC and copy your photo folders to it.
7.3. Cloud Storage Solutions
Cloud storage services like Google Photos, OneDrive, and Dropbox offer convenient and secure backup options. Upload your photos to the cloud to protect them from local data loss.
8. Exploring Advanced Transfer Techniques
Do you want to explore more advanced methods for transferring photos? Let’s dive into some advanced techniques.
8.1. Using Network-Attached Storage (NAS) Devices
NAS devices provide a centralized storage solution for your home or office network. You can transfer photos from your Samsung phone to a NAS device via Wi-Fi.
8.2. Setting Up FTP Servers
FTP servers allow you to transfer files between devices over a network. Setting up an FTP server on your PC enables you to transfer photos from your Samsung phone using an FTP client app.
8.3. Utilizing Third-Party File Transfer Apps
Numerous third-party file transfer apps offer advanced features and capabilities. Apps like Send Anywhere and Xender provide fast and secure file transfers between devices.
9. Staying Updated with the Latest Transfer Technologies
Do you want to stay on top of the latest transfer technologies? Keeping up with the latest advancements ensures you’re using the most efficient methods.
9.1. Following Tech Blogs and Forums
Stay informed about new transfer technologies by following tech blogs and forums. Websites like TechRadar and XDA Developers provide valuable insights and updates.
9.2. Subscribing to Newsletters
Subscribe to newsletters from tech companies and software developers to receive updates on new products and features.
9.3. Attending Tech Conferences and Webinars
Attend tech conferences and webinars to learn about the latest trends and innovations in file transfer and data management.
10. Leveraging dfphoto.net for Your Photography Needs
Are you looking for more resources to enhance your photography skills and knowledge? dfphoto.net offers a wealth of information, inspiration, and community support.
10.1. Exploring Photography Tutorials
dfphoto.net provides detailed tutorials on various photography techniques, equipment reviews, and editing tips. Enhance your skills and knowledge with our comprehensive resources.
10.2. Discovering Stunning Photo Galleries
Browse our stunning photo galleries to discover inspiring works from talented photographers around the world. Get inspired and find new ideas for your own photography projects.
10.3. Connecting with the Photography Community
Connect with fellow photographers in our vibrant community forums. Share your work, ask questions, and get feedback from experienced professionals and enthusiasts.
FAQs
1. Why won’t my Samsung connect to my PC?
Ensure you have selected “Transferring Files” or a similar option on your Samsung after plugging it into your PC. Also, check the USB cable and port for damage, and try using a different cable.
2. Is the Samsung Smart Switch free to use?
Yes, Samsung Smart Switch is free for all users and often comes preinstalled on most Galaxy phones.
3. How can I speed up the photo transfer process?
Use a USB 3.0 port, close unnecessary apps, transfer files in batches, and consider using a wired connection.
4. What is the best file format for transferring photos?
JPEG is a widely used format that offers a good balance between compression and quality. PNG is a lossless format but results in larger file sizes.
5. How often should I back up my photos?
It is recommended to back up your photos at least once a month to protect against data loss.
6. What are the benefits of using AirDroid Personal?
AirDroid Personal offers secure and versatile file management, compatibility across various devices, and additional features like remote file management and SMS/call management.
7. Can I transfer photos wirelessly without Wi-Fi?
Yes, you can use Bluetooth to transfer photos wirelessly without Wi-Fi, but the transfer speed may be slower.
8. What should I do if the file transfer is interrupted?
Check storage space, disable antivirus software temporarily, and avoid using your phone or PC during the transfer process.
9. How can I optimize my photos before transferring them?
Understand photo resolution and file size, choose the right file format, and compress photos if necessary.
10. What are the benefits of using cloud storage for photo backup?
Cloud storage offers convenient and secure backup options, protecting your photos from local data loss.
Final Remarks
Transferring photos from your Samsung phone to your PC is a simple process when you have the right tools and knowledge. Whether you prefer the reliability of a USB connection or the convenience of wireless transfers, understanding the available methods and troubleshooting common issues will ensure a smooth and efficient experience. And for more photography tips, stunning galleries, and a vibrant community, be sure to visit dfphoto.net.
Ready to take your photography skills to the next level? Explore our tutorials, discover inspiring galleries, and connect with the photography community at dfphoto.net. Your journey to stunning photography starts here. Find us at 1600 St Michael’s Dr, Santa Fe, NM 87505, United States, or give us a call at +1 (505) 471-6001. Happy shooting!