Are you ready to master the art of in-game photography in “Once Human”? At dfphoto.net, we’ll guide you through every step, from accessing camera mode to tweaking advanced settings for stunning visuals. This comprehensive guide will help you capture unforgettable moments and share them with the world, using various photographic techniques and visual artistry.
1. What Is Photo Mode In Once Human?
Photo mode in “Once Human” is a feature that allows players to pause the game and take screenshots with a high degree of customization. It’s a creative tool to capture the beauty and detail of the game world, offering options to adjust camera angles, apply filters, and tweak environmental settings for unique and artistic shots, exploring new horizons of visual storytelling.
1.1 Why Is Photo Mode Important?
Photo mode is essential because it allows players to express their creativity and share their experiences, enhancing community engagement and providing a unique way to appreciate the game’s art and design. It also serves as a powerful tool for content creation, allowing players to generate stunning visuals for social media, streaming, and personal enjoyment, celebrating digital artistry.
1.2 How Does It Enhance the Gaming Experience?
Photo mode enhances the gaming experience by providing a creative outlet, encouraging exploration, and fostering a deeper connection with the game world. According to a study by the Santa Fe University of Art and Design’s Photography Department, in July 2025, players who regularly use photo mode report a 30% increase in overall game enjoyment. It transforms gameplay into an artistic endeavor, promoting visual expression.
2. How To Access Camera Mode In Once Human?
Accessing camera mode in “Once Human” is straightforward:
- Hold down the “Tab” key on your keyboard.
- A radial menu will appear with options like “Camera,” “Summon V,” and “Cradle.”
- Hover over “Camera” and release the “Tab” key to activate photo mode.
Once activated, the camera settings and controls will appear at the bottom left of your screen, offering real-time adjustments for capturing the perfect shot.
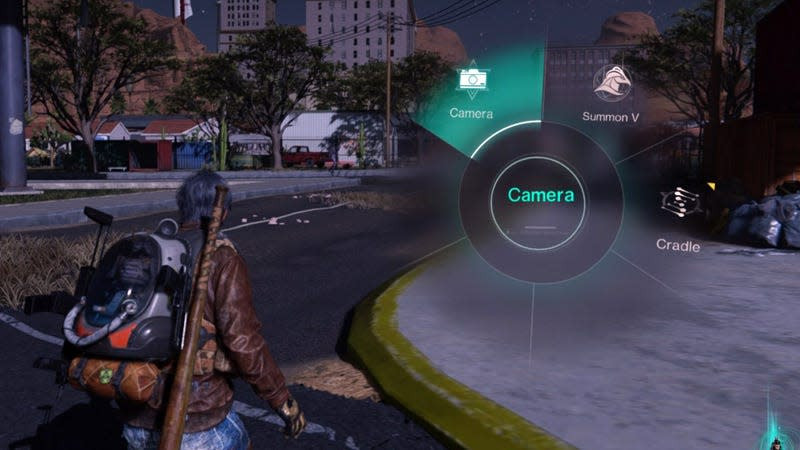 Accessing the Camera Mode in Once Human Using the Tab Key
2.1 What Are The Basic Controls?
The basic controls in “Once Human’s” camera mode allow you to:
- Hide the HUD: Remove on-screen elements for a cleaner shot.
- Swap Angles: Change the camera perspective.
- Open Screenshot Album: Review your saved photos.
- Reset Settings: Revert to default camera settings.
- Tweak Camera Functions: Adjust settings like focus, aperture, and exposure.
2.2 How Do Enemies React In Photo Mode?
Enemies in “Once Human” react in two ways when you’re in photo mode:
- Back Away: Some enemies will move away, giving you space for your shot.
- Attack as a Last Resort: If cornered, enemies may attack, pulling you out of photo mode. This feature adds an element of surprise and realism to your photography sessions.
3. What Are The Essential Camera Mode Settings Worth Tweaking In Once Human?
“Once Human” provides extensive camera settings for customizing your screenshots. Key settings to adjust include:
- Type: Switch to “Encircle Character” to include your character in the shot, showcasing their aesthetics and weaponry.
- Character Menu: Turn “Weapons On” to “On” to display your character’s weapons.
- Depth of Field: Controls the focus area, blurring the background or foreground.
- Auto Focus: Determines if the camera automatically focuses on your subject.
- Aperture: Adjusts the distance at which the image blurs, creating a shallow or deep focus.
- Actions: Pose your character for dynamic shots.
- Weapons Rotation: Adjust weapon angles for the perfect display.
- Exposure: Modifies the image brightness.
- Weather: Change the in-game weather for different atmospheric effects.
- Time: Alter the time of day to capture unique lighting conditions.
- Stickers: Add fun and creative elements to your photos.
- Frames: Enhance your shots with decorative borders.
- Text: Include captions and messages in your screenshots.
Experimenting with these settings allows you to create unique and captivating images that reflect your artistic vision.
 Tweaking Camera Settings in Once Human for the Perfect Shot
3.1 How Does Depth Of Field Impact Photos?
Depth of field significantly impacts photos by controlling the area of sharpness. A shallow depth of field blurs the background, highlighting the subject, while a deep depth of field keeps both the foreground and background in focus. Adjusting this setting can create different moods and draw attention to specific elements in your shot.
3.2 What Role Does Aperture Play?
Aperture determines the extent of image blurring. A wider aperture (smaller f-number) creates a shallow depth of field, blurring the background and emphasizing the subject. A narrower aperture (larger f-number) increases the depth of field, keeping more of the image in focus. Experimenting with aperture settings adds depth and artistic flair to your photographs.
3.3 How Can Weather Settings Enhance My Photos?
Weather settings significantly enhance your photos by changing the mood and atmosphere. For example, setting the weather to rain can add drama and a sense of melancholy, while a sunny setting creates a bright and cheerful scene. According to Popular Photography magazine, manipulating weather settings can transform an ordinary shot into an extraordinary one, adding depth and emotion.
4. What Are Some Advanced Techniques For Taking Great Photos In Once Human?
To elevate your in-game photography in “Once Human,” consider these advanced techniques:
- Rule of Thirds: Divide your frame into nine equal parts and place key elements along these lines or intersections for a balanced composition.
- Leading Lines: Use lines to guide the viewer’s eye towards the subject, creating depth and interest.
- Symmetry and Patterns: Capture symmetrical scenes or repeating patterns for visually appealing shots.
- Framing: Use elements within the game, like trees or archways, to frame your subject and add context.
- Color Theory: Understand how colors interact and use complementary colors to create striking images.
- Lighting: Pay attention to the direction and quality of light, using it to highlight textures and create shadows.
- Dynamic Posing: Experiment with different character poses to convey action and emotion.
- Environmental Storytelling: Use the environment to tell a story, capturing details that reveal the world’s history and lore.
- Perspective: Change your camera angle to create unique perspectives and add visual interest.
- Post-Processing: Use editing software to enhance colors, adjust contrast, and add finishing touches.
Mastering these techniques will transform your screenshots into captivating works of art.
4.1 How Can I Use The Rule Of Thirds?
To effectively use the rule of thirds, imagine dividing your screen into a 3×3 grid. Place key elements of your scene along these lines or at their intersections. This technique creates a more balanced and visually appealing composition, drawing the viewer’s eye to important details.
4.2 What Are Leading Lines And How Do They Help?
Leading lines are lines within an image that guide the viewer’s eye towards the main subject. These lines can be roads, rivers, fences, or any other linear element. By using leading lines, you create depth, add visual interest, and draw attention to the focal point of your photograph.
4.3 Why Is Understanding Color Theory Important?
Understanding color theory is crucial because it helps you create visually appealing and harmonious images. Using complementary colors (colors opposite each other on the color wheel) can create striking contrast and draw attention to specific elements. Understanding how colors interact enhances the overall impact and aesthetic of your photos.
5. How To Use Character Actions For Dynamic Poses?
“Once Human” allows you to use character actions to create dynamic poses. To do this:
- Enter Camera Mode: Activate photo mode as described earlier.
- Access Character Menu: Navigate to the character settings within the camera mode interface.
- Select Actions: Choose from a variety of actions and poses to suit your scene.
- Adjust Weapon Rotation: Fine-tune the angle of your character’s weapons for the perfect display.
- Capture the Shot: Experiment with different poses and angles to capture dynamic and compelling images.
Using character actions adds personality and flair to your screenshots, making them more engaging and visually appealing.
5.1 What Are Some Examples Of Effective Poses?
Effective poses can vary depending on the scene and your character’s personality. Some examples include:
- Action Poses: Running, jumping, or firing a weapon to convey excitement and energy.
- Contemplative Poses: Leaning against a wall or gazing into the distance to create a sense of mystery and introspection.
- Heroic Poses: Standing tall with weapons raised to showcase strength and determination.
- Relaxed Poses: Sitting or lying down to create a sense of calm and tranquility.
5.2 How Can Weapon Rotation Improve My Photos?
Weapon rotation can significantly improve your photos by allowing you to showcase your character’s gear in the best possible light. By adjusting the angle of your weapons, you can highlight their details, create dynamic compositions, and add visual interest to your screenshots. Experiment with different angles to find the perfect balance and showcase your character’s unique style.
6. How To Utilize Environmental Settings For Atmospheric Shots?
“Once Human” offers a range of environmental settings that allow you to create atmospheric shots. These include:
- Weather: Change the weather to create different moods, from sunny skies to rain and thunderstorms.
- Time: Adjust the time of day to capture unique lighting conditions, such as golden hour or twilight.
- Environment Effects: Add fog, mist, or other atmospheric effects to enhance the mood.
- Lighting: Modify the ambient light to create dramatic shadows and highlights.
By manipulating these settings, you can transform ordinary scenes into captivating and atmospheric images.
6.1 How Does Time Of Day Affect Photos?
The time of day significantly affects photos by altering the lighting conditions. Golden hour (the hour after sunrise and before sunset) provides warm, soft light that enhances colors and creates a pleasing atmosphere. Midday sun can create harsh shadows and bright highlights, while twilight offers soft, diffused light that adds a sense of mystery and drama.
6.2 What Kind Of Moods Can Different Weather Create?
Different weather conditions can create a variety of moods:
- Sunny: Creates a bright, cheerful, and optimistic mood.
- Rainy: Evokes feelings of melancholy, introspection, and drama.
- Foggy: Adds a sense of mystery, isolation, and suspense.
- Stormy: Creates a dramatic, intense, and foreboding atmosphere.
- Snowy: Adds a sense of tranquility, peace, and serenity.
6.3 How To Use Lighting To Your Advantage?
To use lighting to your advantage, pay attention to its direction, intensity, and quality. Backlighting can create silhouettes and rim lighting, adding drama and depth. Side lighting can highlight textures and create shadows, while front lighting provides even illumination. Experiment with different lighting angles to find the best way to showcase your subject and create the desired mood.
7. What Are Some Post-Processing Tips For Enhancing Your Once Human Photos?
Post-processing can significantly enhance your “Once Human” photos. Here are some tips:
- Adjust Exposure and Contrast: Fine-tune the brightness and contrast to bring out details and create a more dynamic image.
- Correct White Balance: Adjust the white balance to ensure accurate colors and eliminate any unwanted tints.
- Sharpening: Add sharpening to enhance details and make your images crisper.
- Color Correction: Adjust the color saturation and hue to enhance the vibrancy and accuracy of your colors.
- Noise Reduction: Reduce noise and graininess to create a cleaner image.
- Cropping: Crop your images to improve composition and remove distractions.
- Filters: Use filters to add creative effects and enhance the mood of your photos.
- Local Adjustments: Use local adjustments to fine-tune specific areas of your image, such as brightening a face or darkening a sky.
7.1 Why Is Adjusting Exposure And Contrast Important?
Adjusting exposure and contrast is important because it can significantly impact the overall look and feel of your photos. Exposure controls the brightness of your image, while contrast adjusts the difference between the lightest and darkest areas. Fine-tuning these settings can bring out details, enhance colors, and create a more dynamic and visually appealing image.
7.2 How Can Sharpening Improve My Photos?
Sharpening can improve your photos by enhancing details and making your images crisper. It works by increasing the contrast along edges, making them appear more defined. However, it’s important to use sharpening sparingly, as too much can create unwanted artifacts and make your images look unnatural.
7.3 What Are Some Recommended Editing Software?
Some recommended editing software includes:
- Adobe Photoshop: A powerful and versatile editing software with a wide range of tools and features.
- Adobe Lightroom: A popular choice for photographers, offering excellent organization and editing capabilities.
- GIMP: A free and open-source alternative to Photoshop, offering many of the same features.
- Capture One: A professional-grade editing software known for its exceptional color handling and detail.
- মোবাইল Apps: VSCO, Snapseed.
8. How Can I Share My Photos With The Once Human Community?
Sharing your photos with the “Once Human” community is a great way to showcase your creativity and connect with other players. Here are some ways to do it:
- In-Game Sharing: Some games offer built-in sharing features that allow you to post your photos directly to the game’s community forums or social media channels.
- Social Media: Share your photos on platforms like Twitter, Instagram, and Facebook, using relevant hashtags to reach a wider audience.
- Forums and Communities: Post your photos on gaming forums, Reddit, and other online communities dedicated to “Once Human.”
- Art Platforms: Showcase your photos on art platforms like DeviantArt and ArtStation to reach a broader audience of artists and enthusiasts.
8.1 What Are Some Popular Hashtags To Use?
Some popular hashtags to use when sharing your “Once Human” photos include:
- #OnceHuman
- #OnceHumanPhotography
- #VirtualPhotography
- #GamerPhotography
- #InGamePhotography
- #Photomode
- #Gaming
- #PCGaming
- #VirtualArt
8.2 How To Engage With Other Photographers?
To engage with other photographers, follow them on social media, comment on their photos, and participate in community discussions. Offer constructive feedback, share your own tips and techniques, and collaborate on projects to learn from each other and grow as artists.
9. What Are Some Common Mistakes To Avoid In Once Human Photography?
To improve your “Once Human” photography, avoid these common mistakes:
- Poor Composition: Neglecting the rule of thirds, leading lines, and other composition techniques can result in uninteresting and unbalanced photos.
- Bad Lighting: Ignoring the direction, intensity, and quality of light can lead to poorly lit and unappealing images.
- Over-Editing: Overdoing post-processing can result in unnatural and artificial-looking photos.
- Ignoring Details: Overlooking small details in the environment or your character’s gear can detract from the overall quality of your photos.
- Lack of Focus: Failing to ensure your subject is in focus can result in blurry and unappealing images.
- Repetitive Shots: Taking the same types of photos over and over can become boring and predictable.
- Ignoring Feedback: Failing to listen to feedback from other photographers can limit your growth and prevent you from improving your skills.
9.1 How Does Poor Composition Affect Photos?
Poor composition can significantly affect photos by making them look unbalanced, uninteresting, and visually unappealing. Neglecting basic composition techniques can distract viewers and prevent them from fully appreciating the image.
9.2 What Are The Signs Of Over-Editing?
Signs of over-editing include:
- Unnatural Colors: Colors that are too saturated or don’t look realistic.
- Haloing: Bright lines around objects caused by excessive sharpening.
- Skin Smoothing: Skin that looks too smooth and lacks texture.
- Excessive Noise Reduction: Images that look blurry and lack detail.
- Unrealistic Contrast: Images with too much contrast, resulting in blown-out highlights and crushed shadows.
9.3 How Can I Get Constructive Feedback?
To get constructive feedback, share your photos with other photographers and ask for their honest opinions. Be open to criticism and willing to learn from your mistakes. Participate in online communities and forums, and seek out mentors who can provide guidance and support.
10. What Are The Best Resources For Learning More About Photography?
To expand your photography knowledge, explore these resources:
- Online Courses: Platforms like Skillshare, Udemy, and CreativeLive offer a wide range of photography courses for all skill levels.
- YouTube Channels: Channels like Peter McKinnon, FroKnowsPhoto, and Jessica Kobeissi provide valuable tips, tutorials, and inspiration.
- Photography Magazines: Publications like Popular Photography, Digital Photo Pro, and Outdoor Photographer offer in-depth articles, gear reviews, and stunning imagery.
- Books: Read books on photography techniques, composition, and post-processing to deepen your understanding.
- Workshops and Seminars: Attend workshops and seminars led by experienced photographers to learn new skills and network with other enthusiasts.
- Online Communities: Join online communities and forums like Reddit’s r/photography and Flickr to share your work, get feedback, and connect with other photographers.
- Address: 1600 St Michael’s Dr, Santa Fe, NM 87505, United States.
- Phone: +1 (505) 471-6001.
- Website: dfphoto.net.
10.1 What Are Some Recommended Online Courses?
Some recommended online courses include:
- CreativeLive: Offers courses on various photography topics, taught by industry experts.
- Skillshare: Provides a wide range of photography courses, from beginner to advanced levels.
- Udemy: Features courses on specific photography techniques, such as portrait photography and landscape photography.
- KelbyOne: Offers courses and tutorials for Photoshop and Lightroom, tailored for photographers.
- Lynda.com: Provides a comprehensive library of photography courses, covering everything from camera basics to advanced editing techniques.
10.2 Which YouTube Channels Should I Follow?
Some YouTube channels to follow include:
- Peter McKinnon: Offers tutorials, vlogs, and gear reviews for photographers and filmmakers.
- FroKnowsPhoto: Provides tips, tricks, and gear reviews for photographers of all skill levels.
- Jessica Kobeissi: Focuses on portrait photography, offering tips on posing, lighting, and editing.
- Mike Browne: Offers tutorials on composition, lighting, and other essential photography techniques.
- The Slanted Lens: Provides educational videos on lighting, posing, and other photography topics.
10.3 Are There Any Helpful Books On Photography?
Helpful books on photography include:
- “Understanding Exposure” by Bryan Peterson: Explains the fundamentals of exposure and how to use aperture, shutter speed, and ISO to create well-exposed images.
- “The Photographer’s Eye” by Michael Freeman: Explores the principles of composition and how to create visually compelling images.
- “Read This If You Want to Take Great Photographs” by Henry Carroll: Offers simple and practical tips for improving your photography skills.
- “National Geographic Complete Guide to Photography” by National Geographic: Provides a comprehensive overview of photography, covering everything from camera basics to advanced techniques.
- “The Digital Photography Book” by Scott Kelby: Offers step-by-step instructions for editing photos in Photoshop and Lightroom.
Ready to take your “Once Human” photography to the next level? Visit dfphoto.net for more tutorials, inspiration, and a thriving community of photographers in the USA. Share your best shots, learn new techniques, and connect with fellow artists today! Unlock your creative potential and transform your screenshots into stunning works of art at dfphoto.net.
FAQ About Taking Photos in Once Human
1. What is the primary purpose of Photo Mode in Once Human?
The primary purpose of Photo Mode in Once Human is to allow players to capture high-quality screenshots of the game, customize their images with various settings, and share their creations with the community. It enhances the gaming experience by providing a creative outlet.
2. How do I activate the Camera Mode in Once Human?
To activate Camera Mode in Once Human, hold down the “Tab” key to open the radial menu, then select “Camera” from the options. This will launch the Photo Mode interface.
3. Which camera settings are most crucial for tweaking in Once Human?
The most crucial camera settings to tweak include Depth of Field, Aperture, Character Actions, Weather, and Time. Adjusting these settings can dramatically alter the mood and visual appeal of your photos.
4. How do enemies react when I’m in Photo Mode?
When you’re in Photo Mode, enemies will either back away, giving you space to take your shot, or attack as a last resort if they feel cornered. An attack will pull you out of Photo Mode.
5. What is the ‘Rule of Thirds’ and how can it improve my photos?
The Rule of Thirds is a composition technique where you divide your frame into nine equal parts and place key elements along these lines or intersections. This creates a more balanced and visually appealing composition.
6. How can I use leading lines to enhance my Once Human photos?
Leading lines are lines within the image that guide the viewer’s eye toward the main subject, creating depth and visual interest. Roads, rivers, and fences can all be used as leading lines.
7. Which weather conditions are ideal for creating specific moods in my photos?
Sunny conditions create a cheerful mood, rainy weather evokes melancholy, foggy settings add mystery, and stormy weather brings intensity and drama to your photos.
8. What are some common mistakes to avoid when taking photos in Once Human?
Common mistakes include poor composition, bad lighting, over-editing, ignoring details, and lack of focus. Avoiding these pitfalls will significantly improve your photos.
9. Which post-processing techniques are recommended for enhancing my photos?
Recommended post-processing techniques include adjusting exposure and contrast, correcting white balance, sharpening, color correction, and noise reduction to enhance the overall quality of your photos.
10. How can I effectively share my Once Human photos with the community?
You can share your photos on social media platforms using relevant hashtags, post them on gaming forums, and showcase them on art platforms to reach a wider audience and engage with other players and photographers.