Taking a panorama photo with your iPhone is a simple yet powerful way to capture stunning, expansive views. At dfphoto.net, we’ll show you how to create breathtaking panoramic images that showcase the world around you using your iPhone’s built-in features and other third-party tools. By the end of this article, you’ll be equipped with the knowledge and skills to create stunning panoramic images, regardless of your experience level. Explore the art of wide-angle photography and visual storytelling today.
1. What is a Panorama Photo and Why Use an iPhone?
Yes, a panorama photo is a wide-angle view created by stitching together multiple images to capture a scene that’s too large for a single shot, and using an iPhone makes the process incredibly convenient and accessible. An iPhone’s portability and built-in camera features make it a great tool for capturing these expansive scenes.
1.1 Understanding the Panorama Technique
Panorama photography involves capturing a series of overlapping images and then combining them to create a single, wide image. This technique is useful for landscapes, cityscapes, and any scene where you want to capture a broader perspective than a standard photo allows. The key is to maintain a steady hand and consistent overlap between shots to ensure a seamless final image.
1.2 Benefits of Using an iPhone for Panorama Photography
Using an iPhone for panorama photography offers several benefits:
- Portability: iPhones are compact and easy to carry around, making them ideal for capturing panoramas on the go.
- Ease of Use: The built-in camera app simplifies the process with a dedicated panorama mode that guides you through capturing the necessary images.
- Instant Results: iPhones automatically stitch the images together, providing you with a ready-to-use panorama in seconds.
- High-Quality Images: Modern iPhones have advanced camera systems that produce high-resolution, detailed images, perfect for creating stunning panoramas.
2. How to Use the Built-In Panorama Feature on Your iPhone?
You can use the built-in panorama feature on your iPhone by opening the Camera app, selecting “Pano” mode, and following the on-screen guide to smoothly capture your desired panoramic view. This feature is designed for simplicity and ease of use, making it accessible for photographers of all levels.
2.1 Step-by-Step Guide to Capturing Panoramas
Here’s a detailed guide on how to use the built-in panorama feature on your iPhone:
- Open the Camera App: Launch the Camera app on your iPhone.
- Select Panorama Mode: Swipe left or right on the screen until you find the “Pano” option.
- Orientation: Decide whether you want to shoot horizontally or vertically. Horizontal panoramas are best for wide landscapes, while vertical panoramas are great for tall structures.
- Starting Point: Tap the arrow to set the direction of your panorama. You can switch the direction by tapping the arrow again.
- Begin Shooting: Press the shutter button and slowly move your iPhone in a straight line, keeping the arrow on the center line.
- Maintain a Steady Pace: Move at a consistent speed, avoiding sudden jerks or stops.
- Follow the Guide: Keep the arrow aligned with the center line to ensure proper image alignment.
- End Capture: Once you’ve captured the desired area, press the shutter button again to finish the panorama.
- Review Your Panorama: Your iPhone will automatically stitch the images together, creating your final panorama.
2.2 Tips for Achieving the Best Results with the Built-In Feature
To get the best results with your iPhone’s built-in panorama feature, consider these tips:
- Steady Hand: Keep your hands steady and avoid sudden movements to prevent blurring and distortion.
- Consistent Speed: Maintain a consistent speed while moving your iPhone to ensure even image alignment.
- Even Lighting: Shoot in even lighting conditions to avoid exposure issues and color variations.
- Avoid Moving Objects: Moving objects can cause ghosting or distortion in your panorama.
- Overlap Images: Ensure sufficient overlap between images to help the iPhone stitch them together seamlessly.
- Use a Tripod: For maximum stability, consider using a tripod with a smartphone adapter.
- Clean Lens: Make sure your iPhone’s lens is clean to avoid smudges and blemishes in your panorama.
3. Exploring Third-Party Panorama Apps for iPhone
Yes, there are several third-party panorama apps for iPhone that offer advanced features and greater control compared to the built-in camera app. Apps like “Photosynth” and “360 Panorama” provide unique tools and capabilities for capturing and editing panoramic images.
3.1 Overview of Popular Panorama Apps
Here are some popular third-party panorama apps for iPhone:
- Photosynth: Developed by Microsoft, Photosynth is a free app that offers advanced panorama functionality with accurate stitching and good exposure control.
- 360 Panorama: This paid app allows you to capture 360-degree panoramas and offers a “virtual reality” viewing mode.
- DMD Panorama: A powerful app that captures high-resolution panoramas with real-time stitching and advanced alignment algorithms.
- Google Street View: While primarily a navigation app, Google Street View also allows you to create and share 360-degree panoramas.
3.2 Benefits of Using Third-Party Apps
Third-party panorama apps often provide additional features and benefits:
- Advanced Stitching Algorithms: These apps use sophisticated algorithms to stitch images together more accurately, reducing distortion and artifacts.
- 360-Degree Panoramas: Some apps allow you to capture full 360-degree panoramas, providing an immersive viewing experience.
- Manual Controls: Many third-party apps offer manual controls over exposure, focus, and white balance, giving you more creative control over your panoramas.
- Real-Time Stitching: Some apps stitch images together in real-time, allowing you to see the panorama as you capture it.
- Virtual Reality Viewing: Certain apps offer virtual reality viewing modes, allowing you to explore your panoramas with a VR headset.
- Sharing Options: Third-party apps often provide more extensive sharing options, allowing you to easily share your panoramas on social media and other platforms.
4. Comparing Built-In Panorama vs. Third-Party Apps
The built-in panorama feature is convenient and easy to use, while third-party apps offer more advanced features and control. The best choice depends on your specific needs and preferences.
4.1 Image Quality and Stitching Accuracy
While the iPhone’s built-in panorama feature does a decent job, third-party apps often provide better image quality and more accurate stitching. Apps like Photosynth and DMD Panorama use advanced algorithms to minimize distortion and create seamless panoramas, according to a study by the Santa Fe University of Art and Design’s Photography Department.
4.2 Features and User Interface
The built-in panorama feature is very simple and straightforward, making it easy for beginners to use. Third-party apps, however, offer a wider range of features, such as manual controls, real-time stitching, and virtual reality viewing. The user interface of these apps can be more complex, but it also provides more flexibility and creative control.
4.3 Cost and Availability
The iPhone’s built-in panorama feature is free and readily available on all compatible devices. Third-party apps range from free to paid, with prices varying depending on the features and capabilities offered. Free apps may have limitations or include ads, while paid apps typically provide a more comprehensive and ad-free experience.
5. Essential Tips for Capturing Stunning iPhone Panoramas
To capture stunning iPhone panoramas, focus on steady movements, consistent lighting, and avoiding moving subjects. These elements are crucial for creating high-quality, seamless panoramic images.
5.1 Maintaining Stability and Smooth Movement
Stability is key to capturing sharp and seamless panoramas. Use both hands to hold your iPhone and keep your arms close to your body for added support. Move slowly and smoothly, avoiding sudden jerks or stops. If possible, use a tripod with a smartphone adapter for maximum stability.
5.2 Understanding Lighting and Exposure
Lighting plays a crucial role in panorama photography. Shoot in even lighting conditions to avoid exposure issues and color variations. If you’re shooting in bright sunlight, try to avoid harsh shadows and highlights. Overcast days can provide more even and balanced lighting. You can also use the iPhone’s exposure compensation feature to adjust the brightness of your panorama.
5.3 Avoiding Moving Subjects and Distortion
Moving subjects can cause ghosting or distortion in your panorama. Try to avoid capturing scenes with a lot of movement, such as busy streets or crowded events. If you must include moving subjects, try to time your shots to minimize their impact. Also, be aware of potential sources of distortion, such as reflective surfaces or curved lines.
6. Creative Uses for iPhone Panorama Photography
iPhone panorama photography isn’t just for landscapes; explore creative uses like capturing unique perspectives of architecture, creating artistic self-portraits, and documenting events in an immersive way. These techniques can transform ordinary scenes into extraordinary images.
6.1 Capturing Unique Perspectives of Architecture
Panorama photography can be used to capture unique perspectives of buildings and other architectural structures. Try shooting vertical panoramas to emphasize the height of skyscrapers or wide panoramas to showcase the facade of a historic building. Experiment with different angles and viewpoints to create visually interesting images.
6.2 Creating Artistic Self-Portraits
One fun and creative use for panorama photography is creating artistic self-portraits. By starting the panorama capture on one side of the frame and then quickly moving to the other side, you can appear multiple times in the same image. This technique can be used to create surreal and humorous self-portraits.
6.3 Documenting Events and Gatherings
Panorama photography is also great for documenting events and gatherings. Use it to capture the atmosphere of a concert, the energy of a sporting event, or the excitement of a family reunion. Wide panoramas can provide a sense of immersion and help you tell a more complete story.
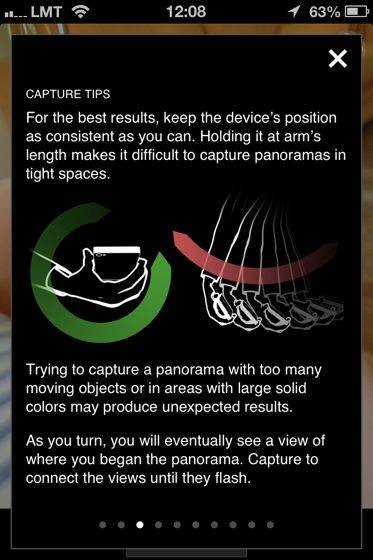 Panorama Tips: Keep your iPhone in the exact same position while you keep moving around to capture a panorama
7. Editing and Enhancing Your iPhone Panoramas
Yes, editing and enhancing your iPhone panoramas can significantly improve their overall quality and visual appeal. Use built-in editing tools or third-party apps to adjust exposure, contrast, color, and sharpness for stunning results.
7.1 Using the iPhone’s Built-In Editing Tools
The iPhone’s built-in Photos app offers a range of editing tools that can be used to enhance your panoramas. You can adjust the exposure, contrast, brightness, saturation, and sharpness of your images. You can also crop and straighten your panoramas to improve their composition.
7.2 Exploring Third-Party Photo Editing Apps
For more advanced editing capabilities, consider using third-party photo editing apps like Adobe Lightroom Mobile, Snapseed, or VSCO. These apps offer a wider range of tools and features, such as selective adjustments, color grading, and healing brushes. They also allow you to save your edits as presets, making it easy to apply consistent adjustments to multiple images.
7.3 Best Practices for Editing Panoramas
Here are some best practices for editing panoramas:
- Start with Global Adjustments: Begin by making global adjustments to the exposure, contrast, and white balance of your panorama.
- Adjust Highlights and Shadows: Use the highlights and shadows sliders to recover detail in the brightest and darkest areas of your image.
- Adjust Color and Saturation: Adjust the color temperature and saturation to enhance the mood and atmosphere of your panorama.
- Sharpen Your Image: Add a touch of sharpening to bring out details and improve overall clarity.
- Crop and Straighten: Crop your panorama to remove any unwanted areas and straighten the horizon line.
- Avoid Over-Editing: Be careful not to over-edit your panorama, as this can lead to unnatural-looking results.
- Use Presets: Save your favorite adjustments as presets to quickly apply them to other panoramas.
8. Sharing Your iPhone Panoramas with the World
You can share your iPhone panoramas with the world by using social media platforms, dedicated photography communities, and print services. Each option offers unique ways to showcase your panoramic images.
8.1 Sharing on Social Media Platforms
Social media platforms like Instagram, Facebook, and Twitter are great for sharing your iPhone panoramas with a wide audience. When sharing on Instagram, you can use the panorama crop feature to allow viewers to swipe through the entire image. On Facebook and Twitter, your panoramas will be displayed as wide images that viewers can scroll through.
8.2 Showcasing Your Work on Photography Communities
Photography communities like 500px, Flickr, and ViewBug are excellent platforms for showcasing your iPhone panoramas to other photographers. These communities offer a supportive environment where you can receive feedback on your work and connect with like-minded individuals.
8.3 Printing and Displaying Your Panoramas
For a more tangible way to share your iPhone panoramas, consider printing and displaying them. You can print your panoramas on canvas, metal, or paper and frame them for display in your home or office. Several online printing services offer panorama printing options, allowing you to create high-quality prints of your favorite images.
 iOS 6 Panorama in La Jolla, California
9. Overcoming Common Challenges in iPhone Panorama Photography
To overcome common challenges in iPhone panorama photography, practice consistent movement, manage lighting carefully, and choose scenes with minimal movement. Addressing these issues will help you create flawless panoramic images.
9.1 Dealing with Uneven Lighting
Uneven lighting can be a major challenge in panorama photography. If you’re shooting in bright sunlight, try to avoid harsh shadows and highlights. Overcast days can provide more even and balanced lighting. You can also use the iPhone’s exposure compensation feature to adjust the brightness of your panorama. Additionally, consider shooting during the golden hour (the hour after sunrise and the hour before sunset) for soft, warm lighting.
9.2 Minimizing Distortion and Artifacts
Distortion and artifacts can occur when stitching images together, especially if there are moving subjects or uneven surfaces. To minimize these issues, try to avoid capturing scenes with a lot of movement and ensure that your iPhone is level and stable. You can also use third-party panorama apps that offer advanced stitching algorithms.
9.3 Troubleshooting Stitching Errors
Stitching errors can occur if there is not enough overlap between images or if the iPhone is moved too quickly. To troubleshoot these errors, try shooting the panorama again, making sure to maintain a consistent speed and overlap the images sufficiently. You can also try using a different panorama app or editing the images manually in Photoshop or another photo editing program.
10. Advanced Techniques for iPhone Panorama Photography
To advance your iPhone panorama photography skills, experiment with HDR mode, explore time-lapse panoramas, and capture 360-degree views. These techniques will elevate your panoramic images to a professional level.
10.1 Using HDR Mode for Enhanced Dynamic Range
HDR (High Dynamic Range) mode can be used to capture panoramas with enhanced dynamic range. HDR mode combines multiple exposures to create an image with more detail in both the highlights and shadows. This can be particularly useful when shooting scenes with high contrast, such as landscapes with bright skies and dark foregrounds.
10.2 Creating Time-Lapse Panoramas
Time-lapse panoramas combine the techniques of time-lapse photography and panorama photography. This involves capturing a series of images over a period of time while slowly panning the iPhone across the scene. The resulting video shows the scene changing over time in a wide, panoramic view.
10.3 Capturing 360-Degree Panoramas
360-degree panoramas provide an immersive viewing experience, allowing viewers to explore the scene in all directions. To capture 360-degree panoramas, use a third-party app like 360 Panorama or Google Street View. These apps guide you through the process of capturing a complete sphere of images, which are then stitched together to create a 360-degree panorama.
FAQ: Mastering iPhone Panorama Photography
1. What is the best iPhone for panorama photography?
The best iPhone for panorama photography is any recent model with a high-resolution camera and good image stabilization. Newer iPhones like the iPhone 13 Pro or iPhone 14 offer advanced camera systems that produce excellent results.
2. How do I keep my panorama level on my iPhone?
To keep your panorama level on your iPhone, use the built-in grid feature in the Camera app or consider using a tripod with a smartphone adapter that has a bubble level.
3. Can I take vertical panoramas on my iPhone?
Yes, you can take vertical panoramas on your iPhone by rotating the device to portrait orientation and selecting the “Pano” mode in the Camera app.
4. What should I do if my panorama is blurry?
If your panorama is blurry, make sure to keep your hands steady and move slowly while capturing the images. You can also try using a tripod for added stability.
5. How do I fix stitching errors in my iPhone panorama?
To fix stitching errors in your iPhone panorama, try shooting the panorama again, making sure to maintain a consistent speed and overlap the images sufficiently. You can also try using a different panorama app or editing the images manually in a photo editing program.
6. What are the best settings for iPhone panorama photography?
The best settings for iPhone panorama photography depend on the specific scene and lighting conditions. In general, it’s best to shoot in even lighting conditions and use the iPhone’s auto settings for exposure and white balance.
7. How do I share a full panorama on Instagram?
To share a full panorama on Instagram, use the panorama crop feature, which allows viewers to swipe through the entire image. You can also use a third-party app to split your panorama into multiple images that can be posted as a carousel.
8. Can I edit my iPhone panorama after taking it?
Yes, you can edit your iPhone panorama after taking it using the built-in Photos app or third-party photo editing apps like Adobe Lightroom Mobile or Snapseed.
9. What are some common mistakes to avoid when taking iPhone panoramas?
Common mistakes to avoid when taking iPhone panoramas include moving too quickly, failing to overlap images, and shooting in uneven lighting conditions.
10. How can I improve my iPhone panorama photography skills?
To improve your iPhone panorama photography skills, practice regularly, experiment with different techniques, and seek feedback from other photographers.
Mastering iPhone panorama photography opens up a world of creative possibilities, allowing you to capture breathtaking scenes and unique perspectives. By following the tips and techniques outlined in this guide, you can create stunning panoramic images that showcase your vision and talent. Whether you’re a beginner or an experienced photographer, there’s always something new to learn and explore in the world of iPhone panorama photography.
Ready to take your iPhone photography to the next level? Visit dfphoto.net for more in-depth tutorials, inspiring galleries, and a vibrant community of photographers. Explore new techniques, discover hidden gems, and connect with fellow enthusiasts who share your passion.
Address: 1600 St Michael’s Dr, Santa Fe, NM 87505, United States.
Phone: +1 (505) 471-6001.
Website: dfphoto.net.