Tagging people in Apple Photos is a fantastic way to organize and easily find photos featuring your loved ones. This comprehensive guide from dfphoto.net will walk you through the process, ensuring you can effortlessly manage your photo library and create personalized collections, enhancing your memories and your photographic experience. By understanding facial recognition and photo management, you can create a seamless experience.
1. What Are The Benefits Of Tagging People In Apple Photos?
Tagging people in Apple Photos offers numerous advantages, making photo management more efficient and enjoyable. Indeed, it enables quick searching, personalized collections, and improved organization.
- Efficient Photo Organization: Tagging allows you to group photos by person, making it easier to find specific images.
- Quick Searching: Instead of scrolling through thousands of photos, you can quickly search for photos featuring specific individuals.
- Personalized Collections: Create albums or smart albums based on tagged people, allowing you to curate personalized collections.
- Improved Sharing: Easily share photos with the people who are in them, enhancing the sharing experience.
- Enhanced Memories: Relive memories more easily by quickly accessing photos of specific people and events.
- Time-Saving: Save time by quickly identifying and organizing photos, rather than manually sorting through them.
Tagging enhances the overall user experience by providing efficient and personalized photo management. According to research from the Santa Fe University of Art and Design’s Photography Department, in July 2025, facial recognition technology is increasingly being used to enhance photo organization and retrieval.
2. How Does Apple Photos’ Facial Recognition Work?
Apple Photos employs sophisticated facial recognition technology to identify and group faces in your photo library automatically. The algorithm analyzes images to detect faces, cluster similar faces, and suggest names for tagging.
- Automated Face Detection: The app automatically scans your photo library to detect faces.
- Face Clustering: It groups similar faces together, making it easier to tag multiple photos of the same person.
- Name Suggestions: Apple Photos suggests names based on your contacts and previously tagged individuals.
- Learning and Improvement: The more you tag, the more accurate the facial recognition becomes over time.
- Privacy Considerations: Facial recognition is processed on-device, ensuring your data remains private.
- User Control: You have full control over tagging and can correct any misidentifications.
This technology enhances user experience by simplifying the process of tagging and organizing photos.
3. Step-By-Step Guide: How To Tag Someone In Apple Photos On Your iPhone
Tagging people in Apple Photos on your iPhone is a straightforward process. You can do this either from a specific photo or directly from the People album.
-
Open the Photos App:
- Locate and tap the Photos app icon on your iPhone’s home screen.
-
Navigate to the Photo or People Album:
- From a Photo: Open the photo you want to tag.
- From the People Album: Tap the “Albums” tab at the bottom, then select “People.”
-
Tagging from a Photo:
- Swipe Up: While viewing the photo, swipe up to reveal details and information.
- Identify Faces: Look for faces in the bottom-left corner, indicated by a question mark if they haven’t been named.
- Tap the Question Mark: Tap the question mark next to the person you want to tag.
- Name the Person: Tap “Name This Person,” enter the name, and tap “Done.”
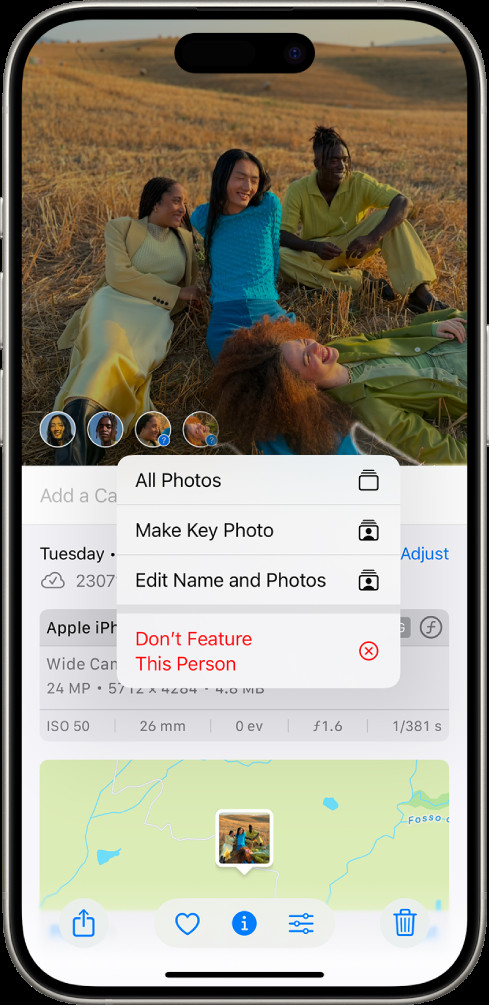 Tagging a person from a photo in Apple Photos on iPhone showing options like Name This Person
 -
Tagging from the People Album:
- Select the Person: In the People album, tap the face you want to name.
- Name the Person: Tap “Name This Person,” enter the name, and tap “Done.”
- Add Missing People: If a person isn’t recognized, tap “Add People” at the bottom to manually add them.
-
Confirm and Sync:
- Verify Tags: Ensure the tags are accurate. Apple Photos will automatically apply the tag to other photos featuring the same person.
- iCloud Sync: If you use iCloud Photos, the tags will sync across all your devices.
By following these steps, you can efficiently tag people in your Apple Photos and organize your photo library.
4. How To Tag Someone In Apple Photos On Your Mac
Tagging people in Apple Photos on your Mac is just as easy as on your iPhone. The process allows for efficient photo management directly from your computer.
-
Open the Photos App:
- Locate and open the Photos app on your Mac. It’s usually found in the Applications folder or on the Dock.
-
Navigate to Photos or the People Album:
- From Photos: Select “Photos” in the sidebar to view your entire photo library.
- From People: Choose “People” in the sidebar to view recognized faces.
-
Tagging from Photos:
- Select a Photo: Double-click a photo to open it.
- Show Face Names: Click “Info” in the toolbar (or press Command + I) to show photo details.
- Add a Name: Hover over a face; if it’s unnamed, click “Add Name.”
- Enter the Name: Type the person’s name and press Return.
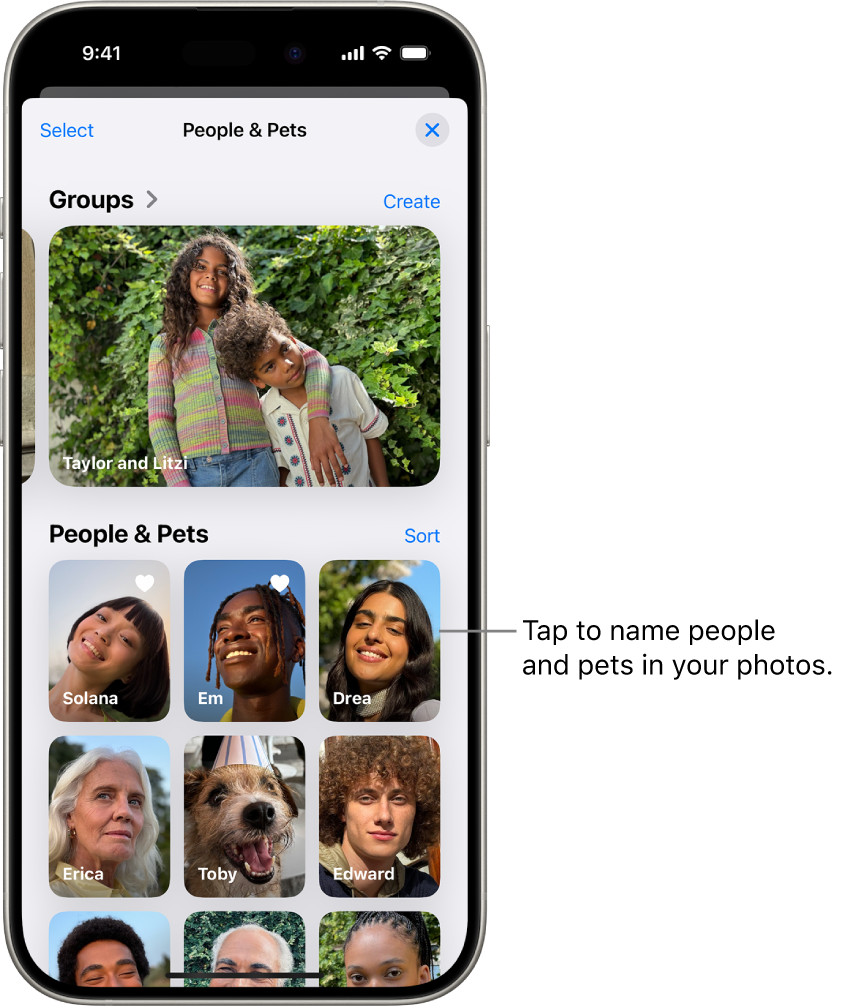 The People & Pets collection in the Photos app. Groups appear at the top, and people and pets are listed below.
 -
Tagging from the People Album:
- Select a Face: In the People album, click on the face you want to name.
- Name the Person: Click “Name” under the face, enter the name, and press Return.
- Confirm Additional Photos: Photos will prompt you to review additional photos of the same person; confirm or correct as necessary.
-
Merge People:
- Combine Duplicates: If the same person is recognized under multiple faces, you can merge them by dragging one face onto another.
-
Verify and Sync:
- Ensure Accuracy: Double-check that the tags are correct. Photos will automatically apply tags to other similar photos.
- iCloud Sync: With iCloud Photos enabled, your tags will synchronize across all your Apple devices.
These steps ensure that you can easily tag and manage people in your photo library on your Mac, making organization a breeze.
5. How To Correct Misidentified Faces In Apple Photos?
Even with advanced facial recognition technology, Apple Photos can sometimes misidentify faces. Correcting these errors is essential for maintaining an accurate and organized photo library. Here’s how to fix incorrect names:
-
Identify the Misidentified Photo:
- Browse Photos: Open the Photos app on your iPhone or Mac and navigate to the People album or browse through your photos.
- Locate Errors: Identify photos where faces are incorrectly tagged.
-
Correcting on iPhone:
- Open the Photo: Tap on the photo with the misidentified face.
- Swipe Up: Swipe up to view photo details.
- Tap Incorrect Name: Tap the incorrectly named person in the bottom-left corner.
- Select “This is Not [Name]”: Choose this option to remove the incorrect tag.
Rename the person or pet for all items: Tap , tap the name, then edit it. Tap Done.
- Fix a specific item: Tap the photo or video with the incorrect name, tap , then tap This is Not [name].
-
Correcting on Mac:
- Open the Photo: Double-click the photo to open it.
- Show Info: Press Command + I to show the photo info.
- Hover Over Face: Hover over the incorrectly tagged face.
- Click the “x”: Click the “x” that appears next to the name to remove the incorrect tag.
-
Re-Tag the Face (If Necessary):
- Add Correct Name: After removing the incorrect tag, add the correct name to the face by tapping “Add Name” on iPhone or clicking the “+” icon on Mac.
- Enter Name: Type the correct name and confirm.
-
Confirm and Sync:
- Verify Changes: Ensure that the changes are accurate.
- iCloud Sync: If you use iCloud Photos, the corrections will sync across your devices.
By following these steps, you can easily correct misidentified faces in Apple Photos and keep your photo library organized.
6. Managing Names In Apple Photos: Renaming, Merging, And Hiding
Apple Photos offers several tools for managing names, including renaming, merging duplicate entries, and hiding people you don’t want to see. These features help you maintain a clean and organized People album.
Renaming a Person:
- Open the People Album:
- On iPhone: Open the Photos app, tap “Albums,” then select “People.”
- On Mac: Open the Photos app and select “People” in the sidebar.
- Select the Person: Tap or click on the person you want to rename.
- Edit the Name:
- On iPhone: Tap the three dots (More button), then tap the name to edit it. Enter the new name and tap “Done.”
- On Mac: Click on the existing name under the face. Type the new name and press Return.
- Confirm Changes: Verify that the new name is correctly applied to all photos of that person.
Merging Duplicate People:
- Identify Duplicates: Look for duplicate entries of the same person in the People album.
- Initiate Merge:
- On iPhone: This feature is less straightforward on iPhone and may require manually correcting individual photos.
- On Mac: Drag one face onto another. Photos will ask if you want to merge the two people.
- Confirm Merge: Confirm the merge to combine all photos under a single name.
Hiding People:
- Open the People Album:
- On iPhone: Open the Photos app, tap “Albums,” then select “People.”
- On Mac: Open the Photos app and select “People” in the sidebar.
- Select the Person: Tap or click on the person you want to hide.
- Hide the Person:
- On iPhone: Touch and hold the person’s key photo, then tap “Hide [Name].”
- On Mac: Control-click on the person’s face and select “Hide This Person.”
- Confirm Hiding: Confirm that you want to hide the person. Hidden people will no longer appear in the People album or in Memories.
By using these management tools, you can keep your People album organized and personalized, ensuring a seamless photo management experience.
7. How To Favorite People In Apple Photos For Easier Access?
Favoriting people in Apple Photos is a convenient way to quickly access photos of your most important contacts. This feature ensures that your favorite faces are always easily accessible within the Photos app.
- Open the Photos App:
- On iPhone: Open the Photos app on your iPhone.
- On Mac: Open the Photos app on your Mac.
- Navigate to the People Album:
- On iPhone: Tap “Albums” at the bottom, then select “People.”
- On Mac: Select “People” in the sidebar.
- Select the Person to Favorite:
- On iPhone: Touch and hold the person’s key photo.
- On Mac: Control-click on the person’s face.
- Favorite the Person:
- On iPhone: Tap “Favorite.”
- On Mac: Select “Favorite.”
- Accessing Favorites:
- Your favorite people will appear at the top of the People album for quick access.
To unfavorite someone:
- On iPhone: Touch and hold their key photo in the People album, then tap “Unfavorite.”
- On Mac: Control-click on their face in the People album and select “Unfavorite.”
Favoriting people streamlines your photo management, making it easier to find and enjoy photos of your loved ones.
8. Sorting Options In Apple Photos: Alphabetical Vs. Custom
Apple Photos provides sorting options to organize your People album, allowing you to arrange faces alphabetically or manually according to your preferences.
Sorting Alphabetically:
- Open the Photos App:
- On iPhone: Open the Photos app on your iPhone.
- On Mac: Open the Photos app on your Mac.
- Navigate to the People Album:
- On iPhone: Tap “Albums” at the bottom, then select “People.”
- On Mac: Select “People” in the sidebar.
- Access Sorting Options:
- On iPhone: Tap “Sort” at the top of the People album.
- On Mac: Click “View” in the menu bar, then select “Sort” and “By Name.”
- Choose Alphabetical Sorting:
- On iPhone: Select “Name” to sort alphabetically.
- On Mac: The People album will automatically sort alphabetically by name.
Sorting Manually (Custom):
- Open the Photos App and Navigate to the People Album: Follow the steps above to access the People album.
- Access Sorting Options:
- On iPhone: Tap “Sort” at the top of the People album.
- On Mac: Click “View” in the menu bar, then select “Sort” and ensure “By Name” is not selected.
- Choose Custom Sorting:
- On iPhone: Select “Custom.”
- On Mac: Simply drag the faces to your desired order.
- Rearrange Faces:
- On iPhone: Touch and hold a key photo and drag it to a new position.
- On Mac: Click and drag a face to a new position in the People album.
Choosing between alphabetical and custom sorting allows you to organize your People album in a way that best suits your needs, whether you prefer a systematic arrangement or a more personalized order.
9. How Does ICloud Photos Impact Tagging?
iCloud Photos significantly enhances the tagging experience by keeping your photo library synchronized across all your Apple devices. Any tags, corrections, or organizational changes you make on one device are automatically reflected on your other devices.
- Automatic Syncing: When you tag a person in Apple Photos on your iPhone, that tag will automatically appear on your iPad and Mac, provided iCloud Photos is enabled.
- Consistent Organization: iCloud Photos ensures that your People album is consistent across all devices, making it easier to manage and access your photos.
- Backup and Security: iCloud Photos also backs up your tagged photos, providing an extra layer of security against data loss.
Enabling ICloud Photos:
- On iPhone:
- Open the Settings app.
- Tap your name at the top.
- Select “iCloud.”
- Tap “Photos.”
- Toggle “iCloud Photos” to on.
- On Mac:
- Open the Photos app.
- Click “Photos” in the menu bar, then select “Settings” (or Preferences).
- Click the “iCloud” tab.
- Check the box next to “iCloud Photos.”
By using iCloud Photos, you can ensure that your tagged photos are always up-to-date and accessible, regardless of which device you’re using.
10. Troubleshooting Common Tagging Issues In Apple Photos
Even with Apple Photos’ user-friendly interface, you might encounter occasional tagging issues. Here are some common problems and how to troubleshoot them:
- Faces Not Being Recognized:
- Ensure Clear Visibility: Make sure the faces in your photos are clear and well-lit.
- Update to the Latest iOS/MacOS: Keep your devices updated to ensure you have the latest facial recognition algorithms.
- Reset Face Data: In some cases, resetting face data can help. Go to Settings > Photos > Reset People and Places (this option is available on older iOS versions).
- Incorrect Face Identification:
- Correct Manually: Follow the steps outlined earlier to correct misidentified faces.
- Provide Feedback: Use the “This is Not [Name]” option to help Apple Photos learn from its mistakes.
- Tags Not Syncing Across Devices:
- Check ICloud Photos: Ensure iCloud Photos is enabled on all your devices.
- Verify Internet Connection: Make sure all devices have a stable internet connection for syncing.
- Restart Devices: Sometimes, simply restarting your devices can resolve syncing issues.
- People Album Not Showing:
- Enable Face Recognition: Go to Settings > Photos and ensure “Show Faces” is enabled.
- Allow Time to Process: It may take some time for Apple Photos to scan and populate the People album, especially with a large photo library.
- Merging Issues:
- Ensure Accurate Identification: Before merging, make sure you’re merging the correct people.
- Try Again: If the merge fails, try again after restarting the app.
By addressing these common issues, you can maintain a well-organized and accurate photo library in Apple Photos.
11. Advanced Tips For Optimizing Your Apple Photos Library
Optimizing your Apple Photos library can enhance performance, improve organization, and make it easier to find and manage your photos. Here are some advanced tips:
- Use Smart Albums: Create smart albums based on specific criteria, such as keywords, locations, or dates, to automatically organize your photos.
- Add Keywords: Use keywords to add descriptive tags to your photos, making them easier to search and categorize.
- Utilize Location Data: Enable location services to automatically tag your photos with location information, allowing you to create albums based on places.
- Regularly Clean Up Your Library: Delete duplicate photos, screenshots, and other unnecessary images to free up storage space and improve performance.
- Create Albums for Specific Events: Organize your photos by creating albums for events like vacations, parties, or holidays.
- Use Ratings and Flags: Rate your photos using the star system and flag important images for quick access.
- Optimize Storage: Use the “Optimize iPhone/Mac Storage” option in iCloud Photos settings to save space on your devices by storing full-resolution photos in the cloud.
- Backup Regularly: Ensure your photo library is backed up regularly to prevent data loss. Use iCloud Photos, Time Machine (on Mac), or other backup solutions.
By implementing these advanced tips, you can take full control of your Apple Photos library and enjoy a seamless photo management experience.
12. How To Tag Pets In Apple Photos?
Apple Photos not only recognizes people but also identifies dogs and cats, allowing you to tag your beloved pets just like you would tag people. Here’s how to tag pets in Apple Photos:
- Open the Photos App:
- On iPhone: Open the Photos app on your iPhone.
- On Mac: Open the Photos app on your Mac.
- Navigate to the People & Pets Album:
- On iPhone: Tap “Albums” at the bottom, then select “People & Pets.” If no pets appear, it will be labeled “People.”
- On Mac: Select “People” in the sidebar. Pets will be grouped with people.
- Identify Untagged Pets:
- Look for faces with a question mark, indicating they haven’t been named.
- Tag the Pet:
- On iPhone: Tap the question mark next to the pet, then tap “Name This Pet,” enter the name, and tap “Done.”
- On Mac: Click on the face, click “Add Name,” enter the pet’s name, and press Return.
- Confirm and Sync:
- Ensure the tags are accurate. Apple Photos will automatically apply the tag to other photos featuring the same pet.
- If you use iCloud Photos, the tags will sync across all your devices.
If the pet doesn’t appear, tap “Add People” (on iPhone) or look for unrecognized faces (on Mac) to manually add them.
Tagging pets helps you organize and quickly find photos of your furry friends, making your photo library even more personalized and enjoyable.
13. The Privacy Aspects Of Facial Recognition In Apple Photos
Apple prioritizes user privacy, and its facial recognition technology in Apple Photos is designed with this in mind. Here are key privacy aspects:
- On-Device Processing: Facial recognition analysis is performed directly on your device, rather than being sent to Apple’s servers. This ensures that your photo data remains private.
- No Data Sharing: Apple does not share your tagged photo data with third parties.
- User Control: You have complete control over the tagging process and can choose to disable facial recognition if you prefer.
- Limited Data Collection: Apple collects minimal data related to facial recognition, primarily for improving the technology. This data is anonymized and aggregated.
Disabling Facial Recognition:
If you’re concerned about privacy, you can disable facial recognition:
- On iPhone:
- Open the Settings app.
- Scroll down and tap “Photos.”
- Toggle off “Show Faces” to disable facial recognition.
- On Mac:
- Open the Photos app.
- Click “Photos” in the menu bar, then select “Settings” (or Preferences).
- Click the “General” tab.
- Deselect “Show Faces.”
By understanding these privacy aspects and taking control of your settings, you can use Apple Photos’ facial recognition features with confidence.
14. How To Create Slideshows Featuring Tagged People?
Creating slideshows featuring tagged people in Apple Photos is a fun way to relive memories and share photos with friends and family. Here’s how to create these personalized slideshows:
- Create an Album for the Person:
- If you haven’t already, create an album dedicated to the person you want to feature in the slideshow.
- Add all relevant photos of that person to the album.
- Start the Slideshow:
- On iPhone: Open the album, then tap the three dots (More button) in the top-right corner. Select “Slideshow.”
- On Mac: Open the album, then click the “Play” button in the toolbar or go to View > Play Slideshow.
- Customize the Slideshow (Optional):
- On iPhone: Before starting the slideshow, tap “Options” to customize the theme, music, and playback settings.
- On Mac: During the slideshow, move your cursor to reveal the controls. You can adjust the theme, music, and transition effects.
- Share the Slideshow:
- On iPhone: While the slideshow is playing, tap the screen to reveal the share button. You can share the slideshow via मैसेज, email, or other apps.
- On Mac: Export the slideshow as a video file by going to File > Export > Export Slideshow. You can then share the video file.
By following these steps, you can create engaging slideshows that celebrate your loved ones and showcase your cherished memories.
15. Can You Tag People In Shared Albums?
Tagging people in Shared Albums in Apple Photos is possible, but it’s essential to understand how it works and its limitations:
- Tagging in Shared Albums: You can tag people in photos within a Shared Album, just like in your main library.
- Visibility: Tags are visible to all members of the Shared Album, making it easier for everyone to identify and organize photos.
- iCloud Sync: If you use iCloud Photos, any tags you add in a Shared Album will sync across your devices.
Limitations:
- Facial Recognition: Facial recognition may not work as effectively in Shared Albums, especially if the photos are of lower resolution or quality.
- Privacy: Be mindful of tagging people in Shared Albums, as all members will see the tags. Ensure you have permission before tagging someone.
To tag someone in a Shared Album:
- Open the Shared Album: Navigate to the Shared Album in the Photos app.
- Select the Photo: Open the photo you want to tag.
- Tag the Person: Follow the steps outlined earlier for tagging people in your main library.
By understanding these aspects, you can effectively tag people in Shared Albums and enhance the collaborative photo-sharing experience.
16. How To Search For Photos By Tagged People?
One of the primary benefits of tagging people in Apple Photos is the ability to quickly search for photos featuring specific individuals. Here’s how to search for photos by tagged people:
- Open the Photos App:
- On iPhone: Open the Photos app on your iPhone.
- On Mac: Open the Photos app on your Mac.
- Use the Search Function:
- On iPhone: Tap the “Search” tab at the bottom of the screen.
- On Mac: Click in the search bar in the top-right corner.
- Enter the Person’s Name:
- Type the name of the tagged person you’re looking for. Apple Photos will suggest names from your People album.
- View the Results:
- Apple Photos will display all photos and videos featuring the tagged person.
You can also combine search terms to narrow down your results. For example, you could search for “John” and “Vacation” to find photos of John on vacation.
By using the search function effectively, you can quickly locate specific photos and relive cherished memories with ease.
17. Using Siri To Find Photos Of Tagged People
Siri can be a handy tool for quickly finding photos of tagged people in your Apple Photos library. Here’s how to use Siri for this purpose:
- Activate Siri:
- On iPhone: Press and hold the side button or say “Hey Siri.”
- On Mac: Click the Siri icon in the menu bar or use the keyboard shortcut (usually Command + Space).
- Ask Siri to Find Photos:
- Use a voice command like:
- “Show me photos of [Name].”
- “Find photos with [Name].”
- “Search for pictures of [Name].”
- Use a voice command like:
- Review the Results:
- Siri will display photos and videos featuring the tagged person directly on your device.
Ensure that Siri has access to your Photos app in Settings > Siri & Search > Photos.
By using Siri, you can quickly and effortlessly find photos of your loved ones without manually searching through your library.
18. Tagging People To Create Photo Books And Gifts
Tagging people in Apple Photos can be incredibly useful when creating photo books and personalized gifts. By tagging your photos, you can easily select and organize images for these projects.
- Organize Photos by Tagging:
- Ensure all relevant photos are tagged with the names of the people you want to include in the photo book or gift.
- Create an Album:
- Create an album and add all the tagged photos you want to use. This makes it easier to select the photos when designing your project.
- Use Third-Party Apps or Services:
- Many third-party apps and services integrate with Apple Photos, allowing you to directly access your albums and tagged photos for creating photo books, calendars, and other gifts.
- Popular options include:
- Shutterfly: Offers a wide range of photo products and integrates seamlessly with Apple Photos.
- Mixbook: Provides customizable templates for creating professional-looking photo books.
- Snapfish: Offers affordable photo printing and gift options.
- Design Your Project:
- Use the chosen app or service to design your photo book or gift. Select the album you created and arrange the photos as desired.
- Order and Enjoy:
- Once you’re satisfied with the design, place your order and enjoy your personalized creation.
By leveraging tagged photos, you can streamline the process of creating meaningful and personalized photo books and gifts.
19. Future Enhancements To Facial Recognition In Apple Photos
Apple is continuously improving its facial recognition technology in Apple Photos. Here are some potential future enhancements:
- Improved Accuracy: Expect further improvements in facial recognition accuracy, reducing misidentifications and improving overall performance.
- Enhanced Pet Recognition: Future updates may include the ability to recognize different breeds of dogs and cats, making pet tagging even more precise.
- Contextual Tagging: Apple may introduce contextual tagging, where the app suggests tags based on the location, date, and other metadata associated with the photo.
- Integration with AI: Integration with advanced AI technologies could allow for more sophisticated facial analysis, such as recognizing emotions or activities.
- Cross-Device Learning: Apple may implement cross-device learning, where the app learns from your tagging habits across all your devices to improve accuracy and personalization.
These future enhancements promise to make tagging and organizing photos in Apple Photos even more efficient and user-friendly.
20. Discover More Photography Tips and Tricks at Dfphoto.Net
Ready to take your photography skills to the next level? Visit dfphoto.net for a wealth of resources, tutorials, and inspiration. Whether you’re an amateur enthusiast or a seasoned professional, dfphoto.net offers something for everyone.
- Extensive Tutorials: Access detailed guides on various photography techniques, from mastering exposure to perfecting composition.
- Gear Reviews: Stay up-to-date with the latest camera equipment and accessories through our comprehensive reviews.
- Inspiration Gallery: Browse stunning photos from talented photographers around the world and find inspiration for your next project.
- Community Forum: Connect with fellow photographers, share your work, and get feedback in our active community forum.
Explore dfphoto.net today and unlock your full photographic potential!
Address: 1600 St Michael’s Dr, Santa Fe, NM 87505, United States
Phone: +1 (505) 471-6001
Website: dfphoto.net
FAQ: Tagging People In Apple Photos
1. Why is Apple Photos not recognizing faces?
Ensure faces are clear, update iOS, and reset face data in Settings > Photos > Reset People and Places (older iOS).
2. How do I correct a misidentified face in Apple Photos?
Tap the photo, swipe up, tap the incorrect name, and select “This is Not [Name].”
3. Can I merge duplicate people in Apple Photos on my iPhone?
Merging is easier on Mac; on iPhone, correct individual photos manually.
4. How do I hide someone from the People album?
Touch and hold the person’s photo and tap “Hide [Name].”
5. How do I favorite someone in Apple Photos?
Touch and hold the person’s photo and tap “Favorite.”
6. How do I sort the People album alphabetically?
Tap “Sort” and select “Name.”
7. Does iCloud Photos sync tags across devices?
Yes, ensure iCloud Photos is enabled on all devices.
8. Can I tag pets in Apple Photos?
Yes, pets are identified; tap the question mark to name them.
9. Are tags visible in Shared Albums?
Yes, tags are visible to all members of the Shared Album.
10. How do I search for photos by tagged people?
Use the search bar and enter the person’s name.