Stopping Google Photos from syncing your iPhone is straightforward and ensures you have control over your photo backups. This article from dfphoto.net, aims to guide you through the steps to disable automatic syncing and explore alternative cloud management solutions, ensuring your precious memories are managed exactly how you want them. Dive in to discover the best ways to manage your photos, explore manual backup options, and learn about cloud storage management for photo enthusiasts.
1. Why is Google Photos Syncing My iPhone?
Google Photos syncs your iPhone to automatically back up your photos and videos to the cloud. This feature ensures that your memories are safe, even if your device is lost or damaged. When you enable “Backup and Sync” in the Google Photos app, it continuously uploads your media files to your Google account, making them accessible from any device.
The convenience of automatic syncing is undeniable. It eliminates the need for manual backups and ensures that your photos are always protected. However, this constant syncing can also lead to several issues:
- Storage Concerns: Google Photos offers a limited amount of free storage. Continual syncing can quickly fill up your storage, prompting you to purchase additional space.
- Data Usage: Uploading photos and videos consumes data. If you’re on a limited data plan, automatic syncing can lead to overage charges.
- Privacy Concerns: Some users are uncomfortable with automatically uploading their photos to the cloud due to privacy considerations.
- Unwanted Backups: You might not want every photo or video on your iPhone to be backed up. Accidental screenshots, memes, or personal photos may not be suitable for cloud storage.
To address these concerns, it’s important to know how to manage or disable Google Photos syncing on your iPhone.
2. How to Disable Google Photos Sync on Your iPhone
Disabling Google Photos sync on your iPhone is a simple process. Here are the steps to follow:
Step 1: Open Google Photos
Locate and open the Google Photos app on your iPhone.
Step 2: Access Your Profile
Tap on your profile picture or initial, usually found in the top right corner of the screen.
Step 3: Go to Photos Settings
From the menu, select “Photos settings.” This will take you to the app’s configuration options.
Step 4: Navigate to Backup & Sync
In the Photos settings menu, find and tap on “Backup & sync.”
Step 5: Toggle Backup & Sync Off
You will see a toggle switch labeled “Backup & sync.” Tap this switch to turn it off. When the switch is grayed out, syncing is disabled.
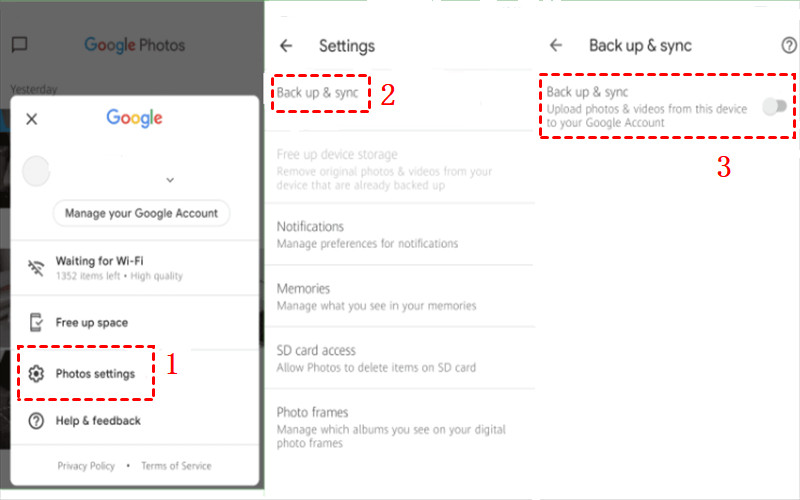 Turn off Backup and Sync
Turning off “Backup & sync” prevents Google Photos from automatically uploading new photos and videos from your iPhone. Your existing backed-up photos will remain in the cloud unless you manually delete them.
3. What Happens When You Turn Off Sync?
When you disable the Backup & sync feature in Google Photos on your iPhone, several things happen:
- No New Backups: Any new photos and videos you take will no longer be automatically uploaded to Google Photos.
- Existing Backups Remain: Photos and videos that have already been backed up to Google Photos will remain in your Google account. They will still be accessible from any device where you are logged into Google Photos.
- Storage Space: Turning off sync can help you conserve storage space on your Google account, as new media files will not be added.
- Data Usage: Disabling sync can reduce your data usage, especially if you are on a limited data plan. Google Photos will no longer use your data to upload files in the background.
- Manual Backups: You can still manually back up photos and videos by selecting them and choosing the “Back up” option within the Google Photos app.
Turning off sync provides you with greater control over what gets backed up and when. It’s a useful option for managing storage, data usage, and privacy.
4. Managing Existing Photos in Google Photos
Even after disabling automatic syncing, you might want to manage the photos already backed up to Google Photos. Here’s how you can do it:
- Deleting Photos: To delete photos from Google Photos, select the photos you want to remove and tap the trash icon. Deleted photos will be moved to the trash folder, where they will remain for 60 days before being permanently deleted.
- Creating Albums: Organize your photos by creating albums. This helps you group related photos together, making them easier to find and share.
- Sharing Photos: Google Photos allows you to share photos and albums with others. You can create a shareable link or directly share via email or other messaging apps.
- Downloading Photos: If you want to save a copy of your photos to your iPhone or another device, you can download them from Google Photos. Select the photos, tap the menu icon (three dots), and choose “Download.”
Managing your existing photos ensures that your Google Photos account remains organized and contains only the media you want to keep.
5. Alternatives to Google Photos Sync
If you’re looking for alternatives to Google Photos sync, several other options are available:
- iCloud Photos: If you are an Apple user, iCloud Photos is a natural choice. It seamlessly integrates with your iPhone and other Apple devices, providing automatic backup and syncing of your photos and videos.
- Dropbox: Dropbox is a versatile cloud storage service that can be used to back up your photos. It offers automatic syncing and allows you to organize your files into folders.
- Amazon Photos: If you are an Amazon Prime member, you get unlimited photo storage with Amazon Photos. It’s a great option for backing up your entire photo library.
- Microsoft OneDrive: OneDrive is another popular cloud storage service that offers photo backup and syncing. It integrates well with Windows and other Microsoft services.
- Manual Backups: You can always opt for manual backups. Connect your iPhone to your computer and transfer your photos and videos to an external hard drive or other storage device.
Each of these alternatives has its own advantages and disadvantages. Consider your specific needs and preferences when choosing the best option for you.
6. How to Manually Back Up Photos to Google Photos
Even with automatic syncing disabled, you can still manually back up photos to Google Photos:
Step 1: Open Google Photos
Launch the Google Photos app on your iPhone.
Step 2: Select Photos
Navigate to the photos you want to back up. You can find them in your iPhone’s camera roll or other albums.
Step 3: Choose Back Up
Select the photos by tapping and holding on each one. Once you’ve selected all the desired photos, tap the menu icon (three dots) in the top right corner.
Step 4: Start Backup
From the menu, choose “Back up.” Google Photos will begin uploading the selected photos to your account.
Manually backing up photos gives you complete control over which photos are uploaded and when. This can be useful for backing up specific moments or events without automatically syncing everything.
7. Understanding Google Photos Storage
Google Photos offers 15 GB of free storage, which is shared across your Google account, including Gmail and Google Drive. Once you exceed this limit, you’ll need to purchase additional storage. Here’s what you should know about Google Photos storage:
- Storage Plans: Google offers various storage plans, ranging from 100 GB to 30 TB. The cost varies depending on the amount of storage you need.
- High Quality vs. Original Quality: When backing up photos, you can choose between “High quality” and “Original quality.” High quality compresses your photos, saving storage space, while original quality preserves the original resolution and detail.
- Managing Storage: You can manage your Google Photos storage by deleting unnecessary photos and videos, compressing existing photos to high quality, or purchasing additional storage.
- Freeing Up Space: Google Photos has a “Free up space” feature that identifies photos and videos that have already been backed up and allows you to remove them from your device, freeing up local storage.
Understanding your Google Photos storage options helps you manage your account effectively and avoid running out of space.
8. Tips for Efficiently Managing Photos on Your iPhone
Efficiently managing photos on your iPhone can help you stay organized and save storage space. Here are some tips:
- Regularly Review and Delete: Make it a habit to regularly review your photos and delete any duplicates, blurry images, or unwanted screenshots.
- Use Albums: Organize your photos into albums to make them easier to find and manage.
- Optimize Storage: Use the “Optimize iPhone Storage” feature in your iPhone settings. This automatically moves full-resolution photos to iCloud and keeps smaller, optimized versions on your device.
- Use Third-Party Apps: Consider using third-party apps like Gemini Photos to identify and remove duplicate and similar photos.
- Backup Regularly: Whether you use Google Photos, iCloud, or another service, make sure to back up your photos regularly to protect them from loss.
By following these tips, you can keep your photo library organized and ensure that you always have enough storage space on your iPhone.
9. Privacy Considerations with Google Photos
When using Google Photos, it’s important to be aware of the privacy considerations:
- Data Collection: Google collects data about your photos, including metadata such as location, date, and time. This data is used to improve the service and provide personalized recommendations.
- Facial Recognition: Google Photos uses facial recognition to identify people in your photos. You can disable this feature in the settings, but it may affect the app’s ability to organize and suggest photos.
- Sharing: Be mindful of who you share your photos with. Shared albums and links can be accessed by anyone with the link, so make sure to share them only with trusted individuals.
- Terms of Service: Review the Google Photos terms of service to understand how your data is used and protected.
- Privacy Settings: Adjust your Google account privacy settings to control the data that Google collects and how it is used.
Being aware of these privacy considerations helps you make informed decisions about how you use Google Photos and protect your personal information.
10. Troubleshooting Common Google Photos Sync Issues
Sometimes, you may encounter issues with Google Photos syncing. Here are some common problems and how to troubleshoot them:
- Photos Not Syncing: Make sure that Backup & sync is turned on and that you have a stable internet connection. Also, check that your Google account has enough storage space.
- App Crashing: Try closing and reopening the Google Photos app. If the problem persists, try restarting your iPhone or reinstalling the app.
- Slow Upload Speeds: Slow upload speeds can be caused by a poor internet connection. Try switching to a faster Wi-Fi network or using a wired connection.
- Incorrect Date and Time: If your photos have incorrect date and time stamps, correct them in your iPhone settings or in the Google Photos app.
- Account Issues: Make sure that you are logged into the correct Google account and that your account is not experiencing any issues.
By following these troubleshooting steps, you can resolve most common Google Photos sync issues and keep your photos backed up and organized.
11. Google Photos and Data Usage: What You Need to Know
Google Photos can consume a significant amount of data, especially when backing up high-resolution photos and videos. Here’s what you need to know about Google Photos and data usage:
- Upload Size: Choose the “High quality” option to reduce the size of your uploads and save data. The “Original quality” option preserves the original resolution but consumes more data.
- Backup Over Wi-Fi: Configure Google Photos to back up photos only when connected to Wi-Fi. This prevents the app from using your cellular data for uploads.
- Data Saver Mode: Enable data saver mode in the Google Photos settings. This reduces the amount of data used by the app for various tasks.
- Monitor Data Usage: Regularly monitor your data usage in your iPhone settings to see how much data Google Photos is consuming.
- Plan Accordingly: If you have a limited data plan, plan your photo backups carefully to avoid exceeding your data limit.
Managing data usage is crucial, especially if you frequently upload photos and videos to Google Photos.
12. Best Practices for Using Google Photos on iPhone
To get the most out of Google Photos on your iPhone, follow these best practices:
- Enable Backup & Sync: Turn on Backup & sync to automatically protect your photos and videos.
- Organize Your Photos: Use albums and folders to organize your photos and make them easier to find.
- Use Facial Recognition: Enable facial recognition to automatically tag people in your photos.
- Share with Others: Use Google Photos to share photos and albums with friends and family.
- Take Advantage of Editing Tools: Use the built-in editing tools to enhance your photos.
- Manage Storage: Regularly manage your storage by deleting unnecessary photos and videos.
- Stay Updated: Keep the Google Photos app updated to take advantage of the latest features and bug fixes.
- Review Privacy Settings: Regularly review your privacy settings to ensure that your data is protected.
By following these best practices, you can enjoy all the benefits of Google Photos while keeping your photos organized and secure.
13. Advanced Tips for Google Photos Users
For advanced users, here are some additional tips to enhance your Google Photos experience:
- Use Google Lens: Use Google Lens to identify objects, text, and landmarks in your photos.
- Create Movies and Animations: Use Google Photos to create movies and animations from your photos and videos.
- Use the Assistant Tab: Take advantage of the Assistant tab to create collages, animations, and other creative projects.
- Explore the Discover Tab: Use the Discover tab to find new and interesting photos from around the world.
- Use Keyboard Shortcuts: If you use Google Photos on your computer, learn the keyboard shortcuts to navigate and manage your photos more efficiently.
- Integrate with Other Services: Integrate Google Photos with other Google services, such as Google Drive and Google Arts & Culture.
These advanced tips can help you unlock the full potential of Google Photos and take your photo management to the next level.
14. How Google Photos Enhances Your Photography Experience
Google Photos enhances your photography experience in several ways:
- Automatic Backup: Ensures that your photos are always safe and protected.
- Organization: Automatically organizes your photos by date, location, and subject.
- Sharing: Makes it easy to share photos and albums with others.
- Editing: Provides powerful editing tools to enhance your photos.
- Search: Allows you to quickly find photos using keywords and facial recognition.
- Storage: Offers ample storage space for all your photos and videos.
- Accessibility: Makes your photos accessible from any device with an internet connection.
- Creative Tools: Provides creative tools for creating collages, animations, and movies.
Google Photos is more than just a photo storage service; it’s a comprehensive platform for managing, editing, and sharing your photos.
15. The Future of Google Photos and Cloud Storage
The future of Google Photos and cloud storage is likely to be shaped by several key trends:
- Increased Storage Capacity: Cloud storage providers will continue to offer more storage capacity at lower prices.
- Improved AI and Machine Learning: AI and machine learning will play an increasingly important role in organizing, editing, and enhancing photos.
- Enhanced Privacy and Security: Cloud storage providers will invest in enhanced privacy and security measures to protect user data.
- Seamless Integration: Cloud storage services will be seamlessly integrated with other devices and platforms.
- Augmented Reality (AR): AR technology may be used to create immersive photo experiences and enhance photo sharing.
- Edge Computing: Edge computing may be used to process and analyze photos on-device, reducing the need for cloud storage.
- Decentralized Storage: Blockchain-based decentralized storage solutions may offer new options for photo storage and management.
These trends suggest that Google Photos and cloud storage will continue to evolve and offer even more powerful and innovative features in the future.
16. Understanding Metadata and Its Role in Google Photos
Metadata is data about data, and it plays a crucial role in how Google Photos organizes and presents your images. Here’s a breakdown:
-
What is Metadata? Metadata includes information like the date and time a photo was taken, the location (if location services were enabled), camera settings (aperture, shutter speed, ISO), and more.
-
How Google Photos Uses Metadata:
- Organization: Google Photos uses date and location metadata to automatically organize your photos into chronological order and on a map.
- Search: You can search for photos based on metadata. For example, searching for “photos taken in Santa Fe” will display images with location metadata matching Santa Fe.
- Suggestions: Google Photos uses metadata to suggest edits, create animations, and identify similar photos.
-
Managing Metadata:
- Privacy: Be aware that metadata can reveal sensitive information. Before sharing photos, consider removing location data if you don’t want to disclose where the photo was taken.
- Editing: While Google Photos allows you to adjust the date and time, you can’t directly edit other types of metadata within the app. Dedicated metadata editing tools are available for more advanced control.
-
Impact on Workflow: Understanding metadata can streamline your photography workflow. By properly tagging and organizing your photos with descriptive metadata, you can easily find and manage your growing photo library.
17. How to Transfer Photos from Google Photos to a New iPhone
Switching to a new iPhone doesn’t mean leaving your precious memories behind. Here’s how to transfer your photos from Google Photos to your new device:
- Install Google Photos: Download and install the Google Photos app from the App Store on your new iPhone.
- Sign In: Open the app and sign in with the same Google account you used on your old iPhone. Your photos should start appearing in the app.
- Download Photos (Optional): If you want to have the photos stored directly on your new iPhone (for offline access, for example), you can download them. Keep in mind that this will consume storage space on your device.
- Individual Downloads: Open a photo and tap the three dots in the corner, then select “Download.”
- Batch Downloads (Desktop Recommended): For downloading multiple photos or entire albums, it’s more efficient to use a computer. Go to the Google Photos website, select the photos/albums, and download them. Then, transfer the files to your new iPhone via iCloud Drive, AirDrop, or a cable connection.
- iCloud Integration (Optional): If you prefer to use iCloud Photos as your primary photo storage, you can download the photos from Google Photos to your new iPhone and then enable iCloud Photos to upload them to iCloud.
Important Considerations:
- Storage Space: Ensure your new iPhone has enough storage space to accommodate all the photos you plan to download.
- Data Usage: Downloading a large number of photos can consume a significant amount of data. Use Wi-Fi to avoid overage charges.
- Transfer Time: The transfer time will depend on the number of photos and your internet connection speed.
18. Exploring Manual Backup Options for iPhone Photography
While cloud services like Google Photos offer convenience, manual backups provide greater control and can be a valuable part of your photography workflow. Here are some manual backup options for your iPhone photos:
-
Using a Computer:
- Connect via USB: Connect your iPhone to your computer using a USB cable. Your computer should recognize the iPhone as an external drive.
- Transfer Photos: Copy the photos from your iPhone’s camera roll to a folder on your computer.
- Organize and Back Up: Organize the photos on your computer and back them up to an external hard drive, NAS (Network Attached Storage) device, or another cloud service.
-
Using External Storage Devices:
- Lightning-Enabled Storage: Several external storage devices connect directly to your iPhone’s Lightning port, allowing you to transfer photos without a computer.
- Wireless Storage: Some external hard drives offer wireless connectivity, allowing you to back up your photos over Wi-Fi.
-
Benefits of Manual Backups:
- Control: You have complete control over where your photos are stored and how they are organized.
- Security: Manual backups can provide an extra layer of security, especially if you store your backups offline.
- Redundancy: Combining manual backups with cloud services creates a robust backup strategy.
19. Maximizing Your iPhone Photography with dfphoto.net
Looking to elevate your iPhone photography skills? dfphoto.net is your ultimate resource! Here’s how we can help you capture stunning images:
- Inspiration: Browse our curated galleries showcasing breathtaking iPhone photos from talented photographers. Discover new perspectives and creative techniques.
- Techniques: Master essential iPhone photography techniques with our in-depth tutorials. Learn about composition, lighting, focus, and more.
- Editing: Discover the best photo editing apps for iPhone and learn how to use them to enhance your images.
- Gear: Get recommendations on the best accessories for your iPhone photography, including lenses, tripods, and lighting equipment.
- Community: Connect with other iPhone photographers in our vibrant community. Share your work, get feedback, and learn from others.
Visit dfphoto.net today and unlock the full potential of your iPhone photography! For personalized guidance and expert advice, visit us at 1600 St Michael’s Dr, Santa Fe, NM 87505, United States or call us at +1 (505) 471-6001. Explore a wealth of knowledge and connect with fellow photography enthusiasts on our website, dfphoto.net.
20. FAQ: Stop Google Photos From Syncing iPhone
1. How do I completely stop Google Photos from syncing my iPhone?
Completely stop Google Photos from syncing your iPhone by opening the Google Photos app, tapping your profile picture, navigating to Photos settings, selecting Backup & sync, and toggling the Backup & sync switch off. This will prevent any new photos from being uploaded.
2. What happens to my existing photos if I turn off sync in Google Photos?
Turning off sync in Google Photos will prevent new photos from being uploaded, but existing photos that have already been backed up will remain in your Google account and accessible from any device logged into Google Photos.
3. Can I manually back up photos to Google Photos if automatic sync is disabled?
Yes, you can manually back up photos to Google Photos by selecting the photos you want to back up, tapping the menu icon (three dots), and choosing “Back up.” This allows you to control which photos are uploaded.
4. How do I manage the storage space used by Google Photos?
Manage your Google Photos storage space by deleting unnecessary photos and videos, compressing existing photos to high quality, or purchasing additional storage if needed. Google Photos also has a “Free up space” feature to remove backed-up photos from your device.
5. What are some alternatives to Google Photos for backing up my iPhone photos?
Alternatives to Google Photos include iCloud Photos, Dropbox, Amazon Photos, and Microsoft OneDrive. Each offers different features and storage options to suit your needs.
6. How does Google Photos use data on my iPhone?
Google Photos uses data to upload photos and videos to the cloud. You can reduce data usage by choosing the “High quality” option for uploads, backing up only over Wi-Fi, and enabling data saver mode in the app settings.
7. What privacy considerations should I be aware of when using Google Photos?
Be aware that Google collects data about your photos, including metadata and facial recognition information. Review the Google Photos terms of service and adjust your privacy settings to control the data that Google collects and how it is used.
8. How do I transfer photos from Google Photos to a new iPhone?
Transfer photos to a new iPhone by installing the Google Photos app, signing in with your Google account, and optionally downloading photos to your device for offline access. You can also integrate with iCloud Photos if desired.
9. What are the best practices for using Google Photos on my iPhone?
Best practices include enabling Backup & sync, organizing your photos into albums, using facial recognition, sharing photos with others, utilizing editing tools, managing storage, and keeping the app updated.
10. Can I edit metadata in Google Photos on my iPhone?
While Google Photos allows you to adjust the date and time, you cannot directly edit other types of metadata within the app. Dedicated metadata editing tools are available for more advanced control.
By understanding these aspects of Google Photos, you can effectively manage your photo backups and ensure your memories are safe and organized.