Sharing precious moments with loved ones is easier than ever. Are you looking for the best way to share photos with family using Family Sharing? This comprehensive guide on dfphoto.net explores how to use iCloud Shared Photo Library to seamlessly share photos and videos with up to five family members. You’ll discover how to set it up, use it effectively, and explore different sharing options to enhance your family’s photo-sharing experience. Discover the joy of shared memories with our photography tips, image management advice, and file sharing strategies.
1. Understanding iCloud Shared Photo Library
iCloud Shared Photo Library offers a fantastic way to share photos and videos effortlessly with up to five other individuals, facilitating collaboration on a collective memory bank. With this feature, everyone can contribute, edit, and enjoy a more complete archive of shared experiences.
1.1 How It Works
When photos and videos are added to iCloud Shared Photo Library, they’re moved out of your Personal Library and into the Shared Library. This shared space allows all participants to have equal permissions to add, edit, and even delete content. The person who initially sets up the Shared Library, known as the library creator, provides the iCloud storage for all content. Other members gain access to this content without it affecting their personal iCloud storage limits.
1.2 Key Benefits
- Collaborative Sharing: Everyone can add, edit, and delete content.
- Storage Efficiency: Only the library creator’s storage is used.
- Automatic Sharing: Option to share content straight from the camera.
- Complete Memories: A comprehensive collection of shared experiences.
- Accessibility: Shared Library content can be accessed on any device.
2. Setting Up Your Shared Library
Creating a Shared Library is straightforward, but requires devices running specific operating systems.
2.1 System Requirements
To set up a Shared Library, ensure you have a device with iOS 16.1, iPadOS 16.1, or macOS Ventura or later, with iCloud Photos turned on. According to Apple Support documentation, the feature requires these operating systems to ensure compatibility and access to all functionalities. Keep your devices updated for the best experience.
2.2 Creating a Shared Library on iPhone or iPad
- Navigate to Photos Settings:
- Open the Settings app.
- Scroll down and tap Photos.
- Tap Shared Library.
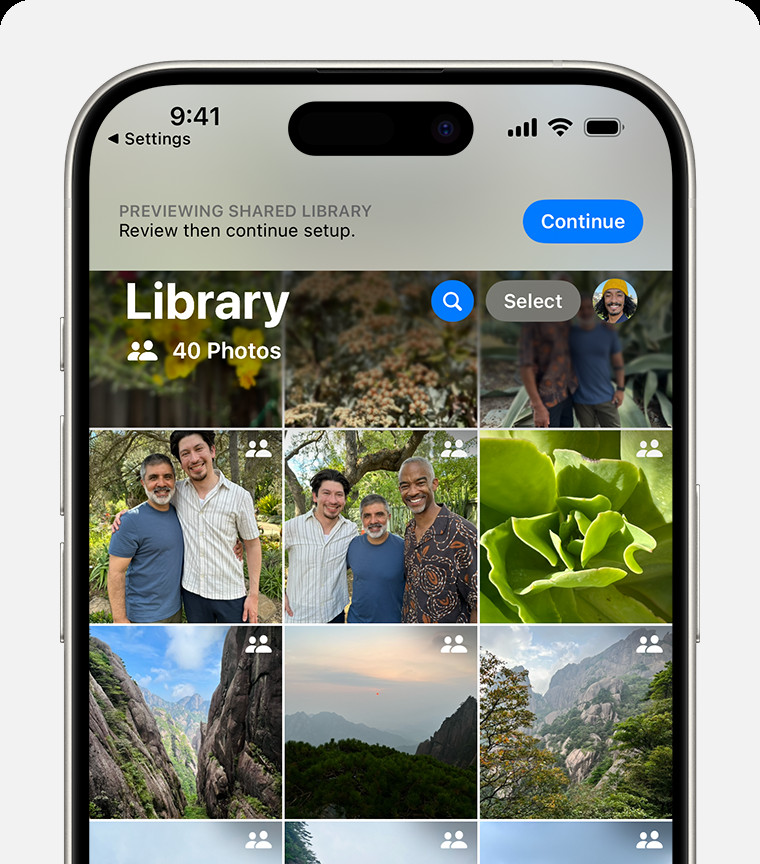 Access Shared Library settings through the Photos app on your iPhone
- Invite Participants:
- Choose up to five people to invite. You can also skip this step and add participants later.
- Select Content to Share:
- Choose past photos and videos to move to your Shared Library. Alternatively, you can opt to move photos later.
- Preview and Confirm:
- Follow the onscreen steps to preview your Shared Library, confirm the content, and invite additional participants.
2.3 Creating a Shared Library on Mac
- Open Photos Settings:
- Open the Photos app.
- In the menu bar, choose Photos > Settings.
- Click iCloud.
- Enable iCloud Photos:
- Ensure that iCloud Photos is turned on. If not, select it.
- Access Shared Library Settings:
- Click Shared Library, then click Get Started.
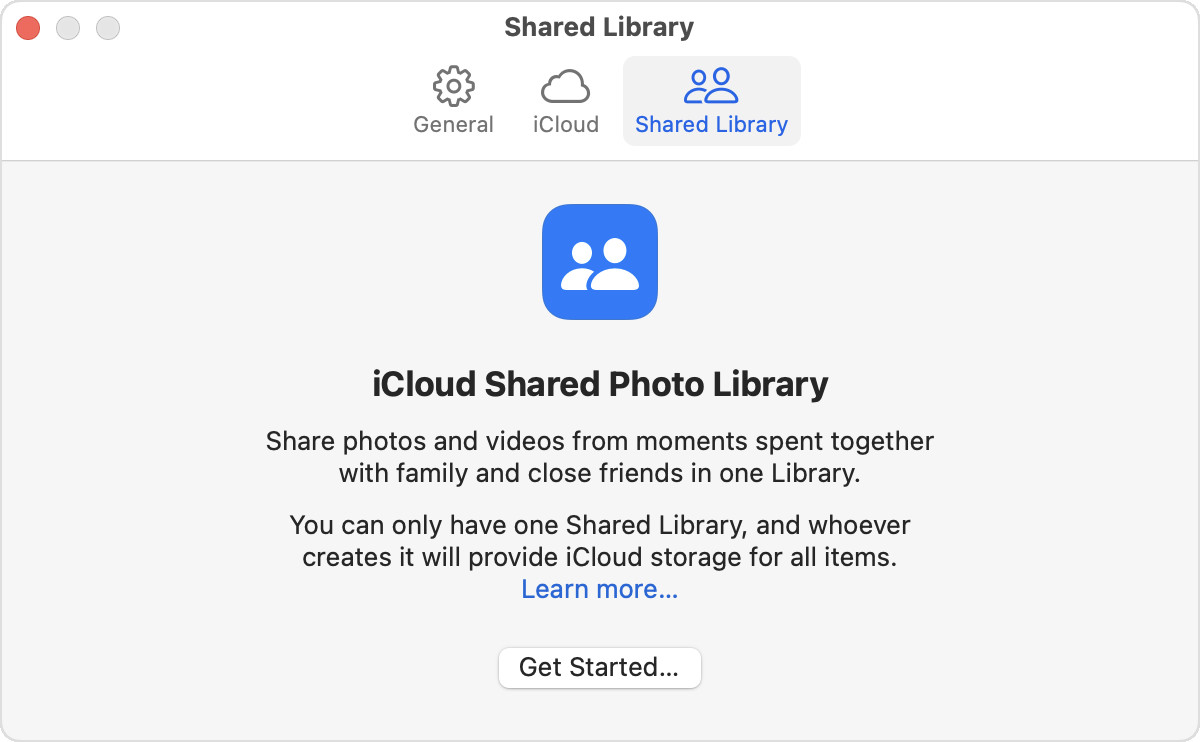 Access Shared Library settings through the Photos app on your Mac
- Invite Participants and Add Content:
- Follow the onscreen instructions to invite participants and add photos and videos.
3. Joining a Shared Library
If someone has invited you to join their Shared Library, the process is simple.
3.1 Joining on iPhone or iPad
- Open the Invitation:
- Open the invitation from the library creator.
- Alternatively, go to Settings > Photos > Shared Library.
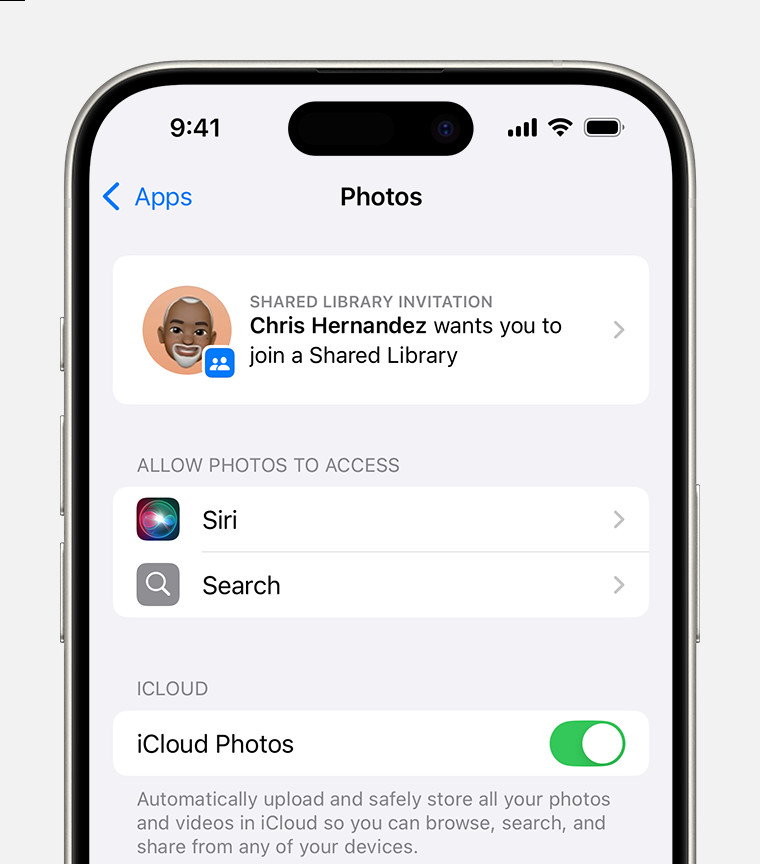 Find Shared Library invitations in the Photos section of your device Settings
- Accept the Invitation:
- Tap Accept & Continue.
- Select Content to Share:
- Choose photos and videos you want to move to your Shared Library, or choose to move photos later.
- Preview and Confirm:
- Follow the onscreen steps to preview your Shared Library content and confirm your selections.
3.2 Joining on Mac
- Open the Invitation:
- Open the invitation from the library creator.
- Alternatively, go to Photos > Settings, and click View Invitation.
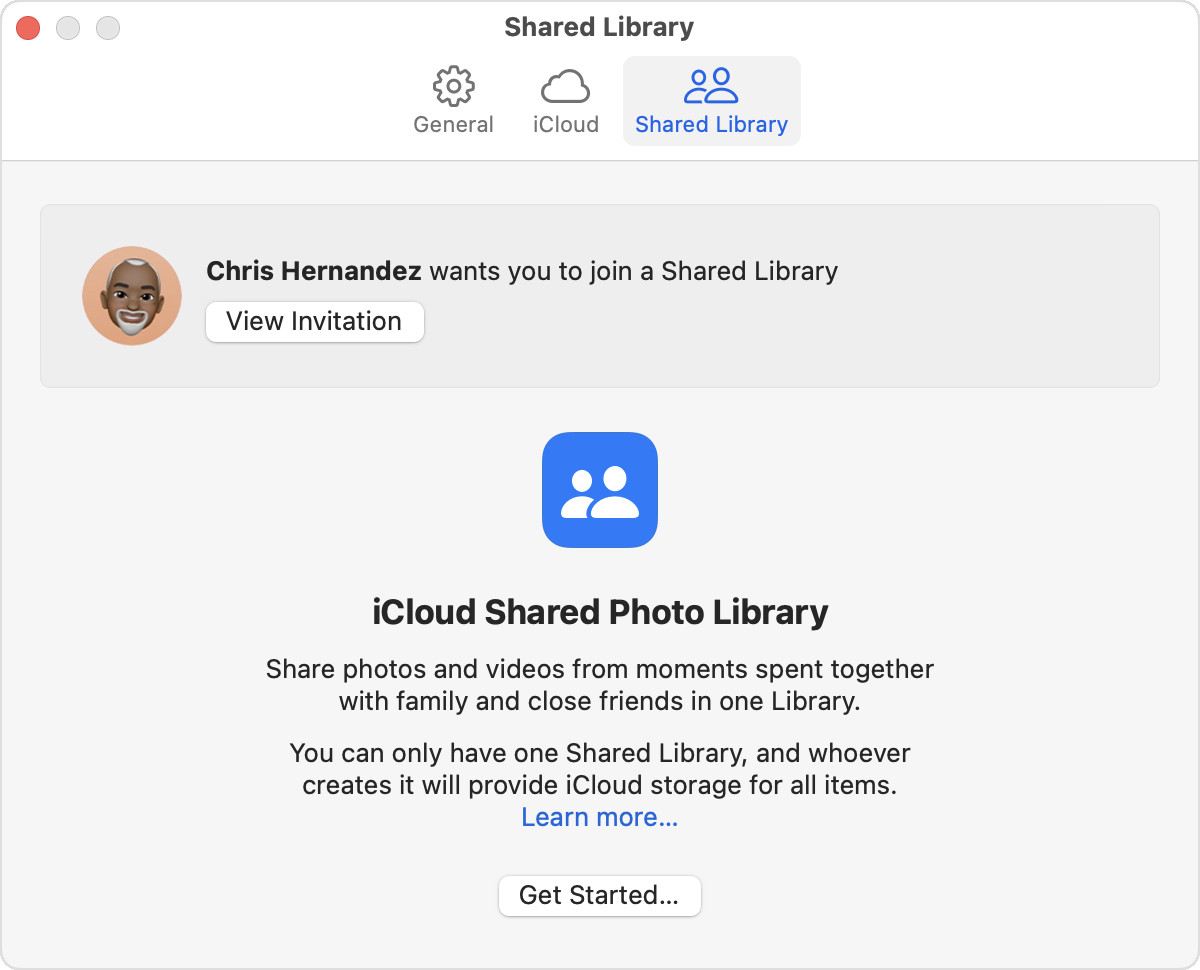 Find Shared Library invitations in the Settings of the Photos app on Mac
- Get Started:
- Click Get Started, then follow the onscreen steps to choose photos and videos you want to move to your Shared Library, or choose to move photos later.
- Preview and Confirm:
- Follow the onscreen steps to preview your Shared Library content and confirm your selections.
4. Using the Shared Library Effectively
Once your Shared Library is set up, understanding how to use it effectively is crucial.
4.1 Sharing Directly from the Camera on iPhone or iPad
To seamlessly share photos straight from your camera:
- Access Shared Library Settings:
- Go to Settings > Photos > Shared Library.
- Enable Sharing from Camera:
- Tap Sharing from Camera and ensure it’s turned on.
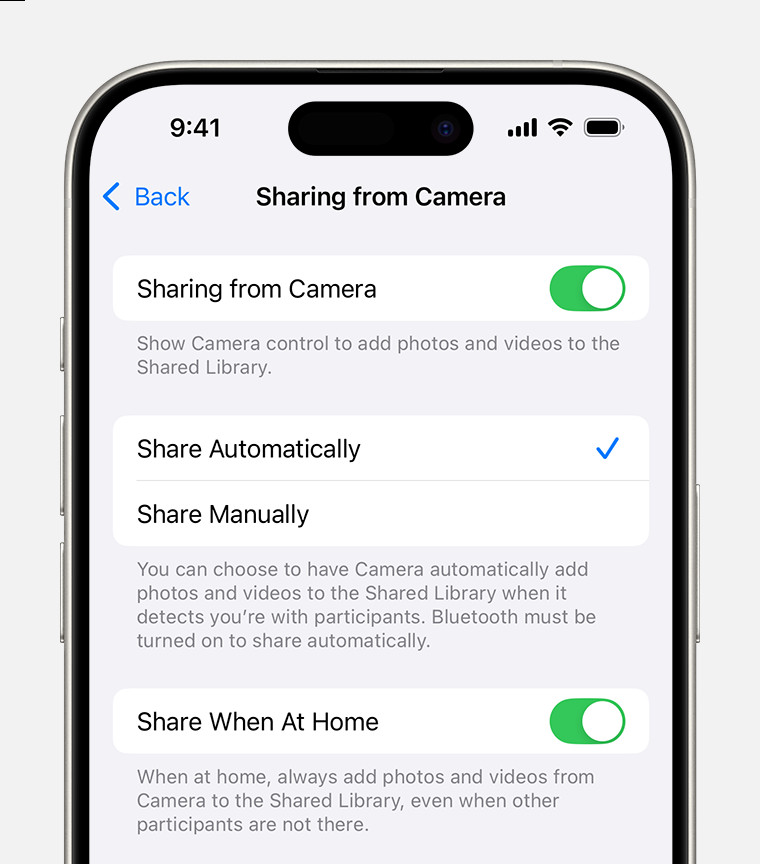 Enable Sharing from Camera to add a button in the Camera app
- Choose a Sharing Option:
- Share Automatically: The Camera app automatically adds photos when you’re near other participants.
- Share Manually: Choose when the Camera app adds photos to your Shared Library.
- Share When At Home: Automatically share photos taken at home.
- Use the Shared Library Button:
- In the Camera app, ensure the Shared Library button is turned on to send photos directly to your Shared Library. Tap to turn it off and send photos to your Personal Library.
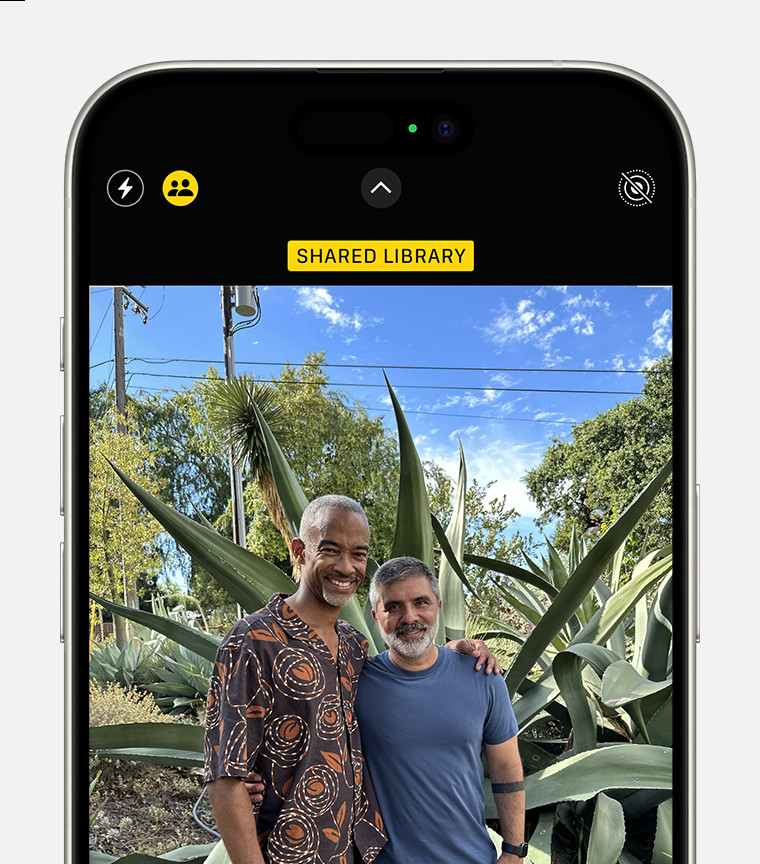 The Shared Library button at the top of the screen in the Camera app
4.2 Switching Between Libraries on iPhone or iPad
- Open the Photos App:
- Open the Photos app.
- Access Library View Options:
- Tap the profile button in the upper corner and scroll down to Library View Options.
- In iOS 17 or earlier, tap the button next to Select in the upper right corner of the Albums or Library tabs.
- Choose Your View:
- Select Personal Library, Shared Library, or Both Libraries.
 Choose between Personal Library, Shared Library, or Both Libraries under Library View Options
Photos in the Shared Library are marked with an icon in Both Libraries or Shared Library view. You can turn this off by tapping Shared Library Indicator.
4.3 Switching Between Libraries on Mac
- Open the Photos App:
- Open the Photos app.
- Select Your View:
- At the top, choose Personal Library, Shared Library, or Both Libraries.
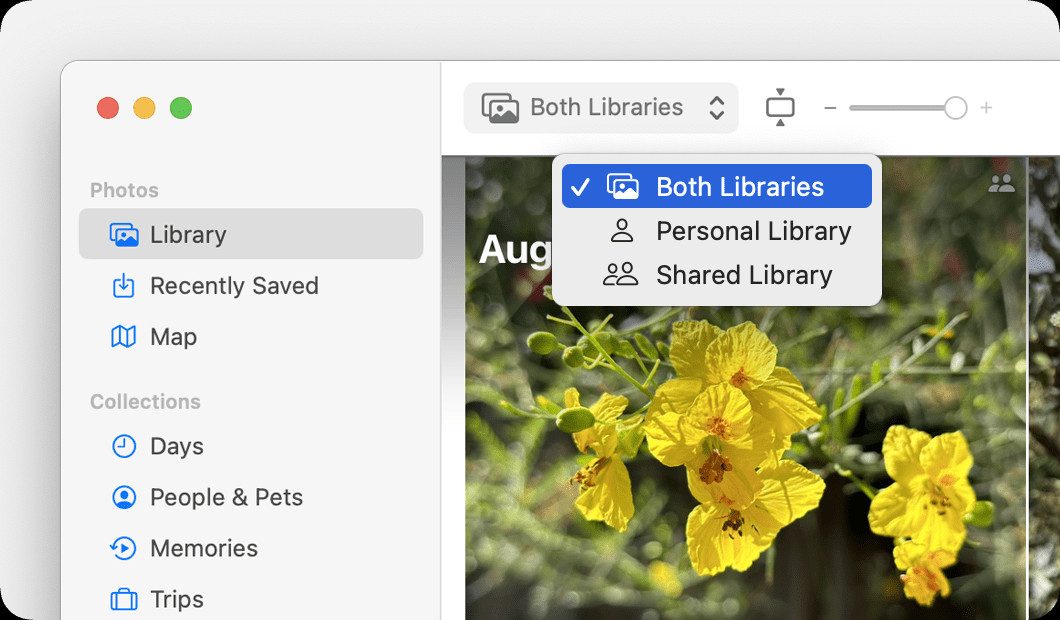 Toggle between Personal Library, Shared Library, and Both Libraries on Mac
Photos in the Shared Library are badged with an icon in Both Libraries or Shared Library view. To turn this off, choose View > Metadata > In Shared Library.
5. Leaving a Shared Library
You have the option to leave a Shared Library whenever you wish.
5.1 Leaving as the Creator
If you created the iCloud Shared Photo Library, you can remove participants or delete the entire library at any time. Deleting the Shared Library sends a notification to all participants. If a participant has been in the Shared Library for more than seven days, they receive all content from the Shared Library in their Personal Library. If they’ve been in the Shared Library for less than seven days, they only receive the photos and videos they contributed.
5.2 Leaving as a Participant
As a participant, you can leave the Shared Library at any time. You can choose to receive a copy of all content from the Shared Library in your Personal Library or just the content you contributed.
6. Troubleshooting Common Issues
While using iCloud Shared Photo Library, you might encounter some issues. Here are a few common problems and their solutions.
6.1 Photos Not Syncing
If your photos aren’t syncing to the Shared Library:
- Check iCloud Status: Ensure that iCloud Photos is turned on in your device settings.
- Verify Internet Connection: A stable internet connection is required for syncing.
- Check Storage: Make sure the library creator has enough iCloud storage.
- Restart Devices: Restarting your iPhone, iPad, or Mac can often resolve syncing issues.
6.2 Invitation Issues
If you’re having trouble inviting or accepting invitations:
- Check Apple ID: Ensure the correct Apple ID is being used.
- Verify Age Restrictions: For users under 13, Shared Libraries are restricted to Family Sharing groups.
- Resend Invitations: Try resending the invitation to ensure it was properly delivered.
6.3 Content Management Issues
If you’re facing issues with adding, editing, or deleting content:
- Permissions: Ensure you have the necessary permissions to modify content. All participants should have equal permissions.
- iCloud Settings: Double-check your iCloud settings to confirm that Shared Library is enabled.
7. Advanced Tips and Tricks
To maximize your experience with iCloud Shared Photo Library, consider these advanced tips:
7.1 Smart Suggestions
iCloud Photos provides smart suggestions for content to add to your Shared Library. These suggestions are based on factors such as location and the people in your photos, making it easier to share relevant memories.
7.2 Shared Album Integration
While iCloud Shared Photo Library is distinct from Shared Albums, you can still use Shared Albums for specific events or projects. Shared Albums are great for temporary sharing, whereas the Shared Library is designed for ongoing collaboration.
7.3 Metadata and Organization
Encourage all participants to add relevant metadata (captions, keywords, locations) to photos. This makes it easier to search and organize content within the Shared Library. Consistent organization helps everyone find the photos they’re looking for quickly.
8. Maximizing Your Photo Sharing Experience
Sharing photos with family and friends can be more than just a simple exchange of files. It’s about preserving memories, creating connections, and reliving special moments together. Here are some additional strategies to make your photo sharing experience even better.
8.1 Creating Themes and Collections
One way to add structure to your Shared Library is by creating themes or collections. For instance, you can create a collection for each year, significant events, or specific family members. This helps keep the library organized and makes it easier to find specific memories.
8.2 Encouraging Active Participation
To make the Shared Library a vibrant and engaging space, encourage all participants to actively contribute. This could involve setting a monthly challenge to add a certain number of photos, or creating collaborative albums for specific events.
8.3 Utilizing Third-Party Apps
While iCloud Shared Photo Library is excellent, there are also third-party apps that can enhance your photo sharing experience. Apps like Google Photos and Dropbox offer additional features such as advanced editing tools, face recognition, and more storage options.
9. Understanding the Legal and Ethical Aspects of Photo Sharing
When sharing photos, it’s essential to be aware of the legal and ethical considerations involved. This includes respecting privacy, obtaining consent, and understanding copyright laws.
9.1 Respecting Privacy
Always respect the privacy of individuals in your photos. Avoid sharing images that might be embarrassing or compromising without their consent. It’s a good practice to ask for permission before sharing photos of others, especially if they are not part of your immediate family.
9.2 Obtaining Consent
Before sharing photos of minors or individuals who may not be able to provide consent, make sure to obtain permission from their parents or guardians. This is particularly important when sharing photos online or on social media platforms.
9.3 Understanding Copyright Laws
Be aware of copyright laws when sharing photos taken by professional photographers or images found online. You may need to obtain permission or licenses to share copyrighted material legally.
10. The Future of Photo Sharing
As technology continues to evolve, so too will the methods and platforms we use for sharing photos. Here are some emerging trends and future possibilities in the realm of photo sharing.
10.1 AI-Powered Photo Management
Artificial intelligence (AI) is already playing a significant role in photo management, with features like automatic tagging, facial recognition, and smart suggestions. In the future, AI could further enhance photo sharing by automatically creating albums, generating captions, and even suggesting the best moments to share. According to research from the Santa Fe University of Art and Design’s Photography Department, in July 2025, AI photo editing tools will provide automated RAW image optimization.
10.2 Augmented Reality (AR) Integration
Augmented reality (AR) could transform the way we interact with shared photos. Imagine being able to overlay digital information onto physical prints, or creating interactive photo albums that come to life with AR animations.
10.3 Blockchain-Based Photo Sharing
Blockchain technology could provide a secure and transparent way to share photos, ensuring that ownership and permissions are properly managed. This could be particularly useful for professional photographers and artists who want to protect their intellectual property.
11. Conclusion
Sharing photos with family using iCloud Shared Photo Library is an excellent way to keep everyone connected and involved in each other’s lives. By following the steps outlined in this guide, you can set up and use the Shared Library effectively, troubleshoot common issues, and explore advanced tips to maximize your experience. Whether you’re a seasoned photographer or just starting out, these tools and techniques can help you preserve and share your precious memories with ease.
Ready to dive deeper into the world of photography and photo sharing? Visit dfphoto.net for more tutorials, tips, and inspiration. Discover new techniques, explore stunning photography, and connect with a vibrant community of photography enthusiasts. Don’t just take photos; share them in meaningful ways.
FAQ: Sharing Photos with Family Sharing
1. What is iCloud Shared Photo Library?
iCloud Shared Photo Library is a feature that allows you to share photos and videos seamlessly with up to five other people, so everyone can collaborate on the collection and enjoy more complete memories. It is designed to consolidate family photos into a single, shared space.
2. How many people can I share my iCloud Photo Library with?
You can share your iCloud Photo Library with up to five other people through Family Sharing, making it easy for close family members to collaborate and share memories. This limit ensures manageable contribution and viewing.
3. What devices are compatible with iCloud Shared Photo Library?
iCloud Shared Photo Library is compatible with devices running iOS 16.1, iPadOS 16.1, or macOS Ventura or later, ensuring a wide range of Apple devices can access and contribute to the shared library. Keeping your devices updated is crucial for optimal functionality.
4. How do I create a Shared Library on my iPhone?
To create a Shared Library on your iPhone, go to Settings > Photos > Shared Library, then follow the onscreen instructions to invite participants and choose photos and videos to share. This streamlined process makes setup quick and easy.
5. Can everyone in the Shared Library edit and delete photos?
Yes, all participants in the Shared Library have equal permissions to add, edit, and delete content, promoting collaborative management of the shared memories. This shared access ensures everyone can keep the library up-to-date.
6. What happens when I delete a photo from the Shared Library?
When you delete a photo from the Shared Library, it is deleted for all participants, so it’s important to communicate before making any major changes to ensure everyone is on the same page. Deleted photos can usually be recovered from the Recently Deleted album if needed.
7. How do I switch between my Personal Library and the Shared Library on my Mac?
To switch between your Personal Library and the Shared Library on your Mac, open the Photos app and choose Personal Library, Shared Library, or Both Libraries at the top of the screen for easy viewing. This simple toggle allows you to focus on different photo collections as needed.
8. What if I want to leave a Shared Library?
If you want to leave a Shared Library, you can do so at any time. You can choose to receive a copy of everything from the Shared Library in your Personal Library, or just what you contributed, providing flexibility in managing your photo collections.
9. How do I ensure my photos are automatically shared to the Shared Library?
To ensure your photos are automatically shared, go to Settings > Photos > Shared Library > Sharing from Camera, and choose Share Automatically or Share When At Home for seamless integration, enhancing convenience. This feature is particularly useful for capturing spontaneous moments with family.
10. Is there a way to suggest photos to add to the Shared Library?
Yes, iCloud Photos provides smart suggestions for content to add to your Shared Library based on factors such as location and the people in your photos, making it easier to share relevant memories. These suggestions can help ensure important moments are not missed in the shared collection.
Visit dfphoto.net for more photography tips, tricks, and tutorials.
