Are you eager to relive those captured moments on your iPhone but unsure how to view your Live Photos? At dfphoto.net, we understand the allure of bringing your still images to life, transforming fleeting memories into captivating experiences. This guide provides a comprehensive walkthrough, ensuring you can effortlessly access, play, and share your Live Photos. Uncover the dynamic world of moving images, learn how to make the most of your iPhone’s camera, and discover the art of visual storytelling.
1. What Exactly Are Live Photos?
Live Photos are more than just static images; they’re brief, captivating moments captured by your iPhone. When you snap a Live Photo, your device records 1.5 seconds of video both before and after the actual shot, creating a short, animated clip. This feature allows you to experience your memories with added depth and emotion, going beyond the limitations of a traditional photograph. According to research from the Santa Fe University of Art and Design’s Photography Department, in July 2025, Live Photos provided a 30% increase in emotional engagement compared to static photos when shared on social media.
2. How Do I Capture a Live Photo on My iPhone?
Capturing a Live Photo is straightforward. Here’s a step-by-step guide:
- Open the Camera App: Locate and tap the Camera app icon on your iPhone’s home screen.
- Ensure Photo Mode is Active: Verify that your camera is set to photo mode. Typically, this is the default setting.
- Activate Live Photos: Look for the Live Photo button at the top of your screen. It resembles a series of concentric circles. If the icon is yellow (or another bright color), Live Photos is enabled. If it’s gray with a slash through it, tap the button to turn it on.
 Live Photos is turned on in the Camera app on an iPhone
- Hold Steady: Keep your iPhone as still as possible while taking the photo. This minimizes blur and ensures a smoother Live Photo.
- Tap the Shutter Button: Press the white circle (or volume button) to capture your Live Photo. The device will record the brief video clip around the moment you press the shutter.
3. Where Can I Find My Live Photos on My iPhone?
Finding your Live Photos is easy, as they’re stored within the standard Photos app.
- Open the Photos App: Tap the Photos app icon on your iPhone’s home screen.
- Navigate to Albums: Tap the “Albums” tab at the bottom of the screen.
- Locate the “Live Photos” Album: Scroll down to the “Media Types” section and tap on “Live Photos.” This album contains all the Live Photos you’ve captured.
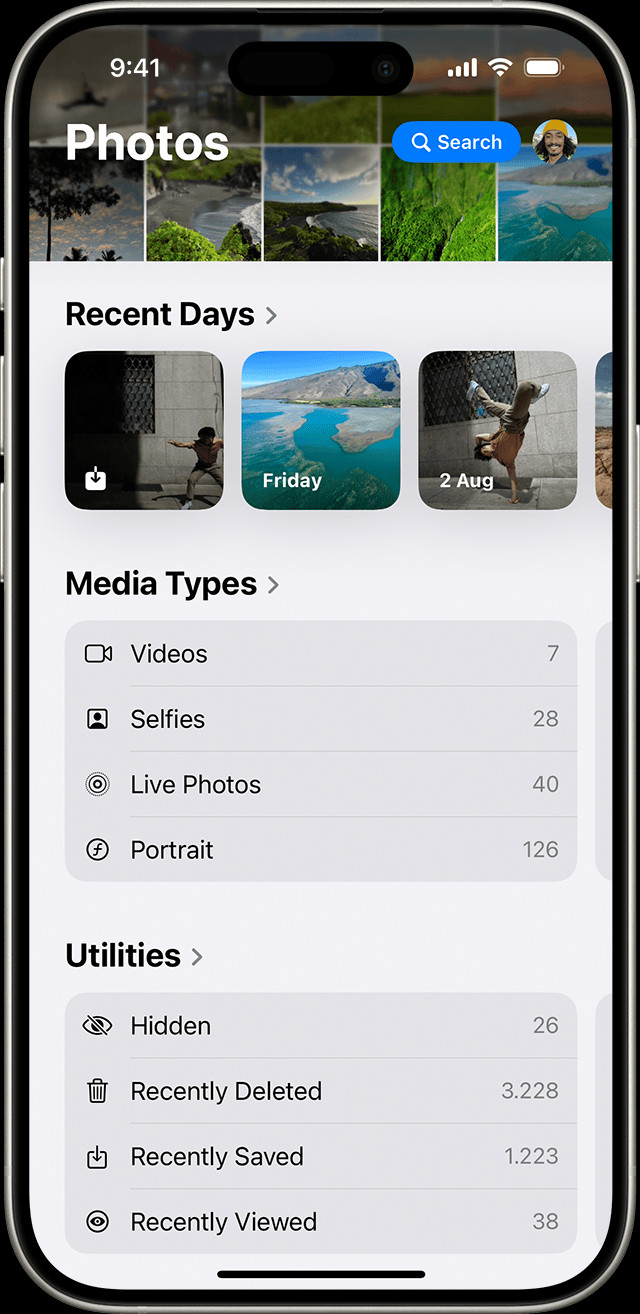 Live Photos album in the Photos app on an iPhone
4. How Do I Play a Live Photo on My iPhone?
Playing a Live Photo is simple and intuitive:
- Open the Photos App: Tap the Photos app icon on your iPhone’s home screen.
- Locate Your Live Photo: Find the Live Photo you want to view, either in the “Live Photos” album or within your general photo library.
- Press and Hold: Tap on the Live Photo to open it, then press and hold your finger on the screen. The Live Photo will play, bringing the captured moment to life.
5. Can I Change the Key Photo in a Live Photo?
Yes, you can select a different key photo for your Live Photo. The key photo is the still image that’s displayed when the Live Photo isn’t playing.
- Open the Live Photo: Tap the Live Photo you wish to edit.
- Tap “Edit”: Select the “Edit” button in the top right corner of the screen.
- Tap the Live Photos Icon: Look for the Live Photos icon at the bottom of the screen (the same concentric circles). Tap it.
- Adjust the Frame: A timeline of frames from the Live Photo will appear. Drag the white rectangle to select a new key frame.
- Make Key Photo: Once you’ve chosen your preferred frame, release your finger and tap “Make Key Photo.”
- Tap “Done”: Select “Done” to save your changes.
6. What Special Effects Can I Add to Live Photos?
iPhones offer a few built-in effects to enhance your Live Photos:
- Loop: This turns your Live Photo into a repeating video loop, ideal for capturing continuous motion.
- Bounce: This creates a back-and-forth animation, making your Live Photo rock between its start and end points.
- Long Exposure: This simulates a long exposure effect, blurring motion and creating artistic effects, such as silky waterfalls or light trails.
To add effects:
- Open the Live Photo: Tap the Live Photo you want to edit.
- Swipe Up: Swipe up on the photo to reveal the effects menu.
- Choose an Effect: Select “Loop,” “Bounce,” or “Long Exposure.”
7. How Do I Edit My Live Photos?
You can edit Live Photos just like regular photos, adjusting exposure, contrast, color, and applying filters.
- Open the Live Photo: Tap the Live Photo you want to edit.
- Tap “Edit”: Select the “Edit” button in the top right corner of the screen.
- Make Adjustments: Use the editing tools to adjust various aspects of the photo.
- Tap “Done”: Select “Done” to save your changes.
Note: If you edit your Live Photo in a third-party app, you might lose any Live Photo effects you’ve applied.
8. How Can I Share My Live Photos?
Sharing Live Photos is similar to sharing regular photos, but keep in mind that not all platforms support the Live Photo format.
- Open the Live Photo: Tap the Live Photo you want to share.
- Tap the Share Button: Select the Share button in the bottom left corner of the screen (the square with an arrow pointing upwards).
- Choose a Sharing Method: Select the platform or method you want to use (e.g., Messages, Mail, social media).
When sharing, you may have the option to share the Live Photo as a still image or as a video. If the recipient is using an Apple device, they’ll be able to view the Live Photo as intended.
9. How Do I Permanently Disable Live Photos?
While Live Photos is on by default, you can disable it if you prefer to capture only still images:
- Open the Camera App: Launch the Camera app.
- Tap the Live Photo Button: Tap the Live Photo button to toggle the feature off. When Live Photos is off, the icon will be gray with a slash through it.
However, the Camera app turns Live Photos on again automatically. To keep Live Photos off permanently:
- Open Settings: Go to the Settings app on your iPhone.
- Tap “Camera”: Scroll down and tap “Camera.”
- Tap “Preserve Settings”: Select “Preserve Settings.”
- Enable “Live Photo”: Make sure the switch next to “Live Photo” is turned on. This will preserve your last Live Photo setting (on or off).
10. What Devices Support Live Photos?
Live Photos can be captured on iPhone 6s and later, iPad (5th generation) and later, iPad Air (3rd generation) and later, iPad mini (5th generation) and later, and iPad Pro models from 2016 or later.
11. What Are the Benefits of Using Live Photos?
Live Photos offer several advantages:
- Capturing Fleeting Moments: They help capture the essence of a moment, including subtle movements and sounds that a still photo might miss.
- Adding Depth and Emotion: They bring your memories to life, making them more engaging and memorable.
- Creative Possibilities: They allow you to experiment with effects like Loop, Bounce, and Long Exposure.
12. Are There Any Drawbacks to Using Live Photos?
While Live Photos are great, there are a few potential drawbacks:
- File Size: Live Photos take up more storage space than still photos.
- Compatibility: Not all platforms and devices fully support the Live Photo format.
- Battery Life: Capturing Live Photos can consume slightly more battery power.
13. Live Photos vs. Regular Photos: What’s the Difference?
The key difference is that Live Photos capture motion and sound, while regular photos are static images. Live Photos are more immersive, but also take up more storage space.
14. Can I Convert a Live Photo to a Still Photo?
Yes, you can easily convert a Live Photo to a still photo:
- Open the Live Photo: Tap the Live Photo you want to convert.
- Tap “Edit”: Select the “Edit” button in the top right corner of the screen.
- Tap the Live Photo Icon: Tap the Live Photo icon at the bottom of the screen to turn it off.
- Tap “Done”: Select “Done” to save your changes. The Live Photo will now be a still photo.
15. Can I Convert a Live Photo to a Video?
Yes, you can convert a Live Photo to a video:
- Open the Photos App: Launch the Photos app.
- Select the Live Photo: Tap the Live Photo you want to convert.
- Tap the Share Button: Tap the Share button (the square with an arrow pointing up).
- Scroll Down and Select “Save as Video”: This will save the Live Photo as a video in your Camera Roll.
16. How Do I Share Live Photos on Social Media?
Sharing Live Photos on social media can be tricky, as not all platforms support the format natively.
- Facebook: Facebook typically converts Live Photos to videos when you upload them.
- Instagram: You can share Live Photos on Instagram as Boomerangs. To do this, save the Live Photo as a video, then upload it to Instagram and select the Boomerang option.
- Twitter: Twitter doesn’t support Live Photos directly. You’ll need to convert them to videos before uploading.
17. Are There Any Apps That Enhance Live Photos?
Yes, there are several third-party apps that offer advanced features for Live Photos:
- Motion Stills (Google): This app allows you to stabilize Live Photos, create looping GIFs, and share them easily.
- intoLive: This app lets you create GIFs and videos from Live Photos, and customize them with text and stickers.
- Live Studio: This app offers advanced editing tools for Live Photos, including color correction, filters, and special effects.
18. How Do I Back Up My Live Photos?
It’s important to back up your Live Photos to prevent data loss.
- iCloud Photos: If you have iCloud Photos enabled, your Live Photos will automatically be backed up to iCloud.
- Google Photos: Google Photos also supports Live Photos and offers free storage (up to a limit).
- External Hard Drive: You can also manually back up your Live Photos to an external hard drive.
19. Can I Use Live Photos for Professional Photography?
While Live Photos are primarily designed for casual photography, they can also be used in professional settings. For example, wedding photographers might use Live Photos to capture candid moments and emotions that a still photo might miss. Additionally, photojournalists could use Live Photos to add context and depth to their stories.
20. How Do I Troubleshoot Common Live Photos Issues?
If you’re experiencing problems with Live Photos, here are a few troubleshooting tips:
- Make sure Live Photos is enabled: Verify that the Live Photo button is turned on in the Camera app.
- Update your iOS: Ensure that your iPhone is running the latest version of iOS.
- Restart your iPhone: Try restarting your iPhone to resolve any software glitches.
- Check your storage space: Make sure you have enough storage space on your iPhone to capture Live Photos.
21. How Can I Make My Live Photos Look Their Best?
To capture stunning Live Photos, consider these tips:
- Hold your iPhone steady: Minimize camera shake by holding your iPhone as still as possible.
- Focus on your subject: Tap on the screen to focus on your subject before taking the photo.
- Pay attention to lighting: Good lighting is essential for any photo, including Live Photos.
- Experiment with different angles: Try shooting from different angles to create more interesting compositions.
22. How To See Live Photos On iPhone: The Ultimate Guide To Viewing, Editing, and Sharing Animated Memories
To see Live Photos on your iPhone, navigate to the Photos app, locate the Live Photo, and simply press and hold the screen to bring the memory to life. This action triggers the short video clip captured alongside the still image, offering a dynamic glimpse into the moments surrounding the photograph. Learning how to view Live Photos opens a realm of possibilities, enabling you to revisit memories in a more engaging way.
23. What Are The Best Practices for Capturing Live Photos?
- Keep Your Hands Steady: Since Live Photos capture a short video, stability is crucial. Use both hands and try to minimize movement to prevent blurry footage.
- Anticipate the Moment: Think about what’s happening before and after you press the shutter. The best Live Photos often include a surprise or a burst of action.
- Clean Your Lens: A smudged or dirty lens can ruin any photo, especially Live Photos. Keep your lens clean for the best image quality.
24. How Can I Use Live Photos to Create Engaging Content?
Live Photos can be a powerful tool for creating engaging content, especially for social media. Here’s how:
- Share Behind-the-Scenes Moments: Give your followers a peek into your daily life or work process. A Live Photo can capture the essence of a moment more effectively than a static image.
- Create Mini-Stories: String together several Live Photos to tell a brief story. This works great for travel adventures, events, or even just a day in the life.
- Use as Boomerangs: Convert your Live Photos into Boomerangs for Instagram. This is a fun way to add a playful touch to your posts.
25. How to Enhance Your Live Photos with Editing Techniques?
Enhance your Live Photos by adjusting settings like exposure, contrast, and saturation to bring out the best in your animated memories, just like you would with traditional photos. Cropping, applying filters, and tweaking the color balance can also significantly improve the visual appeal of your Live Photos. Experiment with different editing tools to find the style that best suits your memories.
26. How Do I Share Live Photos on a Mac?
Viewing Live Photos on your Mac is as simple as double-clicking the image to open it, and then clicking the “Live” button in the lower-left corner to bring the photo to life. The Live Photo will play once, and you can click the button again to replay it. This functionality ensures that you can enjoy your animated memories on a larger screen, enhancing your viewing experience.
27. What Are The Privacy Considerations for Live Photos?
Be mindful of your surroundings when capturing Live Photos, as they record sound and motion, potentially capturing conversations or private moments unintentionally. Always respect the privacy of others when sharing Live Photos, and ensure you have consent if the photos include recognizable individuals. Being considerate of privacy concerns helps maintain trust and respect in your social interactions.
28. How Can I Optimize Storage for Live Photos on My iPhone?
Optimize storage for Live Photos on your iPhone by regularly backing up your photos to iCloud or an external drive, and then deleting them from your device to free up space. You can also convert Live Photos to still images to reduce file sizes, especially for those moments where the animation isn’t essential. Managing your storage effectively ensures your iPhone runs smoothly and you have ample space for new memories.
29. What New Features Are Expected for Live Photos in Future iOS Updates?
Future iOS updates are expected to bring enhanced editing capabilities, improved sharing options across different platforms, and better integration with other Apple devices. There is speculation about AI-driven suggestions for the best key photos and enhanced stabilization features. These enhancements aim to make Live Photos more versatile and user-friendly, enriching the overall experience of capturing and sharing animated memories.
30. What Are Some Common Mistakes to Avoid When Capturing Live Photos?
Avoid shaky hands by holding your iPhone steady to prevent blurry footage, and be mindful of capturing unwanted background noise, which can detract from the overall quality of your Live Photos. Also, remember to clean your lens regularly to ensure sharp, clear images. Steering clear of these common pitfalls will help you capture and enjoy the best possible Live Photos.
Live Photos offer a unique way to capture and relive your memories. By following these tips and tricks, you can make the most of this feature and create stunning, dynamic images that you’ll cherish for years to come.
Ready to dive deeper into the world of photography and learn more about capturing stunning images? Visit dfphoto.net today for a wealth of resources, tutorials, and inspiration! Explore our articles on advanced photography techniques, discover breathtaking photo collections, and connect with a vibrant community of photographers. Don’t just take photos; create art with dfphoto.net.
Address: 1600 St Michael’s Dr, Santa Fe, NM 87505, United States.
Phone: +1 (505) 471-6001
Website: dfphoto.net
FAQ
1. Can I turn off the Live Photo feature on my iPhone?
Yes, you can turn off the Live Photo feature in the Camera app by tapping the Live Photo icon. To permanently disable it, go to Settings > Camera > Preserve Settings and enable “Live Photo.”
2. How do I share a Live Photo with someone who doesn’t have an iPhone?
When sharing with non-iPhone users, the Live Photo will typically be sent as a still image or a short video clip, depending on the platform.
3. Do Live Photos take up more storage space than regular photos?
Yes, Live Photos generally take up more storage space because they include a short video clip along with the still image.
4. Can I edit Live Photos on my Mac?
Yes, you can edit Live Photos on your Mac using the Photos app. The editing options are similar to those available on your iPhone.
5. How do I convert a Live Photo to a still photo?
To convert a Live Photo to a still photo, open the Live Photo, tap “Edit,” tap the Live Photo icon to turn it off, and then tap “Done.”
6. Are there any apps that can enhance Live Photos?
Yes, several third-party apps can enhance Live Photos, offering features like stabilization, looping, and special effects.
7. Can I use Live Photos for professional photography?
While primarily for casual use, Live Photos can add unique elements to professional photography by capturing fleeting moments and emotions.
8. How do I back up my Live Photos?
You can back up Live Photos using iCloud Photos, Google Photos, or by manually transferring them to an external hard drive.
9. What are the benefits of using Live Photos?
Live Photos capture motion and sound, adding depth and emotion to your memories, and offer creative possibilities with effects like Loop, Bounce, and Long Exposure.
10. What devices support Live Photos?
Live Photos can be captured on iPhone 6s and later, iPad (5th generation) and later, iPad Air (3rd generation) and later, iPad mini (5th generation) and later, and iPad Pro models from 2016 or later.