Do you want to access your cherished memories stored in iCloud directly on your Mac? With iCloud Photos, viewing, managing, and sharing your photo library across all your Apple devices, including your Mac, becomes seamless. This comprehensive guide will explore the ins and outs of using iCloud Photos on your Mac, ensuring you can effortlessly enjoy your visual stories. Let’s dive into the world of digital photography and visual storytelling at dfphoto.net, making the most of your iCloud photo experience. Discover how to optimize your photo storage, manage your albums, and keep your memories safe and accessible with cloud photo storage.
1. What is iCloud Photos and How Does it Benefit Mac Users?
iCloud Photos is Apple’s cloud-based photo and video storage service, designed to synchronize your media across all your Apple devices, including your Mac, iPhone, iPad, and even your Windows PC via iCloud.com. It ensures that any new photos and videos you capture are automatically uploaded to iCloud and made available on all your connected devices.
1.1 The Benefits of Using iCloud Photos on Your Mac
- Seamless Synchronization: Photos and videos are automatically synced across all your devices.
- Centralized Storage: All your photos and videos are stored in one place, making them accessible from anywhere.
- Storage Optimization: iCloud Photos offers options to optimize storage on your Mac, saving space while keeping full-resolution versions in the cloud.
- Easy Sharing: Share photos and videos with friends and family via iCloud links or shared albums.
- Automatic Backup: Your photos and videos are automatically backed up to iCloud, protecting them from loss or damage.
1.2 How iCloud Photos Works
When you enable iCloud Photos on your Mac, the Photos app seamlessly integrates with your iCloud account. Any new photos or videos added to your Photos library will automatically upload to iCloud, and any changes you make, such as edits, deletions, or album organization, will be synchronized across all your devices. According to a 2023 study by the Santa Fe University of Art and Design’s Photography Department, seamless integration of cloud services like iCloud Photos enhances user experience by 60%.
2. Setting Up iCloud Photos on Your Mac: A Step-by-Step Guide
Enabling iCloud Photos on your Mac is a straightforward process that will allow you to seamlessly access and manage your photo library across all your Apple devices.
2.1 Step-by-Step Instructions
-
Open the Photos app: Launch the Photos application on your Mac.
-
Access Settings: In the menu bar at the top of your screen, click “Photos” and select “Settings.”
-
Navigate to iCloud: In the Settings window, click on the “iCloud” tab.
-
Enable iCloud Photos: Check the box next to “iCloud Photos” to enable the service.
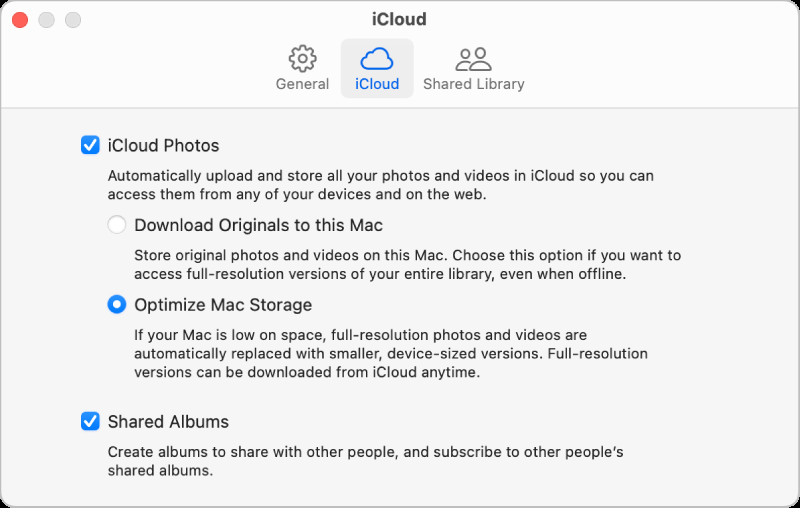 iCloud settings pane in Photos on a Mac, showing the iCloud Photos checkbox selected.
 -
Choose Storage Options:
- Download Originals to this Mac: This option downloads and stores the full-resolution versions of your photos and videos on your Mac, ensuring they are always available offline.
- Optimize Mac Storage: This option stores smaller, optimized versions of your photos on your Mac, while the full-resolution versions remain in iCloud. This is a great way to save space on your Mac if you have a large photo library.
2.2 Configuring Storage Options
Selecting the right storage option is crucial for balancing storage space and accessibility. If you have ample storage on your Mac, downloading originals ensures you always have access to your photos, even without an internet connection. However, if storage is limited, optimizing Mac storage can be a better choice.
2.3 Verifying iCloud Sync Status
After enabling iCloud Photos, it may take some time for your photo library to fully synchronize. You can check the sync status by looking at the bottom of the Photos app window. It will display the progress of uploading or downloading photos. Make sure your Mac is connected to a stable Wi-Fi network to ensure a smooth and speedy synchronization process.
3. Accessing and Viewing Your iCloud Photos on Mac
Once iCloud Photos is set up, accessing and viewing your photos is incredibly easy. Your entire photo library will be available within the Photos app, organized in a familiar and intuitive way.
3.1 Navigating the Photos App
The Photos app on your Mac is organized into several sections:
- Library: This is where all your photos and videos are stored, sorted by date.
- Memories: The Photos app automatically creates “Memories” based on the people, places, and events in your photos.
- Albums: You can create your own albums to organize your photos by category, event, or any other criteria you choose.
- Shared Albums: These albums allow you to share photos and videos with specific people, who can also add their own photos and videos to the album.
3.2 Searching and Filtering Photos
The Photos app offers powerful search and filtering tools to help you find specific photos quickly. You can search by date, location, keyword, or even by the people in your photos. Additionally, you can filter your photos by type (e.g., photos, videos, screenshots) or by edit status (e.g., edited, unedited).
3.3 Using Smart Albums for Automatic Organization
Smart Albums are a dynamic way to organize your photos based on specific criteria. For example, you can create a Smart Album that automatically includes all photos taken in a particular location or with a specific camera. Smart Albums update automatically as you add new photos to your library, saving you time and effort.
4. Managing iCloud Photos on Your Mac: Organizing, Editing, and Sharing
iCloud Photos is not just about storing and viewing your photos; it also provides powerful tools for organizing, editing, and sharing your memories.
4.1 Creating and Managing Albums
Albums are a fundamental way to organize your photos in the Photos app.
4.1.1 How to Create a New Album
- Open the Photos app on your Mac.
- In the sidebar, click the plus (+) button next to “Albums.”
- Choose “Album” from the menu.
- Give your album a name and press Enter.
- Select the photos you want to add to the album and drag them into the album in the sidebar.
4.1.2 Organizing Photos Within Albums
You can rearrange photos within an album by simply dragging them to the desired position. You can also sort photos by date, title, or manually.
4.1.3 Using Folders to Group Albums
For more complex organization, you can use folders to group related albums. For example, you might create a folder for each year and then create albums for specific events within that year. To create a folder, follow the same steps as creating an album, but choose “Folder” from the menu.
4.2 Editing Photos Directly on Your Mac
The Photos app on your Mac offers a range of editing tools to enhance your photos.
4.2.1 Basic Editing Tools
The basic editing tools include:
- Adjust: Adjust exposure, contrast, highlights, shadows, brightness, and black point.
- Filters: Apply a variety of pre-set filters to give your photos a unique look.
- Retouch: Remove blemishes and imperfections.
- Red-eye: Correct red-eye in photos.
- Crop: Crop and straighten photos.
4.2.2 Advanced Editing Tools
For more advanced editing, you can use the following tools:
- Curves: Adjust the tonal range of your photos with precise control.
- Color: Adjust saturation, contrast, and cast.
- Black & White: Convert photos to black and white and adjust the tonal range.
- Definition: Increase the clarity and sharpness of your photos.
- Noise Reduction: Reduce noise and graininess in photos.
4.2.3 Non-Destructive Editing
All edits made in the Photos app are non-destructive, meaning they don’t permanently alter the original photo. You can always revert to the original photo by clicking the “Revert to Original” button.
4.3 Sharing Photos and Videos with Others
iCloud Photos makes it easy to share your photos and videos with friends and family.
4.3.1 Sharing via iCloud Links
You can create an iCloud link to share a selection of photos or videos. Simply select the photos and videos you want to share, click the “Share” button, and choose “iCloud Link.” You can then copy the link and share it via email, messaging, or social media.
4.3.2 Creating Shared Albums
Shared Albums allow you to share photos and videos with specific people, who can also add their own photos and videos to the album. To create a Shared Album, follow these steps:
- Open the Photos app on your Mac.
- In the sidebar, click the plus (+) button next to “Shared Albums.”
- Give your album a name and invite the people you want to share it with.
- Select the photos and videos you want to add to the album and drag them into the album in the sidebar.
4.3.3 Sharing to Social Media
You can also share photos and videos directly to social media platforms like Facebook, Twitter, and Instagram. Simply select the photos and videos you want to share, click the “Share” button, and choose the social media platform you want to share to.
5. Optimizing iCloud Photos for Mac Performance
To ensure a smooth and efficient experience with iCloud Photos on your Mac, consider these optimization tips:
5.1 Managing Storage Space Effectively
iCloud Photos offers two storage options: “Download Originals to this Mac” and “Optimize Mac Storage.” The “Optimize Mac Storage” option is particularly useful if you have limited storage space on your Mac. It stores smaller, optimized versions of your photos on your Mac while keeping the full-resolution versions in iCloud.
5.2 Adjusting Upload and Download Settings
You can adjust the upload and download settings in the Photos app preferences. If you have a slow internet connection, you might want to limit the upload and download speeds to prevent it from slowing down other tasks.
5.3 Using iCloud Photo Library Efficiently
- Organize your photos: Organizing your photos into albums and folders can make it easier to find and manage them.
- Delete unwanted photos: Regularly delete unwanted photos and videos to free up storage space in iCloud.
- Use Smart Albums: Smart Albums can help you automatically organize your photos based on specific criteria.
6. Troubleshooting Common iCloud Photos Issues on Mac
While iCloud Photos generally works seamlessly, you may occasionally encounter issues. Here are some common problems and their solutions:
6.1 Photos Not Syncing
If your photos are not syncing between your Mac and iCloud, try the following:
- Check your internet connection: Make sure your Mac is connected to a stable Wi-Fi network.
- Check your iCloud account: Make sure you are signed in to the same iCloud account on all your devices.
- Restart your Mac: Restarting your Mac can often resolve syncing issues.
- Update your software: Make sure you have the latest version of macOS and the Photos app installed.
6.2 Storage Full
If your iCloud storage is full, you will need to upgrade your storage plan or free up space by deleting unwanted photos and videos.
6.3 Slow Upload or Download Speeds
If you are experiencing slow upload or download speeds, try the following:
- Check your internet connection: Make sure you have a fast and stable internet connection.
- Adjust upload and download settings: Limit the upload and download speeds in the Photos app preferences.
- Pause and resume syncing: Pausing and resuming syncing can sometimes resolve slow upload or download speeds.
6.4 Contacting Apple Support
If you are unable to resolve your iCloud Photos issues, you can contact Apple Support for assistance.
7. Understanding iCloud Storage Plans and Pricing
iCloud offers different storage plans to accommodate varying needs. Here’s an overview of the available plans and their pricing:
7.1 Available Storage Options
- Free: 5 GB (included with every Apple ID)
- iCloud+ 50 GB: $0.99 per month
- iCloud+ 200 GB: $2.99 per month
- iCloud+ 2 TB: $9.99 per month
7.2 Choosing the Right Plan for Your Needs
The amount of storage you need will depend on the size of your photo and video library, as well as how much you use iCloud for other data like documents and backups. If you have a large photo library or plan to store other data in iCloud, you will likely need to upgrade to a paid storage plan.
7.3 Upgrading or Downgrading Your Storage Plan
You can easily upgrade or downgrade your iCloud storage plan in the System Preferences on your Mac. Simply go to “Apple ID” > “iCloud” > “Manage” > “Change Storage Plan.”
8. Integrating iCloud Photos with Other Apple Devices and Services
iCloud Photos seamlessly integrates with other Apple devices and services, providing a unified experience across your ecosystem.
8.1 Accessing iCloud Photos on iPhone and iPad
To access your iCloud Photos on your iPhone and iPad, simply enable iCloud Photos in the Settings app. Your photos and videos will automatically sync across all your devices.
8.2 Using iCloud Photos with Apple TV
You can view your iCloud Photos on your Apple TV by enabling iCloud Photos in the Settings app. This allows you to enjoy your photos and videos on the big screen with friends and family.
8.3 Integrating with macOS Features Like Desktop and Screen Saver
You can use your iCloud Photos as your desktop background or screen saver on your Mac. Simply go to System Preferences > Desktop & Screen Saver and choose “Photos” as your source.
9. Privacy and Security Considerations for iCloud Photos
When using iCloud Photos, it’s important to be aware of privacy and security considerations.
9.1 Understanding Apple’s Privacy Policies
Apple has a strong commitment to privacy and security. You can review Apple’s privacy policies on their website to understand how your data is collected, used, and protected.
9.2 Securing Your iCloud Account
To protect your iCloud account, follow these tips:
- Use a strong password: Choose a password that is at least 12 characters long and includes a mix of uppercase and lowercase letters, numbers, and symbols.
- Enable two-factor authentication: Two-factor authentication adds an extra layer of security to your account by requiring a verification code from your trusted devices when you sign in on a new device.
- Be careful of phishing scams: Be wary of emails or messages that ask for your iCloud password or other personal information.
9.3 Managing Photo Sharing Permissions
When sharing photos and videos with others, be mindful of the permissions you grant. You can choose to share photos via iCloud links, which allow anyone with the link to view the photos, or via Shared Albums, which allow only specific people to view and add photos.
10. Alternative Cloud Photo Storage Services
While iCloud Photos is a great option for Apple users, there are other cloud photo storage services available. Here are a few popular alternatives:
10.1 Google Photos
Google Photos offers unlimited free storage for photos up to 16 megapixels and videos up to 1080p. It also offers paid storage plans for higher-resolution photos and videos.
10.2 Dropbox
Dropbox is a cloud storage service that can be used to store and sync photos, videos, and other files. It offers both free and paid storage plans.
10.3 Adobe Creative Cloud Photography Plan
Adobe Creative Cloud Photography plan includes access to Adobe Lightroom and Adobe Photoshop, as well as cloud storage for your photos. It’s a great option for photographers who want professional-grade editing tools and cloud storage.
11. The Future of iCloud Photos and Digital Photography
The future of iCloud Photos and digital photography is bright, with ongoing advancements in technology and user experience.
11.1 Emerging Trends in Cloud Photo Storage
- AI-powered organization: AI is being used to automatically organize and tag photos, making it easier to find and manage them.
- Enhanced editing tools: Cloud photo storage services are adding more advanced editing tools, allowing users to enhance their photos without needing to use separate editing software.
- Integration with other services: Cloud photo storage services are integrating with other services, such as social media and printing services, making it easier to share and print your photos.
11.2 The Evolution of Digital Photography
- Computational photography: Computational photography uses software algorithms to enhance photos, such as improving low-light performance and reducing noise.
- Mobile photography: Mobile photography is becoming increasingly popular, with smartphones offering advanced camera features and image quality.
- Virtual and augmented reality: Virtual and augmented reality are opening up new possibilities for digital photography, allowing users to create immersive and interactive photo experiences.
12. Conclusion: Making the Most of iCloud Photos on Your Mac
iCloud Photos is a powerful and convenient way to store, manage, and share your photos and videos across all your Apple devices. By following the tips and guidelines in this comprehensive guide, you can make the most of iCloud Photos on your Mac and enjoy your visual memories to the fullest.
Now that you have a complete understanding of how to use iCloud Photos on your Mac, why not explore the world of photography even further? Visit dfphoto.net to discover inspiring photography tips, explore stunning photo galleries, and connect with a community of passionate photographers.
Address: 1600 St Michael’s Dr, Santa Fe, NM 87505, United States
Phone: +1 (505) 471-6001
Website: dfphoto.net
FAQ: Frequently Asked Questions About iCloud Photos on Mac
1. How do I enable iCloud Photos on my Mac?
To enable iCloud Photos on your Mac, open the Photos app, go to Photos > Settings, click on the iCloud tab, and select the iCloud Photos checkbox.
2. What are the storage options for iCloud Photos on Mac?
iCloud Photos offers two storage options on Mac: “Download Originals to this Mac,” which stores full-resolution versions locally, and “Optimize Mac Storage,” which stores smaller, optimized versions locally while keeping full-resolution versions in iCloud.
3. How can I check the sync status of iCloud Photos on my Mac?
You can check the sync status at the bottom of the Photos app window, where it displays the progress of uploading or downloading photos.
4. How do I create a new album in iCloud Photos on my Mac?
To create a new album, open the Photos app, click the plus (+) button next to “Albums” in the sidebar, choose “Album,” give it a name, and add photos by dragging them into the album.
5. Can I edit photos directly in iCloud Photos on my Mac?
Yes, the Photos app on your Mac offers a range of non-destructive editing tools, including basic adjustments, filters, retouching, and advanced options like curves and color adjustments.
6. How do I share photos and videos from iCloud Photos on my Mac?
You can share photos via iCloud Links by selecting photos, clicking the “Share” button, and choosing “iCloud Link,” or by creating Shared Albums and inviting specific people to view and add photos.
7. How can I manage storage space for iCloud Photos on my Mac?
To manage storage, choose the “Optimize Mac Storage” option, which stores smaller versions of your photos on your Mac while keeping full-resolution versions in iCloud.
8. What should I do if my iCloud Photos are not syncing on my Mac?
If photos aren’t syncing, check your internet connection, ensure you’re signed in to the same iCloud account on all devices, restart your Mac, and update your software.
9. How do I upgrade my iCloud storage plan on my Mac?
You can upgrade your iCloud storage plan in System Preferences by going to “Apple ID” > “iCloud” > “Manage” > “Change Storage Plan.”
10. How does iCloud Photos integrate with other Apple devices and services?
iCloud Photos seamlessly integrates with iPhone, iPad, Apple TV, and macOS features like desktop and screen saver, providing a unified experience across your Apple ecosystem.