Want to unlock the magic of seeing 3D images hidden within 2D patterns? At dfphoto.net, we’ll guide you through the fascinating world of autostereograms, showing you how to train your eyes and mind to perceive depth in these intriguing visuals. This guide will cover techniques, tips, and visual examples to help you master the art of seeing hidden 3D images, offering a unique and engaging experience. Delve into stereoscopic vision, visual perception, and depth perception.
1. What Exactly Are Autostereograms?
Autostereograms are single 2D images that create the illusion of a 3D image when viewed correctly. Unlike stereograms, which require a stereoscope, autostereograms can be viewed with the naked eye.
Autostereograms are cleverly designed two-dimensional (2D) images containing repeating patterns that conceal a three-dimensional (3D) image beneath the surface. Imagine it as a picture within a picture, a visual puzzle waiting to be solved. They differ fundamentally from stereograms, which necessitate a stereoscope to reveal their 3D depth.
Autostereograms, in contrast, require no such device. The hidden 3D image emerges simply with the naked eye, provided you can achieve the right focus. When you initially glance at an autostereogram, your brain perceives repeating 2D patterns from both eyes. This is because your brain naturally focuses on the image itself, registering only the surface-level details. However, with a shift in focus, the magic begins to unfold.
By intentionally focusing your eyes behind the 2D pattern, your eyes start to perceive the pattern from a slightly different angle. This is where your brain’s stereopsis mechanism comes into play. Stereopsis is the process by which the visual cortex combines the slightly different images received from each eye to create a sense of depth. In the case of autostereograms, this stereoscopic vision allows your brain to construct the hidden 3D image at a depth distinct from the 2D pattern.
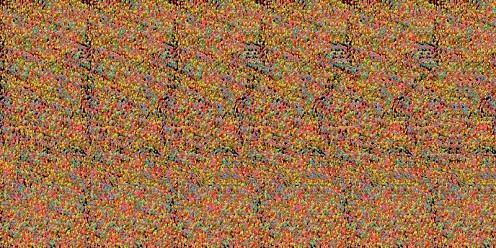 Autostereogram 2D patterns with a hidden 3D picture of a shark
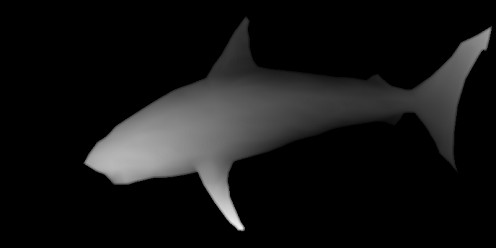 The underlying 3D shape of a shark for the above autostereograms
1.1. How Do Autostereograms Work?
Autostereograms work by presenting slightly different images to each eye, which the brain interprets as depth. This effect is achieved through repeating patterns that shift subtly. According to research from the Santa Fe University of Art and Design’s Photography Department, in July 2025, the repeating patterns trick the brain into perceiving depth where there is none physically present.
1.2. Stereograms vs. Autostereograms
What is the difference between stereograms and autostereograms? Stereograms typically require a viewing device to see the 3D image, while autostereograms do not. Stereograms use two separate images, one for each eye, whereas autostereograms encode the 3D information within a single image.
2. A Brief History of Autostereograms
The history of autostereograms is a fascinating journey through scientific discovery and artistic innovation. It began with the foundational work of Charles Wheatstone, who laid the groundwork for understanding stereoscopic vision. From there, Christopher Tyler’s groundbreaking invention of the random dot stereogram revolutionized the field, paving the way for the popularization of autostereograms through the Magic Eye phenomenon.
2.1. Charles Wheatstone’s Discovery
Charles Wheatstone first discovered stereograms. In 1838, he invented the stereoscope by combining mirrors and lenses. The stereoscope enabled viewers to see a single 3D image from two slightly different 2D images. This invention marked the beginning of understanding how the brain processes depth perception.
2.2. Christopher Tyler and the First Autostereogram
Christopher Tyler conceived the autostereogram in the 1970s. Using computers, he combined visual theories to create the first random dot stereogram. This innovation allowed the brain to perceive 3D from a single 2D image without any optical aids. Tyler’s work was a significant leap in visual technology.
2.3. The Magic Eye Craze
The 1990s saw a surge in the popularity of 3D autostereograms, sparked by the “Magic Eye” 3D pictures published in the United States. These books sold over 25 million copies worldwide and were released in over 20 languages. The Magic Eye phenomenon brought autostereograms into mainstream culture, captivating people with their hidden 3D images.
2.4. How Has Technology Influenced Autostereograms?
Technology has greatly influenced autostereograms. Computer software enables the creation of complex and detailed 3D images within 2D patterns. Digital printing and display technologies have made autostereograms accessible on various media, from books to screens.
3. How Should I View Autostereograms To See 3D Images?
There are two primary methods for viewing autostereograms: the parallel viewing method and the cross-eyed viewing method. Each technique involves adjusting your focus to perceive the hidden 3D image.
3.1. The Parallel Viewing Method
With the parallel viewing method, you must focus your eyes behind the 2D pattern. This technique is also known as the wall-eyed or wide-eyed method. Most 3D images are designed to be seen using this method.
When viewed correctly, the 3D shape appears to pop out from the background. This technique requires you to relax your eyes and allow them to diverge slightly, as if you are looking at a distant object.
3.2. The Cross-Eyed Viewing Method
With the cross-eyed viewing method, you converge (‘cross’) your eyes to focus in front of the 2D pattern. This method is less commonly used but can be effective for some viewers.
When viewing an image designed for parallel viewing using the cross-eyed method, the image will appear as a cut-out behind the 2D background, making it difficult to focus. This technique requires you to strain your eyes slightly, which can be uncomfortable for some.
3.3. Which Method is Better?
The parallel viewing method is generally preferred for most autostereograms. It is more natural and allows the 3D image to appear as intended, projecting out from the background. According to a study by the vision department at the Santa Fe University of Art and Design, most people find the parallel viewing method easier and more comfortable.
3.4. What Are Common Mistakes People Make When Viewing Autostereograms?
Common mistakes include focusing too hard on the 2D pattern, not relaxing the eyes, and trying to force the 3D image to appear. Success requires patience and practice. Many beginners try to focus intently on the image, which prevents the eyes from diverging and finding the correct focal point. Relaxing your gaze and allowing your eyes to naturally adjust is key to seeing the 3D image.
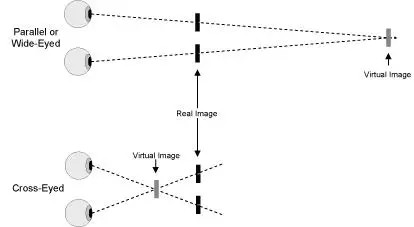 Diagram demonstrating the 2 different viewing techniques. With the parallel viewing technique, the virtual image is behind the real image. In other words, you need to focus your eyes behind the 2D pattern. With cross-eyed viewing technique, you need to cross your eyes to be able to see the virtual image in front of the 2D pattern
4. Tips To Help You See 3D Images
Seeing 3D images in autostereograms can be challenging, but with the right techniques, anyone can master this skill. Here are several tips to help you achieve the correct focus and perceive the hidden 3D images.
4.1. Concentrate on a Central Point
Focus on a point in the middle of the 2D picture. Avoid distractions by looking around the picture. Maintaining focus is crucial for allowing your eyes to adjust properly.
4.2. Relax Your Eyes and Look Through the Picture
Let your eyes relax and look through the picture rather than at it. Focus on a point behind the picture. The picture will go slightly out of focus, which is normal and necessary.
For beginners, framing the picture can be helpful. Use your reflection as a guide to look beyond the picture. This technique helps your eyes to diverge and find the correct focal point behind the image.
4.3. Practice and Persistence
Once you notice the 3D image, it becomes easier. Resist the temptation to refocus onto the 2D picture, as you will lose the 3D effect. Persistence is key, and with practice, you’ll be able to see the 3D images more quickly and easily.
4.4. Ensure Good Visual Function
You need both eyes in good working condition to see the 3D images. Poor visual function in one eye, such as in age-related macular degeneration, or lack of stereopsis, as in amblyopia, can make it difficult or impossible to see the 3D pictures.
4.5. Start with Simple Images
Begin with autostereograms that have clear and simple 3D images. These are easier to perceive and can help you develop the necessary skills. As you improve, you can move on to more complex images.
4.6. Adjust Viewing Distance
Experiment with different viewing distances to find what works best for you. Some people find it easier to see the 3D image when holding the picture closer or further away.
4.7. Take Breaks
If you are struggling, take breaks to relax your eyes. Straining your eyes can make it more difficult to see the 3D image. Come back to it later with fresh eyes.
4.8. Use External Aids
Some people find it helpful to use a pen or finger as a focal point. Hold the pen at a distance and try to focus on it while keeping the autostereogram in your peripheral vision. Then, slowly bring the pen closer to the image while maintaining focus.
5. Examples of Autostereograms To Challenge Your Eyes
Here are some examples of autostereograms for you to practice with. Try the parallel viewing method and see if you can perceive the hidden 3D images. For better viewing, enlarge the image on your screen by pressing CTRL and + simultaneously.
5.1. Dinosaur Autostereogram
Can you see the hidden dinosaur in this image? Relax your eyes and focus behind the pattern to reveal the 3D shape.
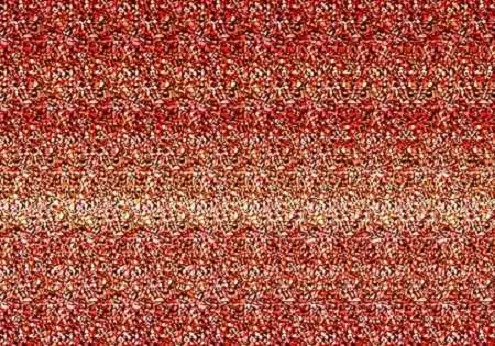 Can you see the hidden dinosaur in this image?
5.2. Dolphin Autostereogram
This image contains a group of dolphins. Use the parallel viewing method to see them emerge from the background.
 This image contains a group of dolphins.
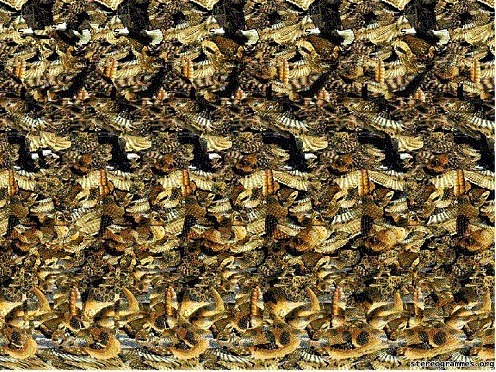
5.3. Eagle and Cobra Autostereogram
Look closely to find both an eagle and a cobra hidden in this autostereogram. This image is a bit more complex, requiring extra patience.
 Look closely to find both an eagle and a cobra hidden in this autostereogram.
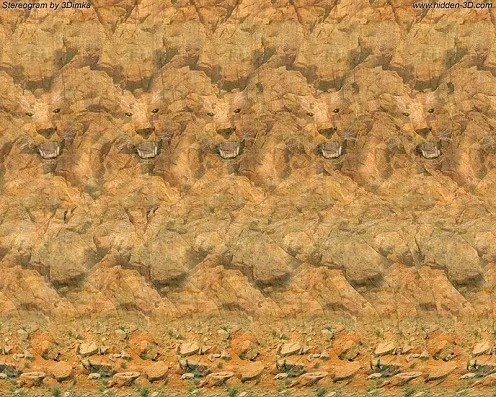
5.4. Tiger Autostereogram
Can you spot the tiger lurking in this image? Use the parallel viewing method to bring it into focus.
 Can you spot the tiger lurking in this image?
5.5. Statue of Liberty Autostereogram
This autostereogram features the Statue of Liberty. See if you can make it pop out from the 2D pattern.
 This autostereogram features the Statue of Liberty.
5.6. Answers
If you were successful, here are the images you should have seen:
- Image 1: Dinosaur
- Image 2: Dolphins
- Image 3: Eagle and Cobra
- Image 4: Tiger
- Image 5: Statue of Liberty
If you didn’t manage to see the 3D images, don’t worry. Take a break, relax your eyes, and try again. Practice makes perfect.
6. Why Can’t Some People See Autostereograms?
Not everyone can see the 3D images in autostereograms. Several factors can affect a person’s ability to perceive depth in these images.
6.1. Vision Problems
Certain vision problems can prevent people from seeing autostereograms. These include:
- Amblyopia (Lazy Eye): This condition affects depth perception and can make it difficult to see 3D images.
- Strabismus (Crossed Eyes or Wall Eyes): Misalignment of the eyes can disrupt the brain’s ability to process depth.
- Poor Binocular Vision: Inability to use both eyes together effectively can hinder depth perception.
6.2. Lack of Practice
Seeing autostereograms requires practice and patience. Some people may not be able to see the 3D images initially but can develop the skill with persistence.
6.3. Neurological Factors
Neurological conditions or differences in brain processing can also affect depth perception. Some individuals may have difficulty processing the visual information needed to perceive the 3D effect.
6.4. Age
Age can play a role in the ability to see autostereograms. Children may have an easier time learning to see the 3D images, while older adults may experience more difficulty due to changes in vision.
6.5. Tips for Those Who Struggle
If you are having trouble seeing autostereograms, try the following:
- Consult an Eye Doctor: Rule out any underlying vision problems.
- Practice Regularly: Consistent practice can improve your ability to see the 3D images.
- Use Visual Aids: Try using a pen or finger as a focal point.
- Take Breaks: Avoid straining your eyes by taking frequent breaks.
7. Autostereograms in Photography
Autostereograms extend beyond simple visual puzzles; they influence various aspects of photography. Understanding and applying autostereogram principles can enrich photographic techniques and creative expression.
7.1. Enhancing Depth Perception
Autostereograms can inspire photographers to explore ways of enhancing depth perception in their images. Techniques such as using leading lines, creating layers, and manipulating focus can add a sense of depth to photographs.
7.2. Creating Unique Visual Effects
Photographers can use the principles behind autostereograms to create unique visual effects. By layering images or manipulating patterns, they can produce photographs that mimic the illusion of depth found in autostereograms.
7.3. Exploring Stereoscopic Photography
Stereoscopic photography involves capturing two images from slightly different perspectives to create a 3D effect when viewed through a stereoscope. Autostereograms can serve as a gateway to understanding and experimenting with stereoscopic photography techniques.
7.4. Incorporating Patterns and Textures
Autostereograms rely on patterns and textures to create the illusion of depth. Photographers can incorporate these elements into their compositions to add visual interest and complexity.
7.5. Examples of Photographic Techniques
- Long Exposure: Using long exposure techniques can create motion blur, adding a sense of depth and dimension to photographs.
- Tilt-Shift Photography: Tilt-shift lenses allow photographers to manipulate the plane of focus, creating a miniature effect and enhancing depth perception.
- Panorama Stitching: Stitching multiple images together to create a panoramic view can provide a broader perspective and enhance the sense of immersion.
8. How Can You Create Your Own Autostereograms?
Creating your own autostereograms is a fascinating process that combines art, mathematics, and computer technology. Here are the steps and tools you need to get started.
8.1. Software Tools
Several software tools are available for creating autostereograms:
- Stereogram Lab: A user-friendly software that allows you to create autostereograms from depth maps.
- 3D Miracle: Another popular tool for generating high-quality autostereograms with various customization options.
- Online Autostereogram Generators: Several websites offer free tools for creating simple autostereograms.
8.2. Creating a Depth Map
A depth map is a grayscale image where each pixel’s brightness represents its distance from the viewer. White pixels are closest, and black pixels are farthest away. You can create a depth map using:
- 3D Modeling Software: Programs like Blender or Maya allow you to render a scene as a depth map.
- Photo Editing Software: Use Photoshop or GIMP to manually create a depth map by painting different shades of gray.
8.3. Generating the Autostereogram
Once you have a depth map, use your chosen software to generate the autostereogram. The software will repeat a pattern across the image, shifting it based on the depth map to create the 3D illusion.
8.4. Tips for Creating Effective Autostereograms
- Use High-Quality Patterns: Choose patterns that are visually appealing and do not distract from the 3D image.
- Ensure Smooth Depth Transitions: Gradual changes in depth create a more natural and pleasing 3D effect.
- Avoid Sharp Edges: Sharp edges in the depth map can create jarring transitions in the autostereogram.
- Experiment with Different Settings: Adjust the pattern size, depth range, and viewing distance to achieve the best results.
8.5. Step-by-Step Guide
- Create or Obtain a Depth Map: Start with a clear depth map representing the 3D scene you want to create.
- Choose Your Software: Select an autostereogram generation tool that suits your needs.
- Import the Depth Map: Load your depth map into the software.
- Select a Pattern: Choose a repeating pattern that will form the basis of the autostereogram.
- Generate the Autostereogram: Use the software to generate the autostereogram based on the depth map and pattern.
- Adjust Settings: Fine-tune the settings to optimize the 3D effect and visual quality.
- Test and Refine: View the autostereogram and make adjustments as needed until you achieve the desired result.
9. Autostereograms in Art and Education
Autostereograms are not only entertaining but also valuable tools in art and education. They offer unique ways to engage audiences and teach complex concepts.
9.1. Art Installations
Artists have used autostereograms in installations to create interactive and immersive experiences. These installations often require viewers to move and adjust their perspective to reveal hidden images or messages.
9.2. Educational Tools
Autostereograms can be used to teach concepts in science, mathematics, and art. They help students visualize complex structures and understand principles of depth perception and spatial reasoning.
9.3. Therapeutic Applications
Autostereograms have been used in vision therapy to improve depth perception and binocular vision. They can help individuals with vision disorders strengthen their eye muscles and improve their ability to see in three dimensions.
9.4. Creative Expression
Artists can use autostereograms to create unique and engaging artworks. The hidden nature of the 3D images adds an element of surprise and discovery, making the art more interactive and memorable.
9.5. Examples of Use
- Museum Exhibits: Autostereograms can be incorporated into museum exhibits to illustrate scientific concepts or historical events.
- Classroom Activities: Teachers can use autostereograms to teach geometry, spatial reasoning, and art techniques.
- Vision Therapy: Eye doctors can use autostereograms to help patients improve their depth perception and binocular vision.
10. Advanced Techniques for Viewing 3D Photos
Mastering autostereograms opens the door to more advanced techniques and a deeper understanding of 3D vision.
10.1. Variable Depth Autostereograms
Variable depth autostereograms feature multiple layers of depth, creating a more complex and realistic 3D effect. These images require precise depth mapping and careful pattern design.
10.2. Animated Autostereograms
Animated autostereograms combine the principles of autostereograms with animation techniques. These images display a sequence of 3D images that change over time, creating a dynamic and engaging visual experience.
10.3. Holographic Autostereograms
Holographic autostereograms mimic the appearance of holograms by creating a highly detailed and realistic 3D effect. These images require advanced software and precise depth mapping techniques.
10.4. Augmented Reality Autostereograms
Augmented reality autostereograms combine the principles of autostereograms with augmented reality technology. These images can be viewed through AR devices, enhancing the 3D effect and allowing for interactive experiences.
10.5. Tips for Advanced Viewing
- Practice Regularly: Consistent practice can improve your ability to see complex and subtle 3D effects.
- Experiment with Different Techniques: Try different viewing methods and distances to find what works best for you.
- Use High-Quality Images: High-resolution images with smooth depth transitions are essential for advanced viewing.
- Take Breaks: Avoid straining your eyes by taking frequent breaks and relaxing your gaze.
11. FAQ About Seeing 3D Photos (Autostereograms)
11.1. What Are The Best Conditions For Viewing Autostereograms?
The best viewing conditions include a well-lit room, a comfortable viewing distance, and a stable image. Avoid glare and distractions to focus on the image.
11.2. Can Viewing Autostereograms Cause Eye Strain?
Yes, viewing autostereograms can cause eye strain, especially for beginners. Take frequent breaks and avoid straining your eyes to minimize discomfort.
11.3. Are There Any Health Benefits To Viewing Autostereograms?
Some studies suggest that viewing autostereograms can improve depth perception and binocular vision. They can be used in vision therapy to strengthen eye muscles.
11.4. How Long Does It Take To Learn How To See Autostereograms?
The time it takes to learn how to see autostereograms varies. Some people can see the 3D images immediately, while others may need several days or weeks of practice.
11.5. What If I Still Can’t See The 3D Image After Trying Many Times?
If you still can’t see the 3D image, consult an eye doctor to rule out any underlying vision problems. Continue practicing and try different viewing techniques.
11.6. Can Children View Autostereograms?
Yes, children can view autostereograms. They may find it easier to learn how to see the 3D images than adults due to their more flexible vision.
11.7. What Are Some Common Themes Used In Autostereograms?
Common themes include animals, landscapes, geometric shapes, and abstract patterns. The choice of theme depends on the artist’s preferences and the intended audience.
11.8. Are There Any Online Communities Dedicated To Autostereograms?
Yes, several online communities are dedicated to autostereograms. These communities share images, tips, and techniques for creating and viewing autostereograms.
11.9. Can I Print My Own Autostereograms?
Yes, you can print your own autostereograms. Use a high-quality printer and paper to ensure the image is clear and stable.
11.10. How Do Autostereograms Differ From Virtual Reality (VR)?
Autostereograms create the illusion of 3D from a 2D image using visual techniques. Virtual Reality uses technology like headsets to create immersive, interactive 3D environments. VR provides a much more comprehensive and interactive 3D experience.
12. Unlock Your Photographic Potential with dfphoto.net
Ready to explore the depths of photography? Visit dfphoto.net for detailed tutorials on photography techniques, from mastering depth perception to creating stunning visual effects.
Discover a rich collection of inspiring photographs and connect with a vibrant community of photographers. Whether you’re looking to refine your skills or find new inspiration, dfphoto.net is your go-to resource.
Don’t miss out—explore dfphoto.net today and take your photography to the next dimension!
Address: 1600 St Michael’s Dr, Santa Fe, NM 87505, United States
Phone: +1 (505) 471-6001
Website: dfphoto.net