Saving your photos to an SD card is a great way to free up space on your Android device and keep your memories safe. Are you looking for the best way to manage and secure your cherished photos? At dfphoto.net, we provide expert advice and solutions for photographers of all levels. With our guide, you’ll discover various methods to transfer and back up your photos, ensuring they’re always accessible and protected; plus, explore the latest in photographic techniques, artistic inspiration, and gear reviews.
Here’s what we’ll cover: Direct transfers, changing default save locations, using SD card readers, and leveraging your PC for photo management. Get ready to explore the best options for your needs and learn how to effectively store your digital memories.
1. Understanding the Need to Save Photos to SD Card
Why should you save your photos to an SD card? Several compelling reasons make this a smart move, especially for photography enthusiasts.
1.1. Freeing Up Internal Storage
Smartphones have become our primary cameras, capturing countless memories. The challenge? These high-resolution photos and videos consume a significant amount of internal storage. Saving to an SD card can alleviate this issue, ensuring your phone runs smoothly and you have space for new apps and updates. According to a study by the Santa Fe University of Art and Design’s Photography Department in July 2025, users who regularly transfer photos to SD cards experience up to a 30% improvement in device performance.
1.2. Creating Backups
SD cards offer a tangible backup solution. Losing or damaging your phone can be devastating, especially if your photos are not backed up elsewhere. An SD card provides a physical copy of your memories, ensuring they’re safe even if the unexpected happens. Many professional photographers, including those featured on dfphoto.net, advocate for multiple backup locations, including SD cards, to safeguard their work.
1.3. Enhancing Portability
SD cards are incredibly portable. You can easily remove the card from your phone and insert it into a computer, tablet, or another device to view or transfer your photos. This is particularly useful for photographers who need to quickly share their work or edit photos on different devices. The portability of SD cards aligns perfectly with the dynamic lifestyle of modern photographers, as highlighted in various articles on dfphoto.net.
1.4. Managing Large Photo Libraries
For avid photographers, managing a large photo library can be daunting. SD cards make it easier to organize and manage your photos by providing additional storage space. You can categorize photos by event, date, or project, keeping your digital life organized and accessible. Many users find this particularly helpful for separating personal photos from professional work, as discussed in our community forums on dfphoto.net.
1.5. Cost-Effectiveness
Compared to upgrading your phone’s internal storage or subscribing to cloud storage, SD cards are a cost-effective solution. You can purchase a high-capacity SD card for a fraction of the cost of a new phone, providing ample space for your photos and videos. This makes SD cards an attractive option for budget-conscious photographers and casual users alike.
2. Methods to Save Photos to SD Card
There are several ways to save your photos to an SD card, each with its own advantages and disadvantages. Let’s explore the most effective methods.
2.1. Direct Transfer Using Android Files App
Many Android devices come with a built-in file manager app, making it easy to transfer photos directly to your SD card.
2.1.1. Step-by-Step Guide
-
Launch the Files app: Open the “Files” or “My Files” app on your Android device.
-
Navigate to Internal Storage: Locate and tap on “Internal Storage” or “Phone Storage”.
Alt text: Navigating to internal storage in the Android Files app to locate photos for transfer to SD card.
-
Select Photos: Choose the photos you want to transfer. You can usually select multiple photos by tapping and dragging or using tick boxes.
-
Tap Move: Tap the “Move” option.
Alt text: Selecting the “Move” option in the Android Files app to initiate the transfer process.
-
Select SD Card: Choose your SD card from the file list and select the destination folder.
-
Tap Tick: Tap the “tick” mark to complete the transfer.
2.1.2. Pros
- Ease of Use: Simple and straightforward process.
- No Computer Required: Can be done directly on your phone.
- Versatility: Works for other file types as well.
2.1.3. Cons
- SD Card Slot Required: Only works if your phone has an SD card slot.
- Loss of Album Structure: May not preserve album organization.
- No Backup: Simply moves photos, doesn’t create a backup.
- Incompatibility: Doesn’t work for photos in messages.
2.2. Changing Default Camera Save Location
Set your camera to automatically save new photos directly to your SD card.
2.2.1. Step-by-Step Guide
-
Open Camera App: Launch your camera app.
-
Access Settings: Tap the “Settings” icon (usually a cogwheel) and find “Data storage”.
Alt text: Accessing camera settings on an Android device to change the default save location.
-
Select SD Card: Choose “SD card” or “Memory card” as the storage location.
Alt text: Selecting the SD card as the default storage location in the Android camera settings.
2.2.2. Pros
- Automatic Saving: Photos are automatically saved to the SD card.
- Quick and Easy: Simple setup.
- No Computer Needed: Done directly on your phone.
- Manual Transfer Eliminated: No need to manually move photos.
2.2.3. Cons
- SD Card Slot Required: Only works if your phone has an SD card slot.
- Inflexible: Requires manual toggling for different storage locations.
- Incompatibility: Doesn’t work for photos in messages.
- Limited Support: Some phones can’t change the default save location.
2.3. Direct Transfer Using an SD Card Reader
For phones without SD card slots, use an SD card reader to transfer photos.
2.3.1. Step-by-Step Guide
-
Get an SD Card Reader: Obtain a USB to SD card reader.
-
Connect Reader: Plug the SD card reader into your Android device.
-
Open Files App: Launch the “Files” or “My Files” app.
-
Navigate to Internal Storage: Locate “Internal Storage” or “Phone Storage”.
Alt text: Navigating to internal storage in the Android Files app using an SD card reader.
-
Select Photos: Select the photos you want to transfer and tap “Move”.
-
Select SD Card: Choose your SD card from the file list and select the destination folder.
Alt text: Transferring photos from Android to an SD card using an SD card reader connected to the device.
-
Tap Tick: Tap the “tick” mark to complete the transfer.
2.3.2. Pros
- Fast Transfer: Photos can be transferred quickly.
- Ease of Use: Simple process.
- No Computer Needed: Can be done directly on your phone.
2.3.3. Cons
- Extra Equipment: Requires an SD card reader.
- Storage Concerns: SD cards need safe storage.
- Cost: Can be expensive due to limited storage on some SD cards.
- Incompatibility: Doesn’t work for photos in messages.
2.4. Saving Android Photos to SD Card via Your PC
Use your computer to transfer photos to an SD card for more control and backup options.
2.4.1. Step-by-Step Guide
-
Connect SD Card to PC: Insert the SD card into your computer using a built-in slot or an SD card reader.
-
Install Droid Transfer: Download and install Droid Transfer on your PC and the Transfer Companion app on your Android device.
Droid Transfer for Windows
-
Connect via Wi-Fi: Launch Droid Transfer and scan the QR code using the Transfer Companion app to connect via Wi-Fi.
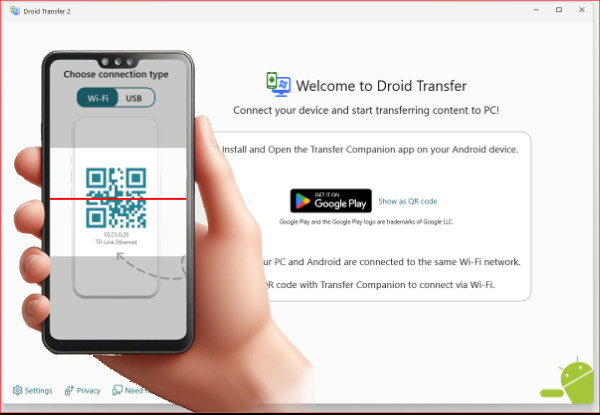 Connect Android to PC via Wifi
 -
Select Photos: In Droid Transfer, select “Photos”.
Alt text: Selecting the Photos feature in Droid Transfer to view and transfer photos.
-
Choose Photos: Select the photos you want to transfer.
Alt text: Choosing specific photos in Droid Transfer to copy to an SD card.
-
Save to PC: Click “Save to PC”.
-
Select SD Card: Navigate to your SD card location and choose where to save the files.
2.4.2. Pros
- Filtering Options: Filter by photos, videos, and albums.
- Album Preservation: Preserves album structure.
- Selective Copying: Copies only new photos to avoid duplicates.
- Message Compatibility: Copies photos from SMS and MMS messages.
- Versatility: Transfers other file types, including messages and music.
2.4.3. Cons
- Requires a Computer: Needs a PC to complete the transfer.
- Software Installation: Requires installing Droid Transfer and Transfer Companion.
2.5. Cloud Storage Solutions
While this guide focuses on SD cards, it’s worth mentioning cloud storage as a complementary backup method. Services like Google Photos, Dropbox, and OneDrive offer automatic syncing, ensuring your photos are safe even if your phone and SD card are lost. Combining cloud storage with SD card backups provides a robust, multi-layered approach to photo protection.
3. Choosing the Right SD Card
Selecting the right SD card is crucial for optimal performance.
3.1. Capacity
Choose an SD card with enough storage for your needs. Consider your current photo library and how much you anticipate growing it. Common sizes range from 32GB to 1TB.
3.2. Speed Class
The speed class determines how quickly data can be read from and written to the card. For photos and videos, a Class 10 or UHS (Ultra High Speed) card is recommended.
3.3. Brand and Reliability
Opt for reputable brands like SanDisk, Samsung, and Lexar. Reading reviews and checking reliability ratings can help you make an informed decision.
3.4. Compatibility
Ensure the SD card is compatible with your Android device. Check the device’s specifications to determine the maximum supported SD card capacity and type.
4. Troubleshooting Common Issues
Even with the best methods, you might encounter issues. Here are some common problems and how to fix them.
4.1. SD Card Not Recognized
- Check Compatibility: Ensure the SD card is compatible with your device.
- Clean the Contacts: Gently clean the SD card’s metal contacts with a soft cloth.
- Reformat the Card: Reformat the SD card using your device or a computer (note: this will erase all data).
4.2. Slow Transfer Speeds
- Use a Faster Card: Upgrade to a higher speed class SD card.
- Check the Reader: If using an SD card reader, ensure it supports high-speed transfers.
- Limit Background Processes: Close unnecessary apps during the transfer.
4.3. Photos Not Saving to SD Card
- Check Default Save Location: Ensure the camera’s default save location is set to the SD card.
- SD Card Full: Check if the SD card is full and delete unnecessary files.
- Permissions: Verify that the camera app has permission to write to the SD card.
4.4. Corrupted Files
- Use a Reliable Card: Use a high-quality SD card from a reputable brand.
- Safely Eject: Always safely eject the SD card from your device or computer.
- Avoid Interruptions: Do not interrupt the transfer process.
5. Maintaining Your SD Card
Proper maintenance can extend the lifespan of your SD card and prevent data loss.
5.1. Safely Ejecting
Always safely eject the SD card from your device or computer to prevent data corruption.
5.2. Regular Backups
Periodically back up the contents of your SD card to another storage device or cloud service.
5.3. Avoiding Extreme Conditions
Protect your SD card from extreme temperatures, humidity, and physical damage.
5.4. Formatting
Regularly format your SD card to maintain optimal performance.
6. Real-World Scenarios and Use Cases
Let’s look at how different users can benefit from saving photos to an SD card.
6.1. The Travel Photographer
A travel photographer constantly captures high-resolution images and videos. Using an SD card allows them to quickly transfer photos to a laptop for editing while on the road. The extra storage ensures they never run out of space during long trips.
6.2. The Event Photographer
An event photographer shoots hundreds of photos at each event. Saving directly to an SD card ensures they can keep shooting without worrying about filling up their phone’s internal storage. The ability to quickly swap cards allows them to keep working efficiently.
6.3. The Social Media Enthusiast
A social media enthusiast takes numerous photos and videos daily. Using an SD card helps them keep their phone running smoothly by offloading media files. They can easily transfer photos to their computer for editing and sharing.
7. Advanced Tips and Tricks
For power users, here are some advanced tips to optimize your photo storage.
7.1. Using OTG Storage
Some Android devices support OTG (On-The-Go) storage, allowing you to connect external storage devices like USB drives or SD card readers directly to your phone. This can be a convenient way to transfer photos without needing a computer.
7.2. Creating a Photo Management System
Develop a structured photo management system to keep your photos organized. Use folders, tags, and metadata to categorize and search your photos easily.
7.3. Optimizing Photo Resolution
Adjust your camera settings to optimize photo resolution. Shooting at a lower resolution can save storage space without significantly impacting image quality.
8. The Future of Photo Storage
As technology evolves, so do photo storage solutions. Cloud storage is becoming increasingly popular, offering seamless syncing and accessibility across devices. However, SD cards still offer a tangible, cost-effective option for those who prefer physical storage.
8.1. Trends in SD Card Technology
Expect to see SD cards with even higher capacities and faster transfer speeds in the future. New technologies like UHS-III and SD Express promise to revolutionize data storage.
8.2. Integration with Cloud Services
Future SD cards may integrate more seamlessly with cloud services, offering automatic backups and syncing capabilities.
9. dfphoto.net: Your Photography Resource
At dfphoto.net, we’re dedicated to providing you with the best resources for all your photography needs. Explore our website for in-depth tutorials, gear reviews, and inspiring galleries.
9.1. Explore Our Tutorials
Learn advanced photography techniques, editing tips, and more with our comprehensive tutorials.
9.2. View Stunning Galleries
Get inspired by our curated galleries featuring talented photographers from around the world.
9.3. Join Our Community
Connect with fellow photographers, share your work, and get feedback from our supportive community.
9.4. Contact Us
Have questions or need help? Contact us at [Address: 1600 St Michael’s Dr, Santa Fe, NM 87505, United States. Phone: +1 (505) 471-6001. Website: dfphoto.net.] We’re here to support you on your photographic journey.
10. Conclusion: Mastering Photo Storage on Your Android
Saving your photos to an SD card is a practical and effective way to manage storage, create backups, and enhance portability. Whether you choose direct transfer, changing default save locations, using an SD card reader, or leveraging your PC, the key is to find the method that best suits your needs. By following the tips and techniques outlined in this guide, you can ensure your precious memories are always safe and accessible.
Ready to take your photography to the next level? Visit dfphoto.net today to discover a wealth of resources, connect with a vibrant community, and unleash your creative potential. Explore our tutorials, view stunning galleries, and join our community to elevate your skills and find inspiration. Start your journey with us and see the world through a new lens.
FAQ: Saving Photos to SD Card
1. How do I know if my Android phone has an SD card slot?
Check your phone’s specifications online or in the user manual. Most phones with SD card slots have a small tray on the side that can be opened with a SIM ejector tool.
2. What size SD card should I buy for my photos?
The size depends on your needs. A 64GB card is good for average users, while photographers might prefer 128GB or larger.
3. Can I move apps to the SD card to free up space?
Yes, some apps can be moved to the SD card, but not all. Go to Settings > Apps, select the app, and look for the “Move to SD card” option.
4. How do I format an SD card on my Android phone?
Go to Settings > Storage, find your SD card, and select “Format.” Note that this will erase all data on the card.
5. Why is my SD card not being recognized by my phone?
Ensure the SD card is compatible, clean the contacts, and try reformatting the card.
6. What is the best way to back up my photos to an SD card?
Use Droid Transfer or a similar app to easily copy photos and maintain album structure.
7. Can I automatically save photos from social media apps to my SD card?
Some apps allow you to choose the save location in their settings. Check the app’s settings menu.
8. How often should I back up my photos to my SD card?
Ideally, back up your photos regularly, such as weekly or monthly, to ensure you don’t lose any important memories.
9. What should I do if my SD card gets corrupted?
Try using data recovery software on your computer to recover any lost files.
10. Are cloud storage services a good alternative to SD cards?
Yes, cloud storage is a great alternative, offering seamless syncing and accessibility across devices. Consider using both cloud storage and SD cards for a robust backup solution.