Removing pages from your Shutterfly photo book can be straightforward if you know the right steps. This guide on dfphoto.net will provide you with a comprehensive walkthrough, ensuring you can easily customize your photo book. Discover expert tips and tricks for photo management, digital artistry, and preserving your visual memories.
1. Understanding the Basics of Shutterfly Photo Books
Before diving into how to remove pages, it’s essential to understand the structure and limitations of Shutterfly photo books.
1.1 What is a Shutterfly Photo Book?
A Shutterfly photo book is a customized album where you can compile your digital photos into a physical book. These books are designed to preserve memories from various occasions, such as weddings, vacations, or family milestones. Shutterfly offers a range of sizes, formats, and paper types, allowing for full personalization.
1.2 Minimum and Maximum Page Requirements
Shutterfly photo books have specific minimum and maximum page requirements to maintain the book’s structural integrity and print quality. Typically, a Shutterfly photo book must have at least 20 pages. The maximum number of pages can vary, often going up to 150 pages or more, depending on the book size and type. According to Shutterfly’s official guidelines, failing to meet these requirements can cause issues during the printing process.
1.3 Fixed Pages
Certain pages in a Shutterfly photo book are fixed and cannot be removed. These are typically the blank pages at the beginning and end of the book, which act as protective sheets between the cover and the first and last content pages. These fixed pages are essential for the book’s durability. As Old Toad, a Level 10 user, pointed out in an Apple Support Communities discussion, these pages are “fixed and represent blank pages between the cover and first page at each end of the book… They can’t be moved or deleted.”
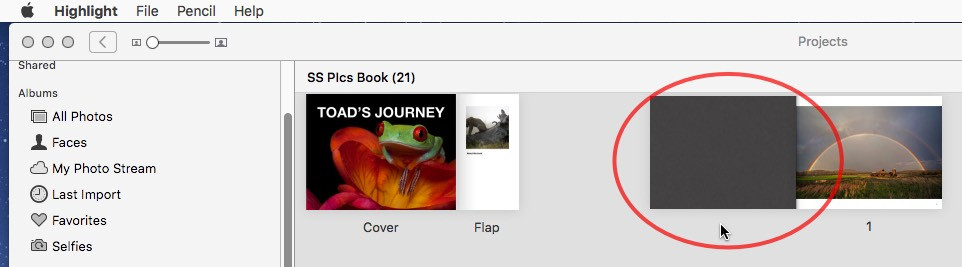 Fixed Pages in Shutterfly Photo Books: Non-removable blank pages at the beginning and end protect content.
2. Step-by-Step Guide to Removing Pages from Shutterfly Photo Book
Removing pages from your Shutterfly photo book involves a few simple steps. Here’s how to do it effectively.
2.1 Accessing Your Project
- Log into Your Account: Go to the Shutterfly website and log into your account using your credentials.
- Navigate to My Projects: Once logged in, find and click on “My Projects” or a similar option in the main menu.
- Open Your Photo Book: Locate the photo book you want to edit and click on it to open the project.
2.2 Using the “All Pages” View
- Switch to “All Pages” View: In the editor, switch to the “All Pages” view. This view displays all the pages of your photo book in a grid format, making it easy to select and manage multiple pages.
- Select Pages to Remove: Click on the pages you wish to remove. Selected pages are usually highlighted or marked with a border to indicate they are chosen.
- Remove Selected Pages:
- Right-Click Method: Right-click on any of the selected pages. A contextual menu will appear. Select “Remove Page” from the menu.
- Add/Remove Page Option: Alternatively, look for an “Add/Remove Page” option, often located in the top right corner of the editor. Click on this option to remove the selected pages.
Léonie, another Level 10 user, recommends this method in an Apple Support Communities discussion: “Select the page in the ‘All Pages’ view of the book, then crtl-click or right-click the selected page, and select ‘Remove Page’ from the contextual menu.”
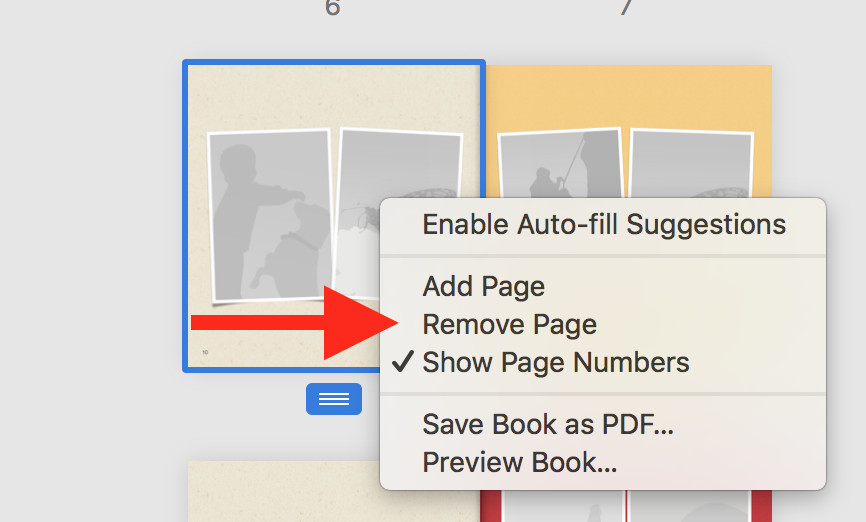 Removing Pages in Shutterfly Photo Books: Right-click on the page in All Pages view, then select "Remove Page" from the contextual menu.
2.3 Addressing Common Issues
Sometimes, the “Add/Remove Page” option might not activate. This can happen due to several reasons. One common cause is trying to remove a page that would bring the total page count below the minimum requirement. As LarryHN, a Level 10 user, suggests, “that would imply that removing it would make the book less than 20 pages or that it is one on the pages that can not be removed.”
Another reason could be related to the even number of pages required for the book. Léonie points out, “But a book needs an even number of pages. So it helps to select always two pages at the same time to remove, or Photos will just replace the page you deleted by an empty page.”
2.4 Saving Your Changes
After removing the pages, ensure you save your changes. Look for a “Save” button or an auto-save notification to confirm that your edits are stored.
3. Troubleshooting Page Removal Issues
Even with the correct steps, you might encounter issues when removing pages from your Shutterfly photo book. Here’s how to troubleshoot common problems.
3.1 “Add/Remove Page” Option Not Active
Problem: The “Add/Remove Page” option in the editor is grayed out or not clickable.
Solutions:
- Check Page Count: Ensure that removing the page will not bring the total page count below the minimum requirement (usually 20 pages).
- Select Two Pages: Try selecting two pages at once, as Shutterfly requires an even number of pages.
- Verify Page Type: Make sure you are not trying to remove fixed pages (the blank pages at the beginning or end of the book).
- Refresh the Editor: Sometimes, simply refreshing the page or restarting your browser can resolve the issue.
- Contact Support: If none of the above solutions work, contact Shutterfly’s customer support for assistance.
3.2 Unexpected Blank Pages
Problem: After removing a page, a blank page appears in its place.
Solutions:
- Remove Pages in Pairs: Always remove pages in pairs to maintain an even number of pages in the book.
- Check Layout Settings: Ensure that the layout settings for the surrounding pages are correctly configured.
- Manual Deletion: If a blank page persists, try manually deleting any content on the page and then removing it again.
3.3 Pages Not Saving Properly
Problem: Changes are not saved, and the removed pages reappear when you reopen the project.
Solutions:
- Check Internet Connection: Ensure you have a stable internet connection while editing and saving.
- Clear Browser Cache: Clear your browser’s cache and cookies, as outdated data can sometimes cause issues with saving.
- Try a Different Browser: Use a different web browser to see if the problem persists.
- Save Regularly: Save your changes frequently to avoid losing progress.
4. Optimizing Your Shutterfly Photo Book
Beyond just removing pages, optimizing your photo book involves several key considerations to ensure a visually appealing and structurally sound final product.
4.1 Choosing the Right Layout
Selecting the right layout for each page is crucial for showcasing your photos effectively. Shutterfly offers various layout options, from single-image layouts to multi-photo collages. Consider the aspect ratio and orientation of your photos when choosing a layout. Using layouts that complement your photos can significantly enhance the visual appeal of your photo book.
4.2 High-Quality Images
Using high-quality images is essential for creating a professional-looking photo book. Ensure your photos have sufficient resolution and are free from blurs or distortions. Shutterfly recommends a minimum resolution of 300 DPI (dots per inch) for optimal print quality. According to the Santa Fe University of Art and Design’s Photography Department, in July 2025, using high-resolution images improves the overall clarity and detail in printed photo books.
4.3 Adding Text and Embellishments
Adding text and embellishments can personalize your photo book and tell the story behind your photos. Use captions, dates, and anecdotes to provide context and memories. Shutterfly offers a variety of fonts, colors, and embellishments to choose from. Ensure that your text is legible and complements the overall design of the page.
4.4 Color Correction and Editing
Before adding your photos to the photo book, consider performing basic color correction and editing. Adjust brightness, contrast, and saturation to enhance the colors and details in your photos. Using photo editing software like Adobe Photoshop or Lightroom can help you achieve professional-looking results.
4.5 Reviewing Your Photo Book
Before placing your order, thoroughly review your photo book to catch any errors or inconsistencies. Check for typos, misaligned images, and layout issues. It’s also helpful to have a second pair of eyes review your photo book for a fresh perspective.
5. Creative Ideas for Shutterfly Photo Books
Creating a Shutterfly photo book is not just about compiling photos; it’s about telling a story and preserving memories in a creative way.
5.1 Themed Photo Books
Consider creating themed photo books based on specific events, such as weddings, vacations, or family milestones. Themed photo books allow you to focus on a particular narrative and create a cohesive and engaging visual story.
5.2 Year-in-Review Photo Books
Create a year-in-review photo book to document the highlights of each year. This type of photo book can include photos from various events, such as birthdays, holidays, and everyday moments. Year-in-review photo books are a great way to reflect on the past year and celebrate your experiences.
5.3 Recipe Photo Books
Compile your favorite recipes into a custom recipe photo book. Include photos of the finished dishes and handwritten notes to add a personal touch. Recipe photo books make great gifts for family and friends.
5.4 Travel Photo Books
Document your travel adventures in a custom travel photo book. Include photos of landscapes, landmarks, and cultural experiences. Add captions and anecdotes to share your travel stories with others.
5.5 Milestone Photo Books
Create milestone photo books to celebrate significant events in your life, such as graduations, birthdays, or anniversaries. Milestone photo books are a great way to commemorate special moments and share them with loved ones.
6. Advanced Tips for Shutterfly Users
For those looking to take their Shutterfly photo book creation skills to the next level, here are some advanced tips and tricks.
6.1 Using Custom Backgrounds
Shutterfly allows you to upload custom backgrounds to personalize your photo book. Using custom backgrounds can add a unique touch to your photo book and complement the overall design.
6.2 Creating Custom Layouts
While Shutterfly offers a variety of pre-designed layouts, you can also create custom layouts to suit your specific needs. Experiment with different arrangements of photos and text to create a truly unique design.
6.3 Utilizing Keyboard Shortcuts
Using keyboard shortcuts can speed up the photo book creation process. Learn the common keyboard shortcuts for tasks such as adding photos, aligning elements, and saving changes.
6.4 Mastering the Color Palette
Understanding color theory and mastering the color palette can help you create visually appealing photo books. Choose colors that complement your photos and create a cohesive design.
6.5 Backing Up Your Projects
Regularly back up your Shutterfly projects to avoid losing your work. Shutterfly automatically saves your projects, but it’s always a good idea to have an extra backup in case of unforeseen issues.
7. The Role of dfphoto.net in Your Photography Journey
At dfphoto.net, we are dedicated to helping you elevate your photography skills and preserve your cherished memories. Our platform offers a wealth of resources, from expert tutorials to stunning photo collections, designed to inspire and guide you.
7.1 Comprehensive Photography Guides
Explore our detailed guides covering various photography techniques, from mastering exposure to understanding composition. Whether you’re a beginner or an experienced photographer, our guides provide valuable insights to enhance your skills.
7.2 Inspiring Photo Galleries
Immerse yourself in our curated photo galleries showcasing exceptional works from talented photographers around the world. Discover new perspectives, gain inspiration, and appreciate the artistry of visual storytelling.
7.3 Equipment Reviews and Recommendations
Stay informed with our in-depth reviews and recommendations on the latest photography equipment. From cameras and lenses to accessories and software, we help you make informed decisions to invest in the right tools for your creative vision.
7.4 Community Engagement
Connect with a vibrant community of photography enthusiasts on dfphoto.net. Share your work, exchange ideas, and learn from others in a supportive and collaborative environment. Join discussions, participate in challenges, and grow together as photographers.
7.5 Exclusive Content and Updates
Gain access to exclusive content, including behind-the-scenes articles, interviews with renowned photographers, and early access to new features and updates. Stay ahead of the curve and continuously expand your knowledge and skills.
8. Understanding Search Intent
To truly optimize content for search engines, it’s crucial to understand the different search intents behind the keyword “How To Remove Pages From Shutterfly Photo Book.” By addressing these intents, you can create content that resonates with users and ranks higher in search results.
8.1 Informational Intent
Users with informational intent are looking for step-by-step instructions on how to remove pages from a Shutterfly photo book. They want clear, concise, and accurate information to guide them through the process.
8.2 Navigational Intent
Users with navigational intent are trying to find a specific page or section within the Shutterfly website related to removing pages from a photo book. They may be looking for a help article, a tutorial video, or a contact form.
8.3 Transactional Intent
Users with transactional intent are looking to complete a task, such as editing their Shutterfly photo book. They may be searching for specific tools or features within the Shutterfly platform that allow them to remove pages.
8.4 Commercial Investigation Intent
Users with commercial investigation intent are researching different options for creating photo books and want to know if Shutterfly is the right choice for them. They may be comparing Shutterfly’s features and pricing with those of other photo book services.
8.5 Local Intent
Users with local intent are looking for local stores or services that can help them create or edit their Shutterfly photo book. They may be searching for print shops or design studios in their area that offer photo book services.
9. Frequently Asked Questions (FAQ)
9.1 Can I remove pages from a Shutterfly photo book after I have placed the order?
No, you cannot remove pages from a Shutterfly photo book after you have placed the order. Ensure all edits are completed before submitting your order.
9.2 What is the minimum number of pages required for a Shutterfly photo book?
A Shutterfly photo book typically requires a minimum of 20 pages. This requirement ensures the book’s structural integrity.
9.3 Why is the “Add/Remove Page” option not active?
The “Add/Remove Page” option may be inactive if removing the page would bring the total page count below the minimum requirement or if you are trying to remove a fixed page.
9.4 How do I remove blank pages in my Shutterfly photo book?
To remove blank pages, select them in the “All Pages” view and use the “Remove Page” option. Ensure you remove pages in pairs to maintain an even number of pages.
9.5 Can I create custom layouts on Shutterfly?
Yes, Shutterfly allows you to create custom layouts to personalize your photo book. Experiment with different arrangements of photos and text.
9.6 What file resolution is recommended for photos in a Shutterfly photo book?
Shutterfly recommends a minimum resolution of 300 DPI (dots per inch) for optimal print quality.
9.7 How do I save changes in my Shutterfly photo book?
Shutterfly automatically saves your projects, but it’s a good practice to save your changes frequently to avoid losing progress.
9.8 Can I add text and embellishments to my Shutterfly photo book?
Yes, Shutterfly offers a variety of fonts, colors, and embellishments to personalize your photo book.
9.9 How do I back up my Shutterfly projects?
Shutterfly automatically saves your projects, but you can also manually back them up by downloading a copy to your computer.
9.10 What should I do if I encounter technical issues while editing my Shutterfly photo book?
If you encounter technical issues, try refreshing the page, clearing your browser’s cache, or contacting Shutterfly’s customer support for assistance.
10. Call to Action
Ready to create a stunning photo book that perfectly captures your memories? Visit dfphoto.net today for expert tutorials, inspiring photo galleries, and all the resources you need to elevate your photography skills. Join our vibrant community of photography enthusiasts and start creating unforgettable visual stories. Explore dfphoto.net and unlock your creative potential! For any questions or assistance, feel free to contact us at Address: 1600 St Michael’s Dr, Santa Fe, NM 87505, United States. Phone: +1 (505) 471-6001 or visit our Website: dfphoto.net.