Losing precious photos from your iPhone can be a distressing experience. Whether it was an accidental tap or a moment of phone cleaning gone wrong, the feeling of losing those memories is never pleasant. Fortunately, recovering deleted photos on your iPhone is often possible. This guide provides a comprehensive walkthrough of methods you can use to retrieve your lost images and prevent future data loss.
1. Check the ‘Recently Deleted’ Album: Your First Stop
The first and easiest place to look for your deleted photos is the ‘Recently Deleted’ album within the Photos app. Apple thoughtfully includes this feature as a safety net. When you delete a photo or video, it’s not immediately erased from your device. Instead, it’s moved to this album and kept there for 30 days. This grace period gives you ample time to recover anything you might have deleted by mistake.
To check the ‘Recently Deleted’ album:
- Open the Photos app on your iPhone.
- Tap on the Albums tab at the bottom.
- Scroll down to Utilities and tap on Recently Deleted.
 Screenshot of the Recently Deleted album on iPhone, highlighting the recover and delete options
If your photos are in this album, you’re in luck! To recover them:
- Tap Select in the top right corner.
- Choose the photos you want to recover, or tap Recover All to restore everything.
- Confirm your action by tapping Recover (or Recover Photos).
The recovered photos will be restored to their original albums in your Photos library. Keep in mind that photos in the ‘Recently Deleted’ album are permanently deleted after 30 days, so act quickly!
2. Restore from an iCloud Backup: If You Have a Backup
If your photos are not in the ‘Recently Deleted’ album, the next best option is to restore your iPhone from an iCloud backup. This method works if you had iCloud Backup enabled before you deleted the photos. iCloud Backup regularly saves a copy of your iPhone’s data, including photos, to Apple’s cloud servers.
To restore from an iCloud backup:
- Erase your iPhone: Go to Settings > General > Transfer or Reset iPhone > Erase All Content and Settings.
- Your iPhone will restart and display the Hello screen. Follow the on-screen setup instructions until you reach the Apps & Data screen.
- On the Apps & Data screen, choose Restore from iCloud Backup.
- Sign in to iCloud with your Apple ID and password.
- Choose the most relevant backup from the list. Ideally, select a backup created before you deleted the photos.
- Wait for the restore process to complete. This may take some time depending on the size of your backup and your internet connection speed.
Important Considerations for iCloud Restore:
- Restoring from an iCloud backup will replace all current data on your iPhone with the data from the backup. Any data created after the backup was made will be lost.
- Make sure you have a recent iCloud backup available. You can check the date of your last backup in Settings > [Your Name] > iCloud > iCloud Backup.
- This method is only effective if iCloud Backup was enabled and functioning correctly before the photo deletion.
3. Restore from an iTunes or Finder Backup: For Computer Backups
If you regularly backed up your iPhone to your computer using iTunes (on older macOS or Windows) or Finder (on newer macOS), you can restore your device from one of these backups. Similar to iCloud restore, this method will revert your iPhone to the state it was in when the backup was created.
To restore from an iTunes or Finder backup:
- Connect your iPhone to the computer you used for backups.
- Open iTunes (if using Windows or older macOS) or Finder (if using newer macOS).
- If prompted, trust your computer on your iPhone.
- Select your iPhone when it appears in iTunes or Finder.
- Click Restore Backup.
- Choose the most relevant backup from the list, ensuring it predates the photo deletion.
- Click Restore and wait for the process to complete. Your iPhone will restart and sync with your computer.
Key Points for iTunes/Finder Restore:
- Similar to iCloud restore, restoring from an iTunes or Finder backup erases all current data on your iPhone and replaces it with the backup content.
- Ensure you have a recent backup on your computer.
- This method only works if you have previously backed up your iPhone to your computer.
4. Utilizing Data Recovery Software: A More Advanced Approach
If you don’t have a backup and the ‘Recently Deleted’ album is empty, data recovery software might be your last resort. These third-party applications are designed to scan your iPhone’s internal storage for recoverable data, including deleted photos.
How Data Recovery Software Works (and Limitations):
Data recovery software works by searching for data fragments that are still present in your iPhone’s storage even after deletion. When you delete a file, it’s not immediately wiped from the storage; instead, the space it occupied is marked as available for new data. If the deleted data hasn’t been overwritten by new information, recovery software might be able to piece it back together.
Important Considerations When Using Data Recovery Software:
- Success is not guaranteed: The success rate of data recovery software depends on several factors, including how long ago the photos were deleted and how much you’ve used your iPhone since then. The more you use your phone after deletion, the higher the chance of data being overwritten and becoming unrecoverable.
- Stop using your iPhone: To maximize your chances of recovery, stop using your iPhone immediately after realizing you’ve deleted important photos. This minimizes the risk of overwriting the deleted data.
- Choose reputable software: Numerous data recovery tools are available, but not all are created equal. Some reputable options include PhoneRescue by iMobie, Dr.Fone by Wondershare, and Tenorshare UltData. Research and read reviews before choosing a tool. Many offer free trials to scan your device and see what’s recoverable before you purchase the full version.
- Potential risks: Be cautious when downloading and installing software from unknown sources. Stick to reputable providers to avoid malware or scams.
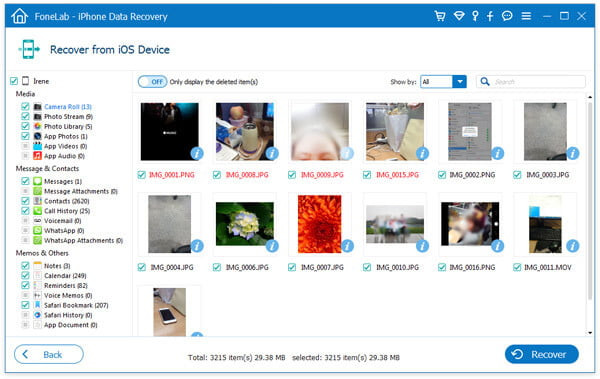
General Steps for Using Data Recovery Software (Steps may vary depending on the software):
- Download and install the data recovery software on your computer.
- Connect your iPhone to your computer.
- Launch the software and follow the on-screen instructions to scan your iPhone for deleted data.
- Preview the recoverable photos after the scan is complete.
- Select the photos you want to recover and choose a location on your computer to save them.
5. Check Other Devices and Cloud Services: Broadening Your Search
Sometimes, photos might exist in other places you haven’t considered. If you use multiple Apple devices or cloud services, it’s worth checking them:
- iPad or Mac: If you have other Apple devices signed in with the same Apple ID and iCloud Photos enabled, your photos might be synced to these devices.
- Google Photos, Dropbox, or other cloud services: If you use third-party cloud storage apps and have photo syncing enabled, check these services for your deleted photos.
- Social Media: If you might have shared the photos on social media platforms, check your accounts.
Prevention is Key: Back Up Your iPhone Regularly
While these recovery methods offer hope, the most reliable way to prevent photo loss is to back up your iPhone regularly. Setting up automatic backups to iCloud or your computer ensures that your photos and other important data are safely stored and can be easily restored if needed.
To enable iCloud Backup:
Go to Settings > [Your Name] > iCloud > iCloud Backup and toggle iCloud Backup to on. Ensure you have enough iCloud storage space.
To back up to your computer (using Finder on macOS or iTunes on Windows):
- Connect your iPhone to your computer.
- Open Finder or iTunes.
- Select your iPhone.
- Under the Backups section, choose Back up now.
By understanding these recovery methods and prioritizing regular backups, you can significantly increase your chances of recovering deleted photos and safeguard your precious memories on your iPhone.