In today’s visually-driven digital world, logos are more than just symbols; they are crucial for brand recognition and making a lasting first impression. It’s been shown that a staggering 93% of a brand’s first impression is visually based, and a logo is at the heart of that visual identity. Whether you’re a budding entrepreneur, a seasoned marketer, or someone looking to personalize their photos, understanding How To Put A Logo On A Photo is an invaluable skill. Adding a logo can instantly transform your images from generic snapshots to professional-looking branded content.
If you’ve ever wondered how do I add a logo to a photo? you’re in the right place. This guide will explore several user-friendly tools and methods to seamlessly integrate your logo into your images. We’ll highlight practical solutions, with a special focus on CapCut, to empower you to brand your visuals effectively.
Way 1: Using CapCut to Add a Logo to Your Photos
CapCut has emerged as a leading online platform for effortless photo editing, especially when it comes to branding. Its intuitive design makes how to put a logo on a photo a straightforward process, regardless of your editing experience. CapCut’s versatility caters to both personal and business needs, providing a suite of tools to enhance your images and ensure your logo is perfectly placed.
Step-by-Step Guide with Images
Step 1: Access CapCut and Log In.
Navigate to the CapCut website and either sign up for a new account or log in if you’re already a user. The platform offers a seamless signup process.
Sign up for free
*No credit card needed
Step 2: Upload Your Base Photo.
Once logged in, start a new project and upload the photo you want to brand with your logo. CapCut supports various image formats, ensuring compatibility with your files.
Step 3: Upload Your Logo and Adjust.
Next, upload your logo file to CapCut. After uploading, you can drag and drop your logo onto your photo. CapCut provides intuitive controls to adjust the logo’s size, position, and opacity. Experiment with these settings to achieve the perfect integration with your image.
Alt text: CapCut interface showing logo being resized and opacity adjusted on a photo, demonstrating how to put a logo on a photo.
Step 4: Save and Download Your Branded Image.
Once you’re satisfied with the logo placement and appearance, click the save or download button. CapCut allows you to download your newly branded image in various formats, ready for sharing or publishing.
CapCut’s Powerful Editing Features
Beyond simply adding logos, CapCut is packed with powerful editing functions that can significantly enhance your photos. These features allow you to refine your images and ensure your logo integrates seamlessly with a professional touch.
- Basic Editing Functions
CapCut offers a range of basic yet essential editing tools. You can add text to include captions or messages, use stickers to add creative elements, or utilize shapes to frame or highlight parts of your image. These tools are fantastic for creating engaging visuals that capture attention and reinforce your brand message.
Alt text: CapCut’s basic editing tool panel showcasing text, stickers, shapes, and effects options for image enhancement, illustrating editing capabilities beyond logo addition.
- Opacity Adjustment
The opacity adjustment feature is crucial for subtle branding. CapCut lets you control the transparency of your logo, allowing it to blend naturally into the photo without overpowering the image. This is particularly useful for creating watermarks or less intrusive branding.
- Background Removal
CapCut’s background removal tool simplifies complex edits. This feature is incredibly useful for isolating your logo if it has a background you want to eliminate, or for creating striking visuals where the subject is cleanly separated from its surroundings. It ensures your logo or product stands out crisply.
Alt text: CapCut’s background removal tool interface highlighting options to remove or customize image backgrounds, demonstrating a key feature for logo and image editing.
- Image Upscaler
Maintaining image quality is paramount, and CapCut’s image upscaler ensures your photos remain sharp and clear, even after adding a logo and potentially resizing. This tool is perfect for enhancing lower-resolution logos or images, making them suitable for high-resolution displays or print materials.
Pros and Cons of Using CapCut
Pros:
- User-Friendly Interface: CapCut’s intuitive design makes it easy for beginners to quickly learn how to put a logo on a photo.
- High-Quality Output: Ensures your branded photos look professional and polished.
- Versatile Editing Tools: Offers a wide range of editing features beyond logo addition, enhancing your creative control.
Cons:
- Network Dependency: As an online tool, CapCut requires a stable internet connection to function.
- Login Requirement: You need to create an account and log in to access CapCut’s features.
CapCut Pricing
CapCut is offered completely free of charge, making it an incredibly accessible option for anyone looking to brand their photos without any financial commitment.
Way 2: IO – A Quick Online Logo Adder
For users seeking a rapid and uncomplicated method for how to add a logo to a picture, IO’s add logo to photo tool is an excellent choice. This free online tool is designed for efficiency, streamlining the logo addition process. Its simplicity makes it perfect for quick edits without the need for complex software or extensive editing skills.
Operation Steps with Images
Step 1: Visit IO and Upload Your Photo.
Go to the IO add logo to photo tool website and upload the image you intend to brand.
Step 2: Upload Your Logo Image.
Click on the “Add Logo Image” button and upload your logo file.
Alt text: IO’s online interface showing the ‘Add Logo Image’ button, guiding users on how to upload a logo to a photo.
Step 3: Adjust Transparency and Download.
Use the transparency slider provided to adjust the logo’s opacity to your liking. Once satisfied, preview your image and download it in your preferred format (PNG or JPG).
Pros and Cons of Using IO
Pros:
- Ease of Use: The straightforward interface is incredibly user-friendly, even for those new to photo editing.
- No Sign-Up Required: You can access all features without needing to register or create an account.
- Client-Side Processing: IO processes images on your browser, enhancing privacy and security as your photos are not uploaded to a server.
Cons:
- Limited Editing Features: IO is primarily focused on logo addition and lacks advanced editing capabilities.
- Internet Dependent: Requires a stable internet connection to access and use the online tool.
IO Pricing
The IO add logo to photo tool is completely free to use, with no limitations on usage or hidden costs.
Way 3: Fotor – Comprehensive Photo Branding
Fotor stands out as a robust and user-friendly online tool for those seeking a more comprehensive approach to how to put a logo on a picture. It offers a wider array of editing tools alongside logo integration, ensuring your branding is perfectly aligned with your overall image aesthetics. Fotor is ideal for users who want more control over the final look of their branded photos.
Operation Steps with Images
Step 1: Go to Fotor and Upload Your Photo.
Navigate to Fotor’s “add logo to photo” feature and upload the photo you wish to brand.
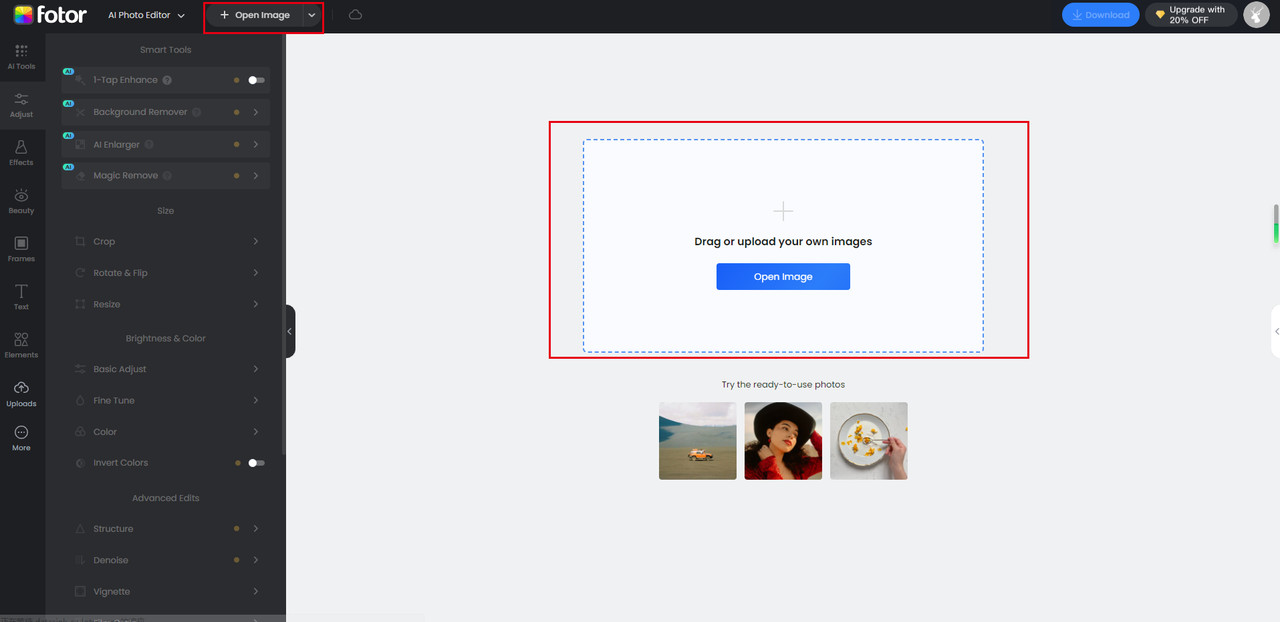 Fotor interface with upload photo option highlighted
Step 2: Drag and Place Your Logo.
Upload your logo and then simply drag and drop it onto your photo canvas within Fotor.
Step 3: Resize, Rotate, and Adjust Opacity.
Utilize Fotor’s editing tools to resize, rotate, and adjust the opacity of your logo. These controls allow for precise customization to achieve the desired branding effect.
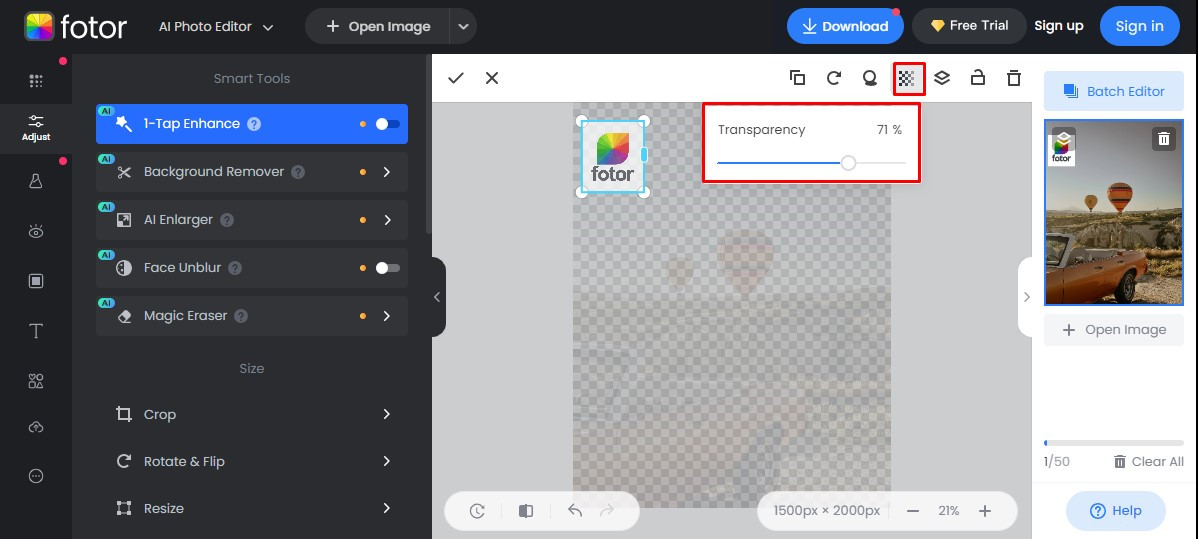 Fotor interface showing logo adjustment tools for resizing and opacity
Step 4: Export Your Branded Photo.
Once you’re satisfied with your logo placement and edits, export your photo in high-resolution format and download it.
Pros and Cons of Using Fotor
Pros:
- Easy and Fast: Fotor provides a streamlined process for quickly adding logos to photos.
- Comprehensive Editing Tools: Offers a range of editing options including cropping, rotating, resizing, and opacity adjustments, giving you greater control over your image.
- High-Resolution Export: Ensures the quality of your final image is maintained, even after editing and logo addition.
Cons:
- Internet Connection Required: Fotor is an online tool and requires a stable internet connection.
- Limited Advanced Features in Free Version: While powerful, some advanced features are only available in the premium versions.
Fotor Pricing
Fotor offers both free and premium versions. The free version includes basic features, suitable for simple logo additions. The premium versions, Fotor Pro and Fotor Pro+, unlock more advanced tools and features. Fotor Pro is priced at approximately 3.3 USD per month, and Fotor Pro+ at around 7.49 USD per month.
Way 4: Pixelixe – Professional Logo Integration
Pixelixe offers a sophisticated online solution for users looking for seamless and professional how to add your logo to a photo capabilities. This tool is designed for both personal and professional branding needs, providing a user-friendly interface coupled with robust editing options to ensure your logo integration is polished and visually appealing.
Operation Steps with Images
Step 1: Visit Pixelixe and Upload Your Photo.
Navigate to the Pixelixe website and upload the photo you want to brand.
Step 2: Position and Adjust Your Logo.
Upload your logo and position it on your image as desired. Pixelixe offers editing options for resizing, rotating, and adjusting opacity to refine the logo’s appearance.
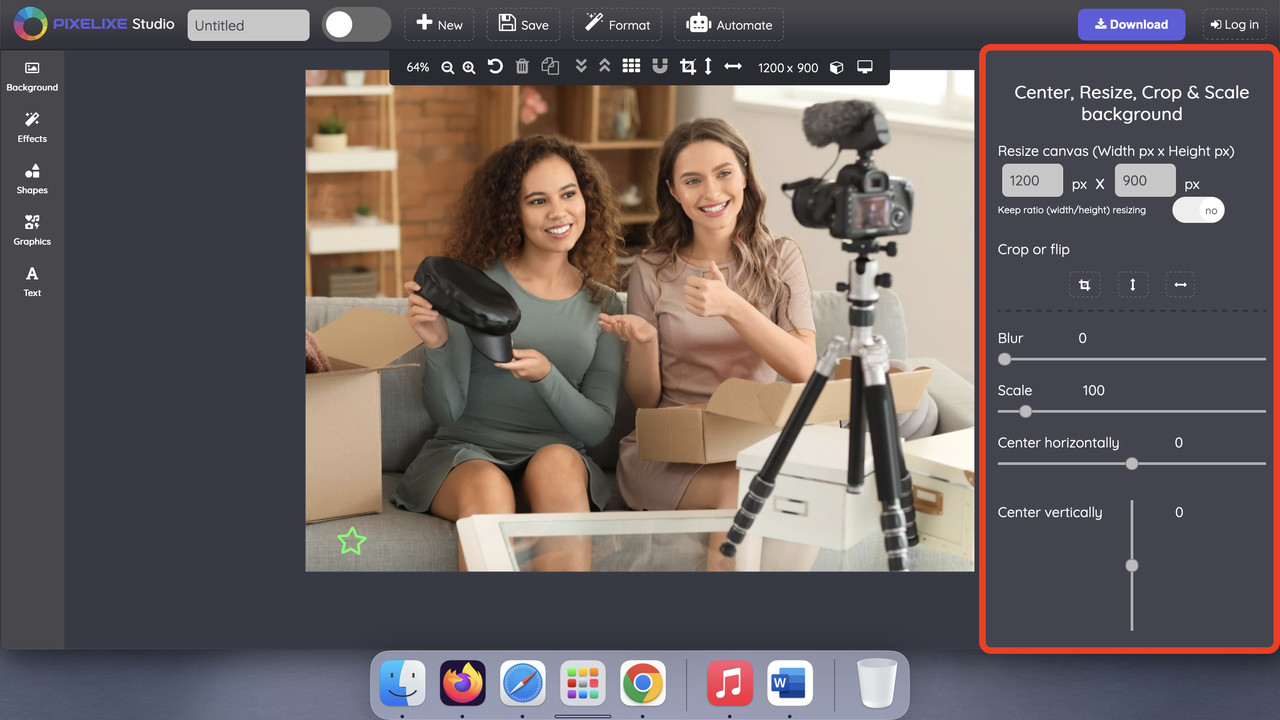 Pixelixe interface showing logo positioning and editing options
Step 3: Save and Download.
Once you have perfected the logo’s placement and appearance, save and download your logo-enhanced photo.
Pros and Cons of Using Pixelixe
Pros:
- Intuitive Interface: Pixelixe is user-friendly and accessible to users of all experience levels.
- Versatile Editing Options: Provides essential tools for resizing, rotating, and opacity adjustments to customize your logo.
- High-Quality Output: Ensures your photos maintain a professional look after logo integration.
Cons:
- Internet Connection Required: Pixelixe is an online tool and requires internet access.
- Focus on Logo Addition: While effective for branding, it’s more focused on logo integration than comprehensive photo editing.
Pixelixe Pricing
Pixelixe offers a free version with basic features. Their premium plans provide more advanced options and access to a wider range of tools, catering to different professional needs. Pixelixe offers several premium plans, including:
- Pixelixe Create: 9 USD/Month
- Pixelixe Automate: 49 USD/Month
- Pixelixe Scale: 99 USD/Month
- Pixelixe Enterprise: 249 USD/Month
Way 5: Toolxox – Simple and Direct Logo Addition
Toolxox provides a straightforward and uncomplicated solution for users wondering how to add my logo to a photo. This online tool is designed for ease of use, making it accessible to anyone looking to quickly personalize their images with a logo, regardless of their editing expertise.
Operation Steps with Images
Step 1: Access Toolxox and Upload Your Photo.
Open the Toolxox website and upload the photo you wish to brand.
Step 2: Upload and Position Your Logo.
Upload your logo file. Then, position the logo within your image using the interface provided.
Alt text: Toolxox’s online interface highlighting logo upload and positioning features, guiding users on simple logo addition to photos.
Step 3: Edit and Download.
Edit the logo’s size and opacity as needed, then save and download your branded photo.
Pros and Cons of Using Toolxox
Pros:
- User-Friendly Interface: Toolxox is designed for simplicity, making it suitable for users with minimal editing experience.
- Logo Customization: Offers options for resizing and opacity adjustments to tailor your logo’s appearance.
- Quick and Simple: Provides a streamlined process for adding logos to photos efficiently.
Cons:
- Outdated Interface: The interface may appear somewhat traditional compared to more modern tools.
- Limited Advanced Features: Toolxox is primarily focused on basic logo integration and lacks extensive editing functionalities.
Toolxox Pricing
Toolxox is a completely free online tool, making it accessible to all users without any cost.
Way 6: Visual Watermark – Branding and Protection
Visual Watermark is a well-regarded platform for learning how to add a logo on a picture, with a strong emphasis on both branding and copyright protection. This online tool simplifies logo integration and is particularly useful for content creators and businesses looking to safeguard their visual content.
Operation Steps with Images
Step 1: Navigate to Visual Watermark and Upload Your Photo.
Go to the Visual Watermark website and upload the photo you want to protect and brand.
Alt text: Visual Watermark’s online interface emphasizing photo upload functionality, guiding users on starting the process of adding a logo for branding and protection.
Step 2: Upload and Arrange Your Logo.
Upload your logo and arrange it within your image. Visual Watermark provides options for precise placement.
Step 3: Utilize Editing Options and Download.
Use the editing tools to resize, adjust opacity, and fine-tune the placement of your logo. Once satisfied, save and download your logo-enhanced photo.
Pros and Cons of Using Visual Watermark
Pros:
- User-Friendly: The interface is intuitive and easy to navigate for all users.
- Comprehensive Editing Features: Offers resizing, opacity control, and precise placement options for logos.
- High-Quality Output: Ensures your photos maintain their professional quality after adding a watermark.
Cons:
- Internet Connection Required: Visual Watermark is an online tool, requiring internet access.
- Limited Free Options: While a free version exists, premium features and functionalities may require a paid subscription.
Visual Watermark Pricing
Visual Watermark offers both free and paid plans. The free plan provides basic watermarking capabilities, while premium plans unlock additional features and options for more extensive branding and protection.
Tips for Selecting the Right Tool
When choosing the best tool for how to put a logo on photos, consider these important factors to ensure you select a tool that meets your needs and workflow:
-
Budget Considerations:
Evaluate whether a free tool meets your needs or if investing in a paid tool with more features is worthwhile. Many free tools are excellent for basic logo addition, while paid options often offer advanced features and higher-quality output.
-
Compatibility:
Ensure the tool is compatible with your devices (desktop, mobile, tablet) and supports the file formats you typically use. Cross-platform compatibility can be a significant advantage for a seamless workflow.
-
Ease of Use:
Choose a tool with a user-friendly interface that matches your technical skill level. An intuitive interface will save you time and frustration, especially if you need to brand photos regularly.
-
Additional Features:
Consider if you need more than just logo addition. Some tools offer a broader range of editing features, such as filters, text tools, and background removal, which can be beneficial for comprehensive image editing and branding.
Conclusion
Learning how to put a logo on a photo is now easier than ever, thanks to these accessible online tools. Whether you opt for CapCut for its versatility, IO for its simplicity, Fotor for its comprehensive features, Pixelixe for professional integration, Toolxox for straightforward edits, or Visual Watermark for branding and protection, each tool offers distinct advantages. When making your choice, consider your specific needs, skill level, and budget. With these versatile options, you can effortlessly elevate your visual content, create a strong brand presence, and make a memorable impact in the digital landscape.