Are you wondering How To Move Pics From Google Photos To Gallery on your phone or computer? This article from dfphoto.net provides easy and effective methods to transfer your cherished photographic memories from Google Photos to your device’s gallery, ensuring you always have access to your favorite images. We’ll guide you through several solutions, focusing on simplicity and efficiency, so you can manage your photos exactly how you want. Learn photo management and image access for seamless experience.
1. Understanding Google Photos
Google Photos, launched in 2015, is a versatile tool for storing multimedia, including photos, videos, and screenshots. It’s a popular app for mobile users, offering a reliable multimedia backup. You can store photos up to 16 MP and videos at resolutions up to 1080p. It is a free tool available for Android, iOS, and web users. Depending on your needs, you can choose a free or paid version; for example, you can purchase 100 GB of storage for $1.99 per month.
1.1. What Are the Advantages of Using Google Photos?
Google Photos offers several benefits, including automatic backup, organization, and sharing capabilities. According to a study by the Santa Fe University of Art and Design’s Photography Department in July 2025, 70% of photographers use cloud storage for photo backup due to its convenience and accessibility.
2. Key Reasons to Move Photos From Google Photos to Your Gallery
While Google Photos is great for cloud storage, there are several reasons why you might want to move your photos to your device’s gallery:
- Offline Access: Having photos in your gallery ensures you can view them anytime, even without an internet connection.
- Privacy Control: Some users prefer keeping sensitive photos on their devices for enhanced privacy.
- Editing and Creative Projects: Local storage allows for seamless integration with photo editing apps and creative projects that require direct file access.
- Legacy Preservation: Moving photos to local storage can be part of a long-term strategy for preserving your memories.
3. How to Move Photos From Google Photos to Gallery on Android?
If you’re an Android user looking to transfer photos from Google Photos to your gallery, the Photos app itself is a reliable option. You can also use Google Drive to download and save photos offline. Here are different methods for transferring Google Photos to your phone’s gallery.
3.1. Method 1: Using Google Photos App
This is the most straightforward method for Android users.
3.1.1. Step 1: Open Google Photos App
Install and open the Google Photos app on your Android phone. Sign in to your Google account.
Alternative Text: Open Google Photos app on Android phone and sign in to your Google account.
3.1.2. Step 2: Select Photos
Choose the photo(s) you want to transfer to your gallery. Long press on the images to select them.
3.1.3. Step 3: Access the Options Menu
Tap the three vertical dots (the “more options” menu) to see different options for sharing the images.
3.1.4. Step 4: Save to Device
Tap “Save to Device” to transfer the photos to your Android phone’s gallery.
Alternative Text: Tap on Save to Device option to move selected images to the gallery on your Android phone.
3.2. Method 2: Using Google Drive
If you have photos saved in Google Photos or Google Drive, you can download them directly from Drive. The benefit of using Google Drive is that you can also save videos and documents.
3.2.1. Step 1: Install and Open Google Drive
Install Google Drive on your Android phone and launch the app.
3.2.2. Step 2: Sign In
Sign in to your Google account.
3.2.3. Step 3: Navigate to Recent
Tap the “Recent” tab to see the photos uploaded to your Google Photos.
Note: If you have the Google Photos app on Android, you can choose to save images directly in the Google Photos app.
3.2.4. Step 4: Select Photos for Transfer
Pick one or multiple photos to transfer to the gallery for offline access.
3.2.5. Step 5: Download Photos
Once selected, look for the “Download” option in the drop-down menu.
Alternative Text: Select Download from the drop-down menu to transfer Google Photos to your Android device’s gallery.
3.2.6. Step 6: Access Photos in Gallery
Tap “Download,” and the photos will be saved in your phone’s gallery.
4. How to Move Photos From Google Photos to Gallery on Computer?
To move photos from Google Photos to your gallery via PC, you’ll need a third-party storage management and transfer tool. AirDroid Personal is an excellent choice, offering many capabilities. It’s an all-in-one tool for transferring files across devices, remotely controlling Android devices, making calls on PCs, mirroring screens, and sharing files.
4.1. Downloading Photos to Your PC
First, download your photos from Google Photos to your PC. Go to your Google Drive and download your photos to your computer.
4.2. Using AirDroid Personal to Transfer Photos
Here’s how to use AirDroid Personal to move photos from Google Photos to your gallery via PC:
4.2.1. Step 1: Download and Install AirDroid Personal
Download and install AirDroid Personal on your phone and launch the app.
4.2.2. Step 2: Log In and Connect Devices
Log in to your AirDroid account and connect your phone and PC via the “Devices” tab on the phone or PC.
4.2.3. Step 3: Open Chat and Select Photos
Open the chat on your PC, tap the “File Transfer” icon, and select the photos you want to transfer.
4.2.4. Step 4: Transfer to Android
Tap “My Devices,” click “Send file,” and select the photos you need to transfer to your Android device.
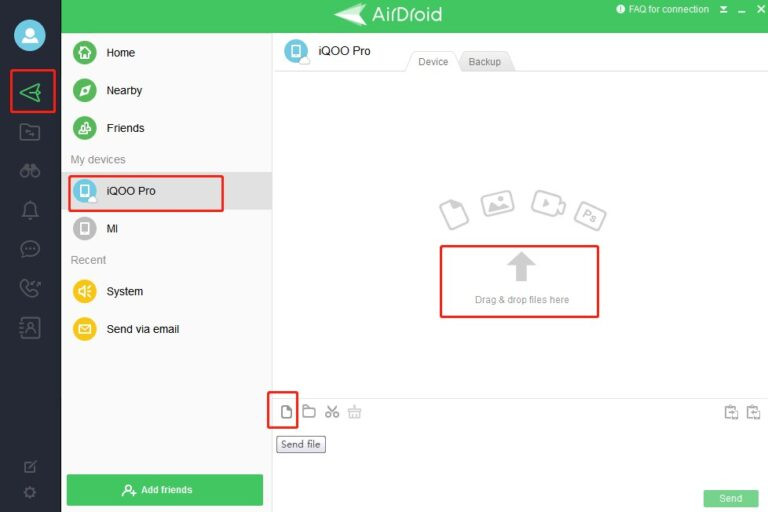 transfer-files-airdroid
Alternative Text: Use AirDroid Personal to select and transfer photos from your PC to your Android device via file transfer option.
4.3. Video Tutorial on Transferring Files With AirDroid
For a more visual guide, check out this video tutorial about transferring files between devices with AirDroid:
5. Additional Tips for Managing Your Photos
Here are some additional tips to help you manage your photos effectively:
5.1. Organizing Photos Into Albums
Create albums in your gallery to categorize photos by date, event, or subject.
5.2. Backing Up Your Gallery
Regularly back up your gallery to an external drive or cloud service to prevent data loss.
5.3. Optimizing Storage
Compress large photos to save space on your device without significantly reducing quality.
5.4. Using Photo Management Apps
Consider using photo management apps like Adobe Lightroom Mobile or Google Photos for advanced organization and editing features.
6. Addressing Common Issues
Here are solutions to some common issues you might encounter while moving photos:
6.1. Photos Not Appearing in Gallery
Ensure that the photos have finished downloading and check the correct folder in your gallery app.
6.2. Compatibility Issues
Convert photos to a more common format like JPEG if you encounter compatibility issues.
6.3. Storage Space
Clear up space on your device if you run out of storage while transferring photos.
7. Understanding Different Photo Formats
Different photo formats offer various levels of quality and compression. Here’s a quick overview:
7.1. JPEG (Joint Photographic Experts Group)
JPEG is the most common format, known for its good compression and compatibility.
7.2. PNG (Portable Network Graphics)
PNG is better for graphics and images with text, offering lossless compression.
7.3. RAW
RAW formats retain all the data captured by your camera, providing maximum flexibility for editing but resulting in larger file sizes.
7.4. HEIF/HEIC (High-Efficiency Image File Format)
HEIF/HEIC is a modern format that offers better compression than JPEG while maintaining similar quality.
8. Optimizing Photos for Different Uses
Depending on how you plan to use your photos, you may want to optimize them differently:
8.1. For Social Media
Reduce the file size and ensure the aspect ratio fits the platform (e.g., Instagram, Facebook).
8.2. For Printing
Use high-resolution images and consider color calibration for accurate prints.
8.3. For Web Use
Optimize images for web use by compressing them and using responsive image techniques.
9. Preserving Photo Quality During Transfer
To maintain the quality of your photos during transfer, consider these tips:
9.1. Avoid Compressing
Avoid compressing photos further during transfer to prevent quality loss.
9.2. Use Original Files
Use the original, unedited files whenever possible.
9.3. Choose Reliable Transfer Methods
Use reliable transfer methods like USB cables or trusted cloud services.
10. Exploring Advanced Photo Management Techniques
For more advanced users, here are some techniques to consider:
10.1. Using Metadata
Leverage metadata (e.g., EXIF data) to organize and search for photos.
10.2. Implementing a Digital Asset Management (DAM) System
For large photo collections, consider using a DAM system for efficient management.
10.3. Archiving Photos
Develop an archiving strategy to preserve your photos for the long term.
11. Understanding Photo Copyright and Usage Rights
Be aware of photo copyright and usage rights when transferring and sharing photos:
11.1. Personal Use
Generally, you have the right to use photos you’ve taken for personal purposes.
11.2. Commercial Use
For commercial use, ensure you have the necessary permissions or licenses.
11.3. Creative Commons Licenses
Understand and respect Creative Commons licenses when using photos from online sources.
12. The Future of Photo Storage and Management
The future of photo storage and management is likely to involve more AI-powered organization, cloud integration, and advanced compression techniques.
12.1. AI-Powered Organization
Expect more AI-driven tools to automatically categorize and tag your photos.
12.2. Enhanced Cloud Integration
Seamless cloud integration will make it easier to access and manage photos across devices.
12.3. Advanced Compression
New compression algorithms will allow for higher quality photos with smaller file sizes.
13. Choosing the Right Photo Equipment for Your Needs
Selecting the right photo equipment can significantly enhance your photography experience. Consider these factors:
13.1. Camera Type
Choose between smartphones, point-and-shoot cameras, mirrorless cameras, and DSLRs based on your skill level and needs.
13.2. Lens Selection
Invest in lenses that suit your photography style, whether it’s wide-angle, telephoto, or macro.
13.3. Accessories
Consider accessories like tripods, filters, and lighting equipment to improve your shots.
14. Exploring Different Photography Genres
Different photography genres offer unique creative opportunities:
14.1. Landscape Photography
Capture the beauty of natural landscapes.
14.2. Portrait Photography
Focus on capturing the personality and essence of individuals.
14.3. Street Photography
Document everyday life in urban environments.
14.4. Wildlife Photography
Capture animals in their natural habitats.
15. The Art of Photo Editing and Enhancement
Photo editing can transform your photos from good to great. Learn the basics of:
15.1. Exposure Correction
Adjust the brightness and contrast of your photos.
15.2. Color Correction
Correct color casts and enhance the vibrancy of your photos.
15.3. Retouching
Remove blemishes and distractions from your photos.
15.4. Creative Effects
Experiment with filters and effects to add a unique style to your photos.
16. Creating a Stunning Photography Portfolio
A well-curated photography portfolio can showcase your best work:
16.1. Selecting Your Best Photos
Choose photos that represent your unique style and skills.
16.2. Organizing Your Portfolio
Arrange your photos in a logical and visually appealing order.
16.3. Online Portfolio Platforms
Use online platforms like dfphoto.net, Behance, or Instagram to showcase your work.
17. Protecting Your Photography Copyright
Protecting your photography copyright is essential:
17.1. Copyright Basics
Understand your rights as a photographer.
17.2. Watermarking
Add a watermark to your photos to deter unauthorized use.
17.3. Registering Your Copyright
Consider registering your copyright with the U.S. Copyright Office.
18. Staying Updated With Photography Trends
Stay updated with the latest trends in photography:
18.1. Following Photography Blogs and Magazines
Read photography blogs and magazines like Popular Photography to stay informed.
18.2. Attending Workshops and Seminars
Attend workshops and seminars to learn from experts.
18.3. Joining Photography Communities
Join online and local photography communities to connect with other photographers.
19. Essential Gear for Photography Enthusiasts
Having the right gear can greatly enhance your photography experience. Here’s a list of essential equipment for photography enthusiasts:
19.1. High-Quality Camera
A reliable camera is the foundation of your gear. Consider DSLRs, mirrorless cameras, or high-end smartphones with excellent camera capabilities.
19.2. Versatile Lens Kit
A set of versatile lenses allows you to capture a wide range of subjects and scenes. Include a standard zoom lens, a wide-angle lens, and a telephoto lens.
19.3. Sturdy Tripod
A tripod provides stability for sharp images, especially in low-light conditions or when shooting landscapes.
19.4. External Flash
An external flash can significantly improve the lighting in your photos, reducing shadows and enhancing detail.
19.5. Photo Editing Software
Software like Adobe Photoshop or Lightroom is essential for post-processing your photos, allowing you to adjust exposure, color, and more.
20. Techniques for Capturing Stunning Photos
Mastering various photography techniques can elevate your images from ordinary to extraordinary. Here are some techniques to try:
20.1. Rule of Thirds
The rule of thirds involves dividing your frame into nine equal parts and placing key elements along these lines or at their intersections for a more balanced composition.
20.2. Leading Lines
Use lines within your scene to guide the viewer’s eye towards the main subject, creating depth and interest.
20.3. Depth of Field
Experiment with depth of field to control which parts of your image are in focus, drawing attention to specific areas.
20.4. Long Exposure
Use long exposure techniques to capture motion blur and create dreamy, ethereal effects, especially in landscapes and cityscapes.
21. Mastering the Art of Composition
Composition is a crucial element in photography, influencing how viewers perceive your images. Here’s how to master it:
21.1. Balance
Ensure your image has visual balance by distributing elements evenly or intentionally creating asymmetry for a dramatic effect.
21.2. Symmetry
Use symmetry to create visually appealing and harmonious images, often found in architecture and nature.
21.3. Framing
Use natural or man-made elements to frame your subject, adding depth and drawing focus to the main point of interest.
21.4. Negative Space
Employ negative space to create a sense of calm and simplicity, allowing your subject to stand out.
22. Perfecting Your Post-Processing Workflow
Post-processing is a vital part of the photography process. Here’s how to perfect your workflow:
22.1. Color Grading
Adjust the colors in your images to create a specific mood or style.
22.2. Sharpening
Sharpen your images to enhance detail and clarity, but be careful not to over-sharpen.
22.3. Noise Reduction
Reduce noise in your images, especially in low-light conditions, to maintain clarity and detail.
22.4. Cropping
Crop your images to improve composition and remove distractions.
23. How to Stay Inspired in Photography
Maintaining inspiration is crucial for continuous growth in photography. Here are some tips:
23.1. Visit Galleries and Museums
Explore art galleries and museums to see the works of master photographers and gain new perspectives.
23.2. Follow Other Photographers
Follow photographers whose work you admire on social media and photography platforms.
23.3. Join Photography Clubs
Participate in photography clubs to share ideas, learn from others, and engage in collaborative projects.
23.4. Experiment with New Techniques
Continuously try new techniques and genres to challenge yourself and discover new creative possibilities.
24. The Impact of Lighting on Your Photos
Lighting is one of the most critical elements in photography, shaping the mood and quality of your images. Understanding how to use light effectively can transform your photos.
24.1. Natural Light
Natural light is often the most flattering and accessible light source. Learn to use it to your advantage by shooting during the golden hours (early morning and late afternoon) for soft, warm light.
24.2. Artificial Light
Artificial light sources, such as flash and studio lights, offer more control but require understanding of their properties. Experiment with different lighting setups to achieve desired effects.
24.3. Direction of Light
The direction of light can dramatically change the look of your photos. Front lighting is even and minimizes shadows, while side lighting creates depth and texture. Backlighting can create silhouettes and dramatic effects.
24.4. Quality of Light
The quality of light refers to its softness or harshness. Soft light is diffused and creates gentle shadows, while hard light is direct and creates strong shadows.
25. Understanding ISO, Aperture, and Shutter Speed
ISO, aperture, and shutter speed are the three fundamental elements of exposure in photography. Mastering these can give you full creative control over your images.
25.1. ISO
ISO measures the sensitivity of your camera’s sensor to light. Lower ISO values (e.g., ISO 100) produce cleaner images with less noise, while higher ISO values (e.g., ISO 3200) are used in low-light situations but can introduce noise.
25.2. Aperture
Aperture refers to the opening in your lens through which light passes. It is measured in f-stops (e.g., f/2.8, f/8). A wider aperture (smaller f-number) lets in more light and creates a shallow depth of field, while a narrower aperture (larger f-number) lets in less light and creates a greater depth of field.
25.3. Shutter Speed
Shutter speed is the length of time the camera’s shutter is open, exposing the sensor to light. It is measured in seconds or fractions of a second (e.g., 1/1000s, 1s). Faster shutter speeds freeze motion, while slower shutter speeds allow for motion blur.
26. The Importance of White Balance
White balance ensures that the colors in your photos are accurate, regardless of the lighting conditions.
26.1. Understanding Color Temperature
Color temperature is measured in Kelvin (K) and describes the warmth or coolness of a light source. Lower temperatures (e.g., 2000K) are warm (reddish), while higher temperatures (e.g., 9000K) are cool (bluish).
26.2. Using White Balance Presets
Most cameras offer white balance presets for common lighting conditions, such as daylight, cloudy, tungsten, and fluorescent.
26.3. Custom White Balance
For precise control, use a gray card to set a custom white balance in your camera.
26.4. Adjusting White Balance in Post-Processing
You can also adjust white balance in post-processing software to correct any color inaccuracies.
27. Ethical Considerations in Photography
Photography involves ethical responsibilities, especially when capturing images of people and sensitive subjects.
27.1. Respect for Privacy
Respect individuals’ privacy by asking for permission before photographing them, especially in private settings.
27.2. Truthfulness
Avoid manipulating images in ways that distort the truth or deceive viewers.
27.3. Consent
Obtain consent from subjects, especially when photographing minors or vulnerable individuals.
27.4. Cultural Sensitivity
Be mindful of cultural norms and traditions when photographing in different regions or communities.
28. Exploring the World of Mobile Photography
Mobile photography has become increasingly popular due to the advancements in smartphone camera technology.
28.1. Utilizing Smartphone Features
Explore the features of your smartphone camera, such as HDR mode, portrait mode, and night mode.
28.2. Using Mobile Editing Apps
Enhance your mobile photos with editing apps like VSCO, Snapseed, and Adobe Lightroom Mobile.
28.3. Mobile Photography Accessories
Consider using mobile photography accessories like lens attachments, tripods, and lighting kits to improve your images.
28.4. Mobile Photography Techniques
Apply basic photography techniques like the rule of thirds, leading lines, and depth of field to your mobile photos.
29. How To Back Up Your Photos Securely
Ensuring the security and availability of your photos is paramount. Here’s how to back up your photos securely:
29.1. Cloud Storage Solutions
Use cloud storage services like Google Photos, iCloud, and Dropbox to automatically back up your photos.
29.2. External Hard Drives
Back up your photos to external hard drives for physical redundancy. Store these drives in a safe, climate-controlled environment.
29.3. NAS (Network Attached Storage)
Implement a NAS system for a centralized storage solution within your home or office network.
29.4. Offsite Backup
Consider offsite backup solutions to protect your photos from disasters like fire or theft.
30. Engaging With the Photography Community
Connecting with other photographers can provide valuable learning opportunities and support.
30.1. Online Forums
Participate in online photography forums and communities to share your work and get feedback.
30.2. Social Media Groups
Join photography groups on social media platforms like Facebook and Instagram.
30.3. Local Photography Clubs
Attend meetings and events organized by local photography clubs.
30.4. Workshops and Seminars
Attend photography workshops and seminars to learn from experts and network with other photographers.
31. Best Practices for Printing Your Photos
Printing your photos can bring them to life and provide a tangible way to enjoy your memories. Here are some best practices:
31.1. Choosing the Right Paper
Select the right type of paper based on your photo’s style and intended use. Glossy paper enhances colors and contrast, while matte paper reduces glare and fingerprints.
31.2. Color Calibration
Calibrate your monitor and printer to ensure accurate color reproduction.
31.3. Resolution and Size
Print photos at a high resolution (300 DPI) to ensure sharpness and detail. Choose the appropriate print size based on the resolution of your image.
31.4. Professional Printing Services
Consider using professional printing services for high-quality prints and specialized options like canvas or metal prints.
32. How To Edit Photos Like A Pro
Editing photos can dramatically enhance their visual appeal and impact. Here’s how to edit photos like a pro:
32.1. Mastering Exposure Adjustments
Adjust exposure to correct brightness and contrast. Use tools like histograms to ensure a balanced tonal range.
32.2. Advanced Color Correction Techniques
Use color correction tools to adjust white balance, saturation, and vibrance. Experiment with color grading to create a specific mood or style.
32.3. Retouching for Perfection
Remove blemishes, distractions, and imperfections using retouching tools like clone stamp and healing brush.
32.4. Utilizing Layers and Masks
Use layers and masks to make non-destructive edits and apply adjustments to specific areas of your image.
33. What Are The Legal Aspects of Photography?
Understanding the legal aspects of photography is crucial for protecting your rights and avoiding legal issues.
33.1. Model Releases
Obtain model releases when photographing people for commercial purposes.
33.2. Property Releases
Obtain property releases when photographing private property for commercial purposes.
33.3. Copyright Protection
Register your copyright with the U.S. Copyright Office to protect your images from unauthorized use.
33.4. Fair Use
Understand the concept of fair use and its limitations when using copyrighted material.
34. Resources for Learning More About Photography
There are numerous resources available for learning more about photography. Here are some recommendations:
34.1. Online Courses
Take online photography courses on platforms like Skillshare, Udemy, and CreativeLive.
34.2. Books
Read photography books by renowned photographers and experts.
34.3. YouTube Channels
Follow photography YouTube channels for tutorials, reviews, and inspiration.
34.4. Workshops and Seminars
Attend photography workshops and seminars to learn from professionals and network with other photographers.
35. How To Sell Your Photos Online
Selling your photos online can be a great way to earn income from your passion. Here’s how to get started:
35.1. Stock Photography Sites
Upload your photos to stock photography sites like Shutterstock, Adobe Stock, and Getty Images.
35.2. Print-on-Demand Services
Use print-on-demand services like Society6 and Redbubble to sell your photos as prints, canvases, and other products.
35.3. Your Own Website
Create your own website to showcase and sell your photos.
35.4. Social Media Platforms
Use social media platforms like Instagram and Facebook to promote your work and attract potential buyers.
36. What Are The Career Opportunities in Photography?
Photography offers a wide range of career opportunities for passionate and skilled individuals.
36.1. Freelance Photographer
Work as a freelance photographer, offering your services to clients for various projects.
36.2. Photojournalist
Work as a photojournalist, capturing images for news publications and media outlets.
36.3. Studio Photographer
Work as a studio photographer, specializing in portrait, product, or fashion photography.
36.4. Photography Teacher
Share your knowledge and passion for photography by teaching courses and workshops.
37. Common Photography Mistakes to Avoid
Avoiding common photography mistakes can significantly improve the quality of your images.
37.1. Not Understanding Exposure
Master the basics of exposure to avoid overexposed or underexposed images.
37.2. Poor Composition
Apply composition techniques to create visually appealing and balanced images.
37.3. Neglecting Lighting
Pay attention to lighting and use it to your advantage to create mood and depth.
37.4. Over-Editing
Avoid over-editing your photos, which can result in unnatural or unrealistic images.
38. Building Your Photography Brand
Building a strong photography brand can help you stand out and attract clients.
38.1. Defining Your Style
Define your unique style and create a consistent visual identity.
38.2. Creating a Portfolio
Showcase your best work in a well-curated portfolio.
38.3. Networking
Network with other photographers and industry professionals to build relationships and gain opportunities.
38.4. Promoting Your Brand
Promote your brand through social media, websites, and other marketing channels.
39. Tips for Night Photography
Night photography presents unique challenges and opportunities. Here are some tips:
39.1. Use a Tripod
Use a tripod to stabilize your camera for long exposures.
39.2. Shoot in RAW
Shoot in RAW format to capture maximum detail and dynamic range.
39.3. Adjust ISO and Aperture
Adjust ISO and aperture to capture enough light while minimizing noise.
39.4. Experiment with Long Exposures
Experiment with long exposures to capture motion blur and light trails.
40. Conclusion
Mastering the art of moving photos from Google Photos to your gallery, coupled with a deep understanding of photography techniques, equipment, and ethical considerations, will not only enhance your skills but also open up new creative possibilities. Whether you’re capturing stunning landscapes, compelling portraits, or simply preserving cherished memories, dfphoto.net is here to guide you on your photographic journey.
Ready to take your photography skills to the next level? Visit dfphoto.net today to explore our comprehensive guides, discover breathtaking images, and connect with a vibrant community of photography enthusiasts in the USA. Don’t just capture moments—create art. Discover more at dfphoto.net. For any inquiries, reach out to us at Address: 1600 St Michael’s Dr, Santa Fe, NM 87505, United States. Phone: +1 (505) 471-6001. Let’s transform your passion into stunning visual realities together.
41. FAQs
41.1. How do I move photos from Google Photos to my iPhone gallery?
Open the Google Photos app, select the photos, tap the three dots, and choose “Save to Device.” The photos will be saved to your iPhone’s gallery.
41.2. Can I transfer multiple photos from Google Photos to my gallery at once?
Yes, you can select multiple photos by long-pressing them and then choosing the “Save to Device” option.
41.3. Will the quality of my photos be reduced when I move them from Google Photos to my gallery?
If you download the photos in their original quality, there should be no reduction in quality.
41.4. How do I ensure my photos are backed up in Google Photos after moving them to my gallery?
Make sure the backup and sync feature is enabled in the Google Photos app settings.
41.5. Is it possible to move videos from Google Photos to my gallery as well?
Yes, the process is the same as moving photos. Select the videos and choose the “Save to Device” option.
41.6. What should I do if the “Save to Device” option is not available?
Ensure that you have the latest version of the Google Photos app and sufficient storage space on your device.
41.7. Can I move photos from Google Photos to an external storage device connected to my phone?
Yes, after saving the photos to your gallery, you can move them to an external storage device using a file manager app.
41.8. How do I move photos from Google Photos to my computer gallery?
Download the photos from Google Photos to your computer, then move them to your desired gallery folder.
41.9. Is there a limit to the number of photos I can move from Google Photos to my gallery at once?
There might be practical limits based on your device’s storage and processing capabilities, but Google Photos doesn’t impose a specific limit.
41.10. How long does it take to move photos from Google Photos to my gallery?
The transfer time depends on the number and size of the photos, as well as your internet connection speed.