Are you looking to quickly annotate, highlight, or add a personal touch to your photos directly from your iPhone? With the built-in Markup feature on your iPhone, available across multiple apps, you can easily enhance your images and PDFs with drawings, text, and signatures, all within a few taps, and dfphoto.net shows you how. This guide will walk you through everything you need to know about using Markup on your iPhone, from accessing it in different apps to mastering its various tools, and will also address all the search intentions. Learn advanced editing, photo annotation, and creative enhancements using a digital device.
1. What Is Markup on iPhone and Why Should You Use It?
Markup on iPhone is a native tool that allows you to annotate, draw, and add text to images, screenshots, and PDFs directly on your device. It’s integrated into various apps like Mail, Messages, and Photos, making it incredibly convenient for quick edits and annotations. Using Markup can significantly enhance your communication and productivity by allowing you to provide visual feedback, highlight important information, or simply add a personal touch to your media.
1.1. Benefits of Using Markup
- Quick Annotations: Easily highlight important details or add notes to images and documents.
- Enhanced Communication: Provide clear visual feedback to colleagues and friends.
- Personalization: Add a personal touch to your photos with drawings and signatures.
- Increased Productivity: Streamline your workflow by editing and annotating directly on your device without needing additional apps.
- Versatility: Use it across multiple apps, including Mail, Messages, Photos, and Files.
1.2. Who Should Use Markup?
Markup is perfect for:
- Professionals: Providing feedback on documents, annotating designs, or quickly marking up reports.
- Students: Highlighting key points in study materials or adding notes to research papers.
- Creatives: Adding artistic touches to photos, creating quick sketches, or annotating visual projects.
- Anyone who wants to quickly edit and share images or documents directly from their iPhone.
1.3. Markup Availability and Compatibility
Markup is available on all iPhones running iOS 9 or later. It is seamlessly integrated into various apps, ensuring you can access it whenever you need it. Whether you’re using the latest iPhone or an older model, Markup provides a consistent and reliable experience.
2. Where Can You Use Markup on Your iPhone?
Markup is versatile and can be used in several native iOS applications. Here’s a breakdown of where you can find and use it:
2.1. Mail
You can use Markup to annotate images or PDFs before sending them via email.
2.1.1. How to Access Markup in Mail
- Open the Mail app and start a new email or reply to an existing one.
- Tap inside the body of your email, then tap the arrow icon or Return to open the format bar. You can also tap inside your email, then tap the cursor and select Insert Photo or Video or Add Attachment. You might need to tap the arrow icon to scroll through the options.
- Tap the Camera button or the Document button, then look for the photo or PDF that you want to attach and mark up.
- Tap the attachment, then tap the arrow icon. Tap the Markup button to add your markup. Tap the plus button to add a signature, text, and more.
- Tap Done, then send your email.
2.1.2. Use Case: Providing Feedback on Documents
Imagine you’re a project manager reviewing a document sent by a team member. You can quickly add comments, highlight areas needing revision, and provide specific feedback using Markup, ensuring clear and efficient communication.
2.2. Messages
Markup allows you to quickly annotate photos before sending them to friends and family.
2.2.1. How to Access Markup in Messages
- Open Messages and tap the compose button to start a new conversation or go to an existing one.
- Tap the Plus button, then tap Photos.
- Select a photo.
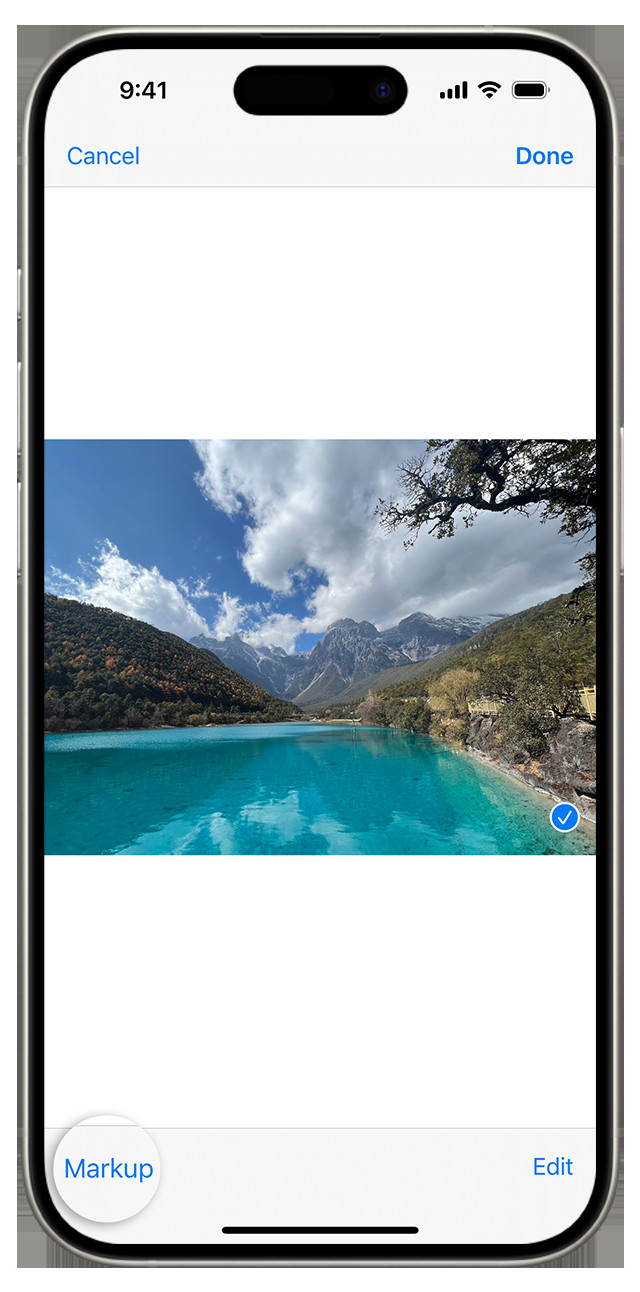
- Tap the photo in the message, then tap Markup. From here, you can add a sketch to the photo, or tap the plus button for other Markup options.
- Tap Save, then tap Done.
- Tap the Send button.
 iPhone Messages with Markup Button
2.2.2. Use Case: Sharing Annotated Vacation Photos
If you’re on vacation and want to share a photo with your family, you can use Markup to point out interesting landmarks or add fun captions to your photos before sending them.
2.3. Photos
The Photos app lets you directly edit and annotate your photos for creative enhancements and quick adjustments.
2.3.1. How to Access Markup in Photos
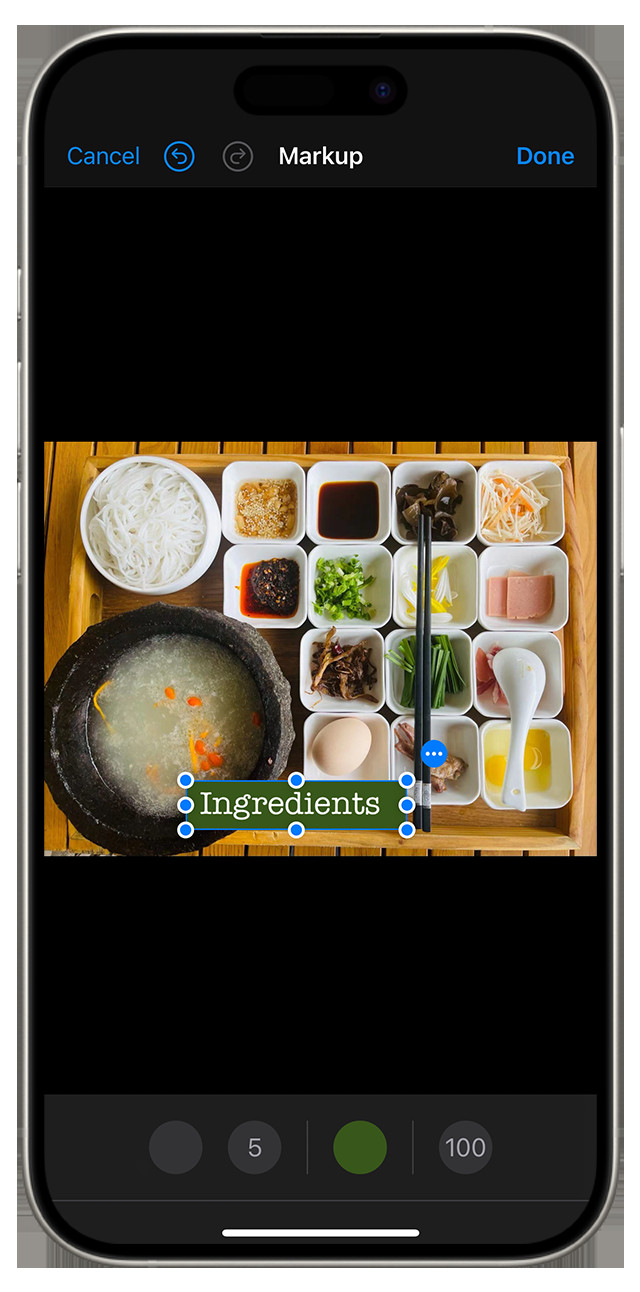
- Go to Photos and select the photo you want.
- Tap Edit, then tap the Markup button. Tap the Add button to add text, shapes, and more.
- Tap Done, then tap Done again.
 iPhone Photos App with Markup Tools
2.3.2. Use Case: Enhancing Social Media Posts
If you’re a social media enthusiast, you can use Markup to add creative elements, highlight important details, or add text overlays to your photos before posting them on platforms like Instagram or Facebook.
2.4. Files
Markup is integrated into the Files app, allowing you to annotate PDFs and other documents directly.
2.4.1. How to Access Markup in Files
- Open the Files app and locate the PDF or image you want to annotate.
- Tap the file to open it.
- Tap the Markup button (usually located at the top-right corner).
- Use the Markup tools to annotate the document.
- Tap Done to save your changes.
2.4.2. Use Case: Reviewing and Signing Documents
Professionals can use Markup in the Files app to review contracts, sign documents, and add notes directly on their iPhone, streamlining the document management process.
3. How to Use Markup Tools on Your iPhone
Markup comes with a variety of tools that allow you to annotate and edit your photos and documents effectively. Here’s a detailed look at each tool:
3.1. Pen, Highlighter, and Pencil
These tools allow you to draw freehand on your images. You can adjust the color, opacity, and thickness of each tool to achieve the desired effect.
3.1.1. How to Use the Drawing Tools
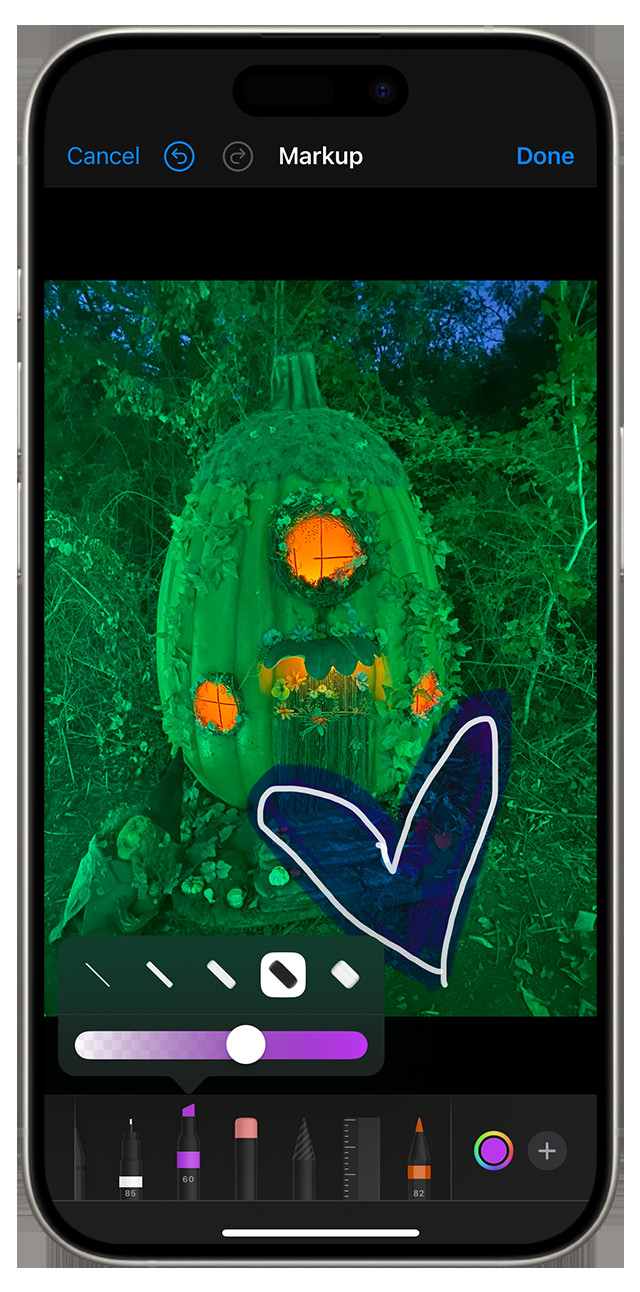
- Select the Pen, Highlighter, or Pencil tool from the Markup toolbar.
- Tap the selected tool again to adjust the color, opacity, and thickness.
- Use your finger or a stylus to draw on the image.
 iPhone Drawing with Markup Tools
3.1.2. Tips for Effective Drawing
- Use a stylus for more precise drawing.
- Adjust the opacity for subtle highlighting or bold markings.
- Experiment with different colors to make your annotations stand out.
3.2. Eraser
The Eraser tool allows you to remove unwanted markings from your image.
3.2.1. How to Use the Eraser
- Select the Eraser tool from the Markup toolbar.
- Rub your finger across the area you want to erase.
3.2.2. Tips for Precise Erasing
- Zoom in for detailed erasing.
- Use the Undo button to revert any accidental erasures.
3.3. Lasso Tool
The Lasso tool allows you to select and move specific parts of your drawing.
3.3.1. How to Use the Lasso Tool
- Select the Lasso tool from the Markup toolbar.
- Trace a circle around the drawing that you want to move.
- Drag the selected drawing to its new location.
3.3.2. Use Case: Rearranging Annotations
If you’ve added several annotations to an image and want to rearrange them, the Lasso tool makes it easy to select and move specific elements without affecting the rest of the image.
3.4. Add Text
The Add Text tool allows you to insert text boxes into your images.
3.4.1. How to Add Text
- Tap the Add button (the plus sign) in the Markup toolbar.
- Select “Text” from the menu.
- Tap the text box to edit the text.
- Use the formatting options to adjust the font, size, and alignment.
- Drag the text box to its desired location.
3.4.2. Tips for Effective Text Annotation
- Use clear and concise text for easy readability.
- Choose a font and color that complements the image.
- Adjust the text size to fit the annotation area.
3.5. Add Signature
The Add Signature tool allows you to add a digital signature to documents.
3.5.1. How to Add a Signature
- Tap the Add button (the plus sign) in the Markup toolbar.
- Select “Signature” from the menu.
- If you have existing signatures, choose one from the list. Otherwise, tap “Add New Signature.”
- Sign your name using your finger or a stylus.
- Tap Done to save the signature.
- Drag the signature to its desired location.
3.5.2. Best Practices for Digital Signatures
- Create a clear and legible signature.
- Store multiple signatures for different purposes.
- Ensure the signature is appropriately sized for the document.
3.6. Add Shapes
The Add Shapes tool allows you to insert various shapes into your images, such as circles, squares, arrows, and speech bubbles.
3.6.1. How to Add Shapes
- Tap the Add button (the plus sign) in the Markup toolbar.
- Select a shape from the menu.
- Drag the shape to its desired location.
- Use the blue dots to adjust the size and shape.
- Use the green dots to adjust the arrow’s curve and the speech bubble’s appearance.
3.6.2. Creative Ways to Use Shapes
- Use circles to highlight specific areas of interest.
- Use arrows to point out important details or indicate direction.
- Use speech bubbles to add captions or comments.
3.7. Magnifier Tool
The Magnifier tool allows you to zoom in on specific areas of your image for closer inspection.
3.7.1. How to Use the Magnifier Tool
- Tap the Add button (the plus sign) in the Markup toolbar.
- Select “Magnifier” from the menu.
- Drag the loupe around to the area you want to magnify.
- Use the blue dot to adjust the size of the magnifier.
- Use the green dot to increase or decrease the magnification level.
3.7.2. Practical Applications of the Magnifier Tool
- Inspecting fine details in photographs.
- Highlighting small text in documents.
- Focusing attention on specific areas of an image.
4. Advanced Markup Techniques
To get the most out of Markup, consider these advanced techniques that can enhance your workflow and creativity.
4.1. Layering Annotations
Layering annotations involves adding multiple layers of drawings, text, and shapes to create complex and informative images.
4.1.1. Tips for Effective Layering
- Start with a clear base image.
- Add annotations in a logical order.
- Use different colors to distinguish between layers.
- Adjust the opacity of layers to create depth.
4.2. Using Markup for Collaborative Feedback
Markup can be a powerful tool for collaborative feedback, allowing multiple users to annotate and comment on the same document.
4.2.1. How to Collaborate Using Markup
- Share the image or document with your collaborators.
- Have each collaborator add their annotations using Markup.
- Review the combined annotations and provide additional feedback.
4.3. Integrating Markup with Other Apps
Markup can be seamlessly integrated with other apps on your iPhone to enhance your productivity.
4.3.1. Examples of App Integration
- Use Markup with cloud storage apps like Dropbox or Google Drive to annotate and share documents.
- Use Markup with project management apps like Trello or Asana to provide visual feedback on tasks.
- Use Markup with educational apps like Notability or GoodNotes to annotate lecture notes and study materials.
5. Troubleshooting Common Markup Issues
Even with its ease of use, you might encounter some issues while using Markup. Here are some common problems and their solutions:
5.1. Markup Tools Not Visible
If you don’t see the Markup tools, make sure you’re accessing Markup from a compatible app and that you’ve selected an image or document that can be annotated.
5.1.1. Solution Steps
- Ensure you’re using a supported app like Mail, Messages, Photos, or Files.
- Select an image or document that supports annotation.
- Look for the Markup button, which may be represented by a pen icon or a “Markup” option in the menu.
5.2. Accidental Markups
Accidental markups can occur when you unintentionally touch the screen while using the drawing tools.
5.2.1. Prevention Tips
- Use a stylus for more precise control.
- Lock the screen to prevent accidental touches.
- Use the Undo button to quickly revert any mistakes.
5.3. Difficulty Erasing Markups
If you’re having trouble erasing markups, make sure you’re using the Eraser tool correctly and that you’re not trying to erase flattened or embedded elements.
5.3.1. Solution Steps
- Select the Eraser tool from the Markup toolbar.
- Rub your finger across the area you want to erase.
- Zoom in for detailed erasing.
- If you’re unable to erase a specific element, it may be flattened or embedded in the image. In this case, you may need to use a more advanced editing tool.
6. Inspiring Ideas for Using Markup Creatively
Markup isn’t just for practical annotations; it can also be used for creative expression. Here are some inspiring ideas to get you started:
6.1. Creating Digital Art
Use the drawing tools to create original digital artwork directly on your iPhone.
6.1.1. Tips for Digital Art Creation
- Experiment with different colors, opacities, and brush sizes.
- Use the Lasso tool to move and rearrange elements.
- Layer annotations to create depth and texture.
6.2. Designing Custom Stickers and Emojis
Create your own stickers and emojis using Markup, then share them with friends and family.
6.2.1. Steps for Designing Stickers and Emojis
- Start with a blank canvas or a simple image.
- Use the drawing tools to create your design.
- Add text, shapes, and other elements to enhance the sticker or emoji.
- Save the design as a PNG file with a transparent background.
- Share the sticker or emoji with your contacts.
6.3. Personalizing Greetings and Invitations
Add a personal touch to your greetings and invitations by annotating them with Markup.
6.3.1. Ideas for Personalizing Greetings and Invitations
- Add handwritten messages to greeting cards.
- Highlight important details on invitations.
- Create custom illustrations to complement the occasion.
7. Staying Updated with Markup Features
Apple regularly updates iOS, often introducing new features and improvements to Markup. Staying updated ensures you can take full advantage of the latest tools and capabilities.
7.1. How to Update Your iPhone
- Go to Settings > General > Software Update.
- If an update is available, tap “Download and Install.”
- Follow the on-screen instructions to complete the update.
7.2. Exploring New Features
Keep an eye on Apple’s release notes and tech blogs to learn about new Markup features and enhancements. Experiment with these features to discover new ways to enhance your images and documents.
8. The Future of Markup
As technology evolves, Markup is likely to become even more powerful and versatile. Here are some potential future enhancements:
8.1. Integration with AR/VR
Markup could be integrated with augmented reality (AR) and virtual reality (VR) technologies, allowing you to annotate and interact with virtual environments.
8.2. AI-Powered Annotations
Artificial intelligence (AI) could be used to automate and enhance the annotation process, such as automatically recognizing objects and suggesting relevant annotations.
8.3. Enhanced Collaboration Tools
Markup could offer more advanced collaboration tools, allowing multiple users to annotate and co-edit documents in real-time.
9. User Experiences with Markup
Real-world examples can illustrate the practical benefits of using Markup. Here are a few scenarios:
9.1. Case Study: A Graphic Designer’s Perspective
A graphic designer uses Markup to quickly annotate design mockups and share feedback with clients. The ability to draw directly on the images and add text annotations streamlines the review process and ensures clear communication.
9.2. Testimonial: An Educator’s Experience
An educator uses Markup to annotate lecture slides and provide personalized feedback to students. The ability to highlight key points and add handwritten notes makes the learning experience more engaging and effective.
9.3. Review: A Photographer’s Thoughts
A photographer uses Markup to quickly edit and annotate photos on their iPhone before sharing them on social media. The ability to adjust colors, add text overlays, and highlight specific details enhances the visual appeal of their images.
10. Why dfphoto.net Recommends Using Markup
At dfphoto.net, we understand the importance of efficient and effective photo editing and annotation. Markup on iPhone offers a seamless way to enhance your images directly from your device, making it an invaluable tool for professionals, creatives, and anyone who wants to add a personal touch to their photos.
10.1. Comprehensive Tutorials and Resources
Visit dfphoto.net for comprehensive tutorials, tips, and resources on mastering Markup and other photo editing techniques. Our expert guides and step-by-step instructions will help you unlock the full potential of Markup and elevate your photography skills.
10.2. Community Engagement and Support
Join the dfphoto.net community to connect with other photographers, share your work, and get feedback from experienced professionals. Our active forums and social media channels provide a supportive environment for learning and growth.
10.3. Showcase Your Work
Submit your Markup-enhanced photos to dfphoto.net and showcase your creativity to a global audience. Gain recognition for your work and inspire others to explore the possibilities of Markup.
Address: 1600 St Michael’s Dr, Santa Fe, NM 87505, United States
Phone: +1 (505) 471-6001
Website: dfphoto.net
Ready to take your iPhone photography to the next level? Visit dfphoto.net today to discover a wealth of resources, connect with a vibrant community, and unlock your creative potential with Markup.
FAQ: How to Markup a Photo on iPhone
1. What is Markup on iPhone?
Markup is a built-in tool on iPhones that allows you to annotate, draw, and add text to images, screenshots, and PDFs directly on your device. It’s integrated into various apps like Mail, Messages, Photos, and Files.
2. How do I access Markup in the Photos app?
To access Markup in the Photos app, open the Photos app, select the photo you want to edit, tap “Edit,” then tap the Markup button (usually represented by a pen icon).
3. Can I use Markup in the Mail app?
Yes, you can use Markup in the Mail app to annotate images or PDFs before sending them. Open Mail, start a new email or reply to an existing one, insert a photo or PDF, tap the attachment, then tap the Markup button.
4. How do I add text to a photo using Markup?
To add text, tap the Add button (plus sign) in the Markup toolbar, select “Text,” tap the text box to edit the text, and then drag the text box to its desired location.
5. Is it possible to add a signature to a document using Markup?
Yes, to add a signature, tap the Add button (plus sign) in the Markup toolbar, select “Signature,” and then either choose an existing signature or add a new one.
6. What tools are available in Markup?
Markup includes tools such as a pen, highlighter, pencil, eraser, lasso tool, text tool, signature tool, shapes tool, and magnifier tool.
7. How can I erase a markup that I don’t want?
To erase a markup, select the Eraser tool from the Markup toolbar and rub your finger across the area you want to erase. You can also use the Undo button to revert any actions.
8. Can I move a drawing after I’ve made it?
Yes, you can use the Lasso tool to trace a circle around the drawing you want to move and then drag it to its new location.
9. How do I change the color or thickness of the pen in Markup?
To change the color or thickness, select the Pen tool, then tap it again to adjust the color, opacity, and thickness settings.
10. Where else can I learn more about using Markup and other photo editing techniques?
For comprehensive tutorials, tips, and resources, visit dfphoto.net. You can also connect with a community of photographers and share your work.