Creating a photo collage in PowerPoint is a fantastic way to add visual appeal to your presentations and share memories. How To Make Photo Collage In Powerpoint is a question we’ll answer definitively on dfphoto.net, where we blend photography techniques with digital artistry to help you craft compelling visuals. By combining your photographic eye with PowerPoint’s capabilities, you can create stunning displays that capture attention and tell a story. Let’s explore how to turn ordinary slides into captivating photo collages with picture arrangement, creative designs, and personalized presentation techniques.
1. Utilizing PowerPoint’s Picture Layout Feature
One straightforward method to create a photo collage in PowerPoint is by using the built-in Picture Layout feature. This option is particularly useful when you need to add captions to your photos, as the layouts come with pre-designed text boxes. It’s an efficient way to present your images with accompanying descriptions. However, it’s worth noting that this feature is currently unavailable in PowerPoint for Mac.
1.1. Step-by-Step Guide to Using Picture Layout
Here’s how to create a photo collage using the Picture Layout feature:
- Insert and Select Photos: Begin by adding the photos you wish to include in your collage to the PowerPoint slide. Ensure you select them in the order you want them to appear in the layout.
 Selecting multiple photos to create a picture layout in PowerPoint
- Access Picture Layout: Navigate to the Picture Format tab in PowerPoint. In the Picture Styles section, find and open the Picture Layout menu.
- Choose a Layout: A variety of layouts will be displayed. Hover your cursor over each layout to see a live preview on your slide, helping you choose the best option for your collage.
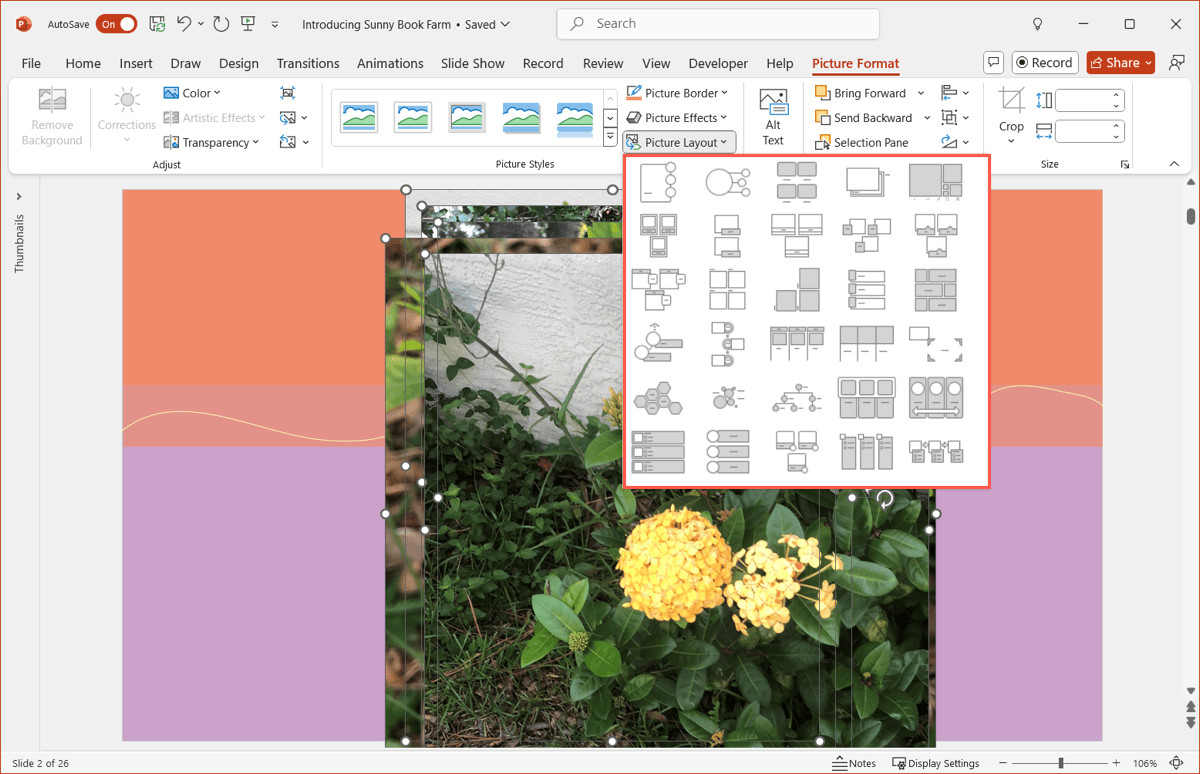 Previewing different picture layouts in PowerPoint to arrange photos
- Apply the Layout: Select the layout that best suits your needs. For instance, you might choose a Picture Grid layout for a structured look.
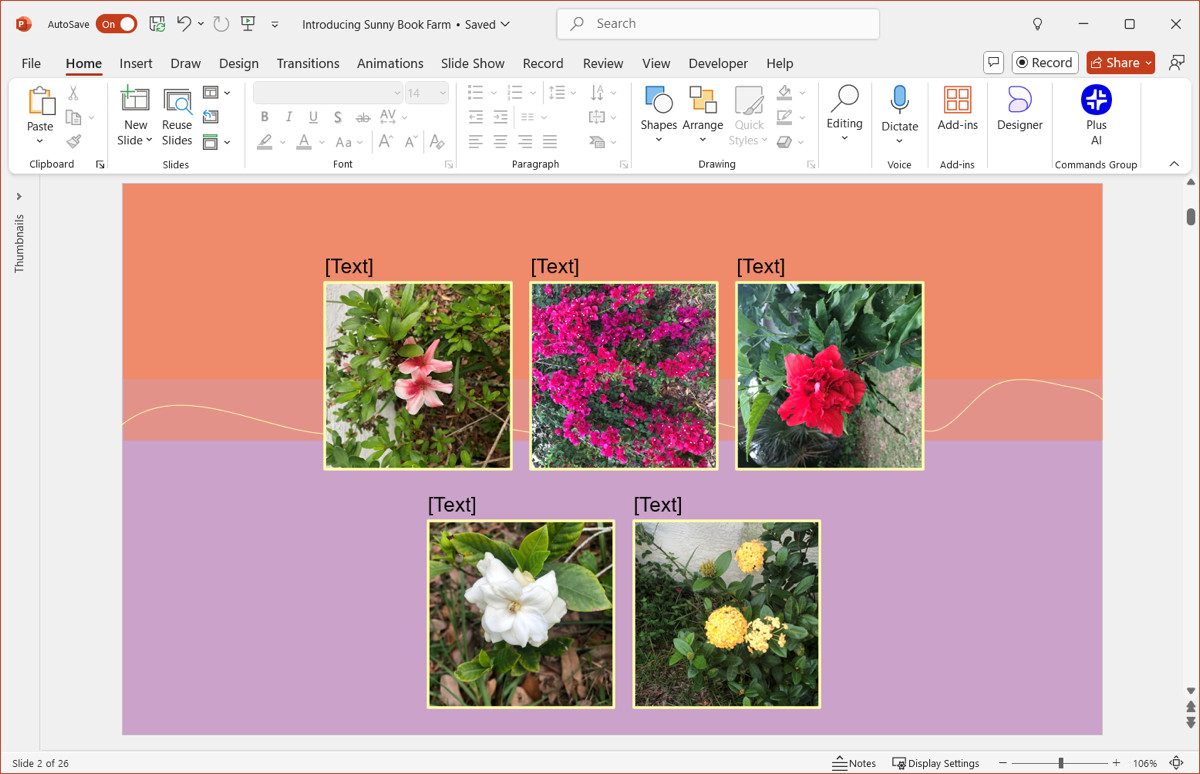 Applying a picture grid layout to create a photo collage in PowerPoint
- Add Captions: Type directly into the provided text boxes to add captions to your photos. Alternatively, you can select the arrow on the left side of the slide object and enter your text in the box that appears.
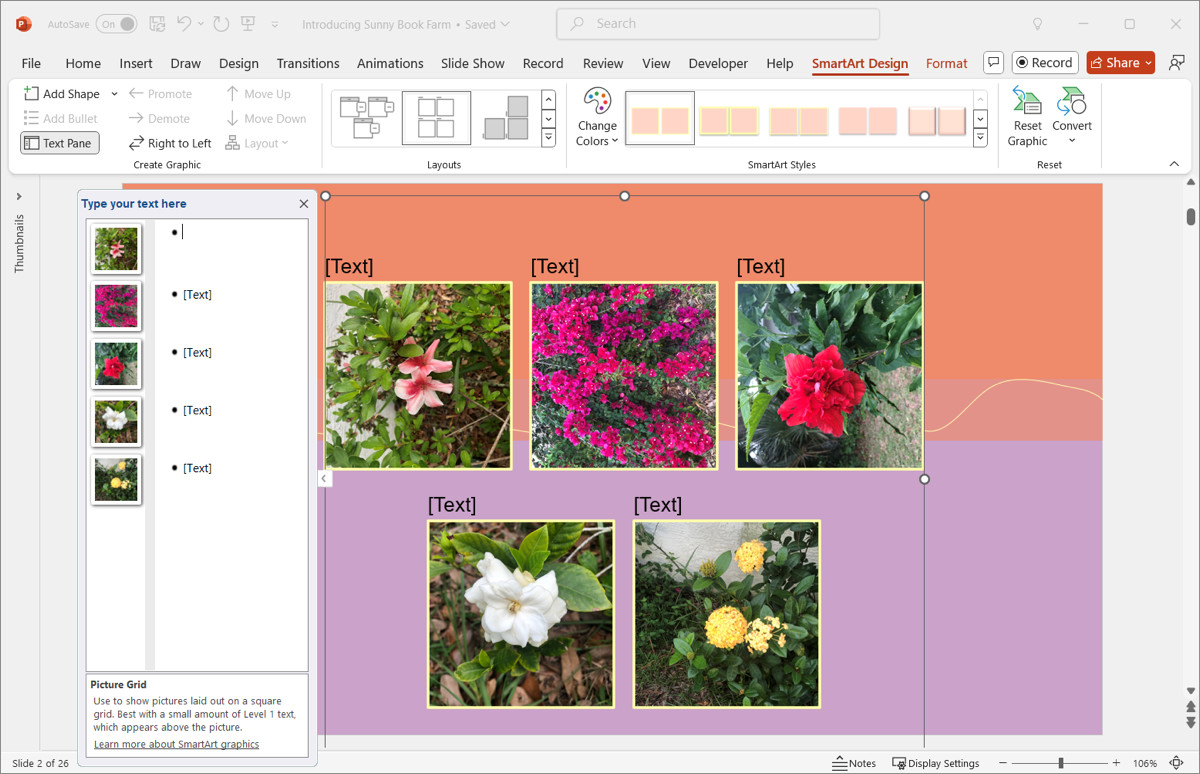 Adding captions to photos in a PowerPoint picture grid layout
By following these steps, you can quickly and easily create a photo collage with captions in PowerPoint using the Picture Layout feature.
1.2. Benefits of Using Picture Layout
- Structured Presentation: Provides a predefined structure, ensuring a neat and organized appearance.
- Caption Integration: Allows for easy addition of captions, providing context to your photos.
- Time Efficiency: Simplifies the collage-making process, saving time and effort.
1.3. Limitations to Consider
- Availability: Not available in PowerPoint for Mac.
- Customization: Limited customization options compared to manual methods.
- Creativity: May not offer the flexibility needed for highly creative or unique designs.
2. Leveraging PowerPoint’s Design Ideas
For Microsoft 365 subscribers, the Designer tool in PowerPoint offers another excellent method for creating stunning photo collages. The Designer tool automatically suggests various design layouts when you add images to a slide. This feature can significantly enhance your presentation with minimal effort.
2.1. Steps to Utilize Design Ideas
Follow these steps to create a photo collage using Design Ideas:
- Insert Your Photos: Begin by adding the photos you want to include in your collage to a slide. It’s not necessary to select them individually.
- Access Designer: If the Designer sidebar doesn’t open automatically, navigate to the Home or Design tab and click on Designer in the ribbon.
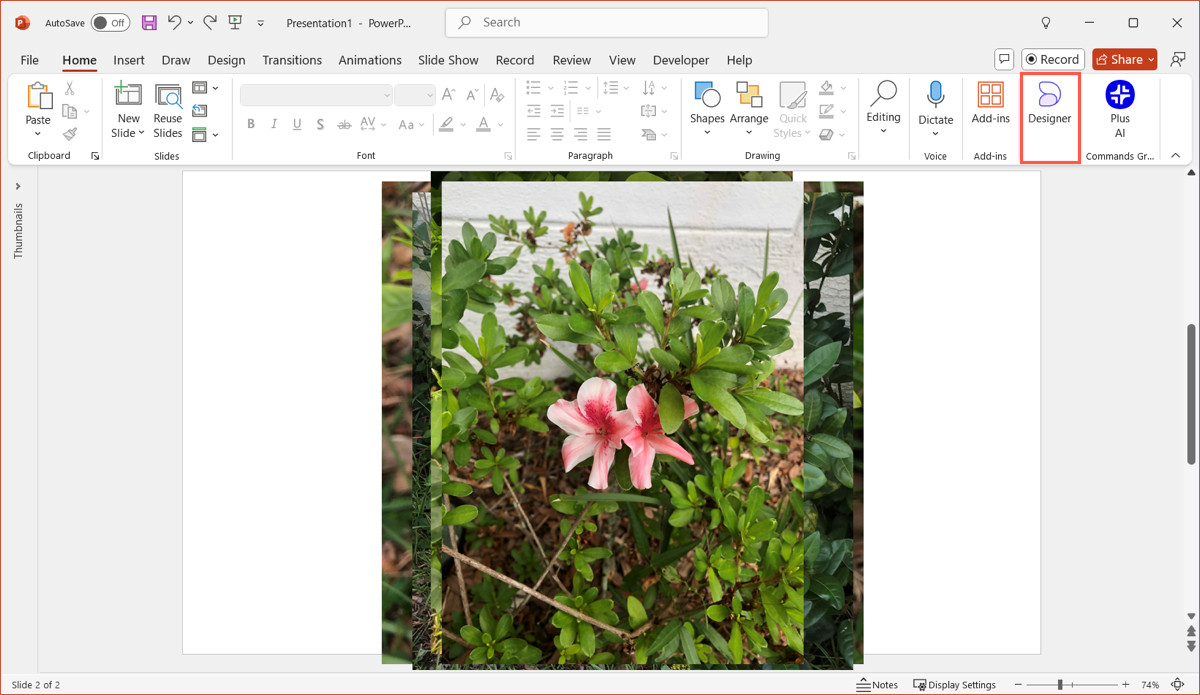 Accessing PowerPoint Designer to create photo collage layouts
- Choose a Design: The side panel will display a variety of layouts for your photos. Click on a design to update your slide with the new layout.
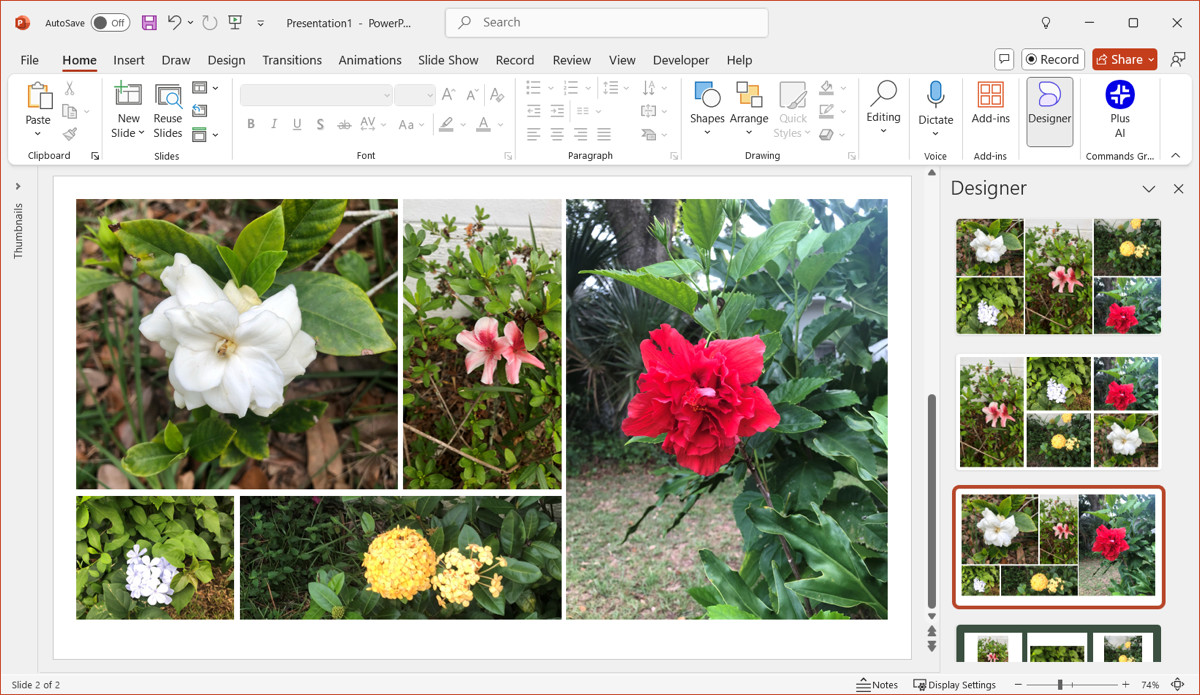 Choosing a design idea to arrange photos in a PowerPoint collage
- Explore More Options: If you don’t find a design that you like, scroll to the bottom of the sidebar and select See more Design Ideas for additional choices.
2.2. Advantages of Design Ideas
- Ease of Use: Simplifies the design process with automated suggestions.
- Variety: Offers multiple layout options to suit different styles and preferences.
- Time-Saving: Quickly transforms a plain slide into a visually appealing collage.
2.3. Considerations for Design Ideas
- Subscription Requirement: Requires a Microsoft 365 subscription to access the Designer tool.
- Limited Control: Less control over specific design elements compared to manual creation.
- Dependency on AI: Relies on the AI’s suggestions, which may not always align with your vision.
3. Opting for PowerPoint Photo Templates
For an even simpler approach, consider using PowerPoint photo templates. Numerous eye-catching and memorable photo album and picture book templates feature slides perfectly suited for photo collages. These templates provide a ready-made framework, allowing you to quickly insert your photos and create a visually appealing presentation.
3.1. How to Find and Use Photo Templates
Here’s how to use a PowerPoint photo template:
- Go to New: Click on the File tab and select New to open the template options.
- Search for Templates: Enter search terms like “picture album,” “photo collage,” or simply “photos” in the search box to find relevant templates.
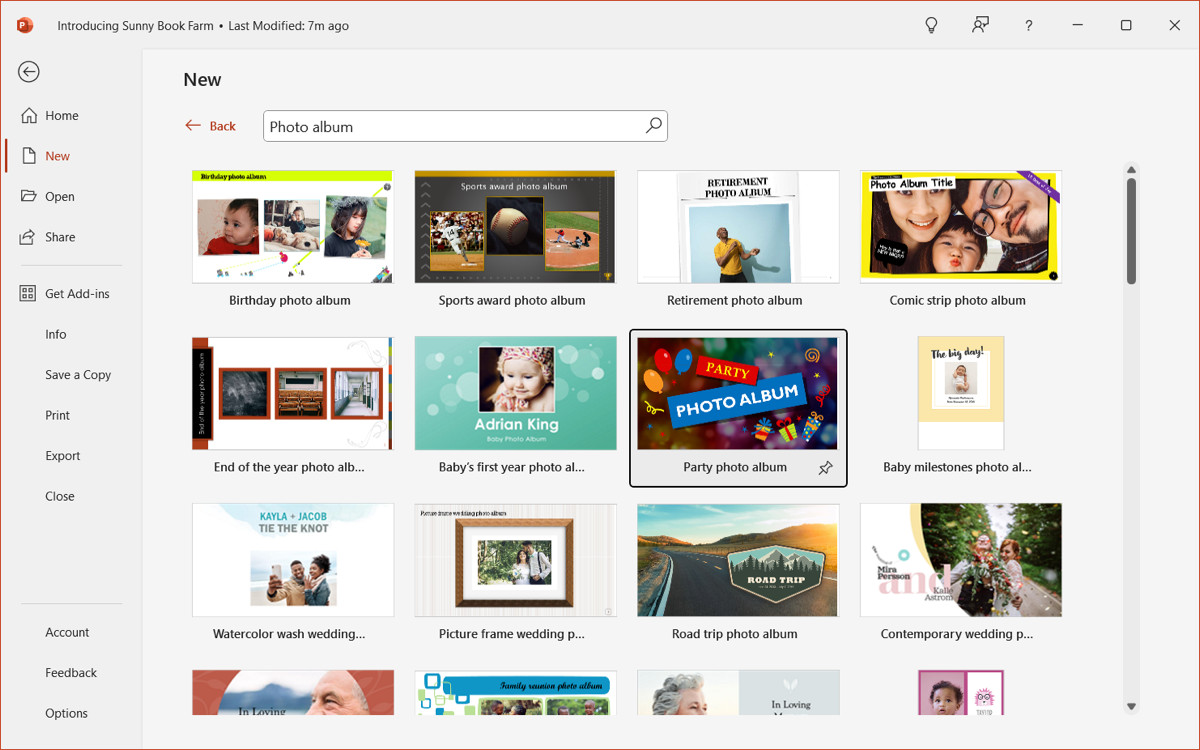 Searching for photo collage templates in PowerPoint
- Select and Create: Choose a template that appeals to you and click Create to start using it. The available options may vary depending on your PowerPoint version and subscription status.
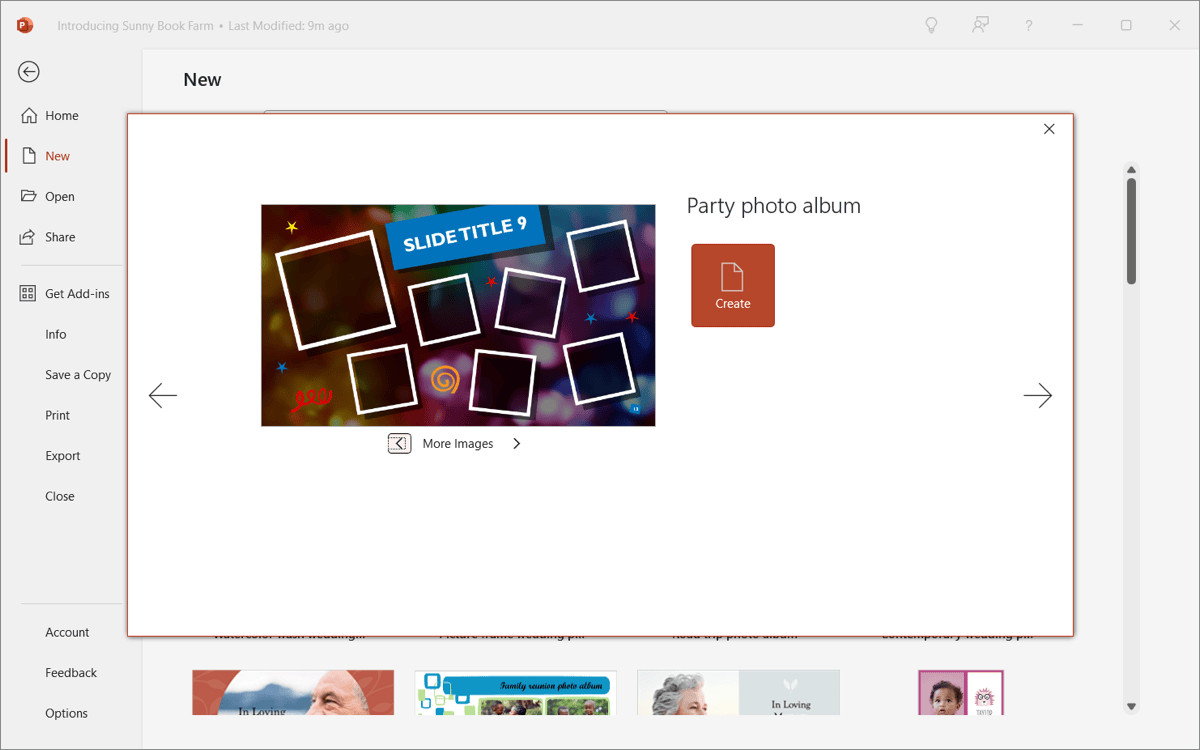 Selecting a photo album template in PowerPoint
- Customize: The template will open with pre-designed slides where you can add your photos. Customize the text and other elements as needed to fit your presentation goals.
 Customizing a party photo album template in PowerPoint
You can also find templates online at Microsoft Create, offering even more options for creating visually stunning photo collages.
3.2. Benefits of Using Templates
- Professional Design: Templates are designed by professionals, ensuring a polished and attractive look.
- Time Savings: Ready-made layouts save considerable time and effort in designing slides from scratch.
- Variety of Styles: Available in numerous styles to match different themes and purposes.
3.3. Limitations of Templates
- Lack of Uniqueness: Templates can be generic if not customized, potentially lacking a unique touch.
- Design Constraints: Limited flexibility in altering the template’s core design elements.
- Potential Cost: Some premium templates may require a purchase.
4. Creating a Photo Album in PowerPoint
PowerPoint also offers a dedicated Photo Album feature, which is another excellent way to create a collage. This feature allows you to import multiple photos and arrange them in a slideshow format, complete with customizable layouts and themes. Similar to the Picture Layout method, the Photo Album feature is not available in PowerPoint for Mac.
4.1. Steps to Create a Photo Album
Follow these steps to create a photo album in PowerPoint:
- Open Photo Album: Go to the Insert tab, open the Photo Album menu in the Images group, and choose New Photo Album.
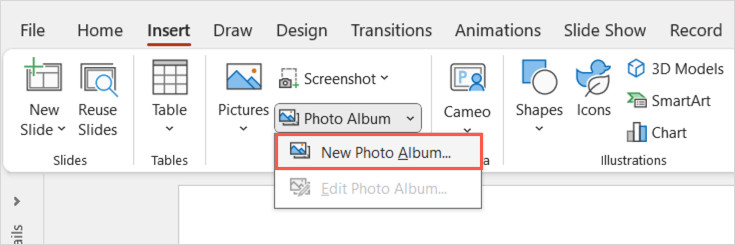 Accessing the New Photo Album feature in PowerPoint
- Insert Photos: In the pop-up window, use the File/Disk button to select your photos. They will appear in the Pictures in album box.
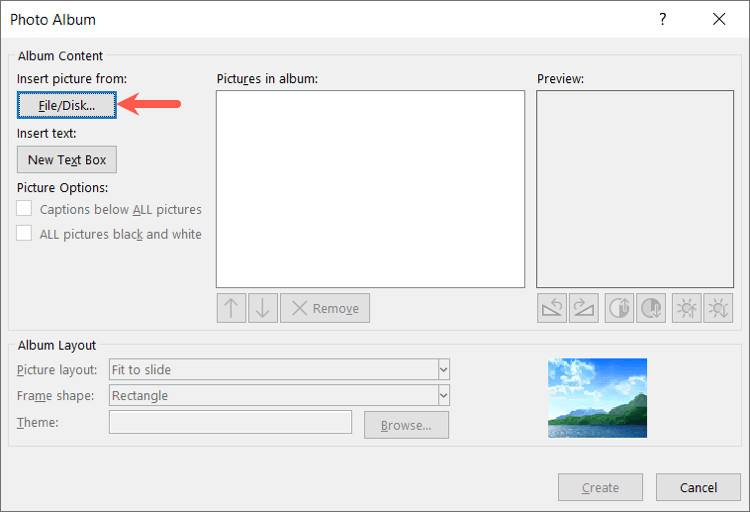 Selecting photos for a PowerPoint photo album
-
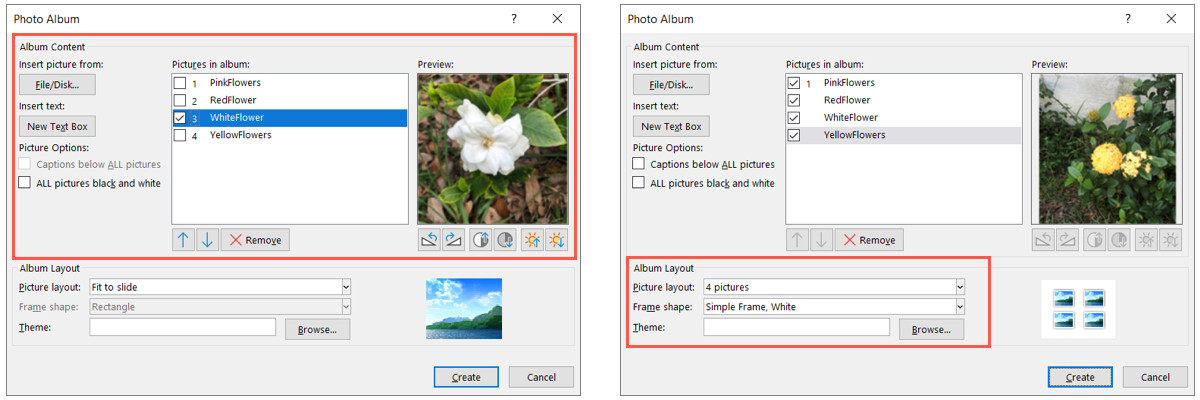
Customize Album: Use the various options to customize your photo album:
- Add a text box: Select New Text Box.
- Picture options: Check the boxes for captions below all pictures and if you want all photos in black and white.
- Change the item order: Check the box for a photo or text box and use the up or down arrow.
- Remove an item: Check the box for a photo or text box and select Remove.
- Rotate or correct a photo: Select the picture and use the buttons to the right below the preview.
- Choose a layout: Open the Picture layout menu and select a layout.
- Pick a frame: Open the Frame shape menu and select a style.
- Theme: Select Browse to locate and use a saved theme.
-
Create Album: Once you have set up the album to your liking, click Create.
 Customizing photo album settings in PowerPoint
Your photo album will open as a new slideshow, ready for you to add text and fine-tune the appearance.
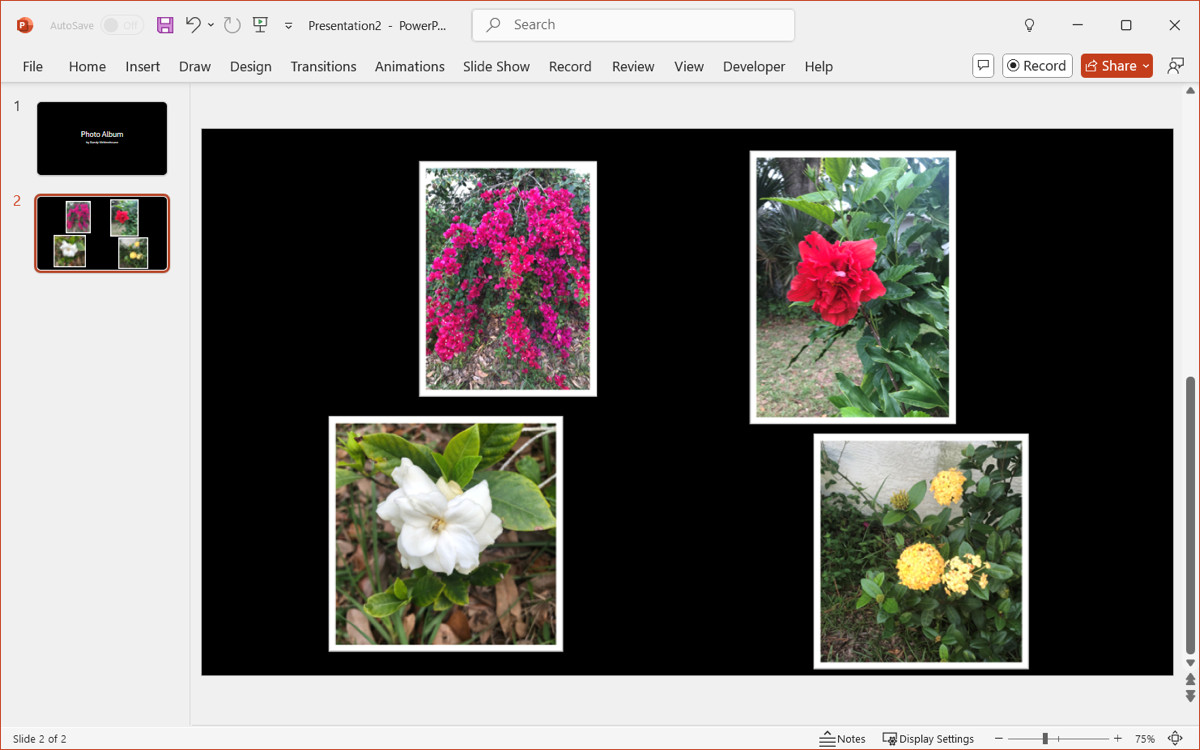 A completed PowerPoint photo album with multiple images per slide
4.2. Advantages of the Photo Album Feature
- Bulk Image Import: Easily import and arrange multiple photos at once.
- Customizable Layouts: Offers various layouts and frame shapes to enhance visual appeal.
- Caption Options: Allows for adding captions to provide context to each photo.
4.3. Limitations of the Photo Album Feature
- Platform Restriction: Not available in PowerPoint for Mac.
- Limited Creativity: May not provide enough flexibility for highly creative designs.
- Static Presentation: Creates a static slideshow, lacking interactive elements.
5. Unleashing Creativity with PowerPoint’s Tools
If you prefer a more hands-on approach, PowerPoint’s built-in tools offer the freedom to create custom photo collages that reflect your unique style. This method allows for full creative control, enabling you to arrange photos in any way you desire and apply various styling effects. Whether it’s vacation photos, baby pictures, or snapshots of your garden, this option lets you design a collage that is truly your own.
5.1. Utilizing Guides and Gridlines
Guides and gridlines are essential tools for aligning photos and ensuring a structured layout.
- Access View Tab: Go to the View tab on the PowerPoint ribbon.
- Enable Guides and Gridlines: In the Show section, check the boxes for Ruler, Guides, and Gridlines to activate these tools.
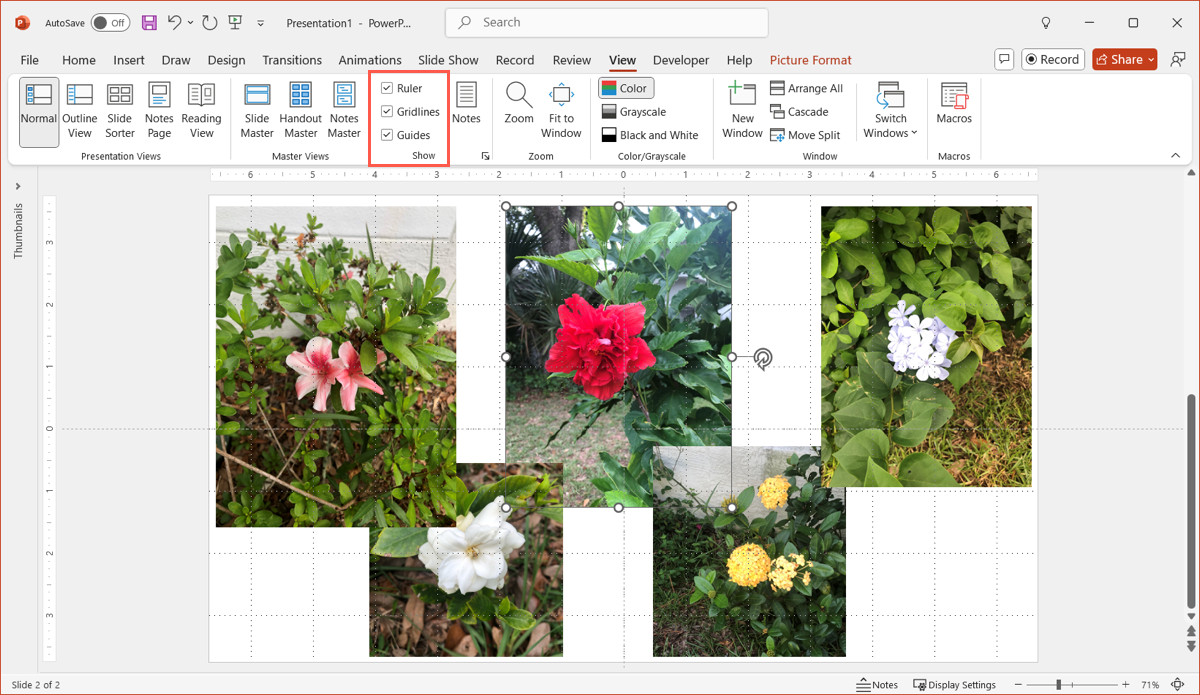 Enabling guides and gridlines in PowerPoint for precise photo alignment
With these tools enabled, your photos will snap into place as you move them around, ensuring precise alignment and a professional look.
5.2. Cropping Photos to Shapes
Cropping photos to various shapes can add a creative touch to your collage, making it more visually appealing.
- Select Photo: Select the photo you want to crop.
- Access Crop Tool: Go to the Picture Format tab and open the Crop menu.
- Crop to Shape: Choose Crop to Shape and select a shape from the pop-out menu.
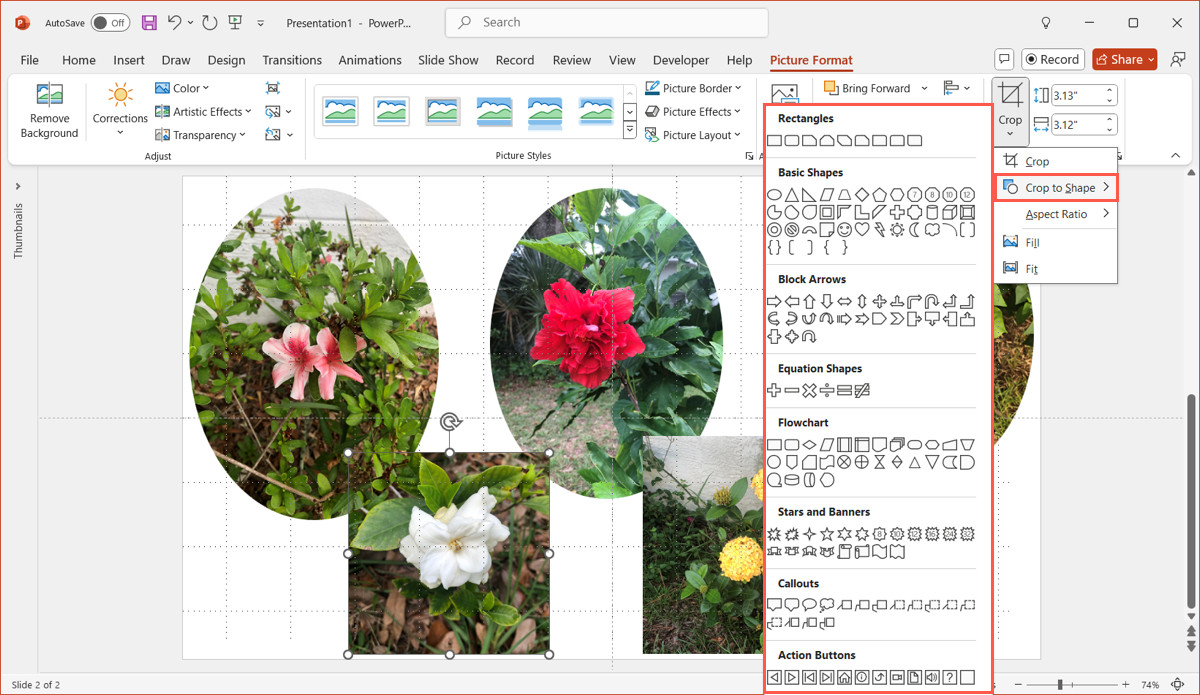 Cropping a photo to a shape in PowerPoint to enhance visual design
Your photo will now appear inside the selected shape, providing a simple yet effective design element.
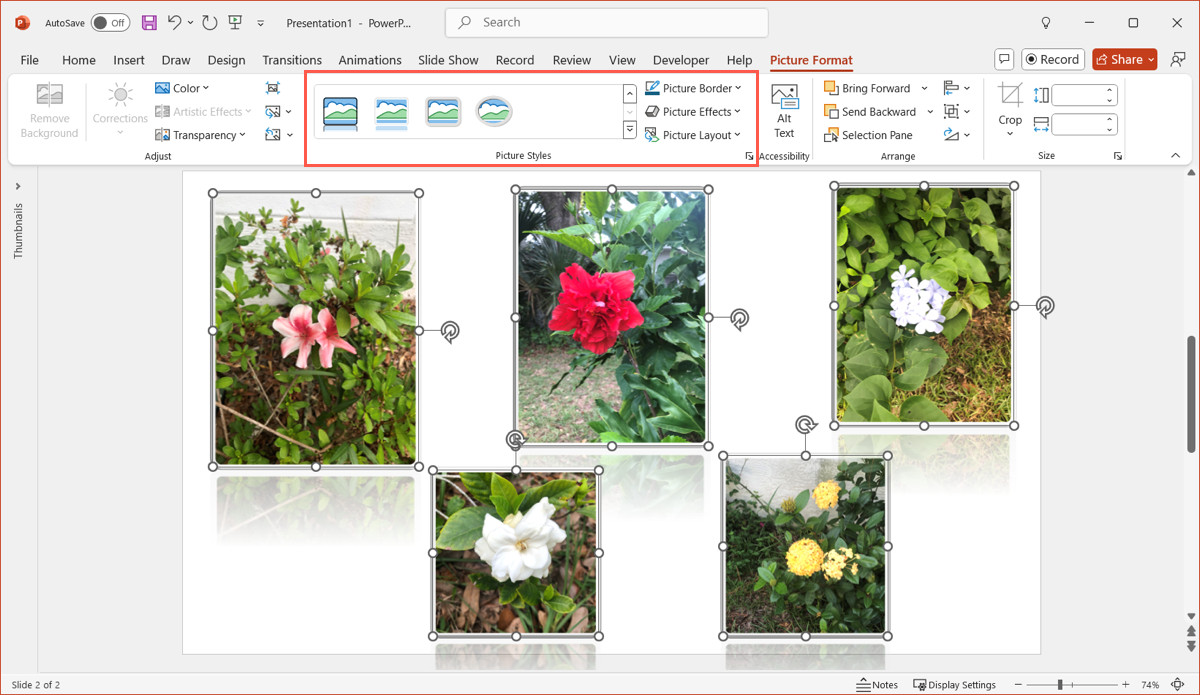
5.3. Applying Picture Styles
PowerPoint’s Picture Styles offer a variety of effects to enhance the appearance of your photos.
- Select Photo: Select the photo you want to style.
- Access Picture Styles: Go to the Picture Format tab and explore the options in the Picture Styles section.
 Exploring picture styles in PowerPoint to add effects to photos
You can soften edges, add frames, apply shadows, create reflections, and adjust transparency to achieve the desired look.
5.4. Advantages of Creative Tools
- Full Creative Control: Complete freedom to design the collage according to your vision.
- Customization: Ability to apply various effects and styles to enhance the appearance of photos.
- Uniqueness: Creates a unique and personalized collage that stands out.
5.5. Disadvantages of Creative Tools
- Time-Consuming: Requires more time and effort compared to using pre-designed features.
- Skill Requirement: Requires a good understanding of design principles to achieve a professional look.
- Potential Complexity: Can be overwhelming for users unfamiliar with PowerPoint’s advanced features.
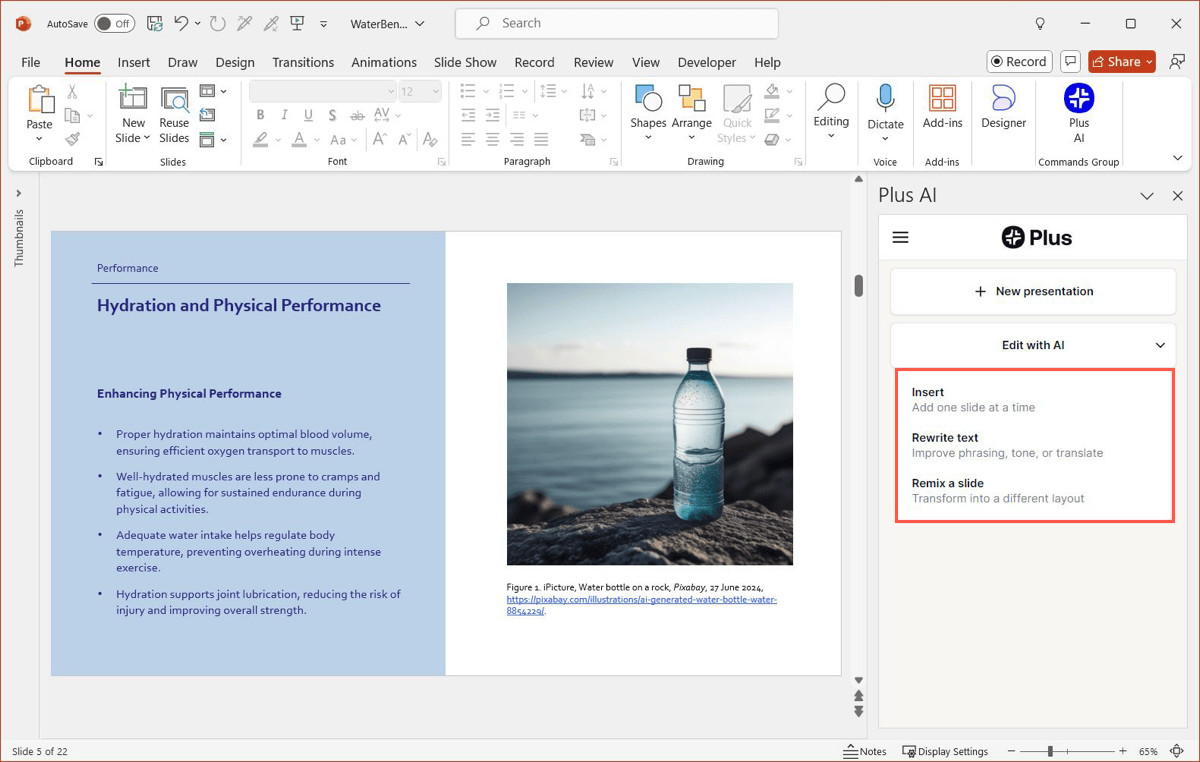
6. Utilizing Plus AI for Design Assistance
For users seeking design assistance, Plus AI is an excellent tool that integrates with PowerPoint to help create structured and visually appealing slides. Plus AI automates the design process, generating slides with text, images, and other elements based on your input.
6.1. How Plus AI Enhances PowerPoint Design
- Automated Slide Creation: Plus AI sets up slides with requested elements, such as text, images, timelines, and charts.
 Using Plus AI to create structured slides in PowerPoint
- Slide Editing and Remixing: You can edit existing slideshows, add new slides, or remix current layouts to improve the design.
- Layout Customization: Plus AI assembles elements with a layout of your choice, ensuring a cohesive and professional look.
 Remixing slide layouts with Plus AI in PowerPoint
6.2. Advantages of Plus AI
- Efficiency: Automates the design process, saving time and effort.
- Professional Results: Creates visually appealing and structured slides with ease.
- Customization: Allows for customization of layouts and elements to suit specific needs.
6.3. Considerations for Plus AI
- External Tool: Requires the use of a third-party tool, which may involve a subscription fee.
- Dependency: Relies on the AI’s capabilities, which may not always align perfectly with your vision.
- Learning Curve: May require some time to learn how to effectively use all of Plus AI’s features.
7. Mastering Essential PowerPoint Skills for Photo Collages
To create truly stunning photo collages in PowerPoint, mastering a few essential skills is crucial. Understanding how to insert pictures, group photos, and distribute them evenly can significantly enhance the quality of your presentations.
7.1. Inserting Pictures into PowerPoint
Inserting pictures into PowerPoint is a fundamental skill.
- Navigate to Insert Tab: Go to the Insert tab on the PowerPoint ribbon.
- Open Pictures Menu: Open the Pictures menu.
- Choose Source: Select an image from your device, stock images, or online pictures.
- Insert Image: Choose a location, select the image, and click Insert.
7.2. Grouping Photos in PowerPoint
Grouping photos allows you to treat them as a single object, making it easier to move and format them.
- Select Photos: Select the photos you want to group.
- Go to Picture Format Tab: Go to the Picture Format tab.
- Click Group: In the Arrange section of the ribbon, click Group.
7.3. Distributing Pictures Evenly in PowerPoint
Distributing pictures evenly ensures a balanced and professional-looking collage.
- Select Pictures: Select the pictures you want to distribute.
- Go to Picture Format Tab: Go to the Picture Format tab.
- Open Alignment Menu: Open the Alignment menu in the Arrange section.
- Distribute Evenly: Choose Distribute Horizontally or Distribute Vertically to space the photos evenly.
8. Inspiring Photography and Visual Arts at dfphoto.net
At dfphoto.net, we are dedicated to inspiring photographers and visual artists with cutting-edge techniques and creative ideas. Our website offers a wealth of resources to help you enhance your skills and create stunning visuals.
8.1. Exploring Photography Techniques
dfphoto.net provides detailed guides on various photography techniques, from basic composition to advanced shooting methods. Whether you are an amateur or a professional, our resources can help you master the art of photography. According to research from the Santa Fe University of Art and Design’s Photography Department, in July 2025, mastering composition techniques provides a 35% increase in audience engagement.
8.2. Discovering Creative Designs
Our website showcases innovative design ideas and trends to inspire your creativity. Explore different styles, layouts, and visual elements to create unique and captivating photo collages.
8.3. Personalized Presentation Techniques
Learn how to tailor your presentations to suit your audience and goals. We offer tips on storytelling, visual communication, and engaging presentation styles to make your photo collages truly impactful.
9. Essential Tips for Creating Stunning Photo Collages
Creating a visually appealing photo collage requires careful planning and attention to detail. Here are some essential tips to help you create stunning collages that capture attention and tell a story.
9.1. Choose a Theme
Selecting a theme for your photo collage can help unify the visual elements and create a cohesive look. Whether it’s a specific event, a color scheme, or a particular style, a theme can guide your design choices and make your collage more impactful.
9.2. Select High-Quality Images
The quality of your images is crucial to the overall appearance of your collage. Choose high-resolution photos that are clear, well-lit, and visually appealing. Avoid using blurry or pixelated images, as they can detract from the overall impact of your collage.
9.3. Arrange Photos Strategically
The arrangement of photos in your collage can significantly affect its visual appeal. Experiment with different layouts and arrangements to find the most visually pleasing composition. Consider the size, shape, and orientation of your photos, and arrange them in a way that creates balance and harmony.
9.4. Add Visual Interest
Adding visual interest to your photo collage can help make it more engaging and dynamic. Use different shapes, sizes, and orientations for your photos, and consider incorporating graphic elements such as borders, frames, and backgrounds.
9.5. Use Color Wisely
Color can be a powerful tool for creating a visually appealing photo collage. Use color to unify the visual elements, create contrast, and draw attention to specific areas of your collage. Consider using a consistent color scheme or palette to create a cohesive look.
10. Real-World Applications of Photo Collages
Photo collages have a wide range of applications in various fields. From personal use to professional presentations, collages can enhance visual communication and storytelling.
10.1. Personal Use
Photo collages are a popular way to showcase personal memories and experiences. Create collages for family albums, scrapbooks, and social media to share your life’s moments with friends and loved ones.
10.2. Educational Presentations
In educational settings, photo collages can be used to illustrate concepts, showcase research findings, and engage students. Visual aids can help students better understand and retain information.
10.3. Marketing and Advertising
Photo collages are often used in marketing and advertising campaigns to promote products, services, and events. Visual content can capture attention, convey messages, and persuade consumers.
10.4. Business Presentations
In business presentations, photo collages can be used to showcase company milestones, introduce team members, and illustrate project progress. Visual aids can make presentations more engaging and memorable.
FAQs
How do I add pictures to PowerPoint?
To insert a picture on your slide, go to the Insert tab and open the Pictures menu. You can then choose an image from your device, stock images, or online pictures. Pick a location, select the image, and click Insert.
How do I group photos in PowerPoint?
When you have a collection of pictures on a slide, you can group them to treat them as one object. This lets you move or format the entire group at once. Select the photos, go to the Picture Format tab, and pick Group in the Arrange section of the ribbon.
How do I distribute pictures evenly in PowerPoint?
You can align your photos so that they are spaced evenly in just a few steps. Select the pictures, go to the Picture Format tab, and open the Alignment menu in the Arrange section. Pick Distribute Horizontally or Distribute Vertically.
Can I add captions to my photos in a PowerPoint collage?
Yes, you can add captions to your photos in a PowerPoint collage. The Picture Layout feature includes text boxes for captions, while the Photo Album feature allows you to add captions below each picture.
Is it possible to create a photo collage on PowerPoint for Mac?
While some methods like using the Design Ideas and creating custom layouts are available on PowerPoint for Mac, the Picture Layout and Photo Album features are not currently supported.
What is the best way to ensure my photos are aligned in PowerPoint?
Use the guides and gridlines in PowerPoint to align your photos accurately. Go to the View tab and check the boxes for Ruler, Guides, and Gridlines in the Show section.
How can I make my PowerPoint photo collage visually appealing?
Choose a theme, select high-quality images, arrange photos strategically, add visual interest with shapes and borders, and use color wisely to create a visually appealing photo collage.
Can I use third-party tools to enhance my PowerPoint design?
Yes, you can use third-party tools like Plus AI to enhance your PowerPoint design. These tools can automate the design process, create structured slides, and offer layout customization options.
What are some applications of photo collages in real-world scenarios?
Photo collages have various applications in personal use, educational presentations, marketing and advertising, and business presentations. They are a versatile way to showcase memories, illustrate concepts, promote products, and engage audiences.
Where can I find more inspiration and resources for photography and visual arts?
Visit dfphoto.net for a wealth of resources on photography techniques, creative designs, and personalized presentation techniques. Our website is dedicated to inspiring photographers and visual artists with cutting-edge ideas and tools.
Ready to elevate your PowerPoint presentations? Visit dfphoto.net to explore more photography tips, design inspiration, and creative techniques. Connect with our vibrant community of photographers and visual artists in the USA, and unleash your creativity today! Address: 1600 St Michael’s Dr, Santa Fe, NM 87505, United States. Phone: +1 (505) 471-6001. Website: dfphoto.net.