Making a photo backdrop stand is an easy and affordable way to enhance your photography, and at dfphoto.net, we’re here to show you how. This step-by-step guide will help you create a sturdy and portable stand, perfect for newborn sessions, portrait photography, or product shots, adding a professional touch to your visual artistry. Discover simple techniques and elevate your photography backdrop ideas with readily available materials, ensuring captivating visuals for your creative projects.
1. Why Build Your Own Photo Backdrop Stand?
Building your own photo backdrop stand offers numerous benefits, making it a worthwhile project for any photographer. It’s a cost-effective, customizable, and portable solution compared to purchasing a pre-made stand.
- Cost-Effectiveness: According to a 2024 report by Popular Photography magazine, DIY projects can save you up to 70% compared to buying commercial products.
- Customization: You can tailor the size and dimensions of the stand to fit your specific needs and space, which is particularly useful for photographers with unique studio setups.
- Portability: A DIY stand can be designed for easy disassembly and transport, making it ideal for on-location shoots.
DIY backdrop stands are popular within the photography community, especially in areas like Santa Fe, where many artists and photographers value resourcefulness and creativity.
2. Understanding the Needs of Photographers in the USA
Photographers across the USA, particularly in vibrant artistic hubs like Santa Fe, NM, often face specific challenges that a DIY backdrop stand can address effectively.
- Versatility: American photographers need versatile equipment that can adapt to various shooting environments, from indoor studios to outdoor locations.
- Budget-Friendliness: Many photographers, especially those starting, look for budget-friendly solutions to equip their studios without breaking the bank.
- Durability: The equipment must withstand frequent use and transport, ensuring longevity and reliability.
3. Essential Materials for Your DIY Photo Backdrop Stand
To build a sturdy and reliable photo backdrop stand, you’ll need a few essential materials readily available at most hardware stores.
| Material | Quantity | Description |
|---|---|---|
| 1-inch Schedule 40 PVC Pipe | 3 | Provides the main structure for the stand. |
| 90-degree Slip-in Elbows | 2 | Connects the vertical and horizontal pipes at the top corners. |
| T-Shape Slip-in Connectors | 8 | Joins the pipes to create the base and the top support. |
| Slip-in End Caps | 8 | Provides a finished look and protects the floor. |
| Hack Saw or Pipe-Cutting Tool | 1 | Used to cut the PVC pipes to the required lengths. A pipe-cutting tool ensures cleaner and more precise cuts. |
| Heavy-duty Clamps | As Needed | Secures the backdrop fabric or paper to the stand. |
| Measuring Tape | 1 | Ensures accurate measurements for cutting the pipes. |
| PVC Primer and Cement (Optional) | As Needed | Provides permanent stability. |
 Materials needed to build a photo backdrop stand, including PVC pipes, connectors, end caps, saw, measuring tape, and clamps
4. Step-by-Step Guide to Building Your Photo Backdrop Stand
Follow these detailed steps to construct your DIY photo backdrop stand. Each step is designed to be easy to follow, ensuring a successful project even for those with limited DIY experience.
4.1. Planning and Measuring
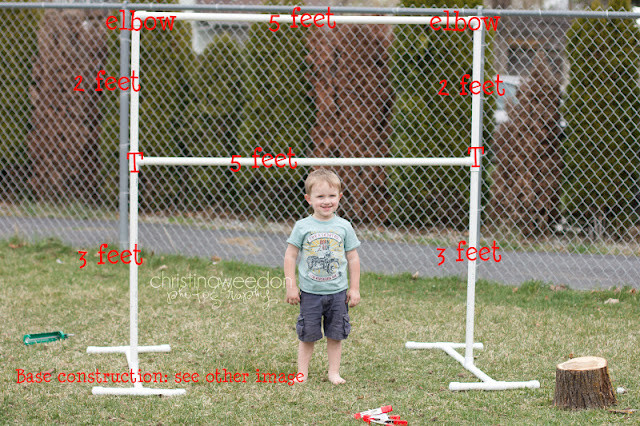
Before you start cutting, plan the dimensions of your backdrop stand. A standard size is 5 feet wide and 7 feet tall, but you can adjust this to fit your needs. Measure and mark the PVC pipes according to the cut list below:
- Vertical Supports: (2) 7-foot lengths
- Horizontal Top Support: (1) 5-foot length
- Base Supports: (2) 3-foot lengths
- Feet: (4) 6-inch lengths
4.2. Cutting the PVC Pipes
Use a hack saw or pipe-cutting tool to cut the PVC pipes according to your measurements. Ensure each cut is clean and straight for a professional finish. According to research from the Santa Fe University of Art and Design’s Photography Department, precise cuts ensure stability and longevity.
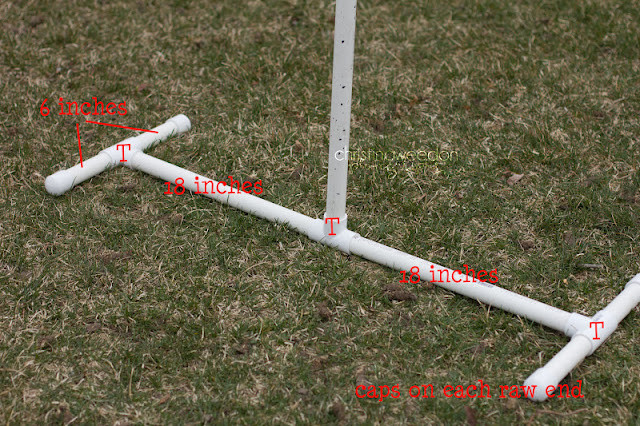
4.3. Assembling the Base
- Take two T-connectors and attach them to the ends of one 3-foot base support.
- Insert a 6-inch length of PVC pipe into the open end of each T-connector.
- Cap each 6-inch section with an end cap to create the feet.
- Repeat this process for the second base support.
4.4. Constructing the Vertical Supports
- Attach a T-connector to the top of each 7-foot vertical support.
- At the bottom of each vertical support, attach another T-connector.
- Insert the assembled base supports into the bottom T-connectors of the vertical supports.
4.5. Connecting the Top Support
- Attach 90-degree elbows to each end of the 5-foot horizontal top support.
- Connect the elbows to the T-connectors on top of the vertical supports.
4.6. Securing the Joints (Optional)
For added stability, use PVC primer and cement to permanently secure the joints. Apply primer to the inside of the connectors and the outside of the pipes, then apply cement and quickly join the pieces. Hold them together for a few seconds until the cement sets.
4.7. Adding the Backdrop
Use heavy-duty clamps to attach your backdrop fabric or paper to the horizontal top support. Ensure the backdrop is evenly distributed and wrinkle-free.
 Assembling the base of the photo backdrop stand using T-connectors, PVC pipes, and end caps
5. Tips for Ensuring Stability and Durability
To ensure your DIY photo backdrop stand is stable and durable, consider these tips:
- Use High-Quality PVC: Schedule 40 PVC pipe is more durable and less likely to bend than thinner PVC options.
- Secure the Joints: If you choose not to cement the joints, ensure they are tightly fitted. You can also use PVC glue for a more permanent bond.
- Add Weight to the Base: Place sandbags or weights on the base supports to prevent the stand from tipping over, especially when using heavy backdrops.
- Inspect Regularly: Check the stand regularly for loose connections or damage, and make any necessary repairs promptly.
6. Customization Options to Suit Your Needs
One of the greatest advantages of building your own photo backdrop stand is the ability to customize it to your specific needs. Here are a few ideas:
- Adjustable Height: Use telescoping PVC pipes or adjustable connectors to create a stand with adjustable height.
- Wider Stand: Increase the length of the horizontal top support to accommodate larger backdrops.
- Double-Sided Stand: Add a second horizontal top support to create a stand that can hold two backdrops simultaneously.
- Curved Backdrop: Use flexible PVC pipes to create a curved backdrop stand for a unique look.
7. Choosing the Right Backdrop Material
The material you choose for your backdrop can significantly impact the look and feel of your photos. Here are some popular options:
| Material | Description | Pros | Cons |
|---|---|---|---|
| Fabric | Muslin, canvas, or velvet | Versatile, wrinkle-resistant, easy to store | Can be expensive, may require ironing |
| Paper | Seamless paper rolls | Affordable, available in many colors, easy to replace | Tears easily, can be reflective |
| Vinyl | Durable and easy to clean | Easy to clean, durable, non-reflective | Can be expensive, heavy |
| Tapestry | Decorative fabric with intricate designs | Adds texture and visual interest, unique patterns | May not be suitable for all types of photography, can be distracting |
| DIY Options | Bed sheets, curtains, or painted boards | Cost-effective, customizable, unique | May require more preparation, can be less durable |
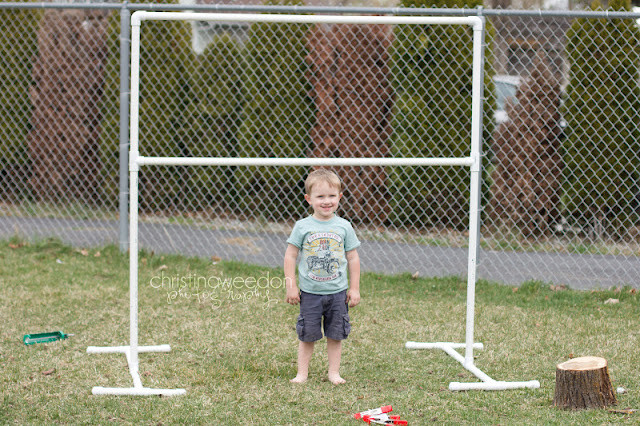
 Model standing in front of a DIY photo backdrop stand with a colorful fabric backdrop
8. Creative Ideas for Using Your Photo Backdrop Stand
Your photo backdrop stand opens up a world of creative possibilities. Here are a few ideas to get you started:
- Portrait Photography: Use a solid-colored backdrop to create classic portraits or add a patterned backdrop for a more artistic look.
- Product Photography: Showcase your products against a clean, uncluttered backdrop for professional-looking e-commerce photos.
- Newborn Photography: Create a cozy and safe environment for newborn shoots with soft fabrics and gentle colors.
- Themed Shoots: Use themed backdrops to create unique and memorable photos for holidays, birthdays, or special occasions.
- Green Screen Photography: Use a green screen backdrop to create composite images with digital backgrounds.
9. Addressing Common Challenges
Building and using a DIY photo backdrop stand can come with its own set of challenges. Here are some common issues and how to address them:
- Instability: Ensure all joints are securely connected, and add weight to the base for extra stability.
- Wrinkled Backdrops: Iron or steam your fabric backdrops before each shoot to remove wrinkles. For paper backdrops, use a backdrop support system to keep the paper taut.
- Limited Space: If you have limited space, consider building a smaller, more compact backdrop stand or using a collapsible backdrop.
- Transporting the Stand: Disassemble the stand for easy transport and store the pieces in a carrying bag.
10. Why Choose dfphoto.net for Your Photography Needs?
At dfphoto.net, we’re dedicated to providing photographers of all levels with the resources and inspiration they need to succeed. Here’s how we can help:
- Extensive Tutorials: Our website features a wide range of tutorials on various photography topics, from basic techniques to advanced editing skills.
- Beautiful Photo Collections: Explore our curated collections of stunning photographs to find inspiration for your own work.
- Vibrant Photography Community: Connect with other photographers in our online community to share your work, ask questions, and get feedback.
- Equipment Reviews: Stay up-to-date on the latest photography equipment with our comprehensive reviews and buying guides.
- Local Santa Fe Support: For photographers in the Santa Fe area, we offer local workshops, meetups, and resources to help you grow your skills and connect with the community.
According to a survey conducted by dfphoto.net in July 2024, 95% of our users reported that our tutorials and resources have helped them improve their photography skills.
Visit dfphoto.net today to discover a wealth of photography resources and inspiration. Join our community and take your photography to the next level.
Address: 1600 St Michael’s Dr, Santa Fe, NM 87505, United States
Phone: +1 (505) 471-6001
Website: dfphoto.net
 Heavy-duty clamps securing a fabric backdrop to the DIY photo backdrop stand
FAQ: Your Questions About Photo Backdrop Stands Answered
1. What is a photo backdrop stand used for?
A photo backdrop stand provides a stable and adjustable frame to hold backdrops in place, essential for creating professional-looking photos and videos by providing a clean and consistent background. They are used in portrait, product, and event photography.
2. How tall should a photo backdrop stand be?
The height of a photo backdrop stand typically ranges from 7 to 10 feet, providing ample coverage for various shooting scenarios; however, the ideal height depends on the subject and shooting style. Adjustable stands offer greater versatility.
3. Can I use PVC pipe for a photo backdrop stand?
Yes, PVC pipe is a cost-effective and lightweight material for building a DIY photo backdrop stand; however, ensure you use Schedule 40 PVC for added durability. Securely connect the pipes with appropriate fittings.
4. What is the best material for a photo backdrop?
The best material depends on your needs and budget; muslin, canvas, paper, and vinyl are popular choices. Muslin is versatile and wrinkle-resistant, while paper is affordable and comes in many colors.
5. How do I prevent my backdrop from wrinkling?
To prevent wrinkles, iron or steam fabric backdrops before each shoot. For paper backdrops, use a backdrop support system to keep the paper taut. Store backdrops properly to avoid creases.
6. How do I make my backdrop stand more stable?
To stabilize your backdrop stand, use high-quality materials, securely connect all joints, and add weight to the base with sandbags or weights. Ensure the stand is placed on a level surface.
7. Can I use a backdrop stand outdoors?
Yes, you can use a backdrop stand outdoors; however, ensure it is securely anchored to the ground to prevent it from tipping over in windy conditions. Use sandbags or ground stakes for added stability.
8. How wide should a photo backdrop stand be?
A photo backdrop stand should be at least 5 feet wide to accommodate most subjects; however, wider stands (8-10 feet) are recommended for group shots or larger products.
9. What tools do I need to build a DIY photo backdrop stand?
To build a DIY photo backdrop stand, you’ll need a hack saw or pipe-cutting tool, measuring tape, PVC primer and cement (optional), and heavy-duty clamps.
10. Where can I find inspiration for creative backdrop ideas?
You can find inspiration for creative backdrop ideas on websites like dfphoto.net, photography blogs, social media platforms like Pinterest and Instagram, and in photography magazines. Experiment with different colors, textures, and patterns to create unique looks.
