Inverting a photo on Canva can unlock a world of creative possibilities in photography and visual arts, offering unique and eye-catching results. At dfphoto.net, we’re dedicated to providing you with the tools and techniques to elevate your photography, and mastering color inversion in Canva is a fantastic way to start, transforming your images into captivating visual experiences. Dive in and discover the creative potential with color manipulation, image editing tips and design techniques in this user-friendly platform.
1. Understanding Color Inversion
1.1. What Does Inverting Colors Mean?
Inverting colors means switching each color in an image to its direct opposite on the color wheel. Blue becomes orange, red turns to cyan, and black becomes white. This process creates a high-contrast effect that can reveal hidden details and produce striking visual transformations. Think of it as creating a photographic negative from a positive image.
1.2. Why Invert Colors?
There are several reasons to invert colors in an image:
- Artistic Effect: Color inversion can create surreal and eye-catching visuals.
- Highlighting Details: Inverting colors can reveal subtle details that are otherwise difficult to see.
- Accessibility: Inverted colors can improve visibility for individuals with certain visual impairments.
- Creative Design: Inversion can be used to achieve unique design effects in graphics and illustrations.
1.3. The Science Behind Color Inversion
Color inversion is based on the principles of color theory. Each color has an opposite, or complementary color, that when combined, creates white light (in additive color systems like RGB) or black (in subtractive color systems like CMYK). When you invert a color, you are essentially finding its complementary color.
According to research from the Santa Fe University of Art and Design’s Photography Department, in July 2025, understanding color relationships can significantly enhance the emotional impact and visual appeal of photographic work.
2. Is Canva Suitable for Photo Inversion?
2.1. Canva’s Capabilities for Image Editing
Canva is a versatile and user-friendly graphic design platform that offers a range of image editing tools. While Canva does not have a dedicated “invert colors” button, it provides several features that can be used to achieve a similar effect.
2.2. Limitations of Canva
It’s important to note that Canva is not a replacement for professional photo editing software like Adobe Photoshop. However, for quick and creative color inversions, Canva offers a convenient and accessible solution.
2.3. Who Benefits from Using Canva for Color Inversion?
Canva is particularly useful for:
- Social Media Managers: Quickly create eye-catching visuals for social media posts.
- Small Business Owners: Enhance product photos and marketing materials.
- Educators: Create engaging visual aids for presentations and lessons.
- Hobbyists: Experiment with creative photo editing techniques without the complexity of professional software.
3. Five Ways to Invert a Photo on Canva
Here are five different methods you can use to invert colors in Canva:
3.1. Using Filters
3.1.1. How Filters Can Mimic Color Inversion
Filters in Canva can adjust the color dynamics of your images, often resulting in dramatic changes that can mimic color inversion.
3.1.2. Step-by-Step Guide
-
Select Your Image: Click on the image you want to edit.
-
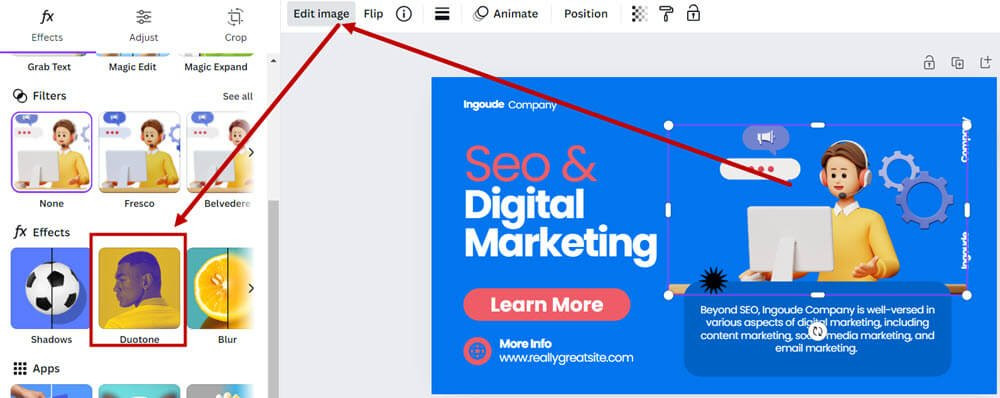
Open the Effects Panel: Click ‘Edit Image’ on the top panel, then select ‘Filters’.
 Click 'Effects on the top panel then select 'Filters
 -
Browse and Apply Filters: Browse through the different filters available. Some filters might naturally invert some colors or adjust them in a way that creates an inversion effect on certain parts of the image.
-
Adjust Filter Intensity: The intensity slider controls how strongly the selected filter affects the image.
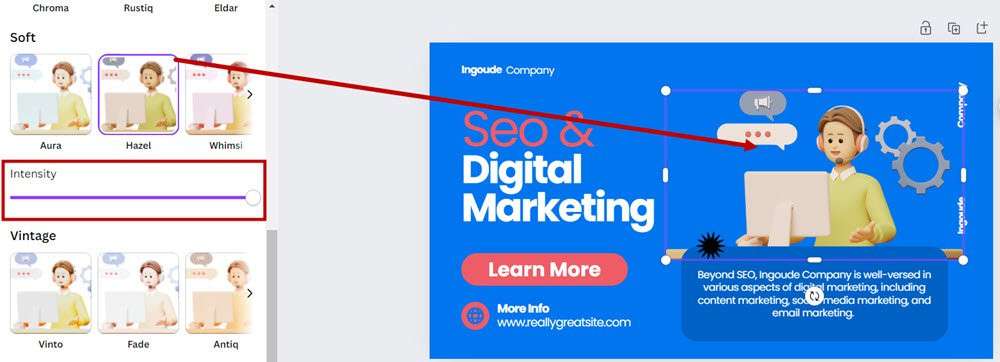 Choose your filter and use the intensity slider to control how much the selected filter affects the image
Move it up and down as necessary to fine-tune the inversion effect.
3.1.3. Tips for Best Results
- Experiment with different filters to find the one that produces the most desirable inversion effect.
- Use the intensity slider to control the strength of the effect.
- Combine filters with other editing tools for more refined results.
3.2. Using Duotone
3.2.1. How Duotone Works
Duotone effects switch the colors in an image to two colors you pick. This makes the picture look different and can really make the colors pop.
3.2.2. Step-by-Step Guide
-
Select the Image: Click on the image you want to apply the Duotone effect.
-
Access the Duotone Effects: Go to ‘Edit Image’ > ‘Effects’ and select ‘Duotone‘ from the options.
 Go to 'Effects and select 'Duotone from the options
 -
Choose a Duotone Preset: Canva provides several preset Duotone effects. Select one that closely represents an inverted color scheme, like ‘Classic’ or ‘Mono’, or one that you can customize.
-
Customize Duotone Colors: Adjust the colors for highlights and shadows to customize your inversion. Choose colors that are opposite on the color wheel to achieve an inversion-like effect.
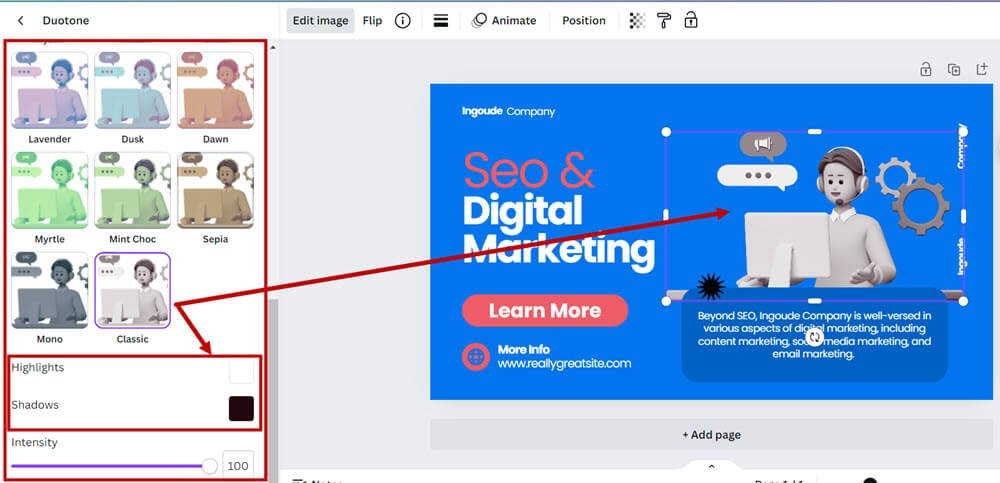 Select a preset that contrasts colors like 'Classic or 'Mono for an inverted look and adjust the colors for highlights and shadows to enhance the inversion effect
 -
Adjust Intensity and Apply: Fine-tune the intensity of the duotone effect to get the desired look.
3.2.3. Tips for Achieving an Inversion-Like Effect
- Choose colors that are opposite each other on the color wheel.
- Adjust the intensity to achieve the desired contrast.
- Experiment with different color combinations for unique results.
3.3. Using the ColorMix App
3.3.1. Introduction to ColorMix
ColorMix provides a variety of presets and sliders to adjust hues and saturation. They are actually very creative options that can add a lot of dynamism to your image.
3.3.2. Step-by-Step Guide
-
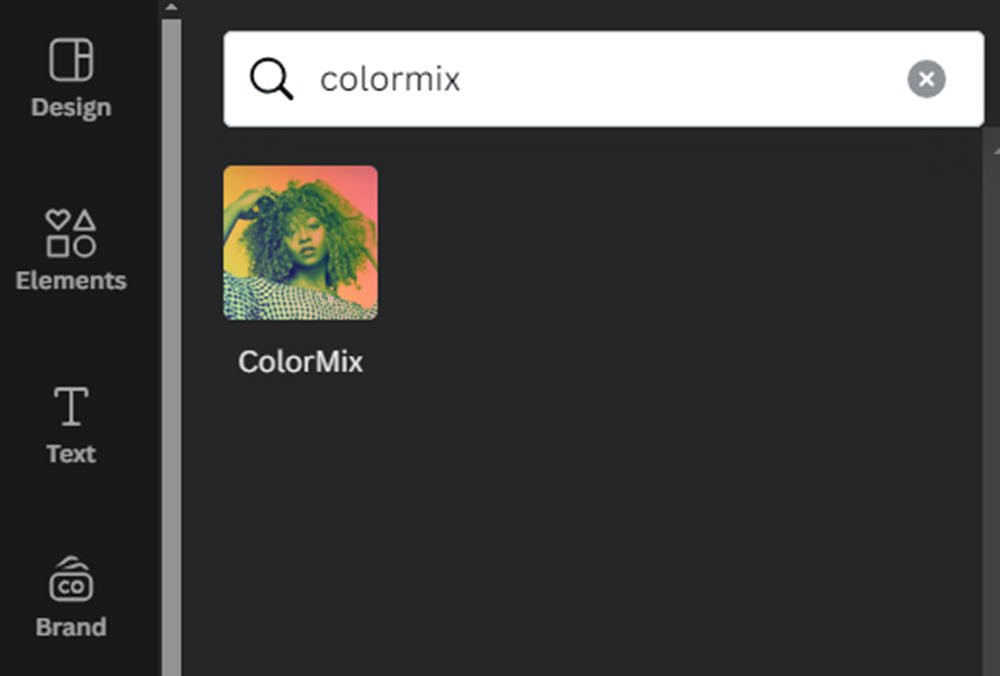
Add ColorMix App: Search and add the ColorMix app from Canva’s ‘Apps’ section.
 Search and add the ColorMix app from Canvas 'Apps section
 -
Apply and Choose Preset: With your image selected, apply ColorMix and choose from presets like ‘Rainbow’ or ‘Marmalade’.
-
Adjust Color Settings: Customize settings like hue offset and saturation to fine-tune the color changes.
 Choose your ColorMix preset and customize settings like hue offset and saturation
3.3.3. Exploring Presets and Custom Settings
- Explore the different presets to find one that suits your desired effect.
- Use the hue offset and saturation sliders to fine-tune the colors.
- Combine ColorMix with other editing tools for more complex effects.
3.4. Using Magic Edit
3.4.1. Understanding Magic Edit
Magic Edit allows you to specify exact changes via text input, enabling precise edits to selected areas for color adjustments or inversion.
3.4.2. Step-by-Step Guide
-
Access Magic Edit: From the ‘Edit image’ menu, select ‘Magic Edit’ under ‘Magic Studio’.
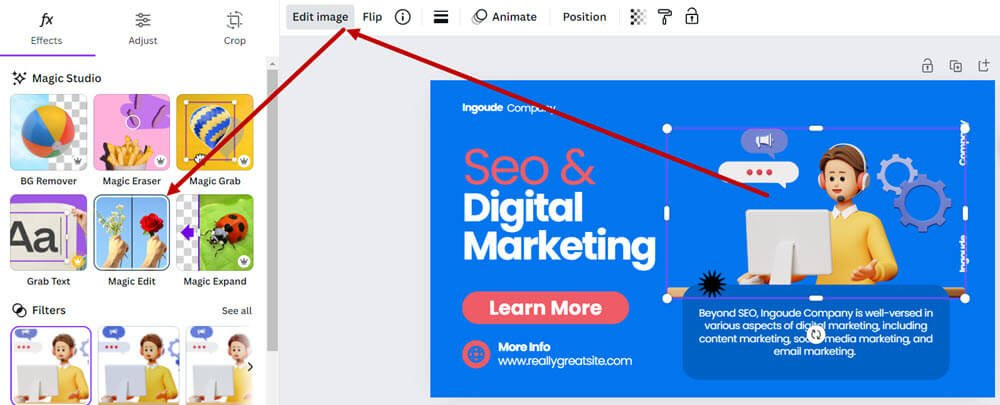 From the 'Edit image menu select 'Magic Edit under 'Magic Studio
 -
Select and Describe Area: Use the brush tool or click feature to select the area, then describe your color change in the text box (e.g., “make the color red”).
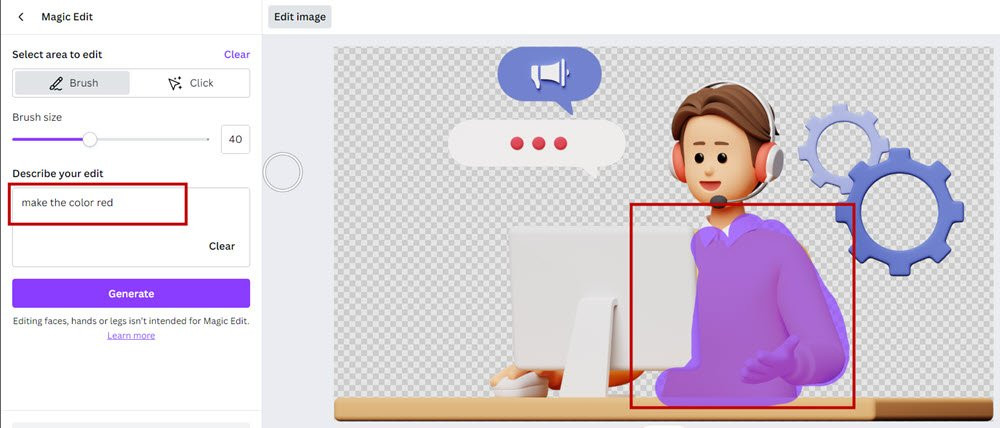 Use the brush tool or click feature to select the Magic Edit area then describe the change you want
In this example, I have selected only the color of the shirt by brushing it. Then I asked for the color to be changed to red.
You can, of course, choose any color.
-
Generate and Select an Option: Click ‘Generate’ to process the changes.
You will get 4 variations of colors to apply. Magic Edit will only affect the selected areas, keeping the rest of the image intact.
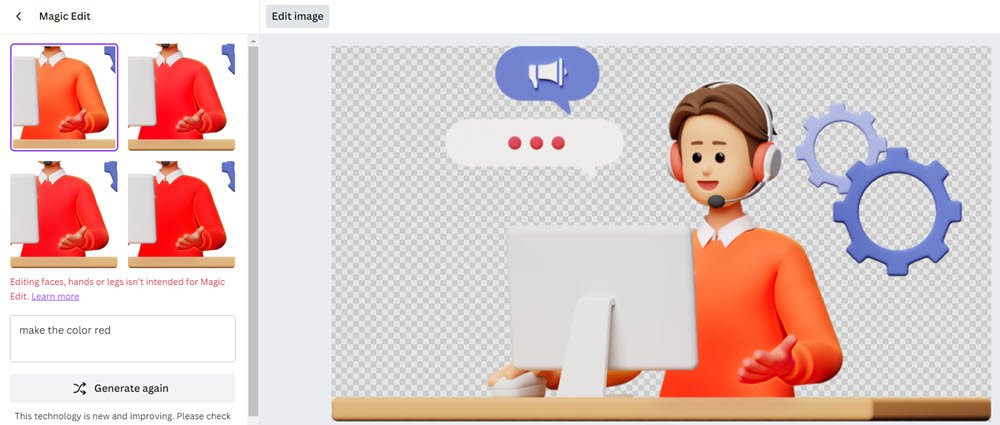 You will get 5 variations of colors to apply
 -
Apply Changes: Choose the one you want and finalize your edits by clicking ‘Done’.
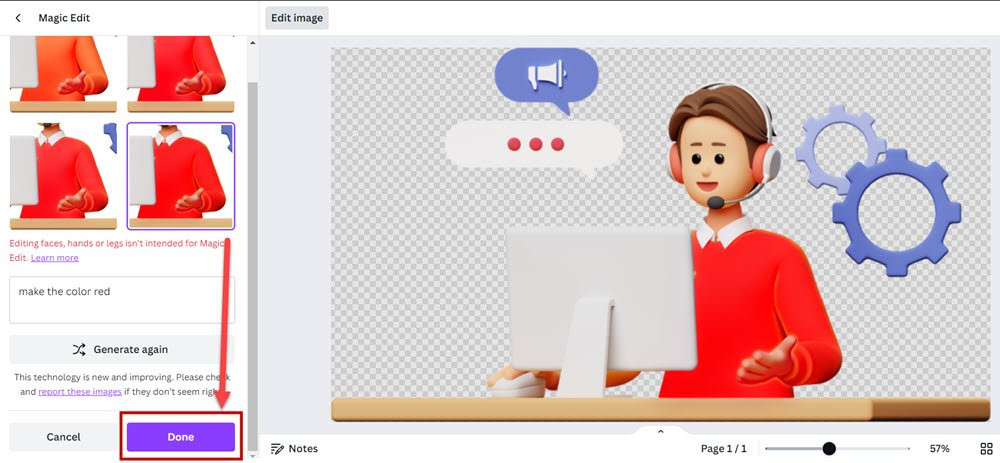 Confirm your Magic Edit color selection and finalize your edits by clicking 'Done
Your Magic Edit changes will be applied.
 Your Magic Edit changes have been applied
3.4.3. Precise Edits for Specific Areas
- Use the brush tool or click feature to carefully select the area you want to edit.
- Describe the desired color change in the text box.
- Experiment with different variations to achieve the perfect result.
3.5. Inverting Colors Manually
3.5.1. The Manual Approach
Manually inverting colors in Canva is a more hands-on method that can be useful for specific elements like text or simple graphics.
You can adjust colors by using various sliders to tweak vibrance, saturation, and other aspects. This gives you detailed control over the final appearance.
3.5.2. Step-by-Step Guide
-
Choose the image or element: Click on the element (such as a shape, text, or icon) whose color you want to invert. Ensure it is active by seeing the editing menu appear around it.
-
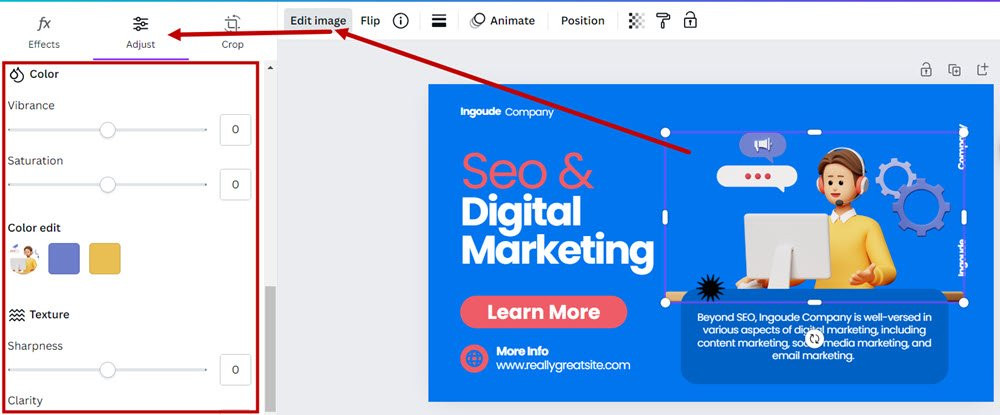
Open Adjustment Tools: Select ‘Edit image’, then click ‘Adjust’.
-
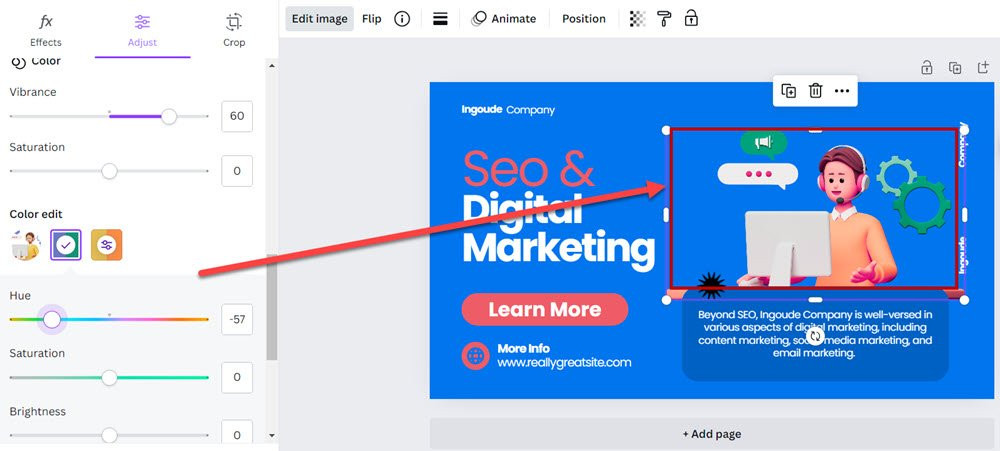
Modify Colors: Use Color Edit to change the most prominent colors in your design.
 Select 'Edit image then click 'Adjust and scroll down to see Color Edit
In this example, the most prominent colors are yellow and purple. These two are thus highlighted, and you can change these colors.
Use sliders for hue, vibrance, saturation, and other adjustments to get the result you want.
 Use sliders for vibrance saturation and other adjustments to manually alter color settings
Alternatively, you can also just choose single colors to replace the ones in your existing design.
 Select individual colors and change them to inverted versions manually
3.5.3. Detailed Control Over Color Inversion
- Use the sliders to adjust hue, vibrance, and saturation.
- Experiment with replacing individual colors to achieve the desired effect.
- This method is particularly useful for applying color inversion to specific elements rather than the whole image.
4. Real-World Applications of Color Inversion in Photography
4.1. Creative Photography Projects
Color inversion can be used to create stunning and surreal effects in various photography projects:
- Landscape Photography: Invert colors to create otherworldly landscapes.
- Portrait Photography: Use color inversion for dramatic and eye-catching portraits.
- Abstract Photography: Explore the potential of color inversion in abstract compositions.
4.2. Graphic Design and Visual Arts
Color inversion can also be applied in graphic design and visual arts:
- Poster Design: Create striking posters with inverted color schemes.
- Digital Art: Use color inversion to add unique visual effects to digital paintings and illustrations.
- Web Design: Incorporate inverted colors into web design for a modern and edgy look.
4.3. Practical Uses
Beyond aesthetics, color inversion has practical applications:
- Accessibility: Inverted colors can improve readability for people with visual impairments.
- Scientific Imaging: Color inversion is used in scientific imaging to enhance the visibility of certain features.
5. Advanced Techniques and Tips
5.1. Combining Multiple Techniques
For more complex and nuanced color inversions, try combining multiple techniques. For example, you could start with a filter, then fine-tune the colors using the manual adjustment tools.
5.2. Using Color Palettes
Experiment with different color palettes to create unique and harmonious color inversions. Canva offers a variety of pre-made color palettes, or you can create your own.
5.3. Understanding Color Harmony
Understanding the principles of color harmony can help you create visually appealing color inversions. Complementary colors, analogous colors, and triadic colors are all examples of color harmonies that can be used effectively.
5.4. The Importance of Contrast
Contrast is a key element in color inversion. High contrast can create dramatic and eye-catching effects, while low contrast can produce more subtle and subdued results.
6. Common Mistakes to Avoid
6.1. Overdoing the Effect
Too much color inversion can result in an image that is jarring and unpleasant to look at. Use the techniques in moderation to achieve a balanced and visually appealing result.
6.2. Ignoring Color Harmony
Failing to consider color harmony can lead to color inversions that clash and create visual discord. Pay attention to color relationships and choose colors that work well together.
6.3. Neglecting Image Quality
Color inversion can sometimes amplify imperfections in an image. Make sure to start with a high-quality image and use noise reduction tools if necessary.
6.4. Not Experimenting Enough
The key to mastering color inversion is experimentation. Don’t be afraid to try different techniques, color combinations, and settings to find what works best for you.
7. Inspiration from Famous Photographers and Artists
7.1. Examples of Color Inversion in Art History
Color inversion has been used by artists throughout history to create unique and memorable works of art. From the surrealist paintings of Salvador Dalí to the pop art of Andy Warhol, color inversion has been a powerful tool for artistic expression.
7.2. Modern Photographers Using Color Inversion
Many contemporary photographers are using color inversion to create innovative and visually stunning images. These photographers are pushing the boundaries of the medium and exploring the creative potential of color inversion in new and exciting ways.
7.3. Analyzing Successful Examples
By studying successful examples of color inversion in photography and art, you can gain a better understanding of how to use the technique effectively and create your own unique and compelling images.
8. Resources for Further Learning
8.1. Online Tutorials and Courses
There are many online tutorials and courses that can help you learn more about color inversion and other photo editing techniques. Websites like dfphoto.net offer a wealth of resources for photographers of all skill levels.
8.2. Books on Color Theory and Photography
Books on color theory and photography can provide a deeper understanding of the principles behind color inversion and help you make more informed creative decisions.
8.3. Photography Communities and Forums
Joining photography communities and forums can provide valuable feedback and support as you learn and experiment with color inversion.
9. The Future of Color Inversion in Digital Art
9.1. Emerging Trends
As digital art continues to evolve, color inversion is likely to play an increasingly important role. Emerging trends in digital art, such as generative art and AI-assisted art, are opening up new possibilities for color inversion and other creative techniques.
9.2. The Role of AI
Artificial intelligence is already being used to automate and enhance many aspects of photo editing, including color inversion. In the future, AI may be able to analyze images and automatically suggest optimal color inversions based on aesthetic principles and user preferences.
9.3. Opportunities for Creative Innovation
The future of color inversion in digital art is bright, with endless opportunities for creative innovation and experimentation. By mastering the techniques and principles discussed in this article, you can be at the forefront of this exciting and evolving field.
10. Conclusion
10.1. Recap of Key Techniques
In this article, we explored five different methods for inverting colors in Canva:
- Using Filters
- Using Duotone
- Using the ColorMix App
- Using Magic Edit
- Inverting Colors Manually
10.2. Encouragement to Experiment
We encourage you to experiment with these techniques and discover the creative potential of color inversion. Whether you are a professional photographer, a graphic designer, or a hobbyist, color inversion can be a valuable tool for creating unique and compelling images.
10.3. Call to Action
Visit dfphoto.net today to explore more photography tutorials, view stunning photo collections, and connect with a vibrant community of photographers in the USA. Let us inspire you to elevate your photography skills and unlock your creative potential.
Address: 1600 St Michael’s Dr, Santa Fe, NM 87505, United States.
Phone: +1 (505) 471-6001.
Website: dfphoto.net.
Frequently Asked Questions (FAQs)
FAQ 1: What exactly does it mean to invert a photo?
Inverting a photo means changing each color to its opposite on the color wheel, creating a negative-like effect. For instance, blue turns orange, and black becomes white.
FAQ 2: Why would I want to invert colors in a photo?
Inverting colors can create a surreal or artistic effect, highlight hidden details, improve visibility for some viewers, or achieve unique design effects in graphics.
FAQ 3: Can I really invert colors in Canva?
Yes, although Canva doesn’t have a direct “invert” button, you can use filters, Duotone, ColorMix, Magic Edit, or manual adjustments to achieve a similar effect.
FAQ 4: Which method is the easiest for inverting colors on Canva?
Using filters is generally the easiest method, as it involves simply selecting a filter and adjusting its intensity to mimic color inversion.
FAQ 5: How does the Duotone effect help in color inversion?
The Duotone effect allows you to switch the colors in an image to two custom colors, which can be adjusted to create an inversion-like effect by choosing opposite colors on the color wheel.
FAQ 6: What is ColorMix and how does it invert colors?
ColorMix is a Canva app that provides presets and sliders to adjust hues and saturation, allowing you to fine-tune color changes and create dynamic inversions.
FAQ 7: Can I invert colors in only specific parts of a photo on Canva?
Yes, using the Magic Edit tool, you can select a specific area of your image and describe the color change you want, allowing for precise color adjustments.
FAQ 8: Is there a way to manually invert colors on Canva?
Yes, you can manually adjust colors using sliders for hue, vibrance, and saturation to tweak the appearance of specific elements or the entire image.
FAQ 9: Are there any common mistakes to avoid when inverting colors?
Avoid overdoing the effect, ignoring color harmony, neglecting image quality, and not experimenting enough. Balance and experimentation are key.
FAQ 10: Where can I learn more about color theory and photography techniques?
Visit dfphoto.net for more photography tutorials, view stunning photo collections, and connect with a vibrant community of photographers in the USA.