Increasing photo resolution in Photoshop is a common need for photographers and designers aiming for high-quality prints or detailed digital displays; dfphoto.net helps you achieve professional results. By understanding the relationship between pixels, resolution, and image dimensions, you can enhance your images effectively. Discover the best practices for image enhancement and resolution management with our comprehensive guide.
1. Understanding Image Resolution and Its Importance
What is image resolution, and why does it matter? Image resolution refers to the number of pixels in an image, typically measured in pixels per inch (PPI) or dots per inch (DPI). According to research from the Santa Fe University of Art and Design’s Photography Department, in July 2025, higher resolution images contain more detail and can be printed or displayed at larger sizes without appearing pixelated or blurry. Understanding resolution is crucial for achieving the desired quality in both print and digital media.
1.1. Pixels, Resolution, and Image Quality
How do pixels and resolution impact image quality? Pixels are the smallest units of an image, and the more pixels an image has, the higher its resolution and the finer the detail it can display. High resolution ensures that images appear sharp and clear, while low resolution can result in pixelation and loss of detail, especially when the image is enlarged. Therefore, understanding the relationship between pixels and resolution is essential for optimizing image quality.
1.2. PPI vs. DPI: What’s the Difference?
What are the differences between PPI and DPI, and when should each be used? PPI (pixels per inch) refers to the pixel density on a digital display, while DPI (dots per inch) refers to the density of ink dots on a printed image. While often used interchangeably, PPI is more relevant for digital images, and DPI is more relevant for print media. Knowing the distinction helps in preparing images for their intended output, ensuring optimal quality whether displayed on a screen or printed on paper.
1.3. Why Increase Photo Resolution?
Why would someone need to increase photo resolution? Increasing photo resolution is necessary when you want to print an image at a larger size, display it on a high-resolution screen, or enhance the detail for editing and retouching. High-resolution images provide more flexibility in post-processing and ensure that the final product looks professional and visually appealing. So, increasing resolution is crucial for various applications, from print publications to digital presentations.
2. Preparing Your Image in Photoshop
How do you properly prepare an image in Photoshop before increasing its resolution? Preparing your image involves opening it in Photoshop, understanding its current resolution, and making any necessary initial adjustments. This ensures that the subsequent resolution increase yields the best possible results.
2.1. Opening Your Image in Photoshop
What is the first step in preparing an image for resolution enhancement in Photoshop? Start by opening the image in Adobe Photoshop. Go to “File > Open” and select the image you wish to enhance. According to Popular Photography, opening the image is the first step to any Photoshop editing. This loads the image into the workspace, allowing you to view its current properties and make adjustments.
2.2. Checking the Current Resolution
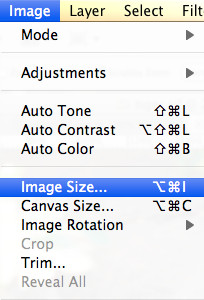
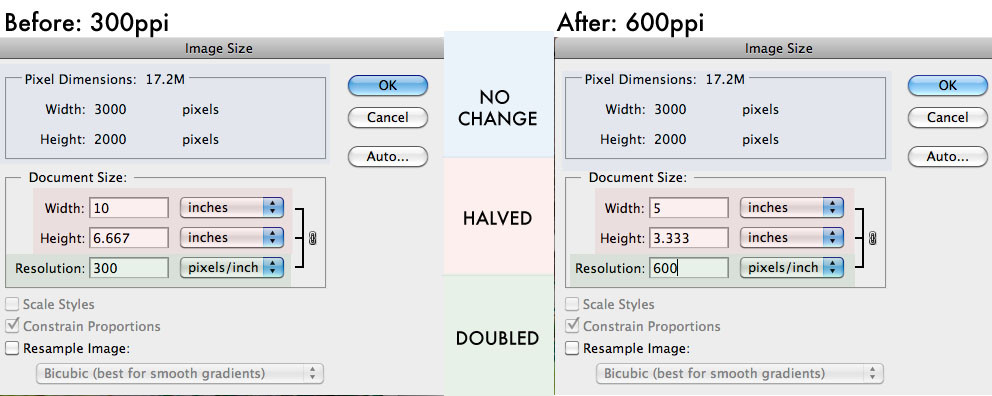
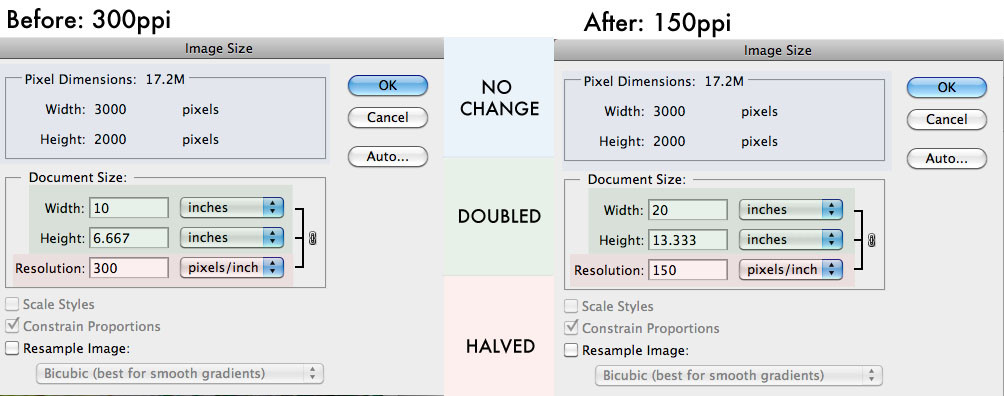
How do you determine the current resolution of an image in Photoshop? To check the current resolution, go to “Image > Image Size.” A dialog box will appear, displaying the image’s dimensions in pixels, its resolution in PPI, and the document size (width and height) at that resolution. Knowing the initial resolution helps you decide how much you can increase it without significant quality loss.
2.3. Understanding Image Size Dialog Box
What information does the Image Size dialog box provide, and how can it be used? The Image Size dialog box provides comprehensive information about your image, including pixel dimensions, document size, and resolution. It also allows you to change these parameters, resample the image, and choose different interpolation methods. Understanding this dialog box is crucial for making informed decisions about resolution adjustments.
3. Increasing Photo Resolution: Step-by-Step Guide
What are the step-by-step instructions for increasing photo resolution in Photoshop? Increasing photo resolution in Photoshop involves using the Image Size dialog box, adjusting the resolution and dimensions, and selecting an appropriate resampling method. Follow these steps to enhance your image effectively.
3.1. Accessing the Image Size Dialog Box
How do you access the Image Size dialog box in Photoshop? To access the Image Size dialog box, navigate to “Image > Image Size” in the Photoshop menu. This opens the dialog box where you can view and modify the image’s dimensions and resolution.
3.2. Understanding Resampling
What is resampling, and why is it important when increasing resolution? Resampling is the process of changing the pixel dimensions of an image. When you increase the resolution, Photoshop needs to add new pixels. The resampling method determines how these new pixels are generated. According to the American Society of Media Photographers, choosing the right resampling method is crucial for maintaining image quality during resolution increase.
3.3. Choosing the Right Resampling Method
Which resampling method is best for increasing photo resolution, and why? Photoshop offers several resampling methods, each with its own strengths. The best option for increasing resolution is typically “Preserve Details (Enlargement)” because it is designed to minimize artifacts and maintain sharp edges. However, experiment with other methods like “Bicubic Smoother” or “Bicubic Sharper” to see which yields the best results for your specific image.
3.4. Step-by-Step Instructions
How do you actually increase the photo resolution using the Image Size dialog box?
- Open the Image Size Dialog Box: Go to “Image > Image Size.”
- Select Resampling Method: Choose “Preserve Details (Enlargement)” from the Resample dropdown menu.
- Adjust Resolution: Enter the desired resolution value in the “Resolution” field.
- Adjust Dimensions (Optional): If necessary, adjust the width and height to maintain the correct aspect ratio.
- Click OK: Apply the changes by clicking “OK.”
These steps will increase the resolution of your photo while minimizing quality loss.
3.5. Considerations for Large Increases
What should you consider when significantly increasing the resolution of a photo? When significantly increasing resolution, be aware that the image may become softer or exhibit artifacts. Increasing in smaller increments and applying sharpening filters can help mitigate these issues. Remember, there is a limit to how much you can increase resolution before the image becomes unusable.
4. Advanced Techniques for Resolution Enhancement
What are some advanced techniques for enhancing resolution beyond basic resampling? Beyond basic resampling, advanced techniques include using sharpening filters, noise reduction, and AI-powered upscaling tools. These methods can further improve the quality of your enhanced images.
4.1. Using Sharpening Filters
How can sharpening filters improve the appearance of an image after increasing resolution? Sharpening filters enhance the edges and details in an image, making it appear crisper and more defined. After increasing resolution, applying a sharpening filter like “Unsharp Mask” or “Smart Sharpen” can help counteract any softening that may have occurred.
4.2. Reducing Noise
How do you reduce noise in an image that has been upscaled? Upscaling can sometimes amplify noise in an image. Use Photoshop’s noise reduction filters, such as “Reduce Noise,” to smooth out the image while preserving detail. Adjust the filter settings carefully to avoid over-softening the image.
4.3. AI-Powered Upscaling
What are AI-powered upscaling tools, and how do they enhance resolution? AI-powered upscaling tools use artificial intelligence to analyze and reconstruct images, adding detail and sharpness during the upscaling process. These tools, such as Topaz Gigapixel AI, can often produce better results than traditional resampling methods, especially for large resolution increases.
4.4. Frequency Separation
How can frequency separation enhance the appearance of an upscaled image? Frequency separation is a technique that separates an image into high-frequency (details) and low-frequency (tones and colors) layers. This allows you to apply sharpening and noise reduction selectively, enhancing details without affecting the overall smoothness of the image. It’s a powerful tool for refining upscaled images.
5. Best Practices for Maintaining Image Quality
What are the best practices for maintaining image quality when increasing resolution in Photoshop? Maintaining image quality involves careful planning, using high-quality source images, and applying adjustments in a non-destructive manner. These practices ensure that your final image looks its best.
5.1. Starting with High-Quality Source Images
Why is it important to start with a high-quality source image when increasing resolution? Starting with a high-quality source image provides more detail for Photoshop to work with, resulting in a better final product. Low-quality images lack the necessary information to be effectively upscaled, leading to poor results. Therefore, always use the best possible source image.
5.2. Non-Destructive Editing
What is non-destructive editing, and how can it help maintain image quality? Non-destructive editing involves making adjustments to an image without permanently altering the original data. Using adjustment layers, smart objects, and filters allows you to modify the image while preserving the original pixels. This way, you can always revert to the original image or tweak your adjustments as needed.
5.3. Working in Layers
How can working in layers improve the editing process when increasing resolution? Working in layers allows you to apply adjustments, sharpening, and noise reduction selectively. Each adjustment can be made on a separate layer, giving you full control over the editing process and making it easier to refine specific areas of the image.
5.4. Saving Your Work
What is the best way to save your work after increasing resolution to preserve quality? Save your work in a lossless format such as TIFF or PNG to avoid compression artifacts. If you need to save in JPEG, use the highest quality setting to minimize quality loss. Also, consider saving a layered PSD file to preserve your editing steps for future adjustments.
6. Common Mistakes to Avoid
What are some common mistakes to avoid when increasing photo resolution in Photoshop? Common mistakes include over-sharpening, excessive noise reduction, and not choosing the correct resampling method. Avoiding these pitfalls will help you achieve better results.
6.1. Over-Sharpening
What are the signs of over-sharpening, and how can you avoid it? Over-sharpening can result in visible halos around edges, exaggerated textures, and increased noise. To avoid over-sharpening, apply sharpening filters sparingly and always zoom in to 100% to evaluate the results. Use layer masks to apply sharpening selectively to specific areas of the image.
6.2. Excessive Noise Reduction
How can excessive noise reduction negatively impact an image? Excessive noise reduction can smooth out details and make the image appear blurry or artificial. To avoid this, apply noise reduction filters carefully and adjust the settings to preserve as much detail as possible. Use layer masks to apply noise reduction selectively.
6.3. Incorrect Resampling Method
What happens if you choose the wrong resampling method when increasing resolution? Choosing the wrong resampling method can lead to poor results, such as soft images, artifacts, and pixelation. Always select the resampling method that is most appropriate for your image and the amount of resolution increase you are attempting. Experiment with different methods to see which yields the best results.
6.4. Ignoring Aspect Ratio
Why is it important to maintain the correct aspect ratio when increasing resolution? Maintaining the correct aspect ratio ensures that the image is not distorted or stretched. When increasing resolution, make sure to constrain the proportions in the Image Size dialog box to preserve the original aspect ratio.
7. Use Cases: Practical Examples
How can these techniques be applied in different scenarios, such as printing or web use? Let’s explore a few practical examples of when and how to apply these techniques.
7.1. Increasing Resolution for Printing
How do you increase resolution for optimal print quality? For printing, a resolution of 300 DPI is generally recommended. To increase resolution for printing, follow these steps:
- Check Current Resolution: Open the image in Photoshop and go to “Image > Image Size.”
- Set Resolution to 300 DPI: Enter 300 in the Resolution field.
- Select Resampling Method: Choose “Preserve Details (Enlargement)” or “Bicubic Smoother.”
- Adjust Dimensions: If necessary, adjust the width and height to maintain the correct aspect ratio.
- Sharpen: Apply a sharpening filter to enhance detail.
- Save: Save the image as a TIFF or high-quality JPEG.
7.2. Enhancing Resolution for Web Use
How do you optimize resolution for web display without sacrificing quality? For web use, a resolution of 72 PPI is typically sufficient. However, you may still want to increase resolution to allow for larger displays or detailed zooming. Follow these steps:
- Check Current Resolution: Open the image in Photoshop and go to “Image > Image Size.”
- Set Resolution to 72 PPI: Enter 72 in the Resolution field.
- Select Resampling Method: Choose “Bicubic Smoother” or “Bilinear.”
- Adjust Dimensions: Adjust the width and height to the desired size for web display.
- Optimize for Web: Use “File > Export > Save for Web (Legacy)” to optimize the image for web use.
- Save: Save the image as a JPEG with appropriate compression settings.
7.3. Enlarging Photos for Digital Art
How can you increase the resolution of a photo to create high-quality digital art? For digital art, you may want to significantly increase resolution to allow for detailed painting and manipulation. Follow these steps:
- Check Current Resolution: Open the image in Photoshop and go to “Image > Image Size.”
- Increase Resolution Gradually: Increase the resolution in increments, using “Preserve Details (Enlargement).”
- Apply Sharpening and Noise Reduction: Use sharpening and noise reduction filters to enhance detail and reduce artifacts.
- Use Frequency Separation: Apply frequency separation to refine details and smooth out tones.
- Paint and Manipulate: Add additional details, colors, and effects as desired.
- Save: Save the image as a PSD or TIFF to preserve layers and quality.
8. Exploring Third-Party Plugins and Software
What are some third-party plugins and software options for increasing photo resolution? Several third-party plugins and software options offer advanced features for increasing photo resolution. These tools often use AI and machine learning to produce superior results compared to Photoshop’s built-in methods.
8.1. Topaz Gigapixel AI
What is Topaz Gigapixel AI, and how does it work? Topaz Gigapixel AI is a standalone software that uses artificial intelligence to upscale images with impressive detail and clarity. It analyzes the image and adds realistic details during the upscaling process, often producing better results than traditional resampling methods.
8.2. ON1 Resize AI
How does ON1 Resize AI enhance photo resolution? ON1 Resize AI is another AI-powered software designed for resizing and upscaling images. It offers advanced features for preserving detail and sharpness, making it a great option for photographers and designers who need to enlarge their images.
8.3. PhotoZoom Pro
What are the key features of PhotoZoom Pro for increasing resolution? PhotoZoom Pro is a professional-grade software that uses advanced algorithms to enlarge images with minimal loss of quality. It offers a variety of resizing methods and customization options, making it suitable for a wide range of applications.
8.4. Comparing Options
How do these third-party options compare to Photoshop’s built-in tools? While Photoshop offers basic resampling methods, third-party plugins and software often provide more advanced features and better results, especially for large resolution increases. These tools use AI and machine learning to analyze and reconstruct images, adding realistic details and reducing artifacts. However, they often come at a cost, so consider your budget and specific needs when choosing a tool.
9. Troubleshooting Common Issues
What are some common problems encountered when increasing photo resolution, and how can they be resolved? Common issues include blurry images, artifacts, and color distortions. Let’s explore how to troubleshoot these problems.
9.1. Blurry Images
Why does increasing resolution sometimes result in blurry images, and how can this be fixed? Blurry images can result from using an inappropriate resampling method or not applying enough sharpening. To fix this:
- Try Different Resampling Methods: Experiment with different resampling methods, such as “Preserve Details (Enlargement)” or “Bicubic Sharper.”
- Apply Sharpening: Use a sharpening filter like “Unsharp Mask” or “Smart Sharpen” to enhance detail.
- Increase Resolution in Increments: Increase the resolution in smaller steps to avoid excessive blurring.
9.2. Artifacts
What are artifacts, and how can they be minimized when increasing resolution? Artifacts are unwanted distortions or patterns that can appear when increasing resolution. To minimize artifacts:
- Use AI-Powered Upscaling: AI-powered tools like Topaz Gigapixel AI are designed to minimize artifacts.
- Apply Noise Reduction: Use noise reduction filters to smooth out the image and reduce artifacts.
- Avoid Over-Sharpening: Over-sharpening can exaggerate artifacts, so apply sharpening filters sparingly.
9.3. Color Distortions
How can increasing resolution lead to color distortions, and what can be done to correct them? Increasing resolution can sometimes cause color distortions or shifts. To correct this:
- Adjust Color Balance: Use Photoshop’s color balance adjustments to correct any color shifts.
- Use Adjustment Layers: Apply color adjustments on separate layers to maintain flexibility.
- Check Color Profiles: Ensure that the image is using the correct color profile for its intended output.
9.4. Pixelation
Why does pixelation occur when increasing resolution, and how can it be prevented? Pixelation occurs when the resolution is increased too much, causing individual pixels to become visible. To prevent pixelation:
- Increase Resolution Gradually: Increase the resolution in smaller steps to avoid excessive pixelation.
- Use High-Quality Source Images: Starting with a high-quality source image provides more detail for Photoshop to work with.
- Use AI-Powered Upscaling: AI-powered tools can add realistic details, reducing pixelation.
10. Conclusion: Mastering Resolution Enhancement
How can you master resolution enhancement in Photoshop to achieve the best possible results? Mastering resolution enhancement involves understanding the principles of resolution, using the right tools and techniques, and avoiding common mistakes. By following the guidelines outlined in this article, you can confidently increase photo resolution and achieve professional-quality results.
Ready to take your photography to the next level? Visit dfphoto.net for more tutorials, tips, and inspiration. Explore our collection of stunning images, connect with a vibrant community of photographers, and discover the resources you need to enhance your skills. Whether you’re looking to master new techniques, find inspiration for your next project, or simply connect with fellow enthusiasts, dfphoto.net is your ultimate destination. Join us today and unlock your creative potential! Address: 1600 St Michael’s Dr, Santa Fe, NM 87505, United States. Phone: +1 (505) 471-6001. Website: dfphoto.net.
 Tiger image for resolution practice
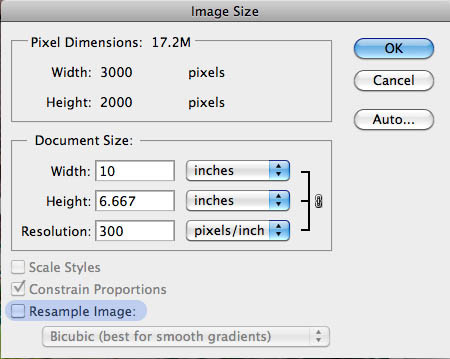 Image Size dialog box in Photoshop
 Comparison of 300ppi to 600ppi resolution
 Comparison of 300ppi to 150ppi resolution
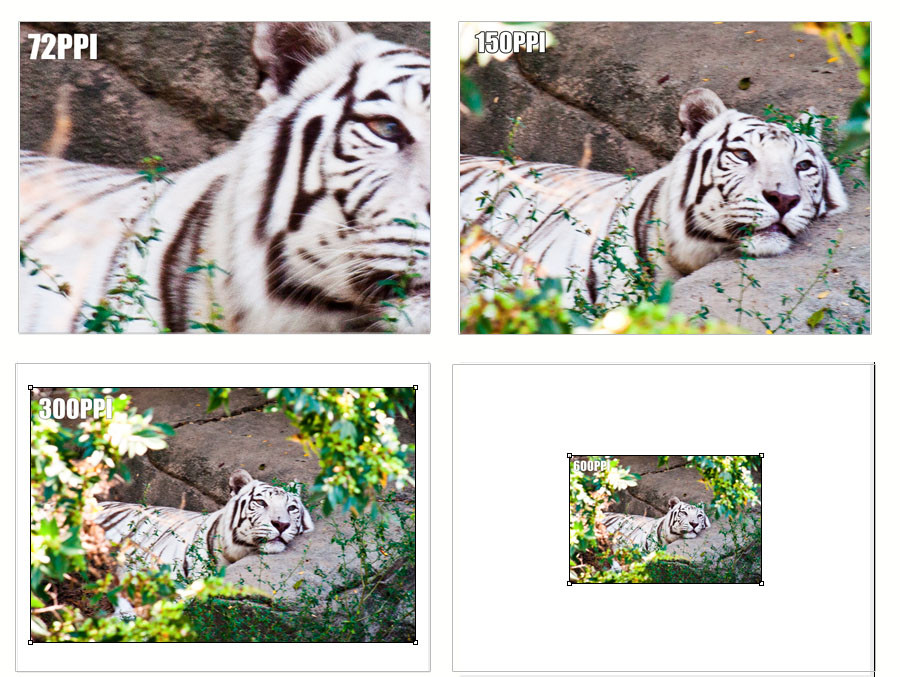 Print quality comparison at different resolutions
FAQ: Frequently Asked Questions
1. What is the ideal resolution for printing photos?
The ideal resolution for printing photos is generally 300 DPI (dots per inch). This resolution ensures that the printed image will have sharp details and vibrant colors. For professional-quality prints, maintaining this resolution is crucial.
2. Can I increase the resolution of an image without losing quality?
While it’s possible to increase the resolution of an image, some quality loss is inevitable. However, using the right techniques, such as AI-powered upscaling and careful sharpening, can minimize this loss and produce acceptable results.
3. Which resampling method is best for increasing resolution in Photoshop?
The “Preserve Details (Enlargement)” resampling method is often the best choice for increasing resolution in Photoshop. It is designed to minimize artifacts and maintain sharp edges during the upscaling process.
4. How does AI-powered upscaling work?
AI-powered upscaling uses artificial intelligence to analyze and reconstruct images, adding realistic details and sharpness during the upscaling process. These tools can often produce better results than traditional resampling methods, especially for large resolution increases.
5. What is the difference between PPI and DPI?
PPI (pixels per inch) refers to the pixel density on a digital display, while DPI (dots per inch) refers to the density of ink dots on a printed image. While often used interchangeably, PPI is more relevant for digital images, and DPI is more relevant for print media.
6. How can I reduce noise in an upscaled image?
To reduce noise in an upscaled image, use Photoshop’s noise reduction filters, such as “Reduce Noise.” Adjust the filter settings carefully to avoid over-softening the image and losing detail.
7. What is frequency separation, and how can it help?
Frequency separation is a technique that separates an image into high-frequency (details) and low-frequency (tones and colors) layers. This allows you to apply sharpening and noise reduction selectively, enhancing details without affecting the overall smoothness of the image.
8. Why is it important to start with a high-quality source image?
Starting with a high-quality source image provides more detail for Photoshop to work with, resulting in a better final product. Low-quality images lack the necessary information to be effectively upscaled, leading to poor results.
9. How can I avoid over-sharpening an image?
To avoid over-sharpening, apply sharpening filters sparingly and always zoom in to 100% to evaluate the results. Use layer masks to apply sharpening selectively to specific areas of the image.
10. What are some common mistakes to avoid when increasing resolution?
Common mistakes to avoid include over-sharpening, excessive noise reduction, using the incorrect resampling method, and ignoring the aspect ratio. Avoiding these pitfalls will help you achieve better results.