Getting rid of shared photos on your iPhone can seem tricky, but it’s a straightforward process. At dfphoto.net, we’ll guide you through simple methods to manage and remove yourself from shared photo albums, ensuring your privacy and photo organization are always in your control. Dive in to learn about photo management, photo privacy, and iCloud settings.
1. What Is An iCloud Shared Photo Library And Why Remove Photos?
An iCloud Shared Photo Library allows you to share photos and videos with up to five other people, making it easy to collaborate and collect memories. You might want to remove photos or leave a shared library for several reasons, including privacy concerns, managing storage space, or simply decluttering your photo collection.
Key reasons to remove photos or leave a Shared Library:
- Privacy: You might not want certain photos shared with everyone in the library.
- Storage: Shared libraries can take up significant iCloud storage space.
- Relevance: The library might no longer be relevant or contain content you’re interested in.
- Control: You prefer to manage your own photo collection independently.
2. How Do I Leave An iCloud Shared Photo Library?
Leaving an iCloud Shared Photo Library is simple and can be done on your iPhone, iPad, or Mac. Make sure you stay signed in to iCloud with iCloud Photos turned on until the process is complete.
2.1. Leaving On Your iPhone Or iPad
- Navigate to Photos Settings: Open the Settings app, scroll down, and tap on Photos. Then, tap Shared Library.
- Choose to Leave: Tap “Leave Shared Library” at the bottom of the screen.
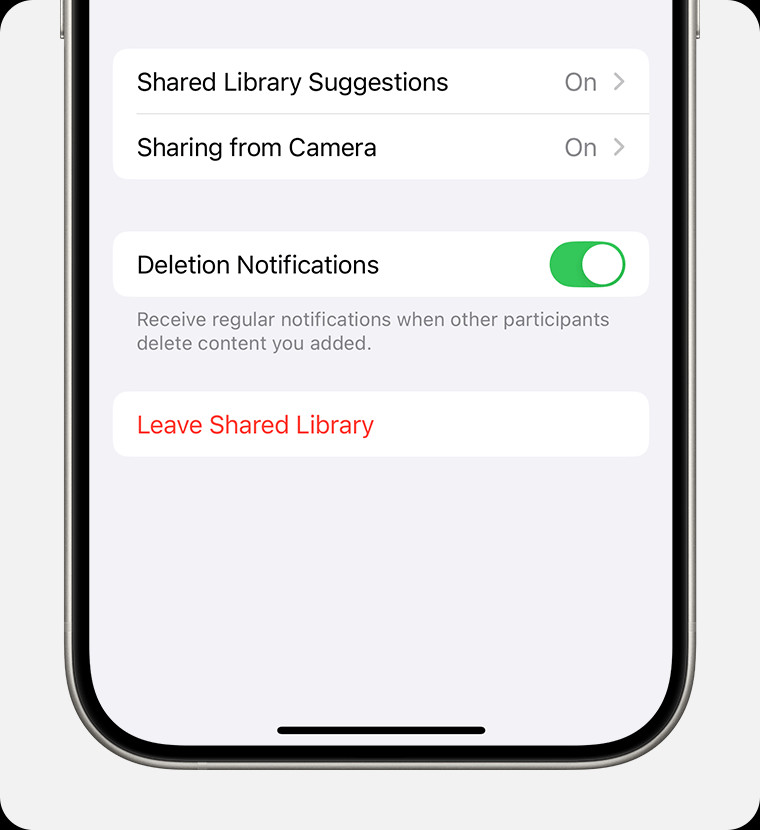 Leave Shared Library is located at the bottom of your screen.
- Select Your Photos: You’ll be prompted to either copy everything from the Shared Library into your Personal Library, or just the content that you contributed. Choose the option that suits you best.
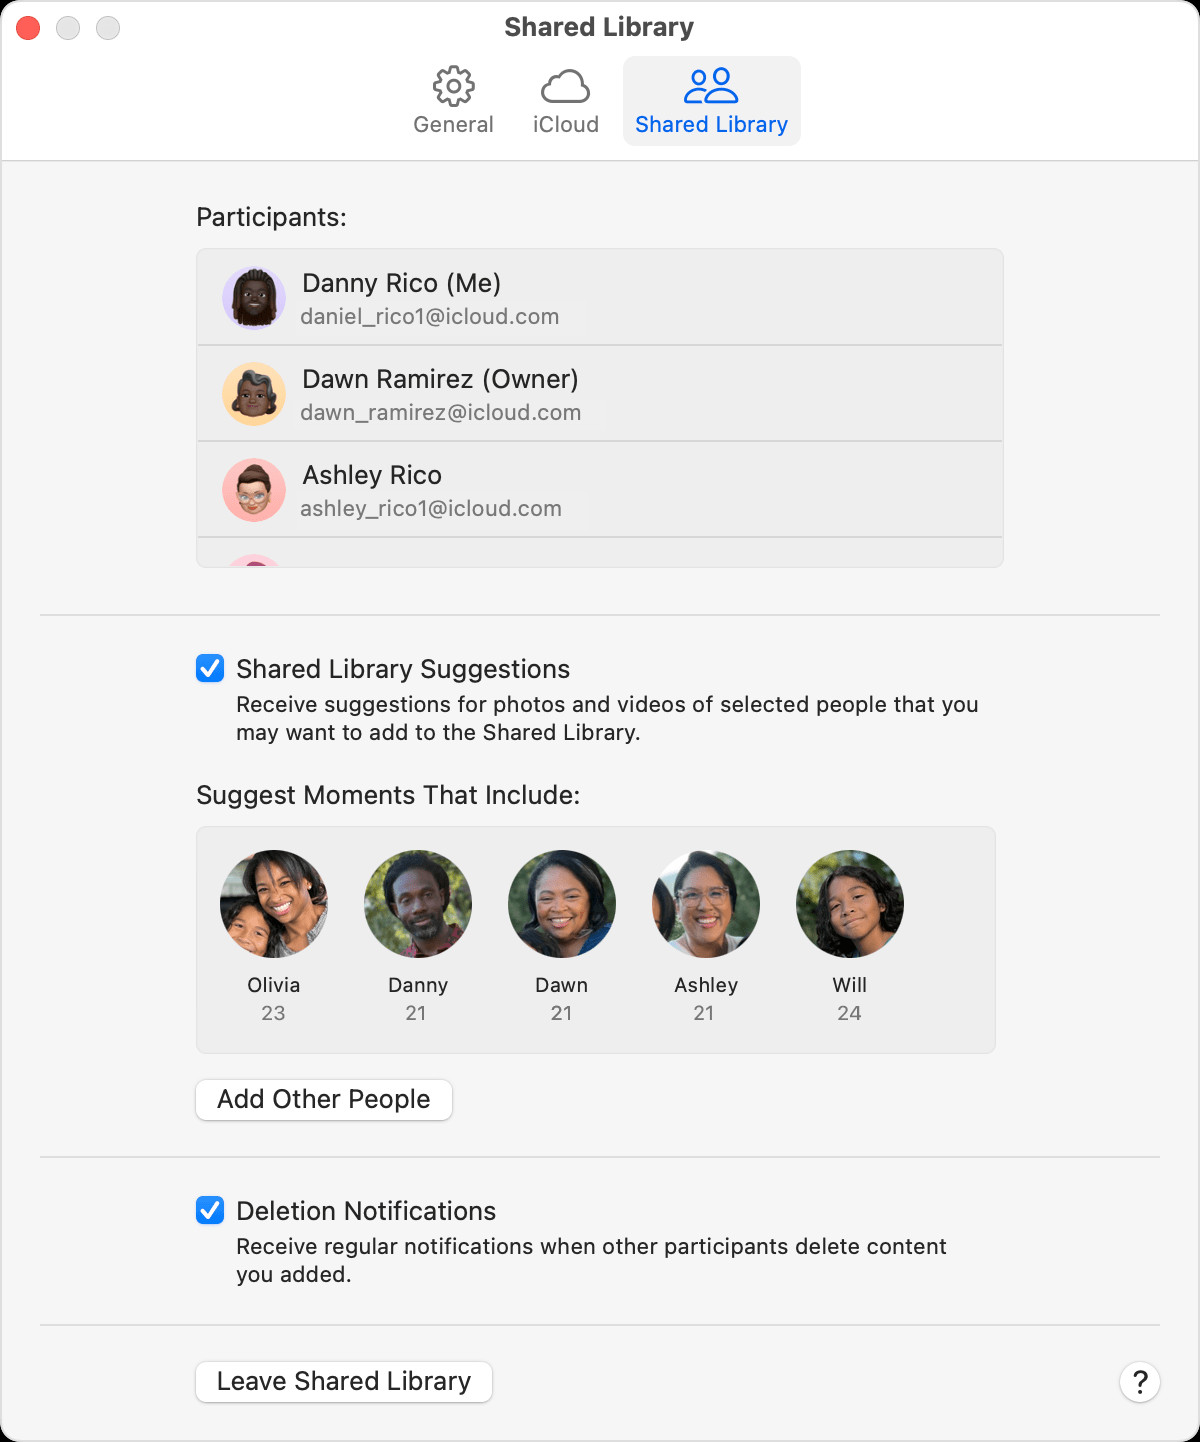
2.2. Leaving On Your Mac
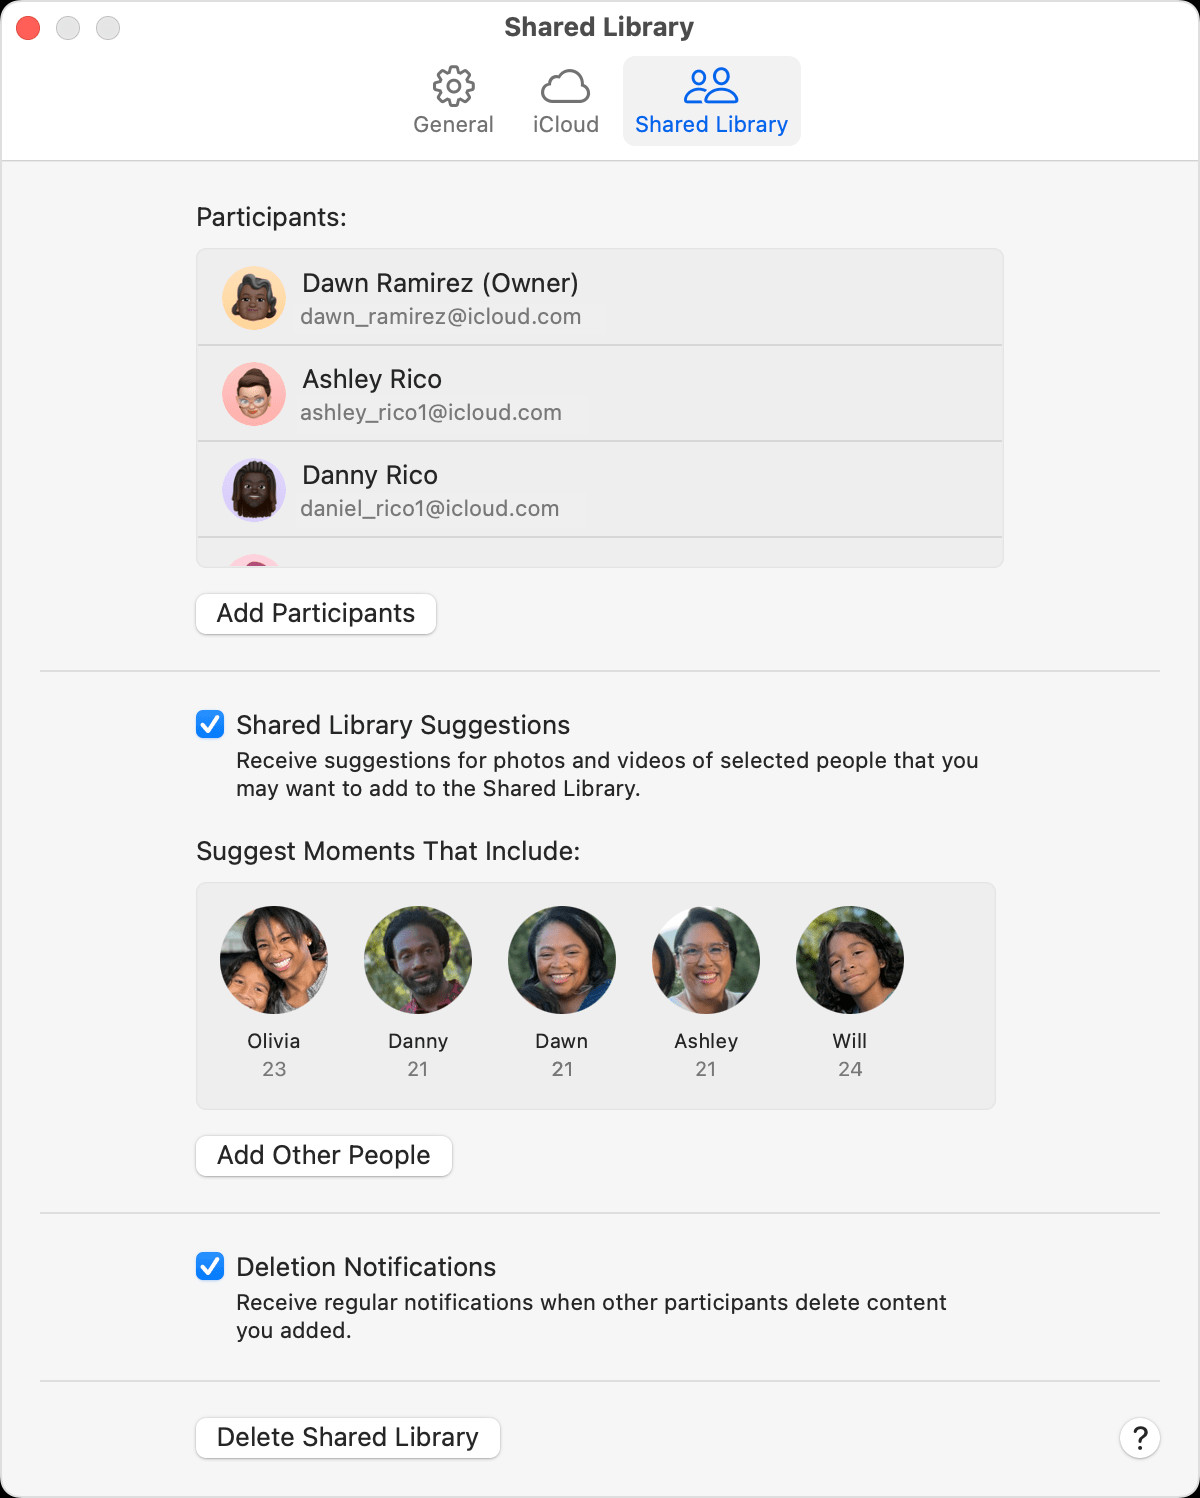
- Open Photos App: Launch the Photos app on your Mac.
- Access Settings: In the menu bar, click “Photos” then select “Settings.”
- Go to Shared Library Tab: Click on the “Shared Library” tab.
 Leave Shared Library is at the bottom of the menu.
- Leave Shared Library: Click the “Leave Shared Library” button.
3. How To Remove A Participant From A Shared Library (For The Library Creator)
If you are the creator of the Shared Library, you have the ability to remove participants.
3.1. Removing Participants On Your iPhone Or iPad
- Go to Shared Library Settings: Open the Settings app, navigate to Photos, then tap Shared Library.
- Select Participant: Choose the participant you want to remove from the list.
- Remove From Shared Library: Tap “Remove from Shared Library.”
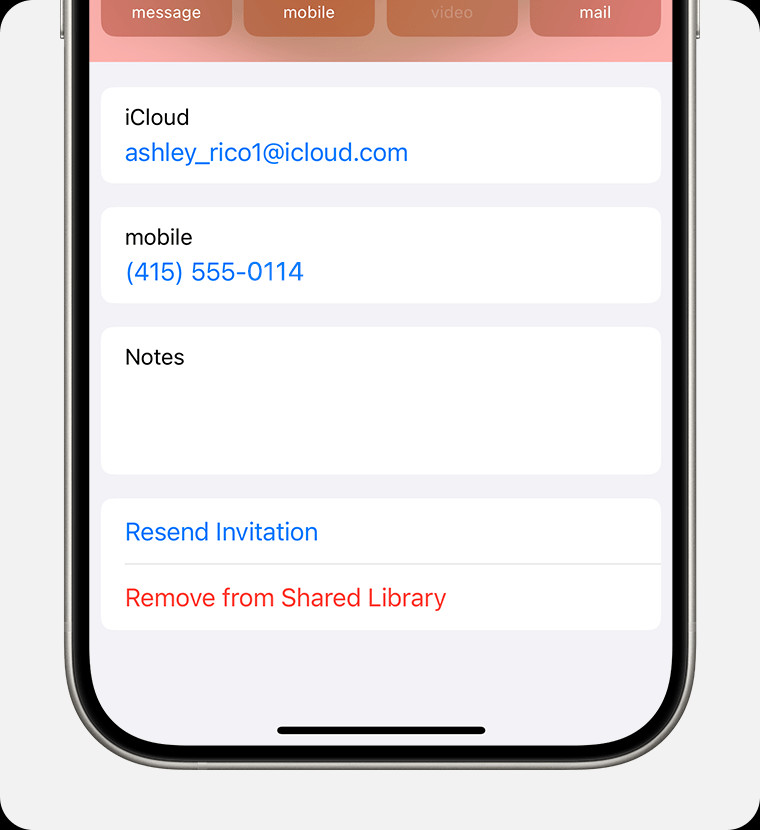 Remove from Shared Library is located below Resend Invitation.
Important Considerations After Removal:
- Notification: The participant will receive a notification that they’ve been removed.
- Photo Transfer: If the participant has been in the Shared Library for more than seven days, all of the shared assets are automatically copied to their Personal Library. If they’ve been in the Shared Library for less than seven days, only the photos and videos that they contributed are copied to their Personal Library.
3.2. Removing Participants On Your Mac
- Open Photos Settings: In the Photos app, go to Photos > Settings.
- Navigate to Shared Library: Select the Shared Library tab.
- Remove Participant: Click the “More” button (three dots) next to a participant’s name, then choose “Remove.”
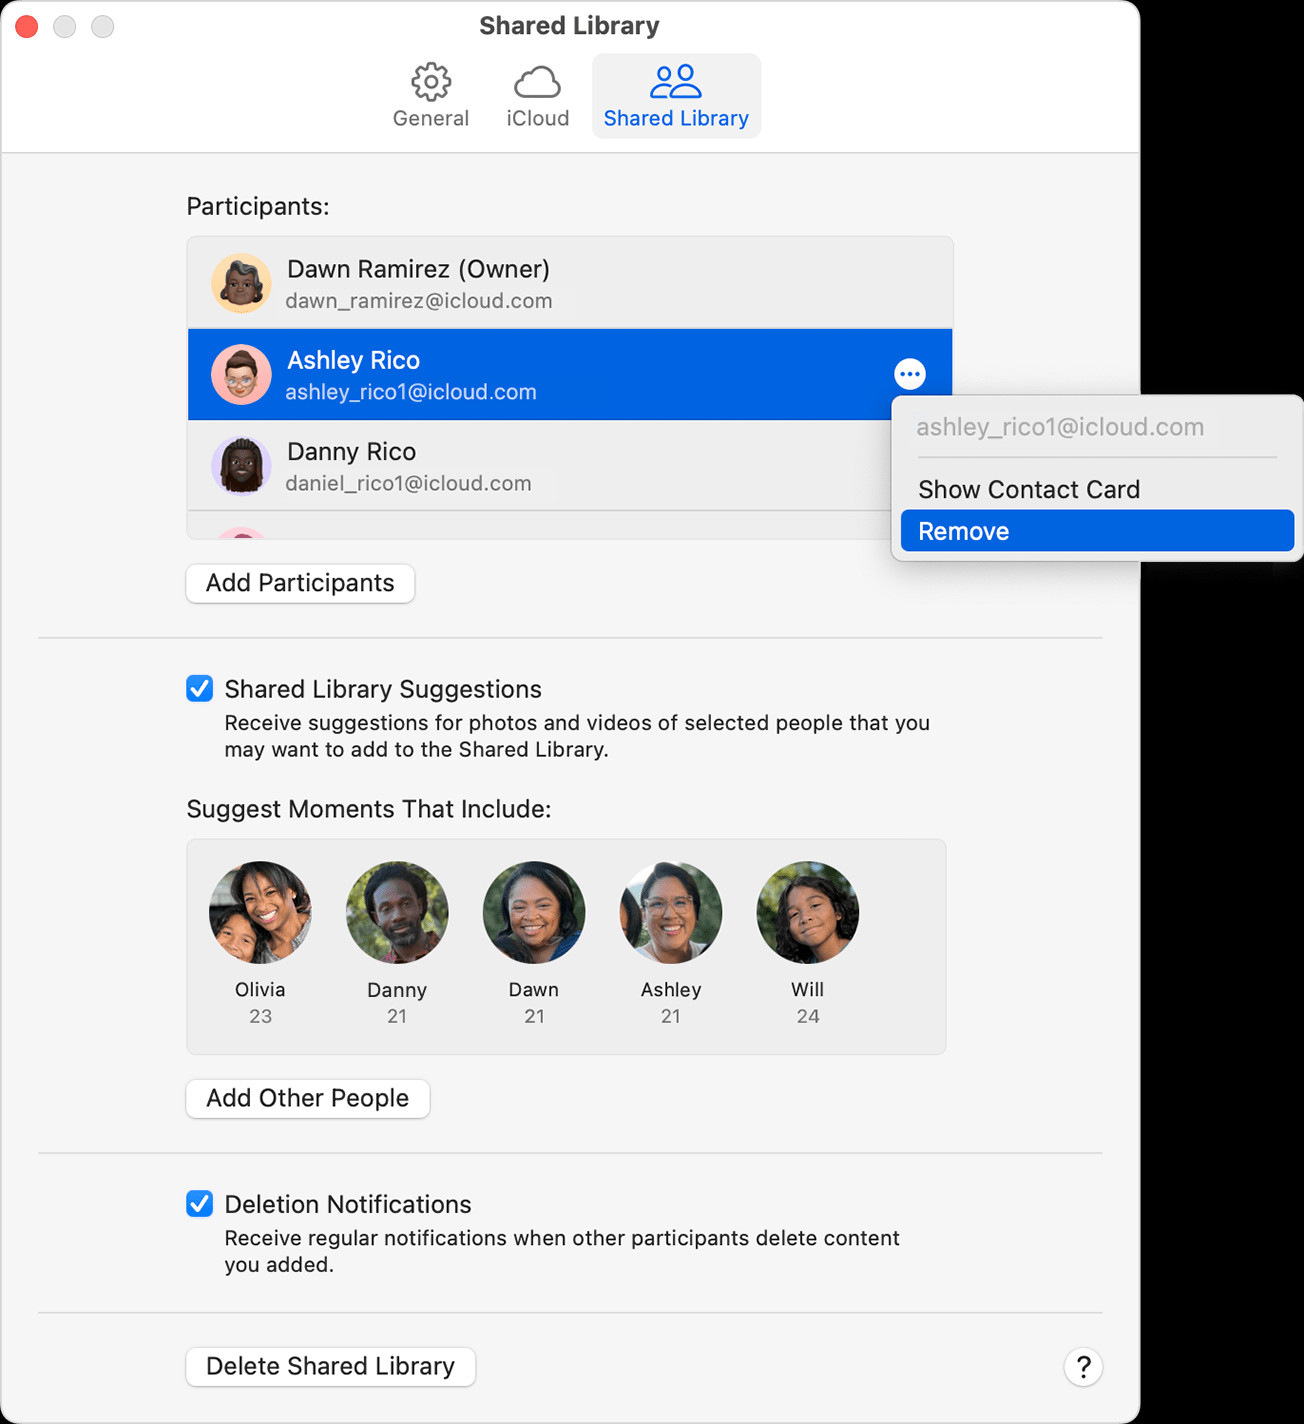 Remove is located beneath Show Contact Card.
Important Considerations After Removal:
- Notification: The participant receives a notification that they’ve been removed from the Shared Library.
- Photo Transfer: If the participant has been in the Shared Library for more than seven days, all of the shared assets are automatically copied to their Personal Library. If they’ve been in the Shared Library for less than seven days, only the photos and videos that they contributed are copied to their Personal Library.
4. How To Delete An Entire iCloud Shared Photo Library (For The Library Creator)
As the library creator, you can delete the entire Shared Library.
4.1. Deleting On Your iPhone Or iPad
- Access Shared Library Settings: Go to Settings > Photos, then tap Shared Library.
- Choose Delete Option: Tap “Delete Shared Library” at the bottom of the screen.
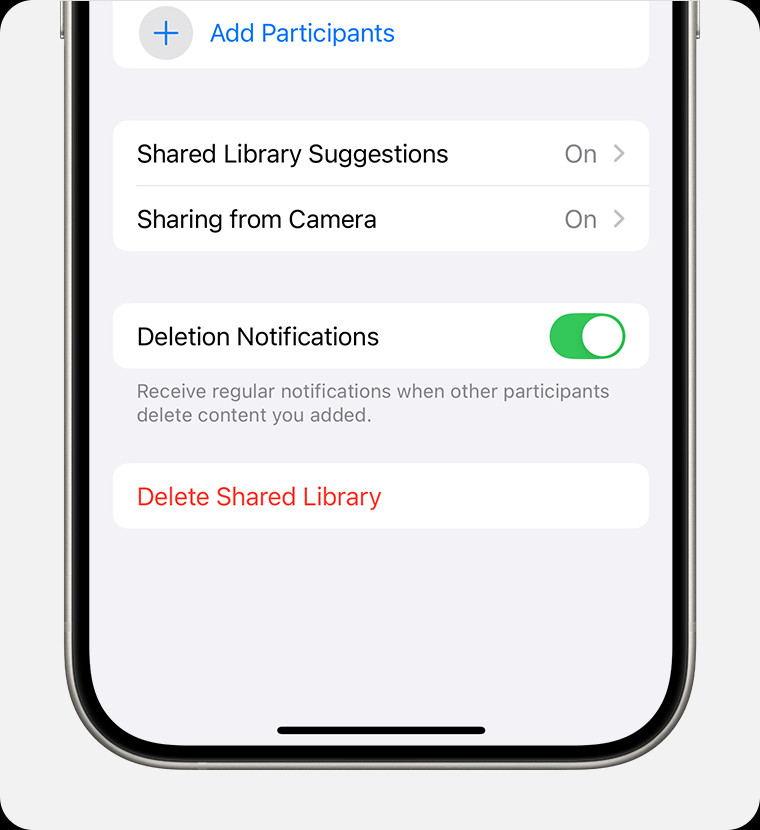 Delete Shared Library is located at the bottom of the screen.
- Select Photo Retention: Choose “Keep Everything” or “Keep Only What I Contributed,” then tap “Delete Shared Library” to confirm.
Important Considerations After Deletion:
- Notification: All participants receive a notification about the deletion.
- Photo Transfer: If the participant has been in the Shared Library for more than seven days, all of the shared assets are automatically copied to their Personal Library. If they’ve been in the Shared Library for less than seven days, only the photos and videos that they contributed are copied to their Personal Library.
4.2. Deleting On Your Mac
- Open Photos Settings: In the Photos app, choose Photos > Settings.
- Go to Shared Library Tab: Select the Shared Library tab.
 Delete Shared Library is located at the bottom of the menu.
- Delete Shared Library: Click “Delete Shared Library.”
- Choose Photo Retention: Choose “Keep Everything” or “Keep Only What I Contributed,” then click “Delete Shared Library” to confirm.
Important Considerations After Deletion:
- Notification: All participants receive a notification.
- Photo Transfer: If the participant has been in the Shared Library for more than seven days, all of the shared assets are automatically copied to their Personal Library. If they’ve been in the Shared Library for less than seven days, only the photos and videos that they contributed are copied to their Personal Library.
5. Managing Individual Photos Within A Shared Library
Sometimes, you may not want to leave the entire shared library but prefer to manage specific photos. Here’s how:
5.1. Hiding Photos
While you can’t directly remove photos contributed by others, you can hide them from your view.
- Open the Photos App: Launch the Photos app on your iPhone.
- Select the Photo: Find the photo you want to hide.
- Hide the Photo: Tap the share icon (the square with an arrow pointing up), scroll down, and select “Hide.”
This will move the photo to the Hidden album, and it won’t appear in your main library view.
5.2. Moving Photos To A Personal Album
You can move photos from the shared library to a personal album to better organize your collection.
- Select Photos: Select the photos you want to move.
- Add To Album: Tap “Add To Album” and choose an existing album or create a new one.
This helps you keep a personal collection separate from the shared content.
6. Understanding iCloud Storage And Shared Libraries
Shared libraries consume iCloud storage, impacting your available space. Managing storage effectively ensures your iPhone runs smoothly.
6.1. Checking iCloud Storage
- Open Settings: Go to Settings on your iPhone.
- Tap Your Name: Tap your name at the top, then select “iCloud.”
- Manage Storage: Tap “Manage Storage” to see a detailed breakdown of how your storage is being used.
6.2. Optimizing Photo Storage
To save space, you can optimize your photo storage settings.
- Go to Photos Settings: In Settings, tap “Photos.”
- Optimize iPhone Storage: Enable “Optimize iPhone Storage.” This stores smaller, device-optimized photos on your iPhone while keeping the full-resolution versions in iCloud.
7. Privacy Considerations When Sharing Photos
Sharing photos involves privacy considerations. Ensure you’re aware of who has access to your shared content and adjust settings accordingly.
7.1. Reviewing Participants
Regularly review the list of participants in your shared libraries to ensure only trusted individuals have access.
7.2. Adjusting Sharing Settings
Familiarize yourself with the sharing settings available within iCloud Photos to control who can view and contribute to your shared albums.
8. Troubleshooting Common Issues
Sometimes, issues may arise when managing shared photos. Here are some common problems and how to troubleshoot them:
8.1. Photos Not Syncing
If photos aren’t syncing correctly, ensure you have a stable internet connection and that iCloud Photos is enabled on all devices.
- Check Internet Connection: Verify your Wi-Fi or cellular data connection.
- Enable iCloud Photos: Go to Settings > Photos and ensure “iCloud Photos” is turned on.
- Restart Devices: Restart your iPhone and other devices to refresh the connection.
8.2. Storage Full Errors
If you receive storage full errors, consider optimizing your photo storage or upgrading your iCloud storage plan.
- Optimize Storage: Enable “Optimize iPhone Storage” in Photos settings.
- Upgrade iCloud Storage: Go to Settings > Your Name > iCloud > Manage Storage to upgrade your plan.
9. Best Practices For Managing Shared Photos On iPhone
Effective management of shared photos ensures a smooth and organized experience.
9.1. Regularly Review Content
Periodically review your shared libraries to remove any outdated or irrelevant content.
9.2. Organize Albums
Use albums to categorize and organize photos within shared libraries, making it easier to find specific memories.
9.3. Communicate With Participants
Maintain open communication with other participants in the shared library to ensure everyone is on the same page regarding content and settings.
10. Using Third-Party Apps to Manage Shared Photos
While iCloud Shared Photo Library is convenient, several third-party apps offer enhanced features for managing and sharing photos.
10.1. Google Photos
Google Photos is a popular alternative that offers unlimited storage (with some limitations) and robust sharing capabilities.
- Pros: Unlimited storage, advanced sharing options, AI-powered organization.
- Cons: Requires a Google account, potential privacy concerns.
10.2. Dropbox
Dropbox is primarily a cloud storage service but also offers photo sharing features.
- Pros: Secure storage, easy file sharing, integration with other apps.
- Cons: Limited free storage, requires a subscription for more space.
10.3. Adobe Lightroom
Adobe Lightroom is designed for professional photographers, offering powerful editing and sharing tools.
- Pros: Advanced editing features, seamless integration with Adobe Creative Cloud, high-quality sharing options.
- Cons: Requires a subscription, steeper learning curve.
11. How to Back Up Your Photos Before Making Changes
Before making any significant changes to your shared photo libraries, it’s crucial to back up your photos. This ensures you won’t lose any precious memories.
11.1. Backing Up to iCloud
- Go to Settings: Open the Settings app on your iPhone.
- Tap Your Name: Select your name at the top, then tap “iCloud.”
- iCloud Backup: Choose “iCloud Backup” and tap “Back Up Now.”
Ensure that “iCloud Photos” is enabled to back up your photos and videos.
11.2. Backing Up to a Computer
- Connect to Computer: Connect your iPhone to your computer using a USB cable.
- Trust This Computer: If prompted, tap “Trust This Computer” on your iPhone.
- Open Finder (Mac) or iTunes (Windows):
- Mac: Open Finder and select your iPhone in the sidebar.
- Windows: Open iTunes and select your iPhone.
- Back Up Now: Click “Back Up Now” to create a backup of your iPhone data, including photos and videos.
11.3. Using External Hard Drives
You can also back up your photos to an external hard drive for added security.
- Connect Hard Drive: Connect the external hard drive to your computer.
- Transfer Photos: Manually transfer your photos from your iPhone to the external hard drive using Finder (Mac) or File Explorer (Windows).
12. Advanced Tips for Managing Photos on iPhone
For users looking to take their photo management skills to the next level, here are some advanced tips.
12.1. Using Smart Albums
Smart Albums automatically organize your photos based on criteria you set, such as date, location, or keywords.
- Open Photos App: Launch the Photos app on your iPhone.
- Go to Albums: Tap the “Albums” tab.
- Create New Smart Album: Tap the “+” button and choose “New Smart Album.”
- Set Criteria: Define the criteria for your smart album, such as photos taken in Santa Fe, NM, or photos with specific keywords.
12.2. Utilizing Keywords and Face Recognition
Tagging photos with keywords and utilizing face recognition can make it easier to find specific images later.
- Add Keywords: Select a photo and add relevant keywords in the info section.
- Use Face Recognition: The Photos app automatically recognizes faces, allowing you to group photos by person.
12.3. Creating Custom Photo Projects
Use your photos to create custom projects like photo books, calendars, or slideshows.
- Photo Books: Use the Photos app or third-party services to create custom photo books.
- Calendars: Design personalized calendars using your favorite photos.
- Slideshows: Create slideshows with music and transitions to share your memories.
13. Legal And Ethical Considerations For Shared Photos
Before sharing photos, it’s essential to consider the legal and ethical implications.
13.1. Copyright Issues
Ensure you have the right to share any photos you upload, especially if they were taken by someone else.
13.2. Privacy Rights
Respect the privacy of individuals in your photos and obtain their consent before sharing them publicly.
13.3. Data Security
Take steps to protect your photos from unauthorized access and ensure they are stored securely.
14. Future Trends in Photo Sharing
The landscape of photo sharing is constantly evolving with new technologies and trends.
14.1. AI-Powered Photo Management
Artificial intelligence is increasingly being used to automate photo organization, editing, and sharing.
14.2. Enhanced Privacy Features
Future photo sharing platforms are likely to offer enhanced privacy features, such as end-to-end encryption and granular control over who can view your photos.
14.3. Integration with Augmented Reality (AR)
AR technology could revolutionize photo sharing by allowing users to overlay digital content onto their photos and share them in immersive new ways.
15. How to Keep Your iPhone Photo Library Organized
Maintaining an organized photo library on your iPhone can save you time and reduce stress. Here are some tips to help you stay on top of your photos.
15.1. Regularly Delete Unnecessary Photos
Make it a habit to delete photos you no longer need, such as duplicates, blurry shots, or screenshots.
15.2. Use Albums to Categorize Photos
Create albums for different events, trips, or themes to make it easier to find specific photos.
15.3. Take Advantage of iCloud Features
Utilize iCloud features like Shared Photo Library and iCloud Photos to keep your library organized and accessible across all your devices.
16. Preserving Photo Quality When Sharing
Maintaining the quality of your photos when sharing is crucial for preserving your memories.
16.1. Use High-Resolution Sharing Options
When sharing photos, choose high-resolution options to avoid compression and loss of quality.
16.2. Avoid Multiple Compressions
Avoid repeatedly compressing photos, as this can degrade their quality over time.
16.3. Use Appropriate File Formats
Use appropriate file formats like JPEG for general sharing and TIFF for archival purposes.
17. Maximizing iPhone Camera Capabilities for Better Photos
Improving your photography skills can enhance the quality of your shared photos.
17.1. Master Basic Photography Techniques
Learn about composition, lighting, and focus to take better photos with your iPhone.
17.2. Use iPhone Camera Features
Explore the various features of the iPhone camera, such as Portrait mode, Night mode, and burst mode, to capture stunning images.
17.3. Edit Photos on Your iPhone
Use the built-in editing tools in the Photos app or third-party apps to enhance your photos before sharing.
18. Addressing Common Misconceptions About Shared Photos
Clearing up misconceptions can help you manage your shared photos more effectively.
18.1. Shared Photos Take Up Double Storage
Shared photos only take up storage space once, regardless of how many people they are shared with.
18.2. Deleting Shared Photos Deletes Them for Everyone
Deleting shared photos only removes them from your library, not from the libraries of other participants.
18.3. Leaving a Shared Library Deletes Your Photos
Leaving a shared library does not delete your photos; it simply removes you from the shared album.
19. The Role Of dfphoto.net In Your Photography Journey
At dfphoto.net, we are dedicated to supporting your photography journey with comprehensive resources and a vibrant community. Whether you’re looking to master new techniques, find inspiration, or stay updated on the latest trends, dfphoto.net is your go-to destination.
19.1. Explore Tutorials And Guides
Access a wealth of tutorials and guides covering various photography topics, from basic techniques to advanced editing tips.
19.2. Discover Inspiring Photo Galleries
Browse stunning photo galleries showcasing the work of talented photographers from around the world.
19.3. Connect With The Community
Join our active community of photography enthusiasts to share your work, exchange ideas, and get feedback.
19.4 Contact Information
Need more personalized assistance or have specific questions? Reach out to us.
- Address: 1600 St Michael’s Dr, Santa Fe, NM 87505, United States
- Phone: +1 (505) 471-6001
- Website: dfphoto.net
20. FAQs About Managing Shared Photos On iPhone
20.1. Can I remove a photo I added to a Shared Library?
Yes, you can remove photos you’ve added. Just select the photo and choose “Delete” or “Remove from Shared Library.”
20.2. What happens when I leave a Shared Library?
You can choose to copy all photos or just your contributions to your personal library before leaving.
20.3. How do I know who is in my Shared Library?
Go to Settings > Photos > Shared Library to see a list of participants.
20.4. Can I recover photos I deleted from a Shared Library?
Check the “Recently Deleted” album in the Photos app. Photos remain there for 30 days.
20.5. How do I prevent photos from being automatically added to the Shared Library?
Turn off the automatic sharing feature in the Shared Library settings.
20.6. Is there a limit to how many photos I can share?
There is no specific limit, but iCloud storage limits apply.
20.7. Can I share photos with someone who doesn’t have an iPhone?
Yes, they can view shared photos through a web browser using an iCloud link.
20.8. How secure is the iCloud Shared Photo Library?
iCloud uses encryption to protect your photos, but always be mindful of who you share with.
20.9. Can I merge multiple Shared Libraries?
No, you cannot directly merge Shared Libraries. You would need to manually move photos between them.
20.10. What if I accidentally delete a Shared Library?
Unfortunately, if you delete a Shared Library and don’t have a backup, the photos may be lost. Always back up important photos.
Managing shared photos on your iPhone doesn’t have to be a headache. By following these tips and tricks, you can keep your photo library organized, secure, and enjoyable. Ready to take control of your photo collection and enhance your photography skills? Visit dfphoto.net today to discover a wealth of resources, connect with fellow enthusiasts, and unleash your creative potential!