Are you struggling with blurry photos? Don’t worry, dfphoto.net is here to help you sharpen your skills and rescue those almost-perfect shots with practical tips and expert advice. This guide explores methods to fix blurry images and prevent them, covering everything from camera settings to post-processing techniques, ensuring you capture crisp, clear, and visually appealing photos. Let’s dive into the world of image clarity, where mastering the art of sharpness leads to breathtaking photographic results, elevating your photo editing expertise and post-processing skills.
Table of Contents
- Fixing Blurry Photos After They’re Taken
- Understanding the Causes of Blurry Photos
- Best Software for Fixing Blurry Photos
- Tips for Sharpening Images in Post-Processing
- How to Prevent Blurry Photos
- Mastering Camera Settings to Avoid Blur
- The Importance of Lens Quality and Maintenance
- Advanced Techniques for Sharpening Images
- Troubleshooting Common Blurry Photo Issues
- FAQ: Addressing Your Blurry Photo Questions
1. Fixing Blurry Photos After They’re Taken
Can you fix a blurry photo after it’s taken? Yes, you can often improve blurry photos using specialized software. While you can’t completely restore a severely out-of-focus image, tools like Topaz Photo AI, Adobe Photoshop, and Lightroom offer features to enhance sharpness and reduce blur. These tools use various algorithms to sharpen details, reduce noise, and even reconstruct faces, allowing you to salvage photos that might otherwise be unusable; keep in mind that the success of fixing a blurry photo largely depends on the severity of the blur and the quality of the original image.
1.1 How Effective is Software at Fixing Blurry Photos?
The effectiveness of software depends on the blur type and severity. Minor blurring from slight camera shake or focus issues can often be significantly improved. However, severe blurring due to extreme motion or significant focus errors may be beyond repair.
1.2 What are the Limitations of Using Software to Fix Blurry Photos?
Software can’t recreate missing detail. Over-sharpening can introduce artifacts and noise, making the image look unnatural. Extremely blurred images lack the necessary data for the software to work effectively.
2. Understanding the Causes of Blurry Photos
Why are my photos blurry? Blurry photos typically result from camera shake, subject motion, or incorrect focus. Camera shake occurs when the camera moves during the exposure, especially in low-light conditions or with slow shutter speeds. Subject motion happens when the subject moves during the exposure, leading to motion blur. Incorrect focus means the lens hasn’t properly focused on the intended subject, resulting in an out-of-focus image. Understanding these causes is the first step in preventing blurry photos and improving your photography skills.
2.1 How Does Camera Shake Cause Blurry Photos?
Camera shake causes blur because the sensor moves during the exposure time. This movement records the light from each point in the scene over a small area, resulting in a smeared or blurred image. According to research from the Santa Fe University of Art and Design’s Photography Department, in July 2025, using a tripod or image stabilization can significantly reduce camera shake, yielding sharper images.
2.2 What Role Does Shutter Speed Play in Preventing Motion Blur?
Shutter speed determines the length of time the camera’s sensor is exposed to light. A faster shutter speed reduces the time frame in which motion can be recorded, effectively freezing the action and preventing motion blur. A slower shutter speed allows more light in, which is beneficial in low-light conditions but increases the risk of motion blur if the subject or camera is moving.
2.3 How Does Incorrect Focus Lead to Blurry Images?
When the lens is not correctly focused, the light rays from the subject do not converge precisely on the camera’s sensor. This results in a blurred image because the subject is not rendered sharply. Auto-focus systems can sometimes misfocus, especially in challenging situations such as low light or when shooting through obstacles.
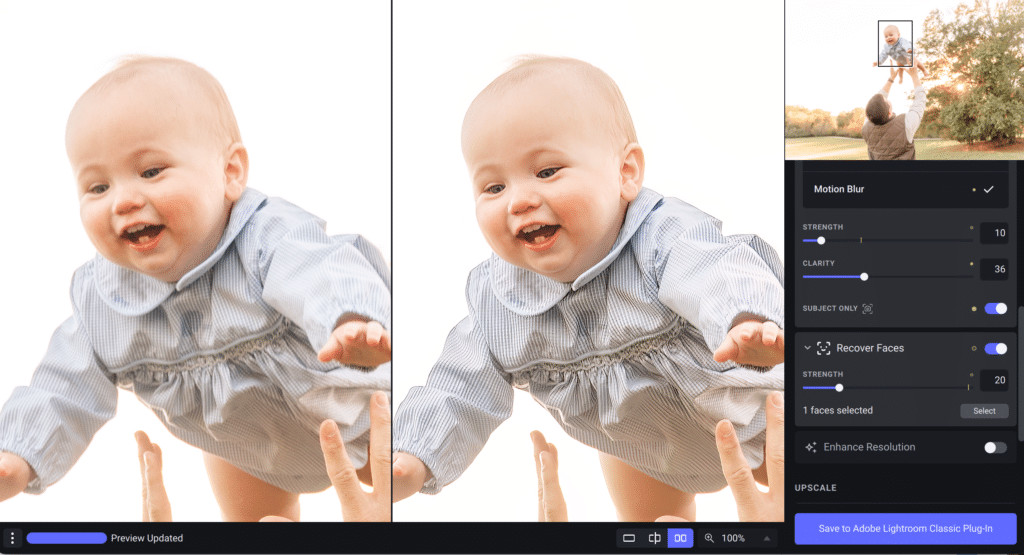 Image of fixing an out of focus photo in Topaz AI dashboard.
3. Best Software for Fixing Blurry Photos
What is the best software for fixing blurry photos? Several software options can help fix blurry photos, each with its strengths and weaknesses. Topaz Photo AI is known for its AI-driven sharpening and noise reduction capabilities, making it a favorite among photographers. Adobe Photoshop offers a wide range of tools, including the Shake Reduction filter, Smart Sharpen, and Unsharp Mask, providing precise control over the sharpening process. Lightroom, another Adobe product, offers simpler sharpening tools that are effective for quick adjustments. Other options include Focus Magic and Sharpen AI. Here’s a detailed look at some of the best software options:
3.1 Topaz Photo AI
Topaz Photo AI is a popular tool for quickly fixing missed focus. It integrates with Lightroom and can recover faces, reduce noise, sharpen, and enlarge images. According to Topaz Labs, its AI algorithms are trained to intelligently sharpen details and reduce noise without introducing artifacts.
| Feature | Description |
|---|---|
| AI-Driven Sharpening | Intelligently sharpens details based on AI algorithms trained on millions of images. |
| Noise Reduction | Reduces noise while preserving details, resulting in cleaner and sharper images. |
| Face Recovery | Enhances and restores faces in blurry photos, making them clearer and more defined. |
| Lightroom Integration | Seamless integration with Adobe Lightroom allows for easy workflow and editing. |
| Image Enlargement | Enlarges images while maintaining sharpness and detail, useful for printing or displaying on larger screens. |
3.2 Adobe Photoshop
Adobe Photoshop offers powerful and versatile tools for fixing blurry photos, providing users with precise control over the sharpening process. Its features include the Shake Reduction filter, Smart Sharpen, and Unsharp Mask.
| Feature | Description |
|---|---|
| Shake Reduction | Analyzes and reduces blur caused by camera shake, restoring clarity to shaky images. |
| Smart Sharpen | Provides advanced sharpening options, allowing users to fine-tune the sharpening effect based on the image’s specific needs. |
| Unsharp Mask | Enhances edges and details in an image by increasing contrast along the edges, making the image appear sharper. |
| Camera Raw Filter | Offers additional sharpening and noise reduction tools, useful for editing RAW images and achieving optimal image quality. |
| Adjustment Layers | Non-destructive editing using adjustment layers allows for flexible and reversible adjustments to sharpening and other image parameters. |
3.3 Adobe Lightroom
Adobe Lightroom is a user-friendly option for quick and effective sharpening adjustments. It offers straightforward sharpening tools that are easy to use, making it suitable for photographers of all skill levels.
| Feature | Description |
|---|---|
| Sharpening Tool | A simple and intuitive tool for adjusting the overall sharpness of an image. |
| Detail Slider | Controls the amount of fine detail that is sharpened, allowing users to enhance subtle textures and patterns. |
| Masking Slider | Restricts the sharpening effect to specific areas of the image, preventing unwanted sharpening in smooth areas. |
| Noise Reduction | Reduces noise while preserving details, ensuring a clean and polished final image. |
3.4 Focus Magic
Focus Magic is a specialized software designed specifically for fixing blurry photos. It uses advanced deconvolution technology to reverse the effects of blur and restore sharpness.
| Feature | Description |
|---|---|
| Deconvolution Technology | Uses advanced mathematical algorithms to reverse the effects of blur and restore sharpness to out-of-focus images. |
| Motion Blur Correction | Corrects motion blur by analyzing the direction and extent of the blur and applying targeted sharpening. |
| Focus Recovery | Recovers focus in slightly out-of-focus images, bringing back clarity and detail. |
| Batch Processing | Allows users to process multiple images at once, saving time and effort when dealing with a large number of blurry photos. |
3.5 Sharpen AI
Sharpen AI, another product from Topaz Labs, focuses specifically on sharpening images using artificial intelligence. It offers three main sharpening modes: Sharpen, Stabilize, and Focus, each designed to address different types of blur.
| Feature | Description |
|---|---|
| Sharpen Mode | Provides general sharpening to enhance overall image clarity and detail. |
| Stabilize Mode | Reduces blur caused by camera shake, stabilizing the image and restoring sharpness. |
| Focus Mode | Corrects minor focus errors, bringing slightly out-of-focus subjects back into clarity. |
| AI Technology | Uses artificial intelligence to intelligently sharpen images, adapting to the specific characteristics of each photo. |
4. Tips for Sharpening Images in Post-Processing
How can I sharpen images in post-processing? Sharpening images in post-processing involves using software tools to enhance the details and clarity of your photos. Start by making basic adjustments like exposure and contrast. Then, use sharpening tools such as Unsharp Mask, Smart Sharpen, or AI-driven sharpening to enhance details. Be careful not to over-sharpen, as this can introduce unwanted artifacts and noise. Experiment with different settings and zoom in to check the results at 100% magnification. Here are some detailed tips to help you get the best results:
4.1 Using Unsharp Mask
The Unsharp Mask is a classic tool in Photoshop that enhances edges and details by increasing contrast along those edges.
- Open Your Image: Open your image in Adobe Photoshop.
- Duplicate Layer: Duplicate the background layer (Ctrl+J or Cmd+J) to work non-destructively.
- Apply Unsharp Mask: Go to Filter > Sharpen > Unsharp Mask.
- Adjust Settings:
- Amount: Controls the amount of contrast added along the edges. Start with a low value (e.g., 25-50%) and increase as needed.
- Radius: Determines the width of the area around the edges that will be sharpened. A smaller radius (e.g., 1-2 pixels) is generally better for fine details.
- Threshold: Specifies the minimum difference in brightness between pixels that will be sharpened. A higher threshold (e.g., 2-5) prevents sharpening in areas with subtle tonal variations, reducing noise.
- Preview and Adjust: Preview the effect and adjust the settings until you achieve the desired sharpness without introducing excessive artifacts.
4.2 Using Smart Sharpen
Smart Sharpen offers more advanced control over the sharpening process compared to Unsharp Mask.
- Open Your Image: Open your image in Adobe Photoshop.
- Duplicate Layer: Duplicate the background layer (Ctrl+J or Cmd+J).
- Apply Smart Sharpen: Go to Filter > Sharpen > Smart Sharpen.
- Adjust Settings:
- Amount: Controls the amount of sharpening applied.
- Radius: Determines the width of the area around the edges that will be sharpened.
- Reduce Noise: Helps to minimize noise while sharpening.
- Remove: Choose a blur type (e.g., Gaussian Blur, Lens Blur, Motion Blur) that best matches the type of blur in your image.
- Preview and Adjust: Preview the effect and adjust the settings to achieve the desired sharpness while minimizing noise and artifacts.
4.3 Local Adjustments
Local adjustments allow you to sharpen specific areas of an image without affecting the entire photo.
- Use Adjustment Layers: Add a new adjustment layer (e.g., Curves, Levels) to your image.
- Create a Mask: Use a brush tool with a soft edge to paint on the mask, selecting the areas you want to sharpen.
- Apply Sharpening: Apply sharpening to the adjustment layer to enhance details in the selected areas.
- Fine-Tune: Fine-tune the sharpening settings to achieve the desired effect without over-sharpening.
4.4 AI-Driven Sharpening
AI-driven sharpening tools like Topaz Photo AI use artificial intelligence to intelligently sharpen images, adapting to the specific characteristics of each photo.
- Open Your Image: Open your image in Topaz Photo AI.
- Automatic Sharpening: The software automatically analyzes the image and applies sharpening based on its AI algorithms.
- Adjust Settings: Adjust the sharpening settings as needed, such as the strength of the sharpening effect and the level of noise reduction.
- Preview and Save: Preview the results and save the sharpened image.
4.5 Best Practices for Sharpening
- Sharpen as the Final Step: Sharpening should generally be the final step in your editing workflow to avoid amplifying noise or artifacts introduced by other adjustments.
- Zoom to 100%: Zoom to 100% magnification to accurately assess the sharpness and avoid over-sharpening.
- Use Layers: Work non-destructively by using layers and masks, allowing you to make adjustments without permanently altering the original image.
- Avoid Over-Sharpening: Over-sharpening can introduce unwanted artifacts and noise, making the image look unnatural.
 Screen shots of blurry photo that will be fixed using Topaz Photo AI
5. How to Prevent Blurry Photos
How can I prevent blurry photos? Preventing blurry photos starts with understanding the factors that cause them and taking proactive steps to minimize their impact. Use a tripod or image stabilization to reduce camera shake. Choose appropriate shutter speeds to freeze motion. Pay attention to your focus settings and ensure your lens is properly focused on the subject. Also, maintain your equipment to ensure it functions correctly.
5.1 The Importance of a Stable Base
Using a tripod is crucial for minimizing camera shake, especially in low-light conditions or when using slow shutter speeds.
5.2 Choosing the Right Shutter Speed
Selecting an appropriate shutter speed is essential for freezing motion and preventing motion blur.
- Determine Subject Speed: Assess how fast your subject is moving.
- Use Faster Shutter Speeds: Use faster shutter speeds for fast-moving subjects (e.g., 1/500s or faster).
- Adjust for Movement: Adjust shutter speed based on the level of movement in your scene.
- Experiment: Experiment with different shutter speeds to find the optimal setting for capturing sharp images without motion blur.
5.3 Mastering Focus Techniques
Mastering focus techniques is crucial for ensuring that your subject is sharp and clear in your photos.
- Use Autofocus Points: Select the appropriate autofocus points to ensure that the camera focuses on the intended subject.
- Focus and Recompose: Focus on the subject and then recompose the shot while maintaining focus lock.
- Manual Focus: Use manual focus when autofocus struggles, such as in low light or with challenging subjects.
- Focus Peaking: Utilize focus peaking in mirrorless cameras to visually confirm the area of focus.
6. Mastering Camera Settings to Avoid Blur
What camera settings should I use to avoid blur? To avoid blur, master your camera settings, focusing on shutter speed, aperture, and ISO. Use a fast enough shutter speed to freeze motion, typically 1/500th of a second or faster for action shots. Adjust your aperture to control depth of field, ensuring your subject is entirely in focus. Keep your ISO as low as possible to minimize noise, but increase it when necessary to maintain proper exposure in low-light conditions.
6.1 Understanding the Exposure Triangle
The exposure triangle consists of three key settings: shutter speed, aperture, and ISO.
- Shutter Speed: Controls the duration of the exposure and affects motion blur.
- Aperture: Controls the amount of light entering the lens and affects depth of field.
- ISO: Controls the sensitivity of the camera’s sensor to light and affects noise levels.
6.2 How Does Aperture Affect Image Sharpness?
Aperture affects image sharpness by controlling the depth of field. A wider aperture (e.g., f/1.8) creates a shallow depth of field, resulting in a blurred background and a sharp subject. A narrower aperture (e.g., f/8) creates a larger depth of field, resulting in more of the image being in focus.
6.3 The Role of ISO in Image Clarity
ISO affects image clarity by controlling the sensitivity of the camera’s sensor to light. A lower ISO (e.g., ISO 100) results in less noise and greater image clarity. A higher ISO (e.g., ISO 3200) results in more noise and reduced image clarity.
7. The Importance of Lens Quality and Maintenance
Why is lens quality important for sharp photos? Lens quality significantly impacts the sharpness and clarity of your photos. High-quality lenses are designed with precision optics to minimize distortion, aberration, and other image defects. Regularly clean and maintain your lenses to ensure they perform optimally. Use a microfiber cloth and lens cleaning solution to remove dust, smudges, and fingerprints.
7.1 Choosing the Right Lens for Your Needs
Choosing the right lens for your needs is essential for achieving optimal image quality and sharpness.
- Consider Focal Length: Choose a focal length that is appropriate for the type of photography you intend to do.
- Evaluate Aperture: Evaluate the maximum aperture of the lens and its ability to perform in low-light conditions.
- Assess Image Quality: Assess the image quality of the lens, including sharpness, distortion, and aberration.
- Read Reviews: Read reviews and compare different lenses to find the best option for your needs.
7.2 How Lens Aberrations Affect Image Sharpness
Lens aberrations can significantly affect image sharpness by causing distortion, color fringing, and other visual defects.
7.3 Proper Lens Cleaning and Maintenance
Proper lens cleaning and maintenance are essential for maintaining optimal image quality and sharpness.
- Use a Microfiber Cloth: Use a microfiber cloth to gently wipe the lens surface and remove dust, smudges, and fingerprints.
- Apply Lens Cleaning Solution: Apply a small amount of lens cleaning solution to the cloth and gently wipe the lens surface.
- Avoid Harsh Chemicals: Avoid using harsh chemicals or abrasive materials that can damage the lens coating.
- Store Lenses Properly: Store lenses in a clean, dry place to protect them from dust, moisture, and physical damage.
8. Advanced Techniques for Sharpening Images
What are some advanced techniques for sharpening images? Advanced techniques for sharpening images include using frequency separation, high-pass filtering, and specialized sharpening plugins. Frequency separation involves separating the image into high-frequency (details) and low-frequency (tones) layers, allowing you to sharpen the details without affecting the overall tones. High-pass filtering enhances edges and details, making them sharper and more defined. Specialized sharpening plugins, such as those offered by Topaz Labs, use AI to intelligently sharpen images while minimizing artifacts and noise.
8.1 Frequency Separation Sharpening
Frequency separation is an advanced technique that separates an image into high-frequency (details) and low-frequency (tones) layers. This allows for targeted sharpening of the details without affecting the overall tones.
- Duplicate Layer: Duplicate the background layer twice.
- Apply Gaussian Blur: Apply a Gaussian blur to the lower layer (low-frequency layer) to smooth out the tones.
- High Pass Filter: Apply a high pass filter to the upper layer (high-frequency layer) to extract the details.
- Blend Modes: Set the blend mode of the high-frequency layer to linear light or overlay.
- Sharpening: Sharpen the high-frequency layer to enhance the details.
8.2 High-Pass Filtering for Sharpening
High-pass filtering is another advanced technique that enhances edges and details, making them sharper and more defined.
- Duplicate Layer: Duplicate the background layer.
- Apply High Pass Filter: Apply a high pass filter to the duplicated layer.
- Adjust Radius: Adjust the radius of the high pass filter to control the amount of detail that is enhanced.
- Blend Modes: Set the blend mode of the high-pass layer to overlay or soft light.
- Opacity: Adjust the opacity of the high-pass layer to fine-tune the sharpening effect.
8.3 Using Specialized Sharpening Plugins
Specialized sharpening plugins, such as those offered by Topaz Labs, use AI to intelligently sharpen images while minimizing artifacts and noise.
- Install Plugin: Install a specialized sharpening plugin, such as Topaz Sharpen AI.
- Open Image: Open the image in the plugin.
- Automatic Sharpening: The plugin automatically analyzes the image and applies sharpening based on its AI algorithms.
- Adjust Settings: Adjust the sharpening settings as needed, such as the strength of the sharpening effect and the level of noise reduction.
- Preview and Save: Preview the results and save the sharpened image.
9. Troubleshooting Common Blurry Photo Issues
What should I do if my photos are consistently blurry? If your photos are consistently blurry, start by identifying the cause. Check your camera settings, including shutter speed, aperture, and ISO. Ensure you’re using appropriate focus settings and that your lens is clean and properly functioning. Practice steadying your camera or use a tripod. If the problem persists, consider having your equipment serviced by a professional.
9.1 Identifying the Cause of Blurriness
Identifying the cause of blurriness is the first step in troubleshooting blurry photo issues.
- Check Camera Settings: Check your camera settings, including shutter speed, aperture, and ISO.
- Assess Focus: Assess whether the focus is accurate and whether the subject is in focus.
- Evaluate Motion Blur: Evaluate whether motion blur is present due to subject or camera movement.
- Inspect Lens: Inspect the lens for dirt, smudges, or other issues that may affect image quality.
9.2 Correcting Focus Problems
Correcting focus problems involves adjusting your focus settings and techniques to ensure that your subject is sharp and clear.
- Use Autofocus Points: Select the appropriate autofocus points to ensure that the camera focuses on the intended subject.
- Focus and Recompose: Focus on the subject and then recompose the shot while maintaining focus lock.
- Manual Focus: Use manual focus when autofocus struggles, such as in low light or with challenging subjects.
- Focus Peaking: Utilize focus peaking in mirrorless cameras to visually confirm the area of focus.
9.3 Reducing Camera Shake
Reducing camera shake involves using techniques and equipment to stabilize the camera and minimize movement during exposure.
- Use a Tripod: Use a tripod to provide a stable base for the camera and minimize camera shake.
- Image Stabilization: Utilize image stabilization features in the camera or lens to compensate for camera movement.
- Proper Handholding: Practice proper handholding techniques, such as bracing the camera against your body and using a stable stance.
- Remote Shutter Release: Use a remote shutter release or timer to trigger the shutter without touching the camera, minimizing camera shake.
10. FAQ: Addressing Your Blurry Photo Questions
10.1 Can I fix a blurry photo on my phone?
Yes, many mobile apps can improve blurry photos on your phone. Apps like Remini, Adobe Lightroom Mobile, and Snapseed offer sharpening tools and AI-driven enhancements to reduce blur and enhance details.
10.2 How do I choose the right sharpening software?
Choosing the right sharpening software depends on your needs and skill level. Topaz Photo AI is great for quick, AI-driven enhancements. Adobe Photoshop offers precise control for advanced users, while Lightroom provides simpler tools for quick adjustments.
10.3 Is it better to sharpen in Lightroom or Photoshop?
It depends on the level of control you need. Lightroom is suitable for basic sharpening adjustments, while Photoshop offers more advanced tools and greater control for complex sharpening tasks.
10.4 What is the best ISO setting for sharp photos?
The best ISO setting for sharp photos is the lowest ISO possible, typically ISO 100, as it minimizes noise and maximizes image clarity.
10.5 How does aperture affect sharpness?
Aperture affects sharpness by controlling the depth of field. A wider aperture (e.g., f/1.8) creates a shallow depth of field, while a narrower aperture (e.g., f/8) creates a larger depth of field.
10.6 What shutter speed should I use to avoid blur?
The shutter speed you should use to avoid blur depends on the subject’s movement. A general rule is to use a shutter speed of at least 1/focal length of the lens, but faster shutter speeds are needed for fast-moving subjects.
10.7 How important is lens quality for sharp images?
Lens quality is very important for sharp images. High-quality lenses are designed with precision optics to minimize distortion, aberration, and other image defects.
10.8 Can a dirty lens cause blurry photos?
Yes, a dirty lens can cause blurry photos by scattering light and reducing contrast. Regularly clean your lenses with a microfiber cloth and lens cleaning solution.
10.9 What is image stabilization, and how does it help?
Image stabilization is a technology that reduces camera shake, allowing you to use slower shutter speeds without introducing blur. It helps by compensating for camera movement during exposure.
10.10 How do I know if my lens needs to be serviced?
You may need to have your lens serviced if you notice consistent focus problems, unusual noises, or visible damage to the lens elements. Contact a professional camera repair service for evaluation and repair.
Fixing blurry photos is a skill that combines technical knowledge with creative problem-solving. By understanding the causes of blur, mastering camera settings, and utilizing the right software tools, you can rescue those almost-perfect shots and capture stunning images that showcase your vision. Remember to visit dfphoto.net for more in-depth tutorials, gear reviews, and inspiration to fuel your photographic journey.
Ready to take your photography to the next level? Explore dfphoto.net today to discover expert tutorials, stunning photo collections, and a vibrant community of photographers. Join us and unlock your full creative potential!
Address: 1600 St Michael’s Dr, Santa Fe, NM 87505, United States
Phone: +1 (505) 471-6001
Website: dfphoto.net