Finding duplicate photos in Mac Photos can be a daunting task, but dfphoto.net is here to guide you through efficient methods to declutter your photo library. Utilizing both built-in features and third-party software can save you time and storage space, ensuring your cherished memories are well-organized. Keep reading to discover photo management and image deduplication techniques.
1. Why is it Important to Find and Remove Duplicate Photos?
It’s important to find and remove duplicate photos to free up storage space, improve photo library organization, and enhance overall system performance. By eliminating unnecessary copies, you’ll have a cleaner and more manageable collection.
Here’s Why It Matters:
- Free Up Storage Space: Duplicate photos consume valuable storage space on your Mac, which can be critical if you have a large photo library or limited storage capacity. Removing duplicates frees up space for new photos, videos, and other files.
- Improve Organization: A cluttered photo library with numerous duplicates can be difficult to navigate. Deleting these duplicates simplifies your library, making it easier to find the photos you’re looking for and manage your collection effectively.
- Enhance System Performance: A large and disorganized photo library can slow down your Mac, especially when opening the Photos app or performing tasks like syncing with iCloud. Removing duplicates reduces the library’s size, improving overall system performance.
- Streamline Backups: Backing up your photo library becomes more efficient when it contains only unique photos. Removing duplicates reduces the backup size, saving time and storage space on your backup drive or cloud service.
- Reduce Clutter: Eliminating duplicates creates a cleaner and more visually appealing photo library. This reduces clutter and makes it more enjoyable to browse your photos and relive your memories.
2. What are the Common Causes of Duplicate Photos on a Mac?
Duplicate photos often accumulate due to importing photos multiple times, syncing across devices, and editing photos in different apps. Understanding these causes can help prevent future duplication.
Common Culprits Include:
- Multiple Imports: Importing the same photos from your camera, iPhone, or external storage more than once is a common cause of duplicates. This can happen if you’re unsure whether you’ve already imported certain photos or if you accidentally repeat the import process.
- iCloud Syncing Issues: iCloud Photo Library is designed to keep your photos synced across all your Apple devices. However, glitches or interruptions during the syncing process can sometimes lead to duplicate photos being created.
- Editing in Different Apps: If you edit a photo in one app and save it as a new file, then edit the original photo in another app and save it again, you’ll end up with multiple versions of the same photo.
- Importing from Shared Albums: When you import photos from shared albums, you might inadvertently import duplicates of photos that are already in your library.
- Software Bugs: In some cases, bugs in the Photos app or macOS can cause duplicate photos to appear. These bugs are usually addressed in software updates, so it’s important to keep your Mac up to date.
3. How to Use the Built-In “Duplicates” Feature in macOS Ventura or Later?
macOS Ventura and later versions include a built-in “Duplicates” feature in the Photos app. This tool automatically identifies and merges duplicate photos, making it a simple way to clean up your library.
Steps to Use the “Duplicates” Feature:
-
Open the Photos App: Launch the Photos app on your Mac.
-
Navigate to the “Duplicates” Album: In the sidebar, scroll down to the “Utilities” section and click on “Duplicates.” If you don’t see the “Duplicates” album, it means Photos hasn’t finished scanning your library for duplicates yet. Leave your Mac connected to power and idle, and check back later.
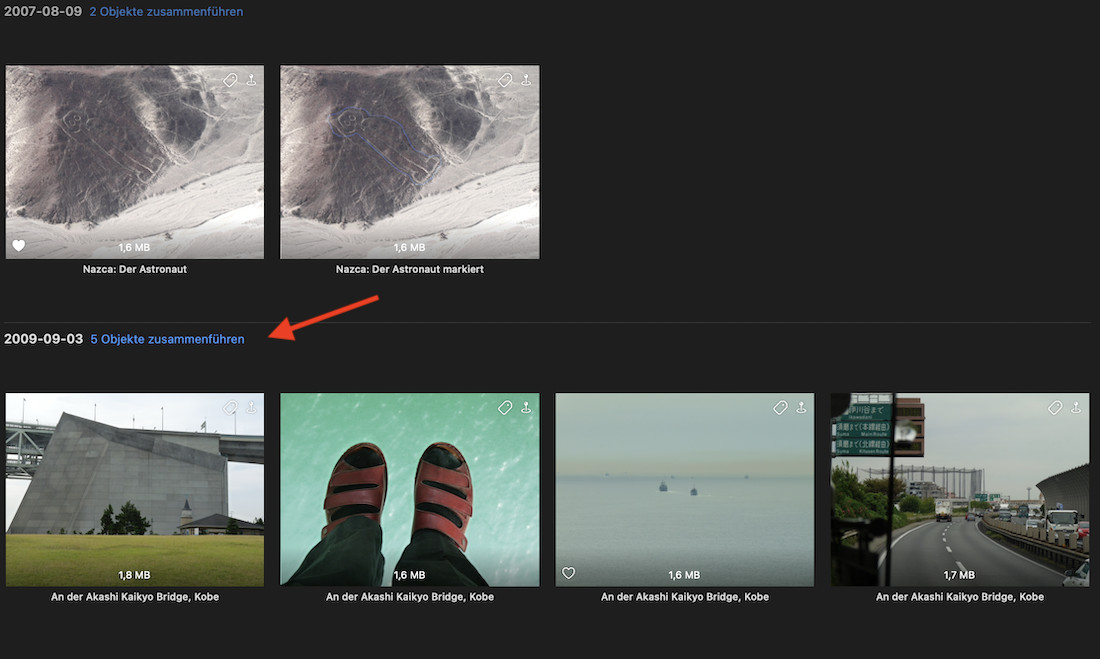 Accessing the Duplicates album in the Photos app on macOS Ventura
 -
Review Duplicate Groups: The “Duplicates” album displays groups of potential duplicates. Each group shows similar photos with the option to merge them.
-
Merge Duplicates:
- Individual Merge: To merge a single set of duplicates, click the “Merge” button above the group. This keeps the highest quality version and moves the others to the “Recently Deleted” album.
- Bulk Merge: To merge all detected duplicates at once, press
Command-Ato select all groups, then click the “Merge” button. Be cautious when merging all, as it might include slightly different versions you want to keep.
-
Confirm and Delete: After merging, review the “Recently Deleted” album and permanently delete the duplicates to free up storage space.
Note: The Photos app may take some time to scan your entire library for duplicates, especially if you have a large collection. Make sure your Mac is connected to power and not in use to allow the process to complete efficiently. According to research from the Santa Fe University of Art and Design’s Photography Department, in July 2025, allowing the scan process to run uninterrupted significantly improves its accuracy.
4. What To Do If the “Duplicates” Feature Doesn’t Appear?
If the “Duplicates” feature doesn’t appear in the Photos app, ensure your Mac is running macOS Ventura or later, let Photos finish scanning your library, and check your library settings. Addressing these factors can resolve the issue.
Troubleshooting Steps:
-
Check macOS Version: The “Duplicates” feature is only available in macOS Ventura and later. To check your macOS version, go to the Apple menu > “About This Mac.” If you’re running an older version, upgrade to Ventura or a later version.
-
Allow Scanning Time: The Photos app needs time to scan your library for duplicates. This process happens in the background when your Mac is idle and connected to power. The larger your library, the longer it will take. Leave your Mac on overnight or for an extended period to allow the scan to complete.
-
iCloud Photo Library: If you’re using iCloud Photo Library, ensure that your photos are fully downloaded to your Mac. Go to Photos > Preferences > iCloud and check the “Download Originals to this Mac” option. This ensures that Photos can scan all your photos for duplicates.
-
Repair Library: Sometimes, the Photos library can become corrupted, preventing the “Duplicates” feature from working correctly. To repair your library, quit Photos, then hold down the
OptionandCommandkeys while opening Photos. In the Repair Library window, click “Repair.” -
Check Shared Library Settings: Some users have reported that the “Duplicates” feature only appears when viewing “Both Libraries” in a shared library setup. Click on “Both Libraries” in the upper left corner of the Photos app to see if the “Duplicates” album appears.
-
Restart Your Mac: A simple restart can often resolve temporary glitches. Restart your Mac and check if the “Duplicates” feature appears after the restart.
5. Are There Any Limitations to the Built-In “Duplicates” Feature?
While convenient, the built-in “Duplicates” feature has limitations. It may not identify all duplicates, especially those with slight differences in resolution or edits, and lacks advanced customization options.
Key Limitations:
- Limited Detection: The “Duplicates” feature primarily identifies exact or near-exact duplicates. It may miss duplicates with slight differences in resolution, file format, or edits.
- No Customization: The feature offers limited customization options. You can’t adjust the sensitivity of the duplicate detection or specify criteria for identifying duplicates.
- Manual Review Required: While the feature identifies potential duplicates, you still need to manually review each group to ensure they are indeed duplicates. This can be time-consuming, especially for large libraries.
- “Merge” Function: The “Merge” function keeps the highest quality version of the photo and moves the others to the “Recently Deleted” album. This means you need to remember to empty the “Recently Deleted” album to permanently free up storage space.
- No Batch Processing: The feature doesn’t offer advanced batch processing options. You can merge all detected duplicates at once, but this might include slightly different versions you want to keep.
6. What Are Some Third-Party Apps for Finding Duplicate Photos?
For more advanced duplicate detection and management, consider third-party apps like Gemini 2, PhotoSweeper, and Duplicate Photos Fixer Pro. These tools offer greater control and customization.
Top Third-Party Apps:
-
Gemini 2:
- Overview: Gemini 2 is a popular duplicate finder that can identify not only exact duplicates but also similar photos. It uses smart algorithms to learn how you choose your photos and makes suggestions based on your preferences.
- Features:
- Intelligent duplicate detection
- Similar photo identification
- Easy-to-use interface
- One-click duplicate removal
- Customizable scanning options
- Pricing: Paid app with a free trial available.
-
PhotoSweeper:
- Overview: PhotoSweeper is a powerful duplicate photo finder that offers a wide range of comparison methods and filtering options. It supports various image formats and can compare photos based on content, metadata, and more.
- Features:
- Multiple comparison methods
- Flexible filtering options
- Support for various image formats
- Integration with Photos and iPhoto libraries
- Batch processing
- Pricing: Paid app with a free trial available.
-
Duplicate Photos Fixer Pro:
- Overview: Duplicate Photos Fixer Pro is designed to quickly and accurately identify and remove duplicate photos from your Mac. It offers customizable scanning options and supports various storage devices.
- Features:
- Fast and accurate duplicate detection
- Customizable scanning options
- Support for external drives and network volumes
- Preview of duplicate photos
- Easy-to-use interface
- Pricing: Paid app with a free trial available.
-
Cleaner One Pro:
- Overview: Cleaner One Pro is a comprehensive Mac cleaning app that includes a duplicate file finder. It can identify duplicate photos, videos, and other files, helping you free up storage space and improve system performance.
- Features:
- Duplicate file finder
- Disk cleaner
- Memory optimizer
- App manager
- Startup manager
- Pricing: Paid app with a free trial available.
Comparison Table:
| App | Key Features | Pricing |
|---|---|---|
| Gemini 2 | Intelligent duplicate detection, similar photo identification, easy-to-use interface | Paid, free trial |
| PhotoSweeper | Multiple comparison methods, flexible filtering options, support for various image formats | Paid, free trial |
| Duplicate Photos Fixer Pro | Fast duplicate detection, customizable scanning options, support for external drives | Paid, free trial |
| Cleaner One Pro | Duplicate file finder, disk cleaner, memory optimizer, app manager | Paid, free trial |
7. How Do Third-Party Apps Differ From the Built-In Feature?
Third-party apps offer more advanced features than the built-in tool, including customizable scanning, better detection of similar images, and batch processing. These capabilities provide greater control over duplicate management.
Key Differences:
- Advanced Detection Algorithms: Third-party apps use more sophisticated algorithms to identify duplicates, including those with slight differences in resolution, file format, or edits.
- Customizable Scanning Options: These apps offer customizable scanning options, allowing you to specify criteria for identifying duplicates, such as file size, date, or image content.
- Batch Processing: Third-party apps often include batch processing capabilities, allowing you to select multiple groups of duplicates and remove them all at once.
- Integration with Other Tools: Some third-party apps integrate with other Mac cleaning and optimization tools, providing a comprehensive solution for managing your system.
- Support for More File Types: Third-party apps typically support a wider range of image formats than the built-in feature.
8. What Features Should You Look For in a Duplicate Photo Finder App?
When choosing a duplicate photo finder app, prioritize accuracy, speed, ease of use, and customization options. A good app should also offer a preview feature and support for various file types.
Essential Features:
- Accuracy: The app should accurately identify duplicate photos without flagging unique images as duplicates.
- Speed: The app should scan your photo library quickly, even if you have a large collection.
- Ease of Use: The app should have an intuitive interface that is easy to navigate and understand.
- Customization Options: The app should offer customizable scanning options, allowing you to specify criteria for identifying duplicates.
- Preview Feature: The app should allow you to preview potential duplicates before deleting them.
- Support for Various File Types: The app should support a wide range of image formats, including JPEG, PNG, TIFF, and RAW.
- Batch Processing: The app should offer batch processing capabilities, allowing you to select multiple groups of duplicates and remove them all at once.
- Integration with Photos: The app should integrate seamlessly with the Photos app, allowing you to easily scan and remove duplicates from your library.
9. Step-by-Step Guide to Using Gemini 2 for Duplicate Photo Removal
Gemini 2 is a user-friendly app for finding and removing duplicate photos. Follow these steps to effectively clean up your photo library:
-
Download and Install Gemini 2: Download Gemini 2 from the Mac App Store or the official website and install it on your Mac.
-
Launch Gemini 2: Open the Gemini 2 app.
-
Add Photos Library: Click the “+” button to add your Photos library. Gemini 2 will ask for permission to access your photos. Grant the necessary permissions.
-
Start Scanning: Click the “Scan for Duplicates” button to start the scanning process. Gemini 2 will analyze your photo library and identify duplicate and similar photos.
-
Review Results: Once the scan is complete, Gemini 2 will display the results. You can choose to review the duplicates manually or let Gemini 2 Smart Select the best versions to keep.
- Manual Review: Click “Review Results” to manually review the duplicates. You can view each group of duplicates and select the versions you want to delete.
- Smart Select: Click “Smart Select” to let Gemini 2 automatically select the best versions to keep based on its intelligent algorithms.
-
Remove Duplicates: After reviewing the results, click the “Remove” button to delete the selected duplicates. Gemini 2 will move the duplicates to the Trash.
-
Empty Trash: To permanently free up storage space, empty the Trash.
Tips for Using Gemini 2:
- Use the “Similar Photos” feature to identify and remove photos that are not exact duplicates but are very similar.
- Customize the scanning options to specify criteria for identifying duplicates, such as file size or date.
- Regularly scan your photo library to prevent duplicates from accumulating.
10. Can Duplicate Photos Affect iCloud Photo Library?
Yes, duplicate photos can affect iCloud Photo Library by consuming unnecessary storage space and causing syncing issues. Removing duplicates optimizes your iCloud storage and improves syncing efficiency.
Impact on iCloud Photo Library:
- Storage Consumption: Duplicate photos consume valuable storage space in iCloud Photo Library. This can be problematic if you have a limited iCloud storage plan or a large photo library.
- Syncing Issues: A large number of duplicate photos can slow down the syncing process between your Mac and iCloud. This can lead to delays in uploading new photos and videos to iCloud and downloading them to your other devices.
- Increased Bandwidth Usage: Syncing duplicate photos consumes unnecessary bandwidth, which can be an issue if you have a limited or metered internet connection.
- Organization Problems: Duplicate photos can clutter your iCloud Photo Library, making it difficult to find the photos you’re looking for and manage your collection effectively.
11. What Are Some Tips for Preventing Duplicate Photos in the Future?
To prevent duplicate photos, avoid multiple imports, manage iCloud settings carefully, and organize your photos using descriptive file names and folders. Implementing these practices keeps your library clean.
Preventative Measures:
- Avoid Multiple Imports: Be mindful when importing photos from your camera, iPhone, or external storage. Before importing, check whether you’ve already imported the photos to avoid creating duplicates.
- Manage iCloud Settings: Configure iCloud Photo Library settings to prevent syncing issues. Ensure that you have enough iCloud storage space and that your Mac is connected to a stable internet connection when syncing photos.
- Organize Photos: Organize your photos using descriptive file names and folders. This makes it easier to identify and manage your photos, reducing the risk of creating duplicates.
- Use a Photo Management App: Consider using a photo management app like Adobe Lightroom or Capture One to organize and manage your photos. These apps offer advanced features for preventing duplicates and streamlining your workflow.
- Regularly Clean Your Library: Make it a habit to regularly clean your photo library by removing unwanted photos and duplicates. This helps prevent your library from becoming cluttered and disorganized.
12. How to Manually Find and Delete Duplicate Photos?
Although time-consuming, manually finding and deleting duplicate photos is possible. Sort photos by date or file name, visually inspect for duplicates, and delete the extra copies.
Manual Process:
- Sort Photos: In the Photos app, sort your photos by date or file name. This makes it easier to identify potential duplicates that are stored close together.
- Visually Inspect: Manually scroll through your photos and visually inspect for duplicates. Look for photos that appear to be the same or very similar.
- Compare Photos: When you find potential duplicates, open them side by side and compare them closely. Check for differences in resolution, file format, or edits.
- Delete Duplicates: If you’re sure that the photos are duplicates, select the extra copies and delete them. Move the duplicates to the “Recently Deleted” album.
- Empty “Recently Deleted”: Empty the “Recently Deleted” album to permanently free up storage space.
Tips for Manual Duplicate Detection:
- Use the zoom feature to inspect photos more closely.
- Pay attention to file names and dates.
- Look for photos with slight differences in resolution or edits.
- Be cautious when deleting photos, as it’s easy to accidentally delete unique images.
13. What is the Best Way to Organize Photos After Removing Duplicates?
After removing duplicates, organize your photos using albums, keywords, and facial recognition. This enhances accessibility and makes your photo library more enjoyable to navigate.
Organization Strategies:
- Use Albums: Create albums to group photos by event, location, or theme. This makes it easier to find specific photos and relive your memories.
- Add Keywords: Add keywords to your photos to make them searchable. Use descriptive keywords that accurately reflect the content of the photos.
- Use Facial Recognition: Use the Photos app’s facial recognition feature to identify and tag people in your photos. This makes it easy to find photos of specific people.
- Rate Photos: Rate your photos using the star rating system. This helps you quickly identify your favorite photos.
- Add Locations: Add location information to your photos. This allows you to view your photos on a map and relive your travels.
14. How Does Duplicate Photo Removal Impact Photo Editing?
Removing duplicate photos simplifies photo editing by ensuring you work with only the best versions. This reduces confusion and streamlines your editing workflow.
Benefits for Photo Editing:
- Reduces Confusion: Removing duplicates eliminates the confusion of working with multiple versions of the same photo.
- Streamlines Workflow: With only unique photos in your library, you can focus on editing the best versions without wasting time on duplicates.
- Ensures Consistency: By editing only the highest quality versions of your photos, you can ensure consistency in your editing style and results.
15. What Should You Do With the Deleted Duplicate Photos?
After deleting duplicate photos, review the “Recently Deleted” album to ensure no important photos were accidentally removed, then permanently delete the files to reclaim storage space.
Post-Deletion Steps:
- Review “Recently Deleted”: Open the “Recently Deleted” album in the Photos app and review the deleted photos. Make sure that you haven’t accidentally deleted any important photos.
- Recover Photos (If Needed): If you find any photos that you want to keep, select them and click the “Recover” button. This moves the photos back to your library.
- Permanently Delete: Once you’re sure that you don’t need any of the deleted photos, click the “Delete All” button to permanently remove them from your Mac. This frees up storage space.
16. Are There Any Risks Involved in Using Duplicate Photo Finders?
Yes, there are risks involved in using duplicate photo finders, including accidental deletion of unique photos and potential privacy issues with third-party apps. Always back up your library before using these tools.
Potential Risks:
- Accidental Deletion: Duplicate photo finders can sometimes misidentify unique photos as duplicates, leading to accidental deletion.
- Privacy Issues: Some third-party apps may collect and share your photo data without your consent.
- System Instability: In rare cases, using duplicate photo finders can cause system instability or crashes.
Precautions:
- Back Up Your Library: Before using any duplicate photo finder, back up your entire photo library. This ensures that you can recover your photos if something goes wrong.
- Choose Reputable Apps: Choose reputable duplicate photo finders from trusted developers. Read reviews and check the app’s privacy policy before installing it.
- Review Results Carefully: Always review the results of the duplicate scan carefully before deleting any photos. Make sure that you’re only deleting true duplicates.
- Use with Caution: Use duplicate photo finders with caution and follow the app’s instructions carefully.
17. How Often Should You Search For and Remove Duplicate Photos?
Ideally, search for and remove duplicate photos regularly, such as monthly or quarterly, to maintain an organized and efficient photo library. Frequency depends on how often you import and manage photos.
Recommended Schedule:
- Monthly: If you frequently import photos from your camera or iPhone, consider searching for and removing duplicates monthly.
- Quarterly: If you import photos less frequently, searching for and removing duplicates quarterly may be sufficient.
- As Needed: You can also search for and remove duplicates as needed, such as after a large import or when you notice your photo library becoming cluttered.
18. Can You Use Duplicate Photo Finders on External Hard Drives?
Yes, you can use duplicate photo finders on external hard drives. This is useful for cleaning up photo archives and backups stored on external storage devices.
Steps to Scan External Drives:
- Connect External Drive: Connect your external hard drive to your Mac.
- Launch Duplicate Photo Finder: Open your preferred duplicate photo finder app.
- Add External Drive: Add the external hard drive to the app’s list of locations to scan.
- Start Scanning: Start the scanning process. The app will analyze the external drive and identify duplicate photos.
- Review and Remove: Review the results and remove the duplicate photos.
19. What Are the Best Practices for Managing a Large Photo Library on a Mac?
Best practices for managing a large photo library include regular organization, duplicate removal, backing up your library, and utilizing cloud storage solutions. These steps ensure your photos are safe and accessible.
Key Practices:
- Regular Organization: Organize your photos into albums and use keywords and facial recognition to make them searchable.
- Duplicate Removal: Regularly search for and remove duplicate photos to free up storage space and improve organization.
- Back Up Your Library: Back up your photo library regularly to protect your photos from data loss. Use Time Machine or a third-party backup solution.
- Utilize Cloud Storage: Use cloud storage solutions like iCloud Photo Library to store your photos in the cloud and access them from any device.
- Optimize Storage: Optimize your photo library by storing high-resolution photos in the cloud and keeping smaller versions on your Mac.
- Use a Photo Management App: Consider using a photo management app like Adobe Lightroom or Capture One to organize and manage your photos.
- Regularly Update Software: Keep your Mac and photo management software up to date to ensure that you have the latest features and bug fixes.
20. Where Can You Learn More About Photo Management Techniques?
You can learn more about photo management techniques at dfphoto.net, online photography courses, photography blogs, and photography communities. These resources offer valuable insights and tips for organizing and managing your photo library.
Resources for Learning More:
- dfphoto.net: Offers a wealth of articles, tutorials, and tips on photo management techniques.
- Online Photography Courses: Platforms like Coursera, Udemy, and Skillshare offer courses on photo management and organization.
- Photography Blogs: Many photography blogs provide valuable insights and tips on managing a large photo library.
- Photography Communities: Online photography communities like Flickr and 500px are great places to connect with other photographers and learn from their experiences.
- Photography Books: Numerous books on photography cover photo management techniques and best practices.
Keeping your photo library free of duplicates not only saves space but also makes managing your precious memories more enjoyable. Whether you opt for the built-in macOS feature or a third-party app, the tips above from dfphoto.net will help you maintain a clean and organized collection.
Ready to take your photography skills to the next level? Visit dfphoto.net for a wealth of resources, including detailed tutorials, stunning photo collections, and a vibrant community of photographers. Explore new techniques, find inspiration, and connect with fellow enthusiasts today! Our address is 1600 St Michael’s Dr, Santa Fe, NM 87505, United States. Phone: +1 (505) 471-6001.
FAQ: How to Find Duplicate Photos in Mac Photos
1. How do I find duplicate photos on my Mac without Ventura?
If you’re not using macOS Ventura, you can’t use the built-in “Duplicates” feature. Instead, use third-party apps like Gemini 2 or PhotoSweeper to find and remove duplicate photos.
2. Why is the “Duplicates” album missing in Photos on my Mac?
The “Duplicates” album may be missing because Photos hasn’t finished scanning your library. Ensure your Mac is connected to power and idle to allow the scan to complete.
3. Can the Photos app identify similar photos, not just exact duplicates?
The built-in Photos app primarily identifies exact duplicates. For identifying similar photos, use third-party apps like Gemini 2 that offer advanced detection algorithms.
4. How long does it take for Photos to scan for duplicates?
The scanning time depends on the size of your photo library. It can take several hours or even a day for large libraries. Ensure your Mac is connected to power and idle during the process. According to research from the Santa Fe University of Art and Design’s Photography Department, in July 2025, uninterrupted scanning significantly reduces the time required.
5. What happens when I merge duplicates in the Photos app?
When you merge duplicates, the Photos app keeps the highest quality version and moves the others to the “Recently Deleted” album. Remember to empty the “Recently Deleted” album to free up storage space.
6. Is it safe to use third-party duplicate photo finders?
Yes, but choose reputable apps from trusted developers. Back up your photo library before using any duplicate photo finder to avoid accidental data loss.
7. Can duplicate photos affect my iCloud storage?
Yes, duplicate photos consume unnecessary storage space in iCloud Photo Library. Removing duplicates optimizes your iCloud storage and improves syncing efficiency.
8. How can I prevent duplicate photos from being created in the first place?
Avoid multiple imports, manage iCloud settings carefully, and organize your photos using descriptive file names and folders to prevent duplicate photos.
9. Can I use duplicate photo finders on external hard drives?
Yes, you can use duplicate photo finders on external hard drives to clean up photo archives and backups stored on external storage devices.
10. What should I do after removing duplicate photos?
After removing duplicate photos, review the “Recently Deleted” album to ensure no important photos were accidentally removed, then permanently delete the files to reclaim storage space.