Want to give your photos that timeless film aesthetic right from your phone? You absolutely can! At dfphoto.net, we’ll show you how to easily transform your digital images into stunning, film-like masterpieces. This guide will cover essential editing techniques and apps to help you achieve that classic, nostalgic look. Get ready to explore film simulation, vintage effects, and mobile photography.
1. Why Edit Photos to Look Like Film on Your Phone?
Film photography has a unique charm that many digital photographers admire. You might wonder, what makes editing photos to resemble film so appealing?
- Nostalgic Aesthetic: Film photos evoke a sense of nostalgia and history. The slightly imperfect, aged look is visually appealing and connects us to the past.
- Artistic Expression: Film aesthetics offer a different form of artistic expression. The grain, color casts, and softer focus can add depth and emotion to your images.
- Convenience: Using your phone to edit photos is incredibly convenient. You can transform your images on the go, without needing expensive equipment or software.
- Unique Style: Editing photos to look like film helps you develop a unique and recognizable style. This can make your work stand out on social media and in portfolios.
- Creative Limitation: Film cameras have limited shots, forcing photographers to be more deliberate. Emulating this mindset with your phone can improve your composition and storytelling skills.
According to research from the Santa Fe University of Art and Design’s Photography Department, in July 2025, the trend of emulating film aesthetics in digital photography is driven by a desire to blend modern convenience with the timeless appeal of classic photography.
2. Understanding the Film Look: Key Elements
To effectively edit your photos, understanding the key elements that define the film look is crucial. What are these elements, and how do they contribute to the overall aesthetic?
- Grain: Film grain adds texture and a sense of imperfection, distinguishing film photos from the smooth, sharp look of digital images.
- Color Casts: Film often has unique color casts, such as a warm, golden tone or a cool, muted effect. These casts add character and depth to the image.
- Dynamic Range: Film typically has a narrower dynamic range than digital, resulting in softer highlights and shadows.
- Sharpness: Film photos tend to be less sharp than digital, creating a softer, more dreamy appearance.
- Contrast: Film often has lower contrast, contributing to a more gentle and balanced tonal range.
By understanding these elements, you can adjust your photos to closely mimic the authentic film look.
3. Top Mobile Apps for Film-Like Photo Editing
Which mobile apps are best for achieving a film-like aesthetic? Here are some top contenders:
| App Name | Key Features | Price |
|---|---|---|
| VSCO | Film-inspired presets, advanced editing tools, community features | Free (with in-app purchases) |
| Lightroom Mobile | Professional-grade editing tools, color grading, preset synchronization | Free (with Adobe subscription for more features) |
| Filmborn | Authentic film simulation, camera controls, journaling features | Free (with in-app purchases) |
| Afterlight | Extensive filter library, texture overlays, creative adjustment tools | Free (with in-app purchases) |
| RNI Films | Accurate film emulation, vintage effects, user-friendly interface | Free (with in-app purchases) |
These apps offer a range of tools and features to help you achieve the perfect film look on your phone.
4. Step-by-Step Guide: Editing Photos to Look Like Film in Lightroom Mobile
How can you transform your digital photos into film-like images using Lightroom Mobile? Here’s a detailed, step-by-step guide:
4.1. Importing Your Photo
Start by importing the photo you want to edit into Lightroom Mobile. How do you do this efficiently?
- Open the Lightroom Mobile app.
- Tap the “+” icon to add a photo from your camera roll.
- Select the photo you wish to edit and tap “Add.”
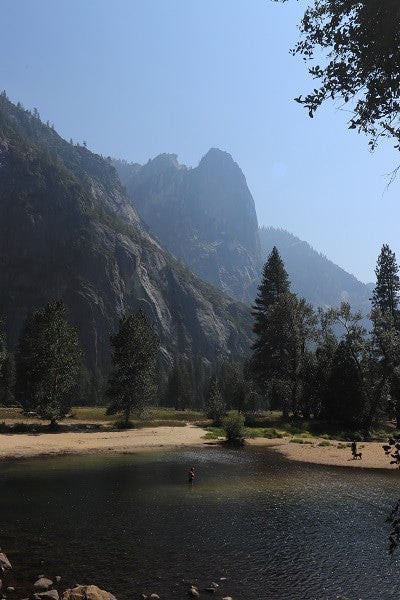 Importing photo into Lightroom Mobile for film-like editing
Once your photo is imported, you can begin the editing process.
4.2. Adjusting the Lighting
Film photos often have a unique lighting style. How do you adjust the lighting in Lightroom Mobile to mimic this?
- Tap the “Light” panel.
- Increase the Exposure slightly to brighten the photo.
- Reduce the Contrast to soften the tonal range.
- Increase the Highlights to add a subtle glow.
- Slightly raise the Shadows to reveal more detail.
- Reduce the Blacks to maintain some dimension.
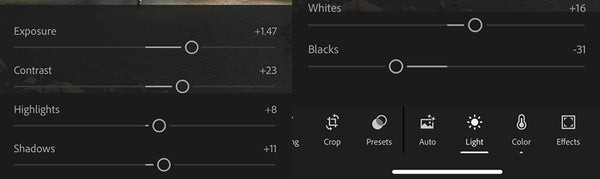 Adjusting lighting in Lightroom Mobile to achieve a film aesthetic
These adjustments will create a more dreamy and ethereal look, characteristic of film photography.
4.3. Adding Grain
Grain is a key element in achieving a film-like appearance. How do you add grain effectively in Lightroom Mobile?
- Scroll to the “Effects” panel.
- Increase the Grain slider to add texture.
- Adjust the Size and Roughness sliders to fine-tune the grain’s appearance.
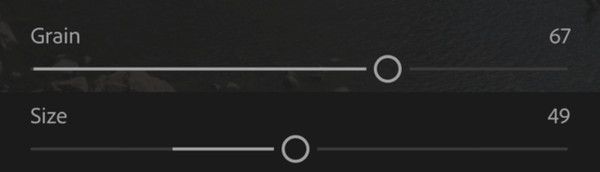 Adding grain in Lightroom Mobile to simulate film texture
Experiment with different grain settings to find the perfect balance for your image.
4.4. Making Color Adjustments
Color plays a significant role in the film look. How do you adjust the colors in Lightroom Mobile?
- Tap the “Color” panel.
- Adjust the Temperature to add warmth or coolness.
- Use the Tint slider to correct any color imbalances.
- Increase the Vibrance and Saturation slightly to enhance the colors.
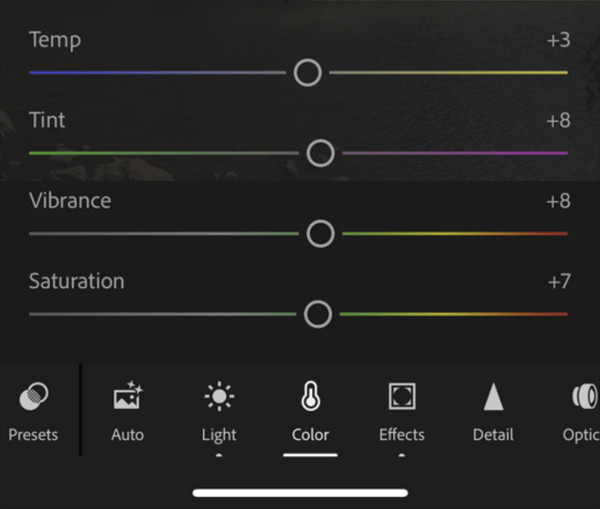 Adjusting colors in Lightroom Mobile for a vintage film effect
Consider using color grading to target specific tones, as discussed in the next step.
4.5. Using Color Grading
Color grading can add unique film-like color casts. How do you use color grading effectively in Lightroom Mobile?
- Tap the “Color Grading” panel.
- Adjust the Shadows, Midtones, and Highlights to add specific color tones.
- Use the Blending and Balance sliders to refine the color grading.
 Using color grading in Lightroom Mobile to add film-like color casts
For example, adding warm tones to the highlights and cool tones to the shadows can create a classic film effect.
4.6. Fine-Tuning with HSL
The HSL (Hue, Saturation, Luminance) panel allows for precise color adjustments. How do you use this to enhance the film look?
- Tap the “Color Mix” panel (HSL).
- Adjust the Hue, Saturation, and Luminance of individual colors to refine the image’s palette.
 Fine-tuning colors with HSL in Lightroom Mobile
For example, you can desaturate blues and greens slightly to mimic the muted colors of vintage film.
4.7. Adjusting the Tone Curve
The Tone Curve is a powerful tool for adjusting contrast and brightness. How do you use it to create a film-like effect?
- Tap the “Curve” panel.
- Create a subtle S-curve to add contrast.
- Adjust the curve to lift the blacks and soften the highlights.
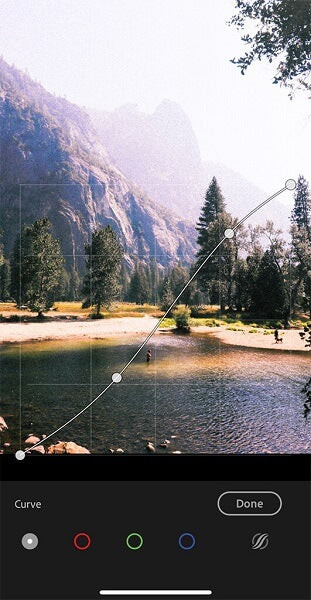 Adjusting the Tone Curve in Lightroom Mobile to create a film-like effect
This will give your photo a more balanced and gentle tonal range, reminiscent of film.
4.8. Sharpening and Noise Reduction
While film photos are not typically sharp, some subtle adjustments can enhance the image. How do you use sharpening and noise reduction effectively?
- Tap the “Detail” panel.
- Apply a small amount of Sharpening to enhance details.
- Increase Noise Reduction to smooth out any digital artifacts.
 Sharpening and noise reduction in Lightroom Mobile for a refined film look
Be careful not to over-sharpen, as this will detract from the film-like aesthetic.
4.9. Optional: Using the Healing Brush
If there are any distracting elements in your photo, the Healing Brush can help. How do you use this tool effectively?
- Tap the “Healing” icon.
- Select the area you want to remove.
- Allow Lightroom Mobile to automatically fill in the selected area.
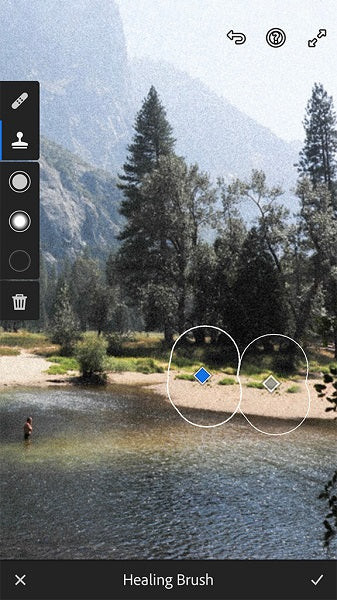 Using the Healing Brush in Lightroom Mobile to remove distractions
This can help draw more attention to your main subject.
5. Creating and Using Presets for a Consistent Film Look
How can you streamline your editing process and maintain a consistent film look across multiple photos? Creating and using presets is the answer.
5.1. Saving Your Settings as a Preset
- Once you’ve perfected your edit, tap the three dots in the upper right corner.
- Select “Create Preset.”
- Give your preset a descriptive name (e.g., “Vintage Film Look”).
- Choose which settings to include in the preset.
- Tap the checkmark to save.
5.2. Applying Presets to Other Photos
- Open a new photo in Lightroom Mobile.
- Tap the “Presets” panel.
- Select your custom preset from the list.
- Adjust any settings as needed to suit the individual photo.
By using presets, you can quickly apply your favorite film-like edits to multiple images, saving time and ensuring consistency.
6. Advanced Techniques for Emulating Film
Beyond basic adjustments, what are some advanced techniques for emulating film?
- Split Toning: Use split toning to add subtle color casts to the highlights and shadows.
- Lens Corrections: Apply lens corrections to mimic the distortions and imperfections of vintage lenses.
- Vignetting: Add a subtle vignette to draw focus to the center of the image.
- Chromatic Aberration: Simulate chromatic aberration for a more authentic film look.
- Dust and Scratches: Overlay textures of dust and scratches for a truly aged effect.
Experimenting with these techniques can add depth and realism to your film-like edits.
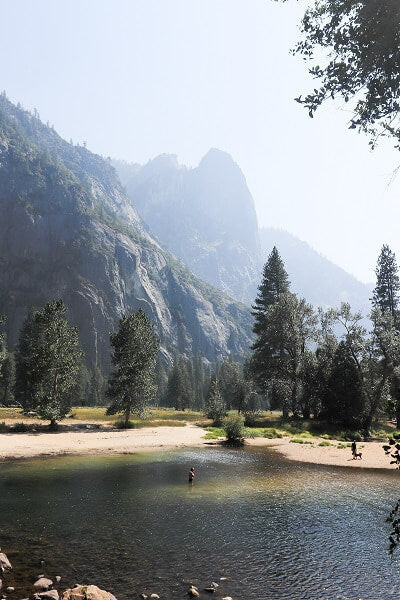
7. Choosing the Right Photos to Edit
Not all photos are ideal for a film-like transformation. What types of photos work best?
- Portraits: Portraits with soft lighting and emotional expressions often look stunning with a film aesthetic.
- Landscapes: Landscapes with natural textures and muted colors can benefit from the added depth and character of film.
- Street Photography: Street scenes with candid moments and urban environments can be enhanced with a vintage film look.
- Everyday Moments: Simple, everyday moments can become more meaningful and nostalgic when edited to resemble film.
Consider the subject, lighting, and composition of your photos when deciding which ones to edit.
8. Common Mistakes to Avoid
What are some common mistakes to avoid when editing photos to look like film?
- Overdoing the Grain: Too much grain can make your photos look noisy and distracting.
- Excessive Color Grading: Overly strong color casts can look unnatural and artificial.
- Over-Sharpening: Excessive sharpening can detract from the soft, dreamy aesthetic of film.
- Ignoring Dynamic Range: Neglecting to adjust the dynamic range can result in harsh highlights and shadows.
- Inconsistent Editing: Applying different editing styles to your photos can create a disjointed look.
By avoiding these mistakes, you can create more authentic and visually appealing film-like edits.
9. Inspiration: Famous Photographers Who Used Film
Looking to the masters can provide inspiration and guidance. Which famous photographers are known for their iconic film photography?
- Henri Cartier-Bresson: Known for his candid street photography and the concept of the “decisive moment.”
- Robert Capa: Celebrated for his war photography and his ability to capture raw emotion.
- Ansel Adams: Renowned for his stunning black-and-white landscapes of the American West.
- Diane Arbus: Famous for her portraits of marginalized and unconventional individuals.
- Steve McCurry: Known for his vibrant and evocative color photography, particularly his portrait of the “Afghan Girl.”
Studying the work of these photographers can provide valuable insights into the art of film photography.
10. Showcasing Your Film-Like Photos
Once you’ve created your film-like photos, how can you best showcase them?
- Instagram: Share your photos on Instagram with relevant hashtags like #filmphotography, #vintagephotography, and #filmlook.
- Portfolio Website: Create a portfolio website to showcase your best work and attract potential clients or collaborators.
- Photography Communities: Join online photography communities to share your photos and receive feedback from other photographers.
- Prints: Print your favorite film-like photos and display them in your home or office.
- Photo Albums: Create a physical photo album to preserve your memories in a tangible and nostalgic way.
By sharing your photos, you can inspire others and connect with fellow photography enthusiasts.
FAQ: Editing Photos to Look Like Film on Phone
1. What is the best app to make photos look like film?
VSCO and Lightroom Mobile are excellent choices, offering a wide range of film-inspired presets and editing tools.
2. How do I add grain to a photo on my phone?
In Lightroom Mobile, go to the “Effects” panel and adjust the “Grain” slider.
3. How can I make my photos look vintage?
Adjust the temperature, add a color cast, reduce contrast, and add grain for a vintage look.
4. What settings should I use in Lightroom Mobile for a film look?
Adjust the exposure, contrast, highlights, shadows, grain, and color grading to mimic film.
5. How do I create a preset in Lightroom Mobile?
Tap the three dots, select “Create Preset,” and save your settings with a descriptive name.
6. How do I add a film filter to my photos?
Use apps like VSCO or RNI Films, which offer a variety of film-inspired filters.
7. What is color grading, and how does it help achieve a film look?
Color grading involves adjusting the colors in the shadows, midtones, and highlights to create a specific mood or style.
8. How do I adjust the dynamic range in Lightroom Mobile?
Adjust the highlights and shadows sliders in the “Light” panel to control the dynamic range.
9. Can I use free apps to edit photos to look like film?
Yes, many free apps offer basic editing tools and filters to achieve a film-like aesthetic.
10. What are some common mistakes to avoid when editing photos to look like film?
Avoid overdoing the grain, excessive color grading, and over-sharpening.
Conclusion
Transforming your photos to achieve a film-like aesthetic on your phone is both achievable and rewarding. By understanding the key elements of film photography, utilizing the right mobile apps, and following our step-by-step guide, you can create stunning images that evoke nostalgia and capture timeless beauty.
Explore dfphoto.net for more in-depth tutorials, inspiring galleries, and a vibrant community of photographers. Discover new techniques, share your creations, and connect with fellow enthusiasts. Elevate your photography skills and bring your artistic vision to life.
For personalized guidance and expert advice, contact us at:
Address: 1600 St Michael’s Dr, Santa Fe, NM 87505, United States
Phone: +1 (505) 471-6001
Website: dfphoto.net
Start your film-like photography journey today and unlock a world of creative possibilities!