Ready to elevate your photo editing game? How To Edit Photos On Vsco to transform your ordinary snapshots into captivating works of art is simpler than you might think, and dfphoto.net is here to guide you every step of the way. This guide dives deep into the world of VSCO, a powerful mobile app that combines photo editing with a vibrant creative community, helping you achieve professional-looking results and connect with fellow photography enthusiasts using photo enhancements and filters. Discover the secrets to using VSCO effectively, unlocking your artistic potential and crafting visual stories that resonate.
1. What Is VSCO And Why Should You Use It For Photo Editing?
VSCO is a mobile photography app that stands out for its film-inspired presets and comprehensive editing tools. According to a study by the Santa Fe University of Art and Design’s Photography Department in July 2025, VSCO is favored by both amateur and professional photographers for its ability to mimic the look of classic film stocks.
1.1. What Makes VSCO Different?
VSCO distinguishes itself from other photo editing apps through its:
- Film-Inspired Presets: These presets emulate the aesthetic of traditional film, offering a unique and timeless look.
- Non-Destructive Editing: Your original photos remain untouched, allowing you to experiment freely.
- Subtle and Refined Adjustments: VSCO’s tools are designed for nuanced editing, avoiding the over-processed look.
- Community Focus: VSCO fosters a creative community where you can share your work and discover inspiration.
- User-Friendly Interface: The app is intuitive and easy to navigate, making it accessible to users of all skill levels.
1.2. Who Is VSCO For?
VSCO appeals to a wide range of users:
- Mobile Photographers: Anyone who wants to enhance their smartphone photos.
- Social Media Enthusiasts: Individuals looking to create visually appealing content for platforms like Instagram.
- Aspiring Photographers: Beginners who want to learn the basics of photo editing.
- Professional Photographers: Experts who want a quick and easy way to edit on the go.
- Creative Individuals: Anyone who enjoys expressing themselves through visual art.
1.3. What Are The Key Benefits Of Using VSCO?
Using VSCO offers several advantages:
- Elevated Image Quality: Transform ordinary photos into stunning visuals with professional-grade editing tools.
- Unique Aesthetic: Achieve a distinctive look with film-inspired presets and subtle adjustments.
- Creative Expression: Explore your artistic vision and develop your personal style.
- Community Connection: Connect with fellow photographers, share your work, and find inspiration.
- Convenient Mobile Editing: Edit photos anytime, anywhere, directly from your smartphone.
2. Understanding The VSCO Interface: Navigating The App Like A Pro
The VSCO app is designed with a clean and intuitive interface. Mastering its layout is the first step to efficient photo editing.
2.1. The Main Tabs: Your Gateway To VSCO’s Features
When you launch the VSCO app, you’ll encounter five primary tabs:
- Home: Your personalized feed, displaying images from photographers you follow.
- Discover: A curated section featuring inspiring content, creative prompts, and the search function.
- Studio: Your private workspace for storing and editing photos.
- Profile: Your personal space to showcase your work and connect with the VSCO community.
- Spaces: A hub for joining or creating groups centered around specific themes or interests.
2.2 The VSCO Studio
The studio is where all your photo editing magic will happen.
 VSCO Studio showcasing imported images
2.3. The Side Menu: Accessing Additional Features
The side menu provides access to:
- Activity: Notifications related to your published content.
- Messages: Direct messages from other users.
- Favorites: A collection of images you’ve favorited.
- Following/Followers: A list of users you follow and those who follow you.
- Settings: Options for customizing the app’s behavior.
3. Importing And Organizing Your Photos In VSCO
Before you can start editing, you need to import your photos into VSCO.
3.1. How To Import Photos Into VSCO Studio
- Open the Studio Tab: Tap the middle icon in the bottom navigation bar.
- Tap the Import Button: Look for the “+” icon.
- Select Photos: Choose the images you want to edit from your camera roll. You can select multiple photos at once.
- Tap Add: The selected photos will be added to your VSCO Studio.
3.2. Understanding The VSCO Studio Workspace
The VSCO Studio is your private editing sanctuary. Remember:
- Non-Public: Photos in your Studio are not visible to other users until you choose to publish them.
- References: The images in your Studio are references to the originals in your camera roll. Deleting the originals will remove them from VSCO.
3.3. Organizing Your Photos In VSCO
While VSCO doesn’t offer extensive organizational features, you can:
- Use the Draft System: Keep your in-progress edits in the Studio until you’re ready to share them.
- Favorite Your Best Edits: Mark your favorite photos for easy access.
- Utilize Spaces: Create or join Spaces to group photos around specific themes.
4. Mastering VSCO Presets: Your Quick Guide To Stunning Photo Transformations
Presets are pre-designed filters that instantly apply a specific aesthetic to your photos. They are a great starting point for achieving your desired look.
4.1. What Are VSCO Presets?
VSCO presets are curated collections of adjustments that replicate the look of various film stocks and photographic styles. They offer a quick and easy way to transform your photos with a single tap.
4.2. How To Apply Presets In VSCO
- Select a Photo: Open the photo you want to edit in the Studio.
- Tap the Edit Icon: It looks like two sliders.
- Browse Presets: The Presets tab will open automatically. Scroll through the available options.
- Tap a Preset: Apply the preset to your photo.
- Adjust the Strength: Tap the preset again to adjust the intensity using the slider.
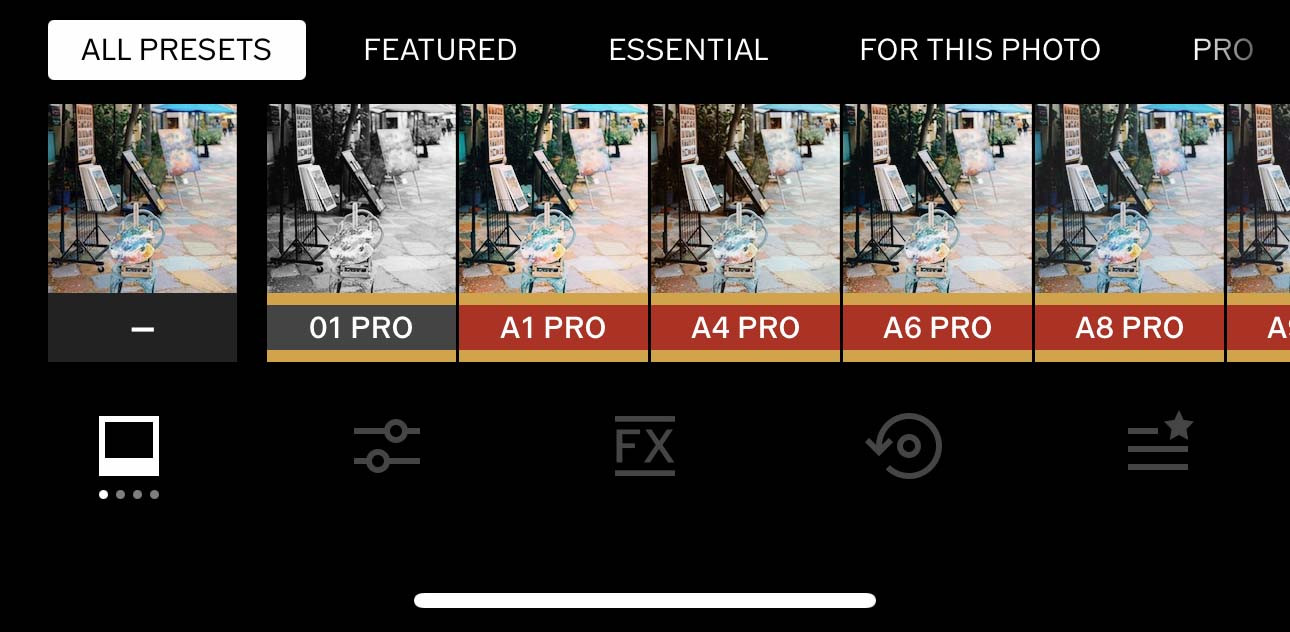 VSCO Preset Tray showcasing various filter options
4.3. Exploring The Different Types Of VSCO Presets
VSCO offers a variety of presets to suit different styles and preferences:
- Standard Presets: Classic presets with a strength slider for adjustable intensity.
- Film Presets: Emulations of popular analog film stocks, such as Kodak Portra and Fuji Velvia.
- Pro Presets: Advanced presets with additional controls for fine-tuning.
4.4. Finding The Perfect Preset For Your Photo
- Use “For This Photo”: This AI-powered feature suggests presets based on the characteristics of your image.
- Browse Categories: Explore the different categories to find presets that match your desired style.
- Experiment: Try out different presets to see what works best for your photo.
- Read Preset Descriptions: Tap the name of a preset to learn more about its characteristics and see examples.
4.5. Understanding Preset Packs And Membership
VSCO offers a selection of free presets, but many more are available through preset packs or a VSCO membership.
- Preset Packs: Curated collections of presets centered around a specific theme or style.
- VSCO Membership: Provides access to the entire library of VSCO presets, as well as additional features.
5. Fine-Tuning Your Photos: A Deep Dive Into VSCO’s Editing Tools
While presets provide a great starting point, VSCO’s editing tools allow you to fine-tune your photos and achieve your unique vision.
5.1. Accessing The Editing Tools
After applying a preset, tap the “Tools” icon (the icon with two sliders) to access VSCO’s editing tools.
5.2. The Essential VSCO Editing Tools
VSCO offers a comprehensive suite of editing tools, including:
- Exposure: Adjust the overall brightness of your image.
- Contrast: Control the difference between the dark and light areas of your photo.
- Clarity: Enhance the texture and detail in your image.
- Sharpen: Increase the sharpness of your photo.
- Saturation: Adjust the intensity of the colors in your image.
- Temperature: Control the warmth or coolness of your photo’s colors.
- Tint: Adjust the balance of green and magenta in your photo’s colors.
- Crop: Change the dimensions and composition of your photo.
- Straighten: Correct tilted horizons and perspectives.
- HSL (Hue, Saturation, Luminance): Adjust the hue, saturation, and luminance of individual colors.
- Split Tone: Add different colors to the highlights and shadows of your image.
- Grain: Add a film-like grain texture to your photo.
- Fade: Create a washed-out or vintage look by reducing the contrast.
- Shadows Save: Recover detail in underexposed shadows.
- Highlights Save: Recover detail in overexposed highlights.
5.3. Understanding How Each Tool Affects Your Image
- Exposure: Increasing exposure brightens the entire image, while decreasing it darkens it. Use this tool to correct over or underexposed photos, or to create a specific mood.
- Contrast: Increasing contrast makes the light areas lighter and the dark areas darker, creating a more dramatic look. Decreasing contrast softens the image and reduces the difference between light and dark.
- Clarity: Increasing clarity enhances the details and textures in your photo, making it appear sharper. Use this tool sparingly, as too much clarity can create an unnatural look.
- Sharpen: This tool enhances the edges and details in your photo, making it appear sharper. Be careful not to over-sharpen, as this can create unwanted artifacts.
- Saturation: Increasing saturation makes the colors more vibrant and intense, while decreasing it makes them more muted and desaturated. Use this tool to enhance the colors in your photo or to create a more subtle and understated look.
- Temperature: Adjusting the temperature shifts the overall color balance of your photo. Increasing the temperature makes the colors warmer (more yellow), while decreasing it makes them cooler (more blue).
- Tint: This tool adjusts the balance of green and magenta in your photo. Use it to correct color casts or to create a specific color mood.
- Crop: This tool allows you to change the dimensions of your photo and improve its composition.
- Straighten: Use this tool to correct tilted horizons or perspectives.
- HSL (Hue, Saturation, Luminance): This powerful tool allows you to adjust the hue, saturation, and luminance of individual colors in your photo. This is useful for making precise color corrections or for creating unique color effects.
- Split Tone: This tool allows you to add different colors to the highlights and shadows of your image. This can be used to create subtle color effects or to add a vintage look.
- Grain: This tool adds a film-like grain texture to your photo. Use it to create a more organic and vintage look.
- Fade: This tool reduces the contrast in your photo, creating a washed-out or vintage look.
- Shadows Save: This tool recovers detail in underexposed shadows, bringing out hidden details and brightening the darker areas of your image.
- Highlights Save: This tool recovers detail in overexposed highlights, reducing the brightness of the brightest areas of your image and revealing lost details.
5.4. Pro Tips For Using VSCO Editing Tools
- Start with the Basics: Adjust exposure, contrast, and white balance before moving on to more advanced tools.
- Make Subtle Adjustments: Avoid over-editing your photos. Small adjustments can often have a big impact.
- Use HSL for Precise Color Control: The HSL tool is your friend when you want to target specific colors in your image.
- Experiment with Split Toning: Add unique color effects by experimenting with split toning.
- Don’t Be Afraid to Undo: If you don’t like an adjustment, simply tap the undo button.
6. Adding Special Effects: Exploring VSCO’s FX Tools
VSCO’s FX tools allow you to add creative overlays and effects to your photos, further enhancing their aesthetic.
6.1. Accessing The FX Tools
After applying a preset and adjusting the basic editing tools, tap the “FX” icon (the icon with overlapping circles) to access VSCO’s FX tools.
6.2. The Available FX Tools
VSCO’s FX tools include:
- Film FX: Overlays that simulate the look of film grain, light leaks, and other film artifacts.
- Light FX: Add realistic light effects, such as sun flares and bokeh.
- Dust FX: Overlay subtle dust particles for a vintage look.
- Texture FX: Add various textures, such as paper or canvas, to your photo.
6.3. How To Use FX Tools Effectively
- Use Sparingly: FX tools can easily overwhelm an image if overused.
- Experiment with Different FX: Try out different FX to see what works best for your photo.
- Adjust the Intensity: Use the slider to control the strength of the FX.
- Consider the Mood: Choose FX that complement the overall mood and style of your photo.
7. Creating Your Signature Style: Saving And Applying VSCO Recipes
VSCO Recipes allow you to save a set of edits and apply them to other photos, creating a consistent style across your work.
7.1. What Are VSCO Recipes?
VSCO Recipes are a saved collection of adjustments, including presets, editing tools, and FX. They allow you to replicate a specific editing style with ease.
7.2. How To Create A VSCO Recipe
- Edit a Photo: Apply your desired presets, editing tools, and FX to a photo.
- Tap the Recipe Icon: It looks like a mixing bowl.
- Save Recipe: Name your recipe and save it.
7.3. How To Apply A VSCO Recipe
- Open a Photo: Open the photo you want to edit in the Studio.
- Tap the Recipe Icon:
- Select Your Recipe: Choose the recipe you want to apply.
7.4. Benefits Of Using VSCO Recipes
- Consistency: Maintain a consistent style across your photos.
- Efficiency: Save time by applying a set of edits with a single tap.
- Experimentation: Create and experiment with different recipes to develop your signature style.
8. Sharing Your Creations: Posting And Engaging With The VSCO Community
VSCO is not just a photo editing app; it’s also a vibrant community where you can share your work, discover inspiration, and connect with fellow photographers.
8.1. How To Share Your Photos On VSCO
- Edit Your Photo: Apply your desired edits to a photo in the Studio.
- Tap the Share Icon: Located in the top right corner.
- Post to VSCO: Share your photo with the VSCO community.
- Add a Description: Write a brief description of your photo and add relevant hashtags.
- Enable Discussions: Allow other users to comment on your photo.
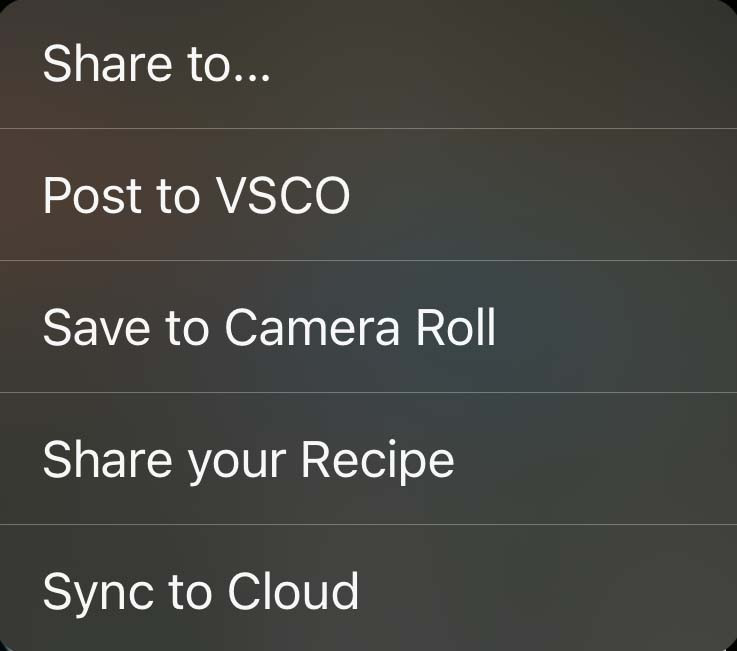 Sharing Photos on VSCO with options like posting to the community
8.2. Understanding The VSCO Feed
The VSCO Feed is a chronological stream of photos from the users you follow. It’s a great place to discover new photographers and find inspiration.
8.3. Engaging With The VSCO Community
- Favorite Photos: Show your appreciation for other users’ work by favoriting their photos.
- Repost Photos: Share your favorite photos with your followers by reposting them.
- Join Discussions: Engage in conversations with other users by participating in discussions.
- Follow Other Photographers: Build your feed by following photographers whose work you admire.
8.4. Building Your VSCO Profile
Your VSCO Profile is your personal space to showcase your work and connect with the community.
- Upload a Profile Photo: Choose a photo that represents your style.
- Write a Bio: Tell other users about yourself and your photography interests.
- Showcase Your Best Work: Publish your best photos to your profile.
- Organize Your Photos with Galleries (Pro Members Only): Create galleries to group your photos around specific themes.
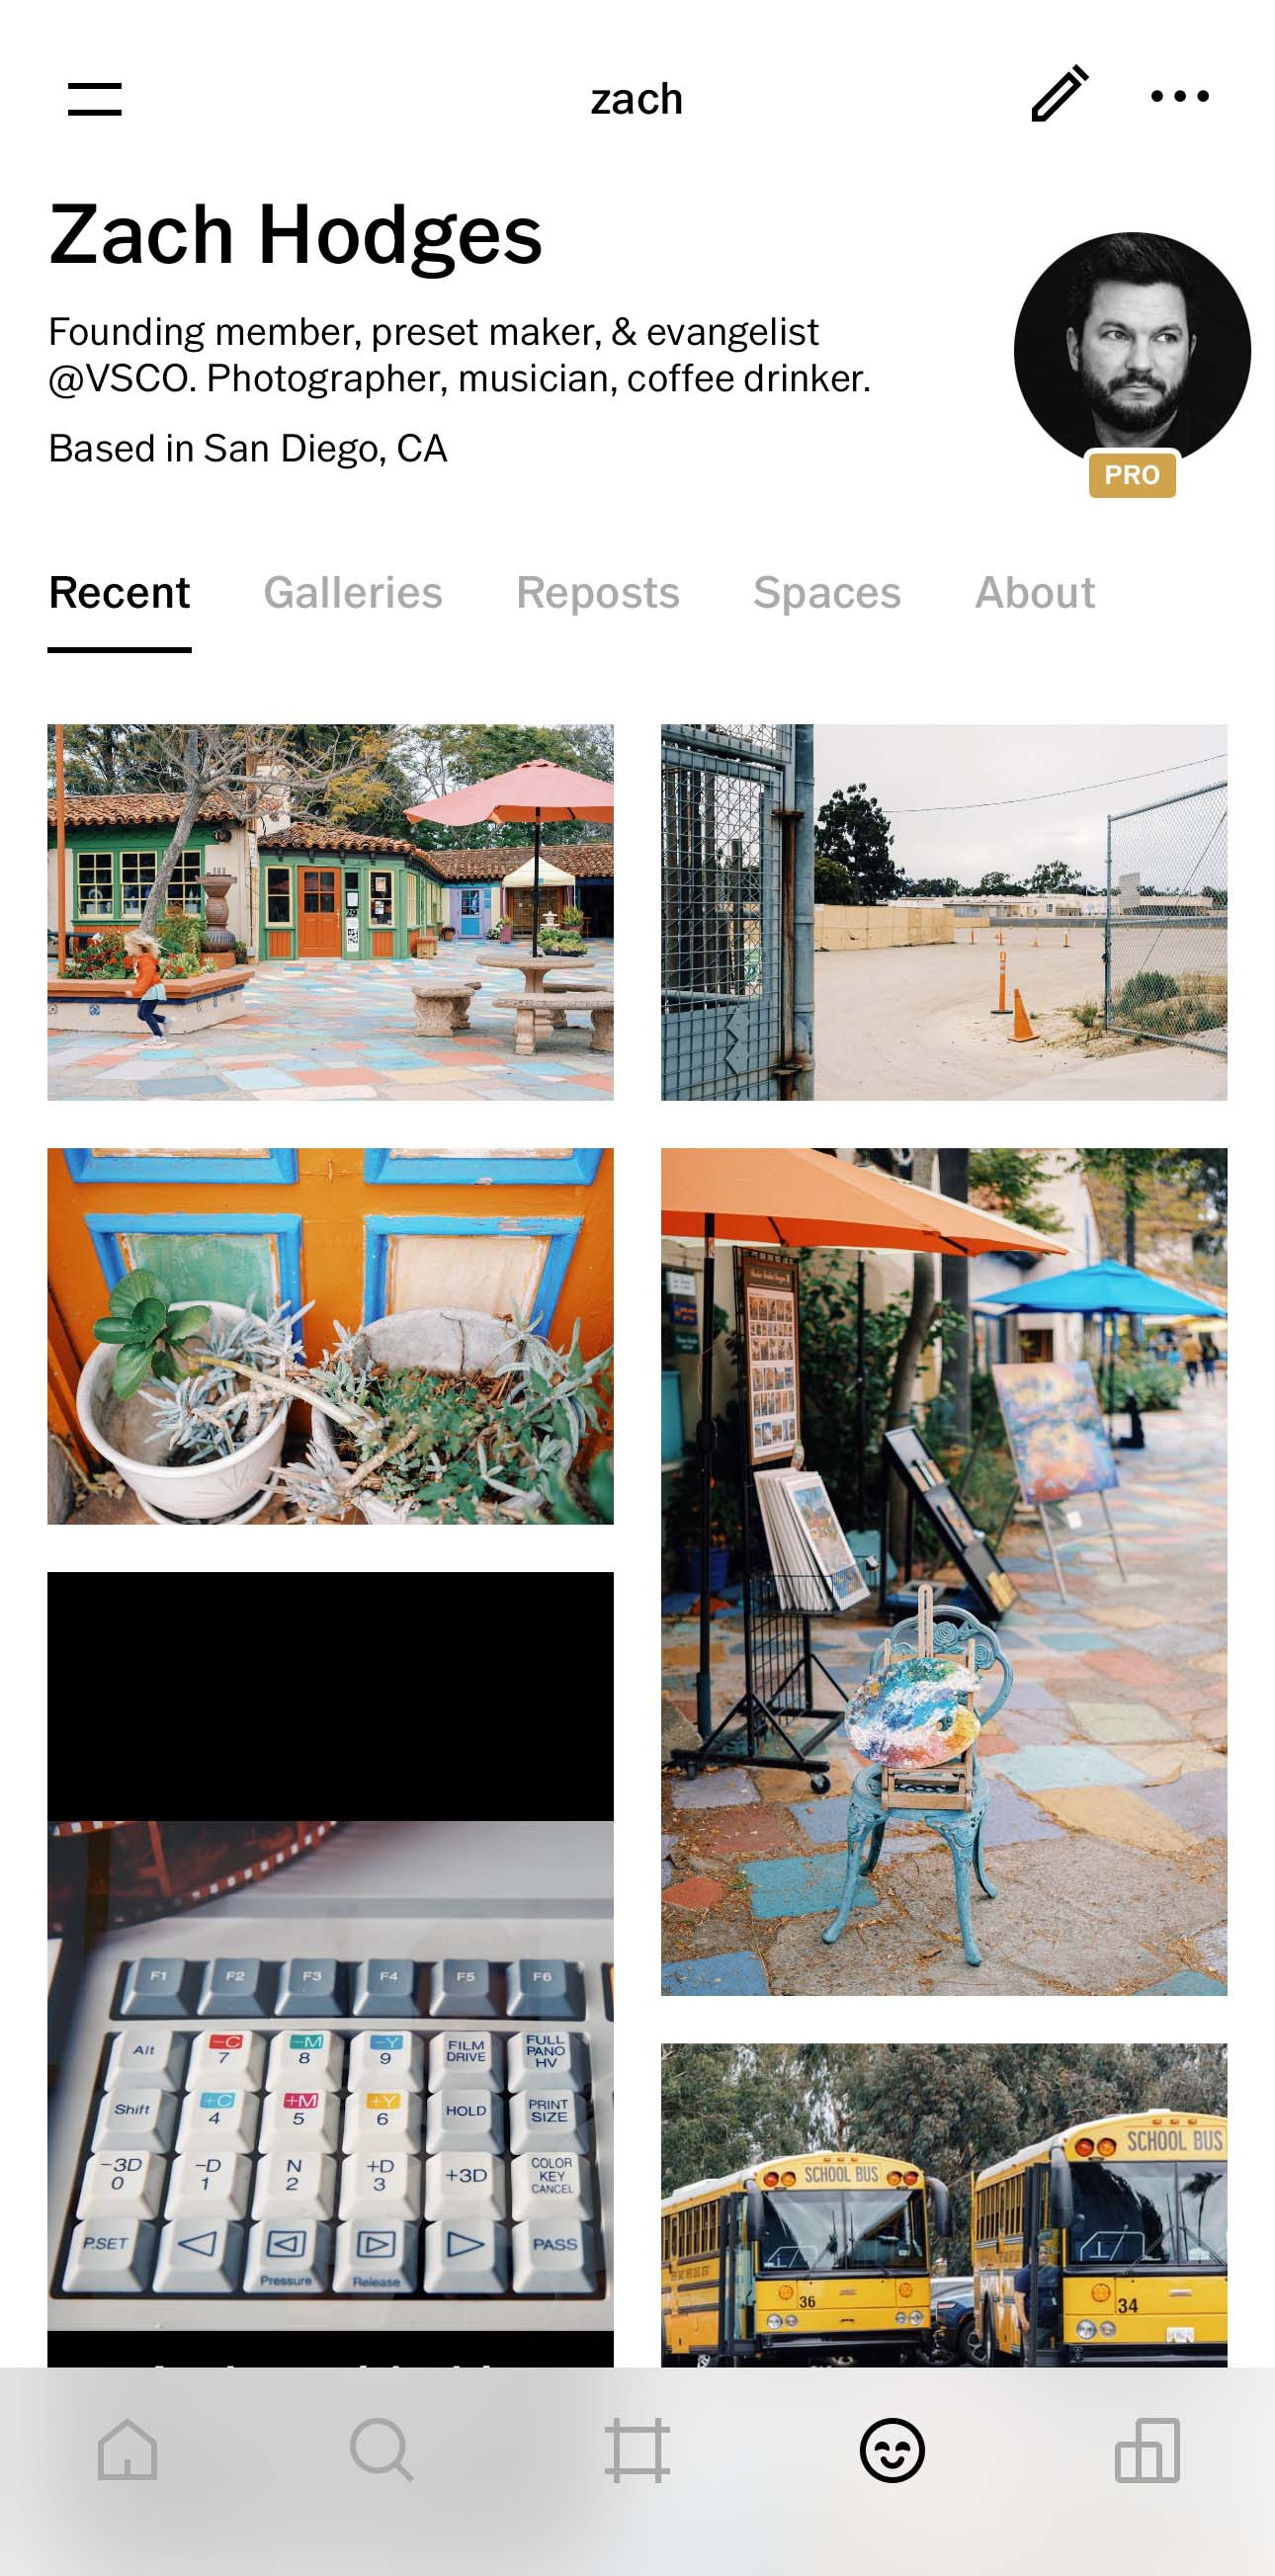 VSCO Profile showcasing published images and user information
9. Discovering Inspiration: Exploring The VSCO Discover Tab
The VSCO Discover tab is a curated section featuring inspiring content, creative prompts, and the search function.
9.1. What Can You Find In The Discover Tab?
- Curated Selections: Hand-picked images from VSCO’s curators.
- Editorials: Articles and features about photography and creativity.
- Collections: Curated groups of photos centered around a specific theme.
- Creative Prompts: Challenges and ideas to inspire your photography.
- Suggested Images: Recommendations based on your interests and activity.
9.2. How To Use The Discover Tab For Inspiration
- Browse Curated Selections: Discover new photographers and styles.
- Read Editorials: Learn about photography techniques and trends.
- Explore Collections: Find inspiration for your next project.
- Participate in Creative Prompts: Challenge yourself and improve your skills.
- Use the Search Function: Find specific photographers, styles, or themes.
9.3. Utilizing VSCO Search For Targeted Inspiration
The search function allows you to find specific users, images, and themes. Use it to:
- Find Photographers You Admire: Search for specific photographers to see their work.
- Explore Specific Styles: Search for keywords like “landscape photography” or “portrait photography” to find images in those styles.
- Discover New Themes: Search for themes like “travel photography” or “street photography” to find inspiration for your next project.
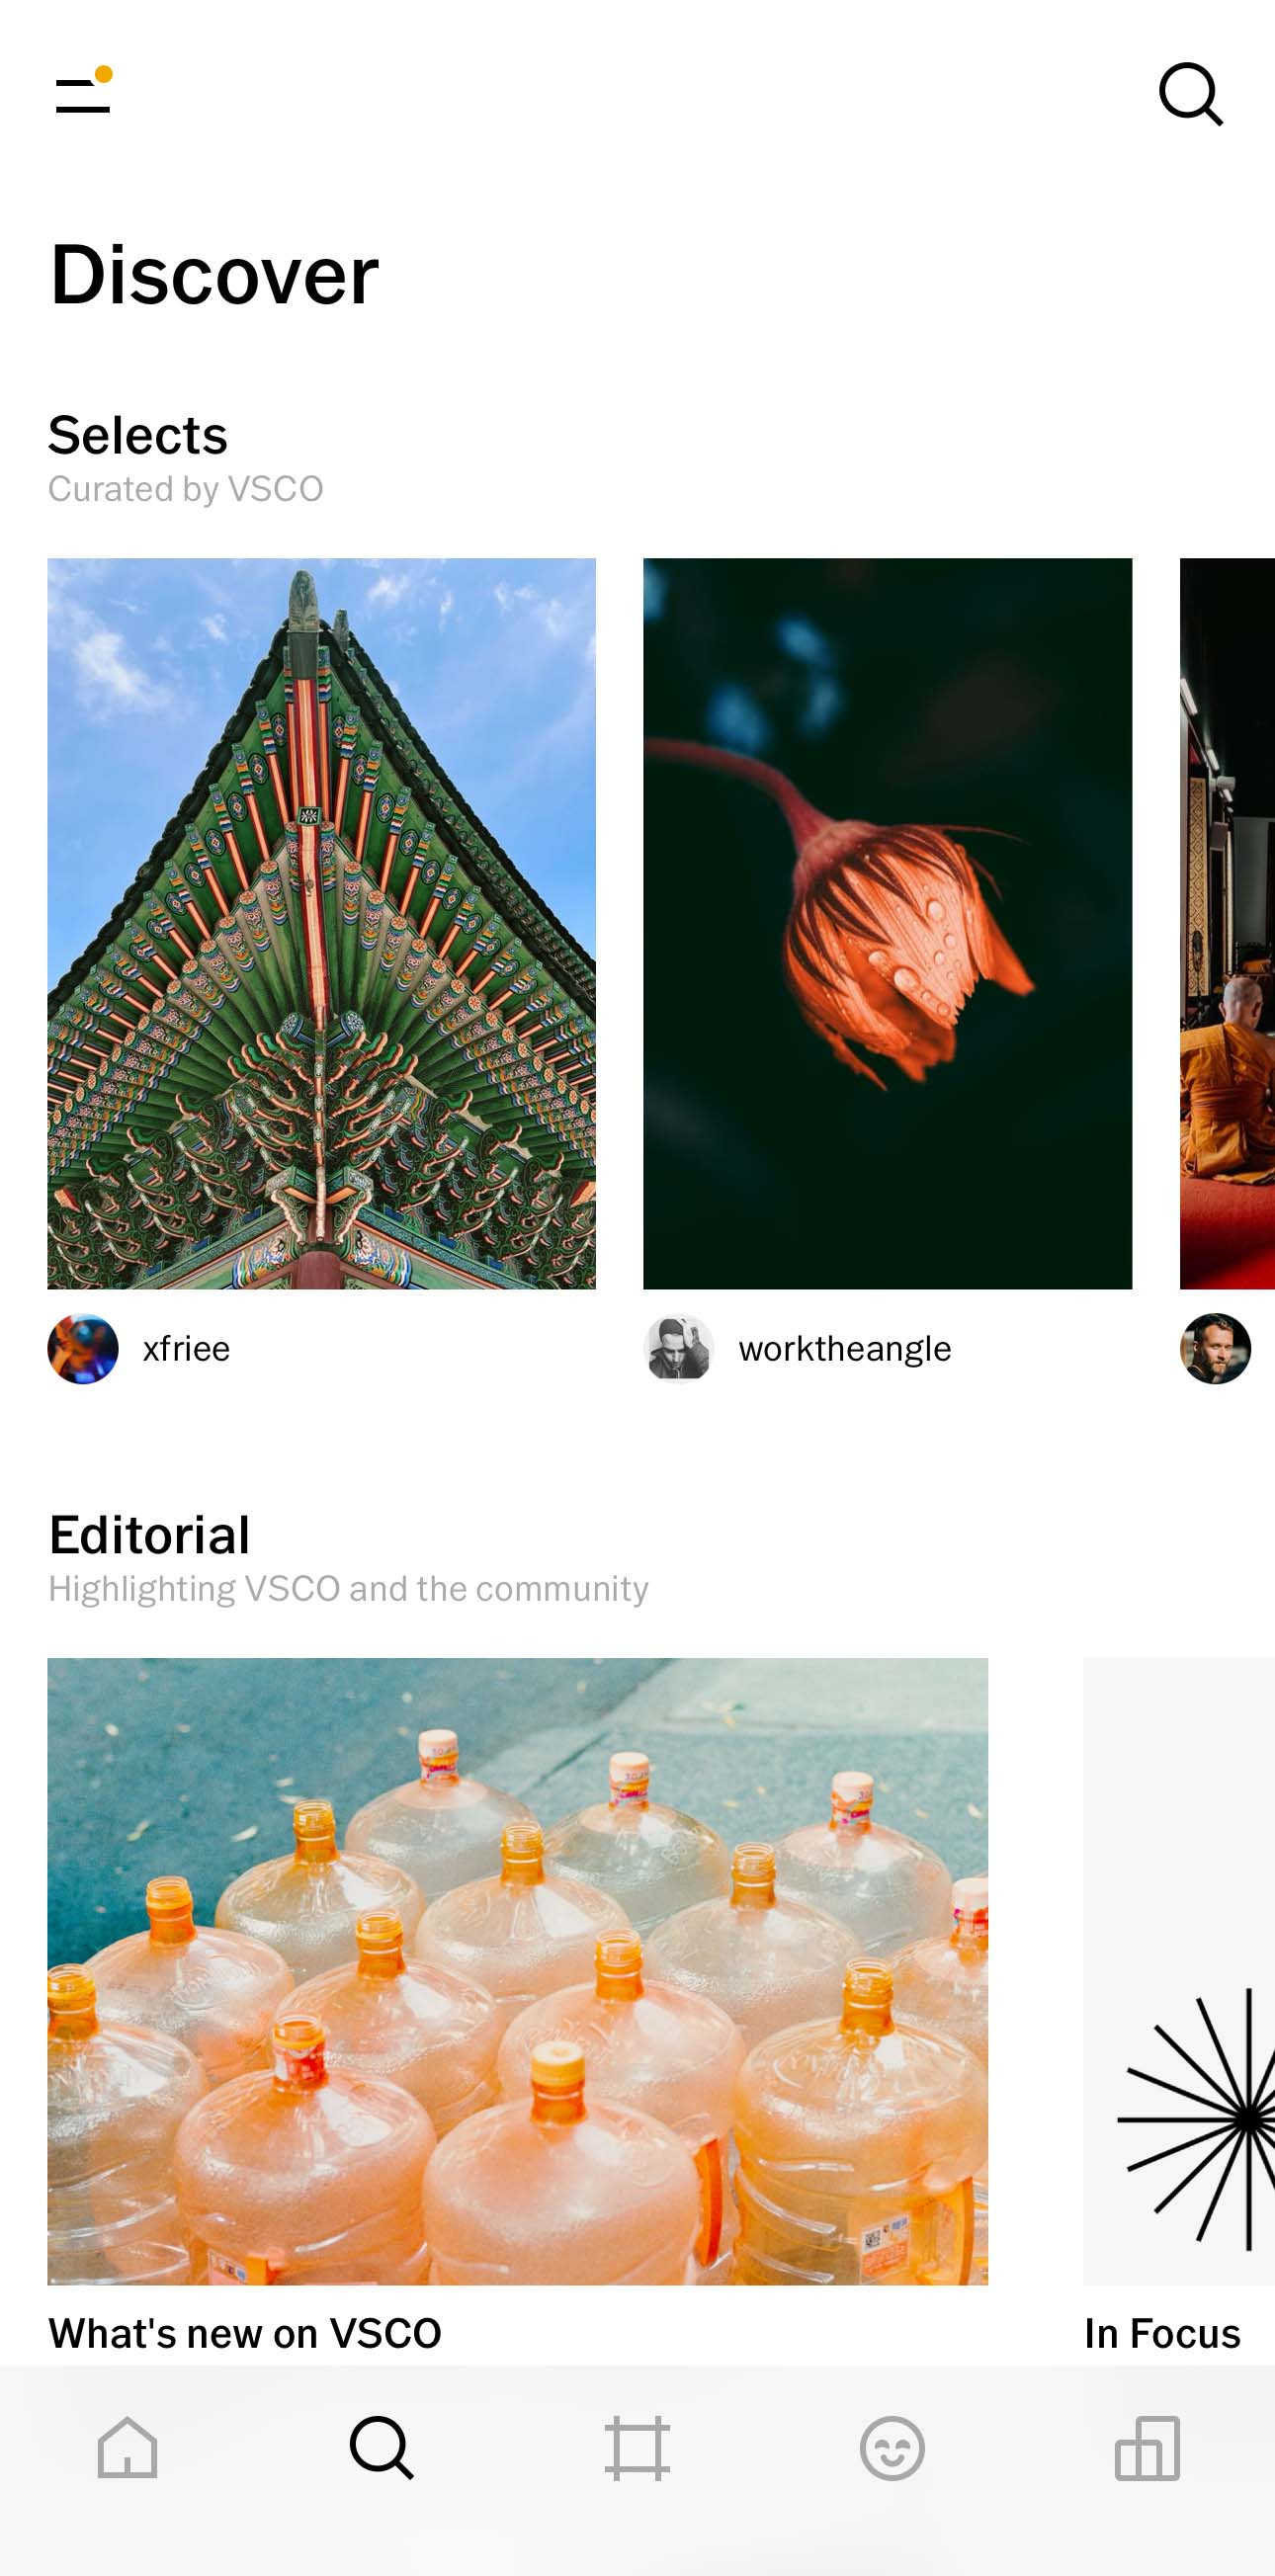 Discover on VSCO with curated selections and creative prompts
10. Connecting With Others: Joining And Creating VSCO Spaces
VSCO Spaces are small communities where you can connect with other like-minded creatives around a specific topic or theme.
10.1. What Are VSCO Spaces?
VSCO Spaces are groups where you can share photos, discuss photography, and connect with other creatives.
10.2. How To Join A VSCO Space
- Tap the Spaces Tab: Located in the bottom navigation bar.
- Browse Available Spaces: Explore the different Spaces to find one that interests you.
- Join a Space: Tap the “Join” button to become a member.
10.3. How To Create A VSCO Space
- Tap the Spaces Tab:
- Tap the “+” Icon:
- Create a Space: Name your space, add a description, and choose whether it will be public or private.
10.4. Benefits Of Joining Or Creating VSCO Spaces
- Connect With Like-Minded Creatives: Find other photographers who share your interests.
- Share Your Work: Get feedback and inspiration from other members.
- Learn New Techniques: Participate in discussions and learn from other photographers.
- Collaborate on Projects: Work with other members on photography projects.
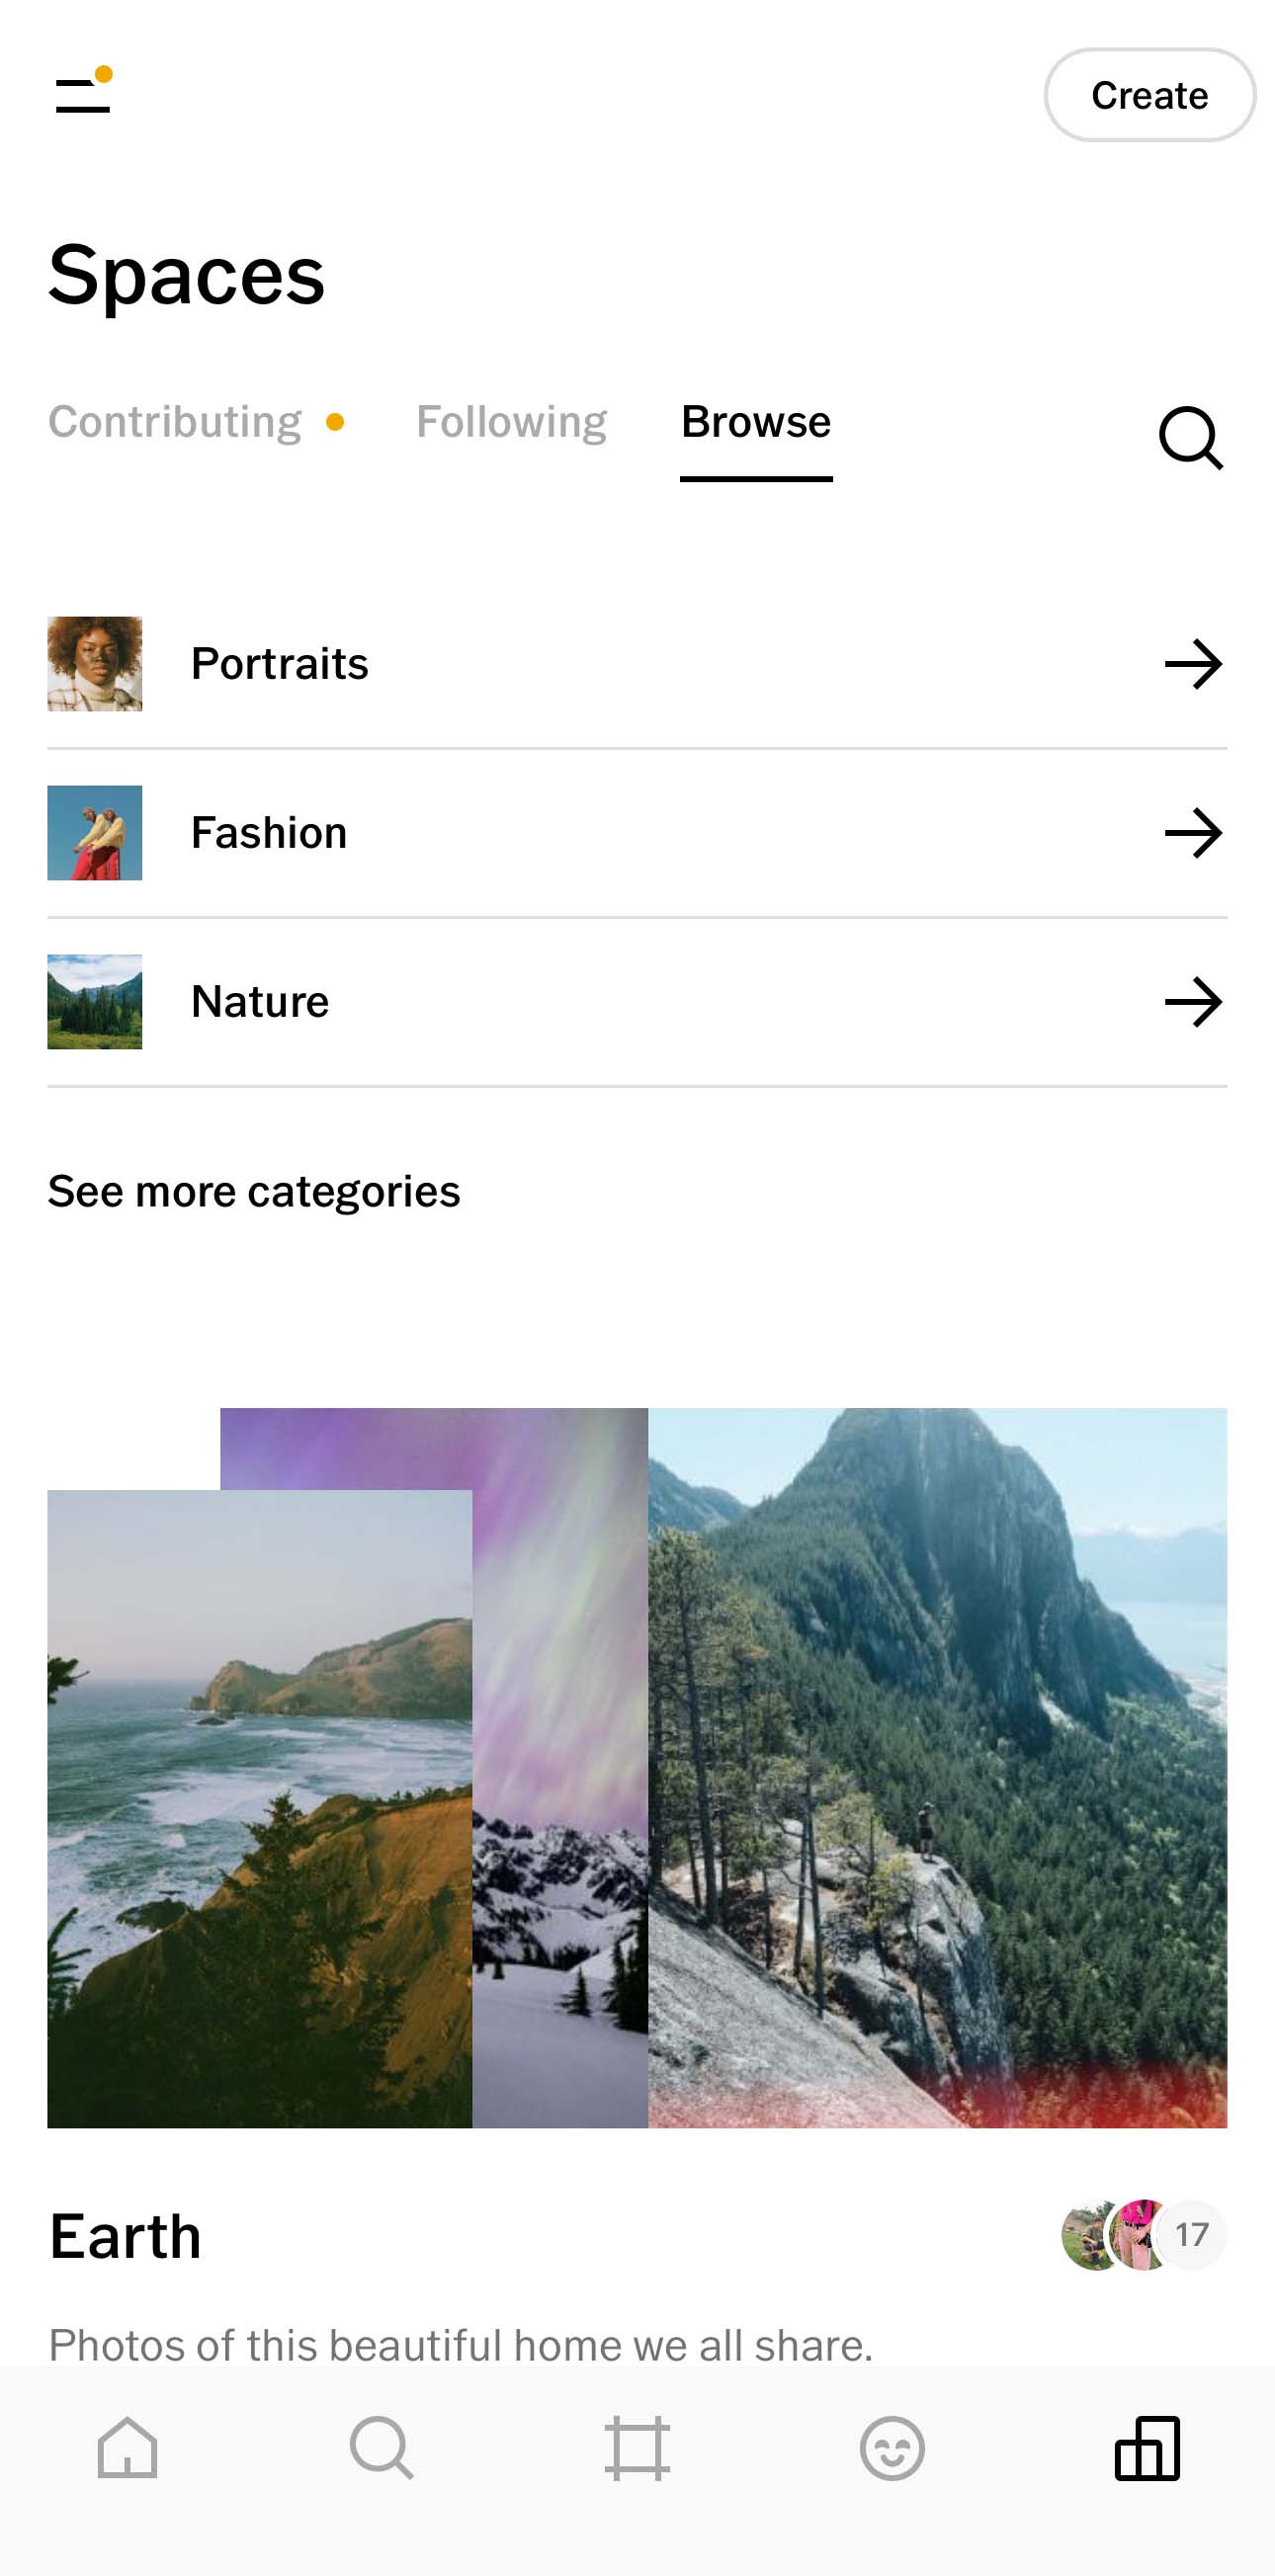 VSCO Spaces showcasing different communities and themes
11. VSCO Tips And Tricks: Mastering The Art Of Mobile Photo Editing
- Embrace Non-Destructive Editing: VSCO’s non-destructive editing allows you to experiment freely without affecting your original photos.
- Use Presets as a Starting Point: Don’t rely solely on presets. Use them as a foundation and then fine-tune with the editing tools.
- Learn the Keyboard Shortcuts: If you’re using the VSCO desktop editor, learn the keyboard shortcuts to speed up your workflow.
- Sync Your Edits Across Devices (Pro Members Only): Sync your edits between your mobile and desktop devices for a seamless editing experience.
- Experiment with Different Styles: Don’t be afraid to try new things and develop your unique style.
- Practice Regularly: The more you use VSCO, the better you’ll become at editing photos.
- Seek Inspiration from Other Photographers: Follow other photographers on VSCO and learn from their work.
- Share Your Work and Get Feedback: Share your photos on VSCO and ask for feedback from other users.
12. The Future Of VSCO: What’s Next For Mobile Photo Editing?
VSCO is constantly evolving, with new features and updates being released regularly. Some potential future developments include:
- Enhanced AI-Powered Features: More intelligent AI-powered tools for automated editing and suggestions.
- Expanded Collaboration Features: More ways to collaborate with other photographers within the app.
- Integration with Other Creative Platforms: Seamless integration with other creative platforms like Adobe Creative Cloud.
- Advanced Video Editing Capabilities: More sophisticated video editing tools for creating cinematic mobile videos.
- AR-Powered Editing Tools: Augmented reality tools for editing photos in real-time.
13. VSCO Alternatives: Exploring Other Mobile Photo Editing Apps
While VSCO is a popular choice, several other mobile photo editing apps offer similar features and capabilities:
- Adobe Lightroom Mobile: A powerful mobile version of the popular desktop photo editing software.
- Snapseed: A free and versatile photo editing app developed by Google.
- PicsArt: A creative photo editing app with a wide range of tools and effects.
- Afterlight: A simple and intuitive photo editing app with a focus on filters and textures.
- Darkroom: A professional-grade photo editing app with advanced color correction tools.
14. Troubleshooting Common VSCO Problems
- App Crashing: Ensure you have the latest version of the app installed and that your device meets the minimum system requirements.
- Import Issues: Check that your photos are in a supported format and that you have enough storage space on your device.
- Sync Problems: Verify that you have a stable internet connection and that you’re logged in to your VSCO account.
- Preset Issues: Try reinstalling the preset or contacting VSCO support.
- Export Errors: Make sure you have enough storage space on your device and that you’re exporting the photo in a supported format.
15. Essential Photography Concepts To Understand For Better VSCO Editing
- Exposure Triangle: Understanding the relationship between aperture, shutter speed, and ISO is crucial for capturing well-exposed photos.
- Composition: Learn the rules of composition, such as the rule of thirds and leading lines, to create visually appealing photos.
- White Balance: Mastering white balance ensures accurate colors in your photos.
- Color Theory: Understanding color theory helps you create harmonious and visually appealing color palettes.
- Dynamic Range: Learn how to manage dynamic range to capture detail in both the highlights and shadows of your photos.
16. Optimizing Your Photos For Different Social Media Platforms
- Instagram: Use a square aspect ratio and optimize for mobile viewing.
- Facebook: Optimize for a larger display and consider the platform’s compression algorithm.
- Twitter: Use a landscape aspect ratio and keep the file size small.
- Pinterest: Use a vertical aspect ratio and optimize for visual discovery.
- TikTok: Use a vertical aspect ratio and consider adding text or animations.
17. Level Up Your Photography With DFphoto.net
Ready to take your photography skills to the next level? DFphoto.net is your ultimate resource for learning, inspiration, and community.
17.1. Discover In-Depth Tutorials And Guides
DFphoto.net offers a wealth of educational resources, including:
- Comprehensive Photography Courses: Learn the fundamentals of photography, from camera settings to composition techniques.
- In-Depth Editing Tutorials: Master photo editing software like Adobe Photoshop and Lightroom.
- Genre-Specific Guides: Explore specialized photography genres like portrait, landscape, and street photography.
17.2. Browse Stunning Photo Galleries
Immerse yourself in the world of visual art with DFphoto.net’s curated photo galleries.
- Showcases of Talented Photographers: Discover the work of emerging and established photographers.
- Themed Collections: Explore photos organized around specific themes, styles, and locations.
- Daily Inspiration: Find fresh inspiration to fuel your creativity.
17.3. Connect With A Passionate Photography Community
Join DFphoto.net’s thriving community of photography enthusiasts.
- Forums and Discussions: Share your work, ask questions, and connect with other photographers.
- Photo Challenges and Contests: Participate in challenges and contests to test your skills and gain exposure.
- Expert Feedback: Receive constructive criticism from experienced photographers.
17.4. Stay Up-To-Date With The Latest Trends
DFphoto.net keeps you informed about the latest trends in photography.
- News and Articles: Stay informed about new equipment, software updates, and industry events.
- Trend Spotting: Discover emerging styles and techniques.
- Interviews with Influential Photographers: Gain insights from leading voices in the photography world.
18. Conclusion: Unleash Your Inner Photographer With VSCO
How to edit photos on VSCO, you’re equipped to transform your photos into stunning works of art. Embrace the app’s film-inspired presets, explore its comprehensive editing tools, and connect with the vibrant VSCO community. Remember, photography is a journey of continuous learning and experimentation. So, grab your smartphone, download VSCO, and start capturing and editing the world around you. Visit dfphoto.net for even more resources to elevate your photography skills and connect with a passionate community of visual storytellers.
Address: 1600 St Michael’s Dr, Santa Fe, NM 87505, United States. Phone: +1 (505) 471-6001. Website: dfphoto.net.
19. Frequently Asked Questions (FAQ) About How To Edit Photos On VSCO
19.1. Is VSCO free to use?
Yes, VSCO offers a free version with a limited selection of presets and editing tools. A paid membership unlocks the entire library of presets and additional features.
19.2. Can I edit videos in VSCO?
Yes, VSCO allows you to edit videos with many of the same tools and presets available for photos.
19.3. How do I create a VSCO account?
You can create a VSCO account by downloading the app and signing up with your email address or phone number.
19.4. How do I find new photographers to follow on VSCO?
Explore the Discover tab, browse curated selections, and use the search function to find photographers whose work you admire.
19.5. How do I share my photos on other social media platforms from VSCO?
Tap the share icon and select the platform you want to share your photo on.
19.6. Can I edit RAW photos in VSCO?
Yes, VSCO supports editing RAW photos on iOS and Android devices.
19.7. How do I recover deleted photos in VSCO?
If you accidentally delete a photo from your VSCO Studio, you can recover it from your device’s photo library.
19.8. How do I cancel my VSCO membership?
You can cancel your VSCO membership through the app store or your VSCO account settings.
19.9. Does VSCO offer customer support?
Yes, VSCO offers customer support through its website and in-app help center.
19.10. What are the best VSCO presets for portraits?
Popular VSCO presets for portraits include those in the “A” and “P” series, which offer flattering skin tones and subtle enhancements.