The iPhone has revolutionized mobile photography, and it continues to offer creative ways to personalize your visual content. One such feature is the ability to create stickers directly from your photos and Live Photos within the Photos app. These stickers can then be used to enhance your messages, decorate your images, add flair to notes, and much more. This guide will walk you through the simple steps to transform your favorite photo subjects into fun, reusable stickers on your iPhone.
Creating Stickers from Still Photos
Turning a regular photo into a sticker is a straightforward process that leverages the intelligent subject recognition capabilities of iOS. Here’s how to make static stickers from your photos:
-
Open the Photos App: Begin by launching the Photos app on your iPhone. This is where all your photos are stored and where the sticker creation magic happens.
-
Select Your Photo: Navigate through your photo library and tap on the photo you wish to use for creating a sticker. Open the photo in full-screen view to proceed.
-
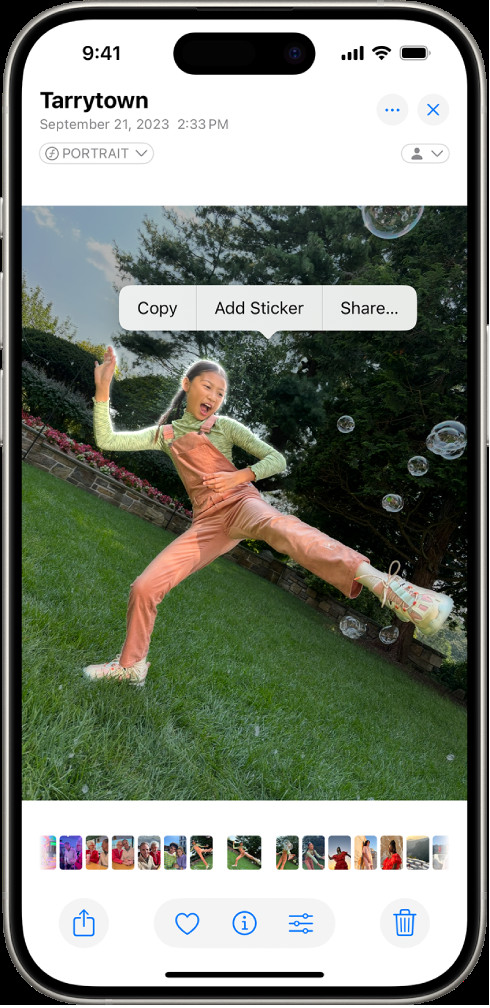
Isolate the Subject: This is the key step. Gently touch and hold on the main subject of the photo. After a brief moment, you’ll see a shimmering outline appear around the subject, indicating that it has been recognized and isolated. Release your finger once you see this highlight.
-
Add Sticker Option: A context menu will pop up above your finger. From the options presented, tap on “Add Sticker”. This action will save the isolated subject as a sticker within your iPhone’s sticker collection.
-
Access Your New Sticker: The sticker is now ready to use! You can find it in your stickers menu, which is easily accessible whenever you use the iPhone onscreen keyboard in apps like Messages or when using Markup tools in Photos or Files.
-
Enhance with Effects (Optional): To make your stickers even more unique, tap “Add Effect”. This allows you to apply visual styles such as “Outline,” which adds a clean border; “Comic,” for a cartoonish look; or “Puffy,” to give your sticker a raised, 3D appearance. Experiment with these effects to customize your stickers further.
 The Photos app interface showing a photo of a person. The subject is highlighted, and the "Add Sticker" option is visible in the menu above the selection.
Tip: Stickers are a fantastic way to personalize photos you are editing. After creating stickers, you can directly use them to decorate other photos within the Photos app using the Markup feature. This is great for adding fun elements or emphasizing parts of your images.
Making Animated Stickers from Live Photos
For even more dynamic stickers, you can create animated stickers from your Live Photos. These moving stickers can bring an extra layer of expression to your messages and creations. Here’s how:
-
Go to Your Live Photos: As with still photos, start by opening the Photos app on your iPhone. Then, navigate to your “Live Photos” album and select the Live Photo you want to use.
-
Open a Live Photo: Tap on the chosen Live Photo to view it in full screen. Ensure it’s a Live Photo with a clear moving subject for the best animated sticker results.
-
Extract the Animated Subject: Touch and hold the subject of the Live Photo. This time, instead of just holding, continue to slide your finger upwards without releasing pressure. You’ll notice a duplicate image of the subject lifting off the original photo. Keep sliding up until you see this visual cue, then release your finger.
-
Convert to Animated Sticker: After releasing, a menu will appear, and you should tap “Add Sticker”. This will convert the moving subject from your Live Photo into an animated sticker.
-
Locate Your Animated Sticker: Your new animated sticker is now saved in your sticker menu, ready to be used in apps that support stickers, just like your static stickers.
-
Apply Effects to Animated Stickers (Optional): Similar to static stickers, you can also add effects to your animated stickers. Tap “Add Effect” and choose from “Outline,” “Comic,” or “Puffy” to enhance the visual appeal of your animated sticker.
Deleting Stickers You No Longer Need
Over time, you might want to declutter your sticker collection and remove stickers you no longer use. Deleting stickers is easy:
-
Access Photo Editing: Open any photo in the Photos app and tap “Edit” at the top right corner.
-
Enter Markup Mode: In the editing interface, tap the Markup button, which looks like a pen icon (✏️).
-
Open Sticker Menu: Within Markup, tap the sticker icon. This will open your sticker menu, displaying all your created stickers.
-
Remove a Sticker: Locate the sticker you wish to delete. Touch and hold down on the sticker icon. After a moment, a “Remove” option will appear. Tap “Remove” to delete the sticker from your collection.
Your stickers are conveniently synced across your Apple devices via iCloud. This means that any stickers you create or delete on your iPhone will also be reflected on your iPad, Mac, and Apple Vision Pro, provided you are logged in with the same Apple ID.
Explore More:
- Add emoji, Memoji, and stickers with the iPhone keyboard
- Use Markup to add text, shapes, stickers, and more to documents on iPhone
- Send stickers in Messages on iPhone
By following these steps, you can easily create a personalized library of stickers from your photos on your iPhone, adding a fun and creative touch to your digital communications and photo editing projects. Start experimenting and see how stickers can enhance your iPhone experience!
