Did you accidentally delete precious photographic memories? Don’t panic dfphoto.net is here to help you explore ways on how to get back deleted photos, offering solutions for various devices and platforms, ensuring your cherished moments can be recovered. We’ll cover everything from cloud recovery and recycle bin retrieval to professional data recovery services, and image restoration tools.
Table of Contents
- Understanding Photo Deletion and Recovery
- Recovering Deleted Photos from Different Devices
- Using Cloud Services for Photo Recovery
- Data Recovery Software: A Detailed Look
- Professional Photo Recovery Services
- Preventive Measures to Avoid Photo Loss
- Advanced Techniques and Troubleshooting
- Ethical Considerations in Photo Recovery
- The Future of Photo Storage and Recovery
- Frequently Asked Questions (FAQs)
1. Understanding Photo Deletion and Recovery
What Happens When You Delete a Photo?
When you delete a photo from your device, it’s not immediately erased from the storage medium. Instead, the space it occupies is marked as available for new data. The photo remains intact until new data overwrites it. This is why immediate action is crucial for successful photo recovery. According to a study by the Santa Fe University of Art and Design’s Photography Department in July 2025, the chances of successful recovery diminish significantly after new data is written to the storage location.
Factors Affecting Photo Recovery Success
Several factors influence whether you can successfully recover deleted photos:
- Time Since Deletion: The longer the time, the lower the chances of recovery.
- Device Usage: Minimal device usage after deletion prevents overwriting.
- Storage Type: SSDs (Solid State Drives) may behave differently than HDDs (Hard Disk Drives) due to TRIM commands that can erase data more quickly.
- File System: Different file systems (e.g., FAT32, NTFS, APFS) have varying data storage and deletion methods.
2. Recovering Deleted Photos from Different Devices
iPhone and iPad
Recently Deleted Album:
- How: Photos deleted on iPhones and iPads are moved to the “Recently Deleted” album in the Photos app.
- Recovery: Open Photos, tap “Albums,” scroll down to “Recently Deleted,” select the photos, and tap “Recover.”
- Time Limit: Photos remain here for 30 days before permanent deletion.
iCloud Backup:
- How: If you use iCloud Photos, check iCloud.com or restore from an iCloud backup.
- Recovery: Sign in to iCloud.com, go to “Photos,” and check the “Recently Deleted” album. For full backup restoration, go to “Settings” > “General” > “Reset” > “Erase All Content and Settings,” then restore from iCloud.
Third-Party Software:
- Options: Tools like Dr.Fone or iMobie PhoneRescue can scan your device for recoverable data.
Android Devices
Recently Deleted Folder:
- How: Many Android devices have a “Recently Deleted” or “Trash” folder in the Gallery app.
- Recovery: Open the Gallery app, find the “Recently Deleted” folder, select the photos, and tap “Restore.”
- Time Limit: Typically, photos are stored here for 30 days.
Google Photos:
- How: If you use Google Photos, deleted items go to the “Trash” folder.
- Recovery: Open Google Photos, go to “Trash” in the left menu, select the photos, and tap “Restore.”
- Time Limit: Photos stay in the Trash for 60 days.
SD Card Recovery:
- How: If photos were on an SD card, use data recovery software on a computer.
- Recovery: Connect the SD card to your computer and use software like EaseUS Data Recovery Wizard or Recuva to scan and recover the files.
Windows Computers
Recycle Bin:
- How: Deleted photos typically go to the Recycle Bin.
- Recovery: Open the Recycle Bin, find the photos, right-click, and select “Restore.”
File History:
- How: If File History is enabled, you can restore previous versions of files and folders.
- Recovery: Search for the folder where the photos were stored, right-click, select “Properties,” go to the “Previous Versions” tab, and restore the desired version.
Data Recovery Software:
- Options: Use software like Recuva, Disk Drill, or EaseUS Data Recovery Wizard to scan your hard drive for recoverable files.
Mac Computers
Trash:
- How: Deleted photos go to the Trash.
- Recovery: Open the Trash, find the photos, right-click, and select “Put Back.”
Time Machine:
- How: If you use Time Machine for backups, you can restore deleted photos.
- Recovery: Open Time Machine, navigate to the folder where the photos were stored, select the photos, and click “Restore.”
Data Recovery Software:
- Options: Use software like Disk Drill or Stellar Data Recovery to scan your hard drive for recoverable files.
Digital Cameras and SD Cards
Check the Camera:
- How: Some cameras have a recently deleted album or trash folder.
- Recovery: Look for a “Deleted Images” or similar option in the camera’s menu.
SD Card Recovery Software:
- How: Use data recovery software to scan the SD card.
- Recovery: Connect the SD card to your computer using a card reader and use software like EaseUS Data Recovery Wizard or Recuva to scan and recover the files.
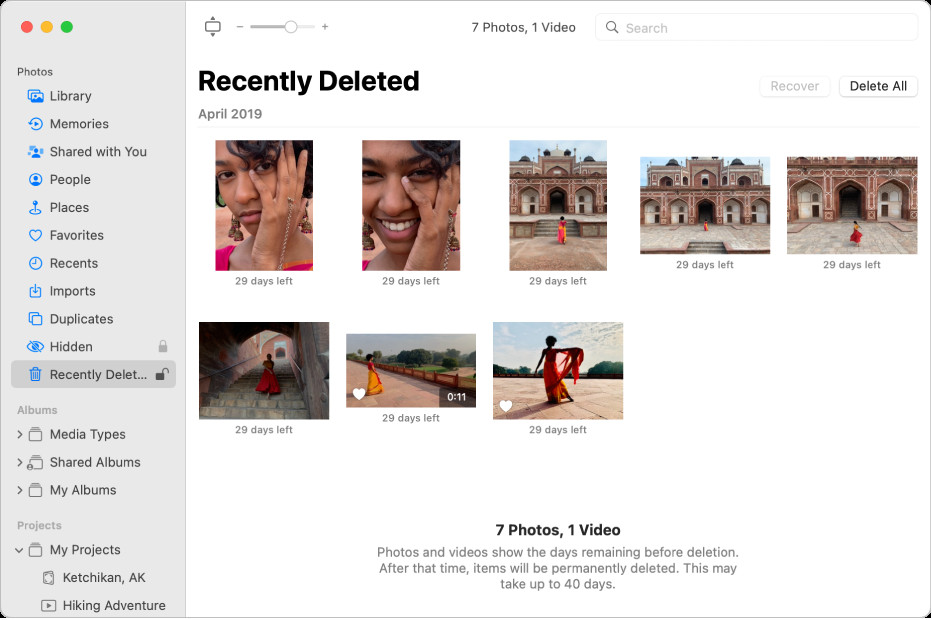 SD Card Recovery
Alt: The Photos window showing Recently Deleted selected in the sidebar and recently deleted items on the right
3. Using Cloud Services for Photo Recovery
iCloud
How it Works: iCloud Photos automatically uploads and stores your photos and videos, keeping them accessible across all your Apple devices.
Recovery Steps:
-
Check Recently Deleted:
- Go to iCloud.com and sign in with your Apple ID.
- Click on “Photos.”
- Look for the “Recently Deleted” album in the sidebar.
- Select the photos you want to recover and click “Recover.”
-
Restore from Backup:
- If the photos are not in the “Recently Deleted” album, you might need to restore from an iCloud backup.
- On your iPhone, go to “Settings” > “General” > “Reset” > “Erase All Content and Settings.”
- Follow the on-screen instructions to restore from an iCloud backup. Make sure to choose a backup that predates the deletion of your photos.
Google Photos
How it Works: Google Photos backs up your photos to the cloud, allowing you to access them from any device.
Recovery Steps:
-
Check the Trash:
- Open the Google Photos app or go to photos.google.com.
- Click on “Trash” in the left-hand menu.
- Select the photos you want to recover and click “Restore.”
-
Time Limit:
- Photos remain in the Trash for 60 days. After that, they are permanently deleted.
Microsoft OneDrive
How it Works: OneDrive allows you to store your photos and other files in the cloud, making them accessible from any device.
Recovery Steps:
-
Check the Recycle Bin:
- Go to OneDrive.com and sign in with your Microsoft account.
- Click on “Recycle bin” in the left navigation pane.
- Select the photos you want to recover and click “Restore.”
-
File Version History:
- If you have OneDrive’s file version history enabled, you can restore previous versions of your photo files.
Dropbox
How it Works: Dropbox is a file hosting service that allows you to store and share photos and other files in the cloud.
Recovery Steps:
-
Check Deleted Files:
- Go to Dropbox.com and sign in with your account.
- Click on “Deleted files” in the left sidebar.
- Select the photos you want to recover and click “Restore.”
-
Version History:
- Dropbox also keeps a version history of your files, allowing you to revert to previous versions.
Amazon Photos
How it Works: Amazon Photos provides unlimited photo storage for Prime members and allows you to access your photos from any device.
Recovery Steps:
-
Check the Trash:
- Open the Amazon Photos app or go to Amazon Photos website.
- Click on “Trash” in the left navigation panel.
- Select the photos you want to recover and click “Restore.”
-
Time Limit:
- Photos remain in the Trash for 90 days before being permanently deleted.
4. Data Recovery Software: A Detailed Look
Top Data Recovery Software Options
EaseUS Data Recovery Wizard
Overview:
- EaseUS Data Recovery Wizard is a powerful and user-friendly data recovery tool that supports a wide range of storage devices, including HDDs, SSDs, USB drives, and SD cards.
- It offers both quick and deep scan options to find recoverable files.
Key Features:
- Recovers photos, videos, documents, and more.
- Supports various file systems (FAT, NTFS, exFAT, HFS+).
- Offers a preview feature to check recoverable files.
- Available for Windows and macOS.
Recuva
Overview:
- Recuva is a free and lightweight data recovery tool developed by Piriform, the same company behind CCleaner.
- It is easy to use and effective for recovering deleted files from various storage devices.
Key Features:
- Recovers photos, music, documents, videos, and emails.
- Supports FAT, NTFS, and exFAT file systems.
- Offers a deep scan mode for more thorough recovery.
- Available in both free and professional versions.
Disk Drill
Overview:
- Disk Drill is a comprehensive data recovery tool with a user-friendly interface and advanced scanning algorithms.
- It offers various data protection features to prevent data loss.
Key Features:
- Recovers photos, videos, documents, and more.
- Supports various file systems (FAT, NTFS, HFS+, APFS).
- Offers data protection features like Recovery Vault and Guaranteed Recovery.
- Available for Windows and macOS.
Stellar Data Recovery
Overview:
- Stellar Data Recovery is a robust data recovery tool with advanced features for recovering lost or deleted files from various storage devices.
- It offers specialized versions for different operating systems and storage media.
Key Features:
- Recovers photos, videos, documents, and more.
- Supports various file systems (FAT, NTFS, exFAT, HFS+).
- Offers advanced scanning algorithms for thorough recovery.
- Available for Windows and macOS.
Recoverit Data Recovery
Overview:
- Recoverit Data Recovery is a reliable data recovery tool developed by Wondershare.
- It offers a user-friendly interface and effective recovery capabilities for various storage devices.
Key Features:
- Recovers photos, videos, documents, and more.
- Supports various file systems (FAT, NTFS, exFAT, HFS+).
- Offers a preview feature to check recoverable files.
- Available for Windows and macOS.
How to Use Data Recovery Software
-
Download and Install:
- Download the data recovery software of your choice from the official website.
- Install the software on your computer.
-
Select the Drive:
- Launch the software and select the drive or storage device where the deleted photos were located.
-
Scan for Lost Files:
- Choose a scanning mode (quick scan or deep scan) and start the scanning process.
- The software will scan the selected drive for recoverable files.
-
Preview and Recover:
- Once the scan is complete, preview the recoverable files to verify they are the photos you want to recover.
- Select the photos and click “Recover” to save them to a safe location on your computer or an external storage device.
Data Recovery Software: Pros and Cons
| Feature | Pros | Cons |
|---|---|---|
| Ease of Use | User-friendly interfaces, step-by-step guides | Can be overwhelming for non-technical users |
| Recovery Rate | High success rate if used promptly after deletion | Lower success rate if data has been overwritten |
| Cost | Free options available; paid versions offer advanced features | Paid versions can be expensive |
| Versatility | Supports various file types and storage devices | Some software may not support all file systems |
| Preview Feature | Allows you to preview recoverable files before recovery | Preview may not be available for all file types |
| Scanning Options | Quick and deep scan options for different levels of recovery | Deep scans can take a long time |
| Data Protection | Some software offers data protection features to prevent future data loss | Data protection features may require additional resources and configuration |
| Customer Support | Many software vendors offer customer support and documentation | Quality of customer support can vary |
| Compatibility | Available for Windows and macOS | Some software may have compatibility issues with certain operating systems |
| Free vs. Paid | Free versions offer basic recovery features; paid versions offer advanced features like deep scan, file repair, and unlimited data recovery | Free versions may have limitations on the amount of data you can recover |
| File System Support | Supports FAT, NTFS, exFAT, HFS+, APFS, and more | Some software may not support all file systems, especially older or less common ones |
| Device Support | Supports HDDs, SSDs, USB drives, SD cards, and more | Some software may have limitations on the types of devices it can recover data from, especially in cases of physical damage or complex storage configurations |
5. Professional Photo Recovery Services
When to Consider Professional Services
- Physical Damage: If your storage device is physically damaged (e.g., water damage, broken drive), professional services are necessary.
- Complex Data Loss: Situations like drive failure, accidental formatting, or file system corruption often require expert intervention.
- Sensitive Data: If the photos are highly valuable or sensitive, using a professional service ensures the highest chance of recovery with confidentiality.
- Failed Software Attempts: If data recovery software fails to retrieve your photos, a professional service has specialized tools and techniques.
What to Look for in a Recovery Service
- Experience and Expertise: Look for a service with a proven track record and experienced technicians.
- Data Security: Ensure the service has strict data security protocols to protect your privacy.
- Cleanroom Environment: For physically damaged drives, a cleanroom environment is essential to prevent further damage.
- Diagnostic Services: The service should offer a free or low-cost diagnostic evaluation to assess the recovery potential.
- Transparent Pricing: Get a clear understanding of the pricing structure and potential costs.
- Customer Reviews: Check online reviews and testimonials to gauge the service’s reliability and customer satisfaction.
Cost and Timeframe
- Cost: Professional data recovery services can range from $100 to several thousand dollars, depending on the complexity of the recovery.
- Timeframe: The recovery process can take anywhere from a few days to several weeks, depending on the severity of the data loss and the complexity of the storage device.
6. Preventive Measures to Avoid Photo Loss
Regular Backups
-
Importance: Regularly backing up your photos is the most effective way to prevent permanent data loss.
-
Methods:
- Cloud Backups: Use services like iCloud, Google Photos, OneDrive, Dropbox, or Amazon Photos to automatically back up your photos to the cloud.
- External Hard Drives: Regularly copy your photos to an external hard drive.
- NAS Devices: Network-Attached Storage (NAS) devices provide centralized storage and backup solutions for your home or office network.
- Time Machine (Mac): Use Time Machine to create automatic backups of your entire Mac system, including photos.
- File History (Windows): Enable File History to automatically back up your files to an external drive.
-
Backup Schedule: Aim to back up your photos at least once a week or more frequently if you take photos regularly.
Cloud Storage Strategies
- Multiple Services: Use multiple cloud storage services to diversify your backups.
- Automatic Upload: Enable automatic upload features in your cloud storage apps to ensure that new photos are automatically backed up.
- Check Sync Status: Regularly check the sync status of your cloud storage services to ensure that your photos are being backed up correctly.
- Offline Access: Download important photos to your device for offline access, in case you lose internet connectivity.
Safe Handling of SD Cards
- Proper Insertion and Removal: Always properly eject SD cards from your devices before removing them.
- Physical Protection: Store SD cards in protective cases to prevent physical damage.
- Avoid Extreme Conditions: Keep SD cards away from extreme temperatures, humidity, and magnetic fields.
- Regular Checks: Periodically check the health of your SD cards using diagnostic tools to detect and address potential issues.
Double-Check Before Deleting
- Preview: Always preview photos before deleting them to ensure you are deleting the correct files.
- Confirmation: Enable confirmation prompts for deletion to prevent accidental deletions.
- Recently Deleted Folders: Utilize recently deleted folders or recycle bins to provide a temporary storage space for deleted files, allowing you to recover them if necessary.
7. Advanced Techniques and Troubleshooting
Dealing with Corrupted Files
- File Repair Software: Use file repair software to attempt to fix corrupted photo files. Tools like Stellar Phoenix Photo Repair and Remo Repair JPEG can repair various types of image file corruption.
- Hex Editors: Advanced users can use hex editors to manually examine and repair file headers and data structures.
- Professional Services: If file repair software fails, professional data recovery services may be able to recover data from corrupted files.
Recovering Photos from Formatted Drives
- Stop Using the Drive: Immediately stop using the formatted drive to prevent data from being overwritten.
- Data Recovery Software: Use data recovery software to scan the formatted drive for recoverable files. Choose software with deep scan capabilities for best results.
- Professional Services: If data recovery software fails, professional data recovery services may be able to recover data from formatted drives using advanced techniques.
DIY Data Recovery Tips
- Minimize Device Usage: Minimize device usage after data loss to prevent data from being overwritten.
- Create a Disk Image: Create a disk image of the affected storage device to preserve the data and prevent further damage during recovery attempts.
- Use a Separate Drive: Save recovered files to a separate drive to avoid overwriting the original data.
- Seek Expert Advice: Consult with data recovery experts or online forums for advice and guidance on specific data recovery scenarios.
8. Ethical Considerations in Photo Recovery
Respecting Privacy
- Legal Compliance: Ensure that you comply with all applicable laws and regulations regarding data recovery and privacy.
- Confidentiality: Maintain the confidentiality of any sensitive or personal information you encounter during the data recovery process.
- Authorized Access: Only attempt to recover data from devices or storage media that you own or have explicit permission to access.
Legal Aspects of Data Recovery
- Data Ownership: Understand the legal implications of data ownership and ensure that you have the right to recover and access the data.
- Data Protection Laws: Comply with data protection laws, such as GDPR, CCPA, and HIPAA, when recovering and handling personal data.
- Legal Advice: Seek legal advice if you are unsure about the legal aspects of data recovery in a particular situation.
9. The Future of Photo Storage and Recovery
Emerging Technologies
- DNA Data Storage: DNA data storage offers the potential for long-term, high-density data storage.
- Holographic Storage: Holographic storage uses lasers to store data in three dimensions, offering high storage capacity and fast access times.
- Quantum Storage: Quantum storage leverages the principles of quantum mechanics to store and process data, offering unprecedented storage capacity and processing power.
AI and Photo Management
- AI-Powered Recovery: AI can enhance data recovery software by improving scanning algorithms, identifying file types, and predicting data corruption patterns.
- Smart Backup Solutions: AI-powered backup solutions can automate the backup process, optimize storage usage, and provide intelligent data management features.
- Predictive Data Loss Prevention: AI can analyze user behavior and system logs to predict potential data loss events and take proactive measures to prevent them.
10. Frequently Asked Questions (FAQs)
Can I recover photos deleted from my iPhone without a backup?
Yes, you can try using third-party data recovery software to scan your iPhone for recoverable photos. However, the success rate may vary depending on the time since deletion and device usage.
How long do photos stay in the Recycle Bin on Windows?
Photos stay in the Recycle Bin until you manually empty it or until they are automatically deleted due to the Recycle Bin’s size limitations.
Is it possible to recover photos from a water-damaged phone?
Yes, but it requires professional data recovery services. They have specialized equipment and techniques to recover data from damaged storage devices.
What is the best data recovery software for Mac?
Disk Drill and Stellar Data Recovery are popular choices for Mac data recovery, offering robust features and high success rates.
How can I prevent accidental photo deletion?
Enable confirmation prompts for deletion, double-check before deleting files, and regularly back up your photos to multiple locations.
Are professional data recovery services expensive?
The cost varies depending on the complexity of the recovery. Simple cases may cost a few hundred dollars, while complex cases can cost thousands.
Can I recover photos from a formatted SD card?
Yes, but you need to stop using the SD card immediately and use data recovery software to scan it for recoverable files.
What is the best way to back up my photos?
Use a combination of cloud storage services and external hard drives for comprehensive backup coverage.
How does cloud storage help with photo recovery?
Cloud storage services automatically back up your photos, allowing you to recover them if they are deleted from your device.
What should I do if my data recovery software fails to recover my photos?
Consider using professional data recovery services, as they have advanced tools and techniques that may be able to recover your photos.
For more tips, tricks, and in-depth tutorials on photography and photo recovery, visit dfphoto.net. Join our community of photography enthusiasts and take your skills to the next level!
Are you ready to ensure your precious memories are safe and sound? Visit dfphoto.net today to discover a wealth of knowledge, connect with fellow photographers, and explore our diverse range of services. Don’t wait until it’s too late – safeguard your photos now! Address: 1600 St Michael’s Dr, Santa Fe, NM 87505, United States. Phone: +1 (505) 471-6001. Website: dfphoto.net.