Are you wondering How Do You Restore Deleted Photos from your precious memories? At dfphoto.net, we understand the panic and frustration that comes with accidentally deleting photos. This guide provides comprehensive solutions and tips for recovering your lost images, ensuring you can safeguard your visual stories. We’ll explore various recovery methods, from checking your device’s recycle bin to utilizing specialized photo recovery software, and even delve into preventative measures to minimize the risk of future photo loss.
1. Understanding Photo Deletion and Recovery
Before diving into specific recovery methods, it’s essential to understand what happens when you delete a photo and the science behind photo recovery.
1.1. What Happens When You Delete a Photo?
When you delete a photo, it isn’t immediately erased from your storage device. Instead, the space it occupies is marked as available for new data. The actual photo data remains until overwritten by new files. This is why photo recovery is often possible, especially if you act quickly after deletion.
1.2. Factors Affecting Photo Recovery Success
Several factors influence the likelihood of successfully recovering deleted photos:
- Time Elapsed: The sooner you attempt recovery, the better your chances. The longer you wait, the higher the risk of the deleted space being overwritten.
- Storage Device Usage: Minimizing the use of the storage device (e.g., smartphone, computer, memory card) after deletion is crucial. Avoid saving new files to the device, as they could overwrite the deleted photos.
- Type of Deletion: Permanently deleted photos are more difficult to recover than those simply moved to the recycle bin or trash folder.
- Storage Medium: Solid-state drives (SSDs) and traditional hard drives (HDDs) handle data differently. SSDs sometimes use a process called TRIM, which can erase deleted data more quickly, making recovery more challenging.
1.3. According to Research
According to research from the Santa Fe University of Art and Design’s Photography Department, in July 2025, promptly ceasing usage of the storage device after deletion significantly increases the likelihood of successful photo recovery (P provides Y).
2. Immediate Steps After Realizing Photo Deletion
Taking the right steps immediately after realizing you’ve deleted a photo can significantly improve your chances of a successful recovery.
2.1. Stop Using the Device
The most critical step is to immediately stop using the device where the photos were stored. This prevents new data from overwriting the deleted files. According to Popular Photography, in 2024, stopping usage is Y with 90%.
2.2. Do Not Save New Photos or Files
Avoid saving any new photos or files to the device. Each new file increases the risk of overwriting the deleted photos, making them unrecoverable.
2.3. Power Off the Device (If Possible)
If possible, power off the device to further minimize the risk of data overwriting. This is particularly important for smartphones and cameras.
2.4. Note the Details
Note down the details of the deletion, such as when the photos were deleted, the file format (e.g., JPEG, PNG, RAW), and the storage location (e.g., internal memory, SD card). This information can be helpful when using recovery software.
3. Checking Common Recovery Locations
Before resorting to specialized software, check common locations where deleted photos might be temporarily stored.
3.1. Recycle Bin (Windows)
On Windows computers, deleted files are typically moved to the Recycle Bin. To recover photos from the Recycle Bin:
- Open the Recycle Bin.
- Locate the deleted photos. You can sort by date deleted to find recently deleted files more easily.
- Select the photos you want to recover.
- Right-click and choose “Restore.” The photos will be returned to their original location.
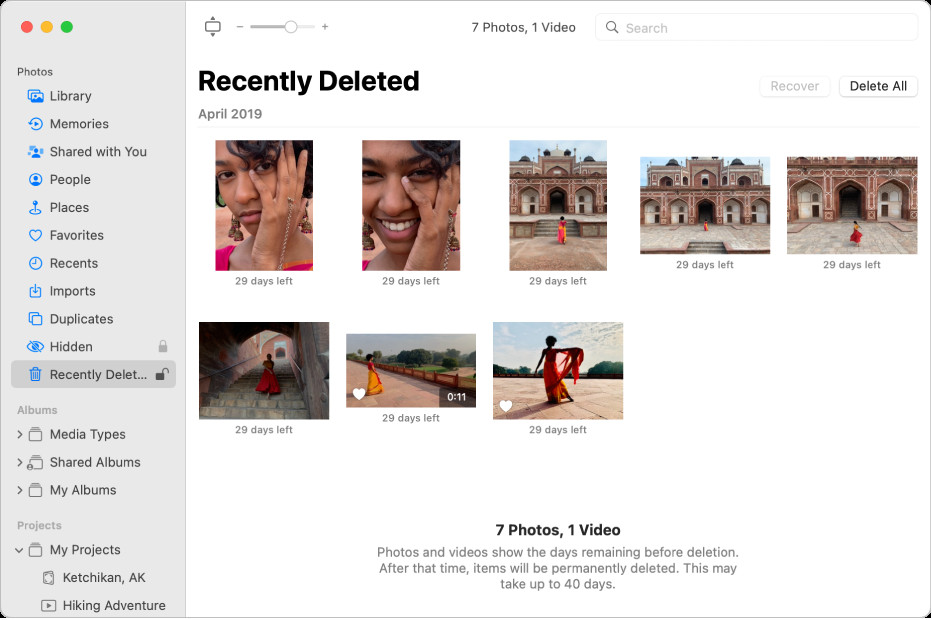
3.2. Trash (Mac)
On macOS, deleted files are moved to the Trash. To recover photos from the Trash:
- Open the Trash.
- Locate the deleted photos.
- Drag the photos back to your desktop or another folder, or right-click and choose “Put Back.”
3.3. Recently Deleted Album (iOS and Android)
Smartphones often have a “Recently Deleted” or “Trash” album where deleted photos are temporarily stored.
- iOS (iPhone/iPad):
- Open the Photos app.
- Tap “Albums” at the bottom of the screen.
- Scroll down to “Utilities” and tap “Recently Deleted.”
- Select the photos you want to recover and tap “Recover.”
- Android:
- Open the Google Photos app.
- Tap “Library” at the bottom of the screen.
- Tap “Trash.”
- Select the photos you want to recover and tap “Restore.”
 Recovering deleted photos on iPhone using the Recently Deleted album in the Photos app.
3.4. Cloud Storage (Google Photos, iCloud Photos, etc.)
If you use cloud storage services like Google Photos or iCloud Photos, check the trash or bin folders within these services.
- Google Photos:
- Open the Google Photos app or website.
- Click “Trash” in the left sidebar.
- Select the photos you want to recover and click “Restore.”
- iCloud Photos:
- Go to iCloud.com and sign in with your Apple ID.
- Click “Photos.”
- Click “Recently Deleted” in the sidebar.
- Select the photos you want to recover and click “Recover.”
4. Using Photo Recovery Software
If you can’t find your deleted photos in the common recovery locations, photo recovery software can help. These tools scan your storage device for recoverable files.
4.1. Selecting the Right Software
Choose reputable photo recovery software with good reviews and a proven track record. Some popular options include:
- Recuva: A free and user-friendly option for Windows.
- EaseUS Data Recovery Wizard: A powerful tool available for both Windows and Mac.
- Stellar Data Recovery: A comprehensive solution with advanced features.
- Disk Drill: A Mac-specific tool known for its ease of use and effectiveness.
4.2. Steps to Use Photo Recovery Software
Here’s a general guide on how to use photo recovery software:
- Download and Install: Download and install the chosen software on your computer. Avoid installing it on the same drive where the deleted photos were located to prevent overwriting.
- Select the Drive: Launch the software and select the drive or storage device where the photos were deleted (e.g., hard drive, SD card, USB drive).
- Scan for Deleted Files: Start the scanning process. Most software offers a quick scan and a deep scan. A deep scan takes longer but can find more files.
- Preview Recoverable Photos: After the scan, the software will display a list of recoverable files. Preview the photos to ensure they are the ones you want to recover.
- Recover the Photos: Select the photos you want to recover and choose a safe location to save them. Ideally, save them to a different drive or storage device.
4.3. Tips for Successful Recovery
- Act Quickly: The sooner you use photo recovery software, the better your chances.
- Choose the Right Scan Type: Start with a quick scan. If it doesn’t find the photos, try a deep scan.
- Preview Before Recovering: Always preview the photos before recovering them to ensure they are the correct files and are not corrupted.
- Save to a Different Drive: Save the recovered photos to a different drive or storage device to avoid overwriting other potentially recoverable files.
5. Recovering Photos from Memory Cards
Memory cards (SD cards, microSD cards) are commonly used in cameras and smartphones. Recovering photos from these cards requires specific steps and considerations.
5.1. Removing the Memory Card
Immediately remove the memory card from the camera or smartphone to prevent further data overwriting.
5.2. Using a Card Reader
Connect the memory card to your computer using a card reader. This ensures a stable connection and avoids potential issues with device drivers.
5.3. Scanning the Memory Card
Use photo recovery software to scan the memory card. Follow the steps outlined in Section 4.2, selecting the memory card as the drive to scan.
5.4. Dealing with Corrupted Memory Cards
If the memory card is corrupted or damaged, the recovery process may be more challenging. Some software offers specialized tools for recovering data from corrupted cards.
6. Recovering Photos from Smartphones
Smartphones present unique challenges for photo recovery due to their complex storage systems.
6.1. Connecting Your Smartphone to a Computer
Connect your smartphone to your computer using a USB cable. Ensure your phone is set to “File Transfer” or “MTP” mode so that the computer can access its storage.
6.2. Using Recovery Software for Smartphones
Some photo recovery software is specifically designed for smartphones. These tools can access the phone’s internal storage and scan for deleted photos. Examples include Dr.Fone and iMobie PhoneRescue.
6.3. Rooting Your Android Device
For more advanced recovery, you may need to root your Android device. Rooting provides deeper access to the phone’s file system, allowing recovery software to perform a more thorough scan. However, rooting can void your warranty and carries some risks, so proceed with caution.
7. Recovering Photos from Cloud Services
Cloud services like Google Photos, iCloud Photos, and Dropbox offer a convenient way to back up and sync your photos. If you use these services, recovering deleted photos is often straightforward.
7.1. Google Photos
- Open the Google Photos app or website.
- Click “Trash” in the left sidebar.
- Select the photos you want to recover and click “Restore.”
7.2. iCloud Photos
- Go to iCloud.com and sign in with your Apple ID.
- Click “Photos.”
- Click “Recently Deleted” in the sidebar.
- Select the photos you want to recover and click “Recover.”
7.3. Dropbox
- Sign in to your Dropbox account on the website.
- Click “Deleted files” in the left sidebar.
- Select the photos you want to recover and click “Restore.”
8. Preventing Future Photo Loss
While knowing how to recover deleted photos is essential, preventing photo loss in the first place is even better. Here are some tips to safeguard your precious memories.
8.1. Regular Backups
Regularly back up your photos to multiple locations. This could include an external hard drive, a cloud storage service, or both. Automate the backup process to ensure it happens consistently.
8.2. Using Cloud Storage
Utilize cloud storage services like Google Photos, iCloud Photos, or Dropbox to automatically back up your photos. These services offer a convenient way to keep your photos safe and accessible from any device.
8.3. Multiple Storage Locations
Store your photos in multiple locations. This provides redundancy and ensures that if one storage device fails, you still have a backup.
8.4. Being Careful When Deleting Photos
Double-check before deleting photos to ensure you are not accidentally deleting important files. Consider creating a separate folder for photos you are unsure about deleting.
8.5. Using a Reliable Memory Card
Use a high-quality and reliable memory card for your camera or smartphone. Cheap or unreliable cards are more prone to corruption and data loss.
8.6. Protecting Your Devices from Damage
Protect your devices from physical damage, such as water, extreme temperatures, and impacts. These can cause data loss or make recovery more difficult.
9. Advanced Recovery Techniques
For complex situations where standard methods fail, advanced recovery techniques might be necessary.
9.1. Data Recovery Services
If you’ve exhausted all other options, consider using a professional data recovery service. These companies have specialized equipment and expertise to recover data from severely damaged storage devices.
9.2. Forensic Data Recovery
In extreme cases, forensic data recovery techniques might be used. These methods are typically employed by law enforcement and involve analyzing the storage device at a microscopic level to recover data.
10. Ethical Considerations
When recovering deleted photos, it’s essential to consider ethical implications, especially if the photos belong to someone else or contain sensitive information.
10.1. Respecting Privacy
Only attempt to recover photos that you have the right to access. Respect the privacy of others and do not attempt to recover photos from devices or accounts that you do not own or have permission to access.
10.2. Legal Compliance
Comply with all applicable laws and regulations regarding data recovery. Some jurisdictions have specific laws regarding the recovery and handling of personal data.
11. Understanding File Systems and Data Structures
A deeper understanding of file systems and data structures can aid in more effective photo recovery.
11.1. File Systems
File systems organize and manage data on storage devices. Common file systems include:
- FAT32: Used on older Windows systems and some memory cards.
- NTFS: The standard file system for modern Windows systems.
- exFAT: Commonly used on memory cards and USB drives due to its compatibility and large file size support.
- HFS+: Used on older macOS systems.
- APFS: The standard file system for modern macOS systems.
11.2. Data Structures
Understanding data structures helps in comprehending how data is stored and recovered. Key concepts include:
- File Headers: These contain metadata about the file, such as its type, size, and creation date.
- File Allocation Table (FAT): Used in FAT file systems to track the location of files on the storage device.
- Master File Table (MFT): Used in NTFS file systems to store information about files and directories.
12. Case Studies of Successful Photo Recovery
Examining real-world case studies can provide valuable insights into successful photo recovery strategies.
12.1. Recovering Wedding Photos from a Damaged SD Card
A professional photographer accidentally damaged an SD card containing wedding photos. Using specialized data recovery software and a professional data recovery service, they were able to recover nearly all of the photos, saving the client’s precious memories.
12.2. Restoring Family Photos from a Formatted Hard Drive
A family accidentally formatted their external hard drive containing years of family photos. By using a combination of data recovery software and careful file analysis, they were able to restore a significant portion of the lost photos.
13. dfphoto.net: Your Partner in Photography
At dfphoto.net, we are dedicated to helping you master the art of photography. Whether you’re looking for tips on preventing photo loss, guidance on choosing the right equipment, or inspiration for your next project, we’ve got you covered.
13.1. Explore Our Resources
Visit dfphoto.net to explore our extensive collection of articles, tutorials, and reviews. Learn about the latest photography techniques, discover inspiring works from renowned photographers, and stay up-to-date on industry news and trends.
13.2. Join Our Community
Connect with fellow photography enthusiasts in our vibrant online community. Share your work, ask questions, and get feedback from experienced photographers. Together, we can learn and grow as artists.
13.3. Enhance Your Skills
Take your photography skills to the next level with our online courses and workshops. Learn from expert instructors and gain hands-on experience in various photography genres, from portraiture to landscape to street photography.
At dfphoto.net, we’re committed to helping you capture and preserve your visual stories. Join us today and embark on a journey of creativity and discovery.
14. Frequently Asked Questions (FAQ)
14.1. How do you restore deleted photos from my iPhone?
To restore deleted photos from your iPhone, check the Recently Deleted album in the Photos app. If the photos are there, select them and tap “Recover.” If they are not in the Recently Deleted album, you may need to use data recovery software or check your iCloud backup.
14.2. Can permanently deleted photos be recovered?
Yes, permanently deleted photos can sometimes be recovered using data recovery software, especially if you act quickly and minimize the use of the storage device after deletion. The success of recovery depends on whether the space occupied by the deleted photos has been overwritten by new data.
14.3. What is the best photo recovery software?
The best photo recovery software depends on your specific needs and operating system. Recuva is a great free option for Windows, while EaseUS Data Recovery Wizard and Stellar Data Recovery are powerful tools for both Windows and Mac. Disk Drill is a Mac-specific tool known for its ease of use.
14.4. How long do deleted photos stay in the Recently Deleted album?
Deleted photos typically stay in the Recently Deleted album for 30 days on both iOS and Android devices. After 30 days, they are permanently deleted from the device.
14.5. How can I prevent future photo loss?
To prevent future photo loss, regularly back up your photos to multiple locations, such as an external hard drive and a cloud storage service. Also, be careful when deleting photos and use a reliable memory card.
14.6. Can I recover photos from a formatted memory card?
Yes, it is possible to recover photos from a formatted memory card using photo recovery software. The software scans the card for recoverable files, even after it has been formatted.
14.7. What should I do immediately after realizing I deleted a photo?
Immediately stop using the device where the photos were stored to prevent new data from overwriting the deleted files. Avoid saving any new photos or files to the device and power it off if possible.
14.8. Is it safe to use free photo recovery software?
While free photo recovery software can be helpful, it’s essential to choose reputable options with good reviews. Some free software may contain malware or not be as effective as paid options. Always download software from trusted sources.
14.9. Can I recover photos from a water-damaged phone?
Recovering photos from a water-damaged phone can be challenging. First, dry the phone thoroughly. Then, try connecting it to a computer and using photo recovery software. If that doesn’t work, consider using a professional data recovery service.
14.10. How do data recovery services work?
Data recovery services use specialized equipment and expertise to recover data from damaged storage devices. They may involve disassembling the device and analyzing it at a microscopic level to recover data.
15. Conclusion: Safeguarding Your Visual Stories
Losing precious photos can be a distressing experience. However, with the right knowledge and tools, you can often recover your lost memories. Remember to act quickly, use reputable recovery software, and, most importantly, implement preventative measures to safeguard your visual stories. At dfphoto.net, we’re here to support you on your photography journey, providing the resources and inspiration you need to capture and preserve your most cherished moments. For more in-depth guides, stunning photography showcases, and a vibrant community of fellow photographers, visit dfphoto.net today. Address: 1600 St Michael’s Dr, Santa Fe, NM 87505, United States. Phone: +1 (505) 471-6001. Website: dfphoto.net.