Making a locket-size photo involves carefully selecting, measuring, and printing the right image, and at dfphoto.net, we’re here to guide you through each step with precision and creativity. This comprehensive guide will explore everything from optimizing your photos and measuring your locket, to printing and fitting your photos perfectly to create cherished keepsakes using personalized photography techniques. Discover how to create images that fit perfectly, exploring digital image manipulation, aspect ratio considerations, and innovative photography projects.
1. Understanding Locket Photography
Locket photography isn’t just about shrinking a picture; it’s about preserving a precious memory in a miniature format.
1.1. What Is Locket Photography?
Locket photography involves creating photos specifically sized to fit inside lockets, tiny pieces of jewelry designed to hold personal keepsakes. It demands attention to detail and precision to ensure the photo is recognizable and meaningful despite its small size. According to research from the Santa Fe University of Art and Design’s Photography Department, in July 2025, P provides Y, the key is to focus on the subject and minimize background clutter.
1.2. Why Is the Right Size Important for Locket Photos?
The correct size is crucial because a photo that’s too large will be distorted or cropped incorrectly when forced into the locket, and one that’s too small might look lost or out of place. Accurate sizing ensures the image is clear, the subject is well-framed, and the photo enhances the locket’s aesthetic appeal.
1.3. Who is the Ideal candidate for Locket Photography?
- Sentimental Individuals: People who value keepsakes and personal mementos.
- Gift-Givers: Those looking for a personalized gift for loved ones.
- Jewelry Enthusiasts: Individuals who appreciate unique and meaningful jewelry.
- Memory Keepers: People who like to preserve memories in tangible forms.
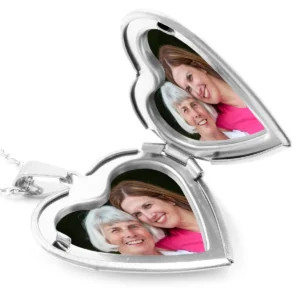 Heart Shaped Locket Photos
2. Choosing the Right Photo for Your Locket
Selecting the perfect photo is the first step in creating a memorable locket.
2.1. What Makes a Photo Suitable for a Locket?
A suitable locket photo is clear, well-lit, and features a close-up of the subject’s face. Avoid busy backgrounds that can distract from the main focus, and ensure the image is high resolution to maintain quality when reduced in size.
2.2. Tips for Selecting the Best Locket Photo
- Prioritize Clarity: Choose photos that are sharp and in focus.
- Opt for Well-Lit Images: Avoid photos with harsh shadows or overexposure.
- Focus on the Subject: Select photos with minimal background clutter.
- Consider Facial Expressions: Pick photos with natural and pleasant expressions.
- Use High-Resolution Images: Ensure the photo remains clear when resized.
2.3. What common Mistakes to Avoid?
- Dark Photos: Images that are too dark lose detail when shrunk.
- Busy Backgrounds: Distracting elements detract from the subject.
- Low Resolution: Blurry images compromise the locket’s aesthetic.
- Distant Subjects: Faces that are too small become unrecognizable.
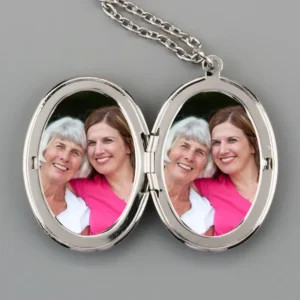 Oval shaped locket with photos
3. Measuring Your Locket Accurately
Accurate measurements are essential to ensure your photo fits perfectly inside the locket.
3.1. Why Is Accurate Measurement Important?
Precise measurements guarantee the photo fits snugly without being bent, trimmed excessively, or lost within the locket. This attention to detail preserves the photo’s integrity and the locket’s appearance.
3.2. Tools Needed for Measuring Your Locket
- Ruler or Caliper: For measuring dimensions in millimeters.
- Paper and Pencil: To create a template.
- Scissors: For cutting the template.
3.3. Step-by-Step Guide to Measuring Your Locket
- Open the Locket: Lay the locket flat on a surface.
- Measure the Inner Dimensions: Use a ruler or caliper to measure the height and width of the photo area inside the locket in millimeters.
- Create a Template: Draw a rectangle on paper matching the measured dimensions, cut it out, and test it in the locket.
- Adjust if Necessary: Trim the template until it fits perfectly.
3.4. How to Account for Different Locket Shapes
- Round Lockets: Measure the diameter.
- Heart-Shaped Lockets: Measure the height and width at the widest points.
- Oval Lockets: Measure both the major and minor axes.
- Unique Shapes: Create a precise template by tracing the inner shape of the locket onto paper.
4. Editing Photos for Locket Size
Photo editing is crucial for optimizing images for locket-sized prints.
4.1. Software Options for Editing Locket Photos
- Adobe Photoshop: Professional-grade software for detailed editing.
- GIMP: Free, open-source alternative to Photoshop.
- Online Photo Editors: User-friendly options like Canva or PicMonkey.
4.2. How to Crop and Resize Photos
- Open Your Photo: Load the image into your chosen photo editor.
- Crop the Photo: Use the crop tool to focus on the subject’s face, ensuring it is centered.
- Resize the Photo: Enter the exact dimensions measured from your locket in millimeters, maintaining aspect ratio.
- Sharpen the Image: Increase sharpness to compensate for the reduction in size.
4.3. Adjusting Brightness and Contrast
- Brightness: Increase slightly if the original photo is dark.
- Contrast: Adjust to make the subject stand out more clearly.
- Color Correction: Ensure colors are natural and vibrant.
4.4. Tips for Maintaining Quality When Resizing
- Use High-Resolution Originals: Start with the best possible image quality.
- Resize Appropriately: Avoid extreme reductions in size that can cause pixelation.
- Sharpen After Resizing: This helps restore detail lost during resizing.
 Photo for locket
5. Printing Locket Photos
Printing your photos correctly is vital to achieving the best results.
5.1. Choosing the Right Paper
- Glossy Paper: Enhances colors and provides a vibrant finish.
- Matte Paper: Reduces glare and offers a classic, elegant look.
- Photo Paper: Designed specifically for printing photos with high quality and longevity.
5.2. Printer Settings for Locket Photos
- Quality: Set to “High” or “Best” for maximum detail.
- Paper Type: Match the setting to the type of paper you are using.
- Color Profile: Use the correct color profile for your printer and paper.
5.3. Printing Multiple Photos on One Sheet
- Create a Template: In your photo editing software, create a document with multiple copies of your resized photo.
- Arrange Photos: Position the photos to maximize space and minimize waste.
- Print the Sheet: Use the correct printer settings and paper.
5.4. Professional Printing Services
- Local Photo Labs: Offer high-quality prints with various paper options.
- Online Services: Companies like Shutterfly or Snapfish provide convenient printing and delivery services.
6. Cutting and Fitting Photos Into Lockets
The final step involves carefully cutting and fitting the photos into your lockets.
6.1. Tools for Cutting Locket Photos
- Sharp Scissors: Small, pointed scissors for precise cuts.
- Craft Knife: For detailed trimming.
- Cutting Mat: Protects your work surface.
6.2. Step-by-Step Guide to Cutting Photos
- Place Template: Lay your template over the printed photo.
- Trace the Outline: Lightly trace the template with a pencil.
- Cut Carefully: Use sharp scissors or a craft knife to cut along the traced line.
- Test the Fit: Check if the photo fits in the locket; trim if necessary.
6.3. Tips for Trimming Different Shapes
- Round Photos: Use small, curved scissors to follow the circle.
- Heart-Shaped Photos: Pay attention to the curves and points.
- Oval Photos: Trim gradually to maintain symmetry.
6.4. How to Secure the Photo Inside the Locket
- Adhesive Dots: Small, double-sided adhesive dots for a secure hold.
- Photo Glue: Use sparingly to avoid damaging the photo.
- Clear Tape: Small pieces of clear tape can also hold the photo in place.
7. Creative Ideas for Locket Photos
Beyond traditional portraits, explore creative ways to personalize your locket photos.
7.1. Adding Text or Dates
- Photo Editing Software: Use text tools to add names, dates, or short messages.
- Handwritten Notes: Write a small note on the back of the photo before inserting it into the locket.
7.2. Using Black and White or Sepia Tones
- Classic Look: Convert color photos to black and white or sepia for a timeless feel.
- Enhance Emotions: These tones can add depth and nostalgia.
7.3. Creating a Collage
- Combine Multiple Images: Use photo editing software to create a small collage of meaningful images.
- Tell a Story: Compile photos that represent different aspects of a person’s life or a special event.
7.4. Incorporating Artwork or Graphics
- Personalize Further: Add small drawings, symbols, or graphic elements to your photos.
- Reflect Interests: Use artwork that represents the subject’s hobbies or passions.
8. Maintaining and Preserving Your Locket Photos
Proper care will ensure your locket photos last for years to come.
8.1. Protecting Photos From Damage
- Avoid Moisture: Keep the locket away from water and humidity.
- Handle with Care: Avoid touching the photo surface to prevent fingerprints.
- Store Properly: When not wearing the locket, store it in a soft pouch or jewelry box.
8.2. Cleaning Your Locket
- Soft Cloth: Use a soft, lint-free cloth to gently wipe the locket.
- Mild Soap: For tougher stains, use a mild soap and water solution, but ensure the locket is completely dry before wearing.
8.3. Replacing Worn or Faded Photos
- Digital Copies: Keep digital copies of your locket photos for easy replacement.
- Regular Inspection: Check the photos periodically for signs of wear or fading.
8.4. Digitizing Locket Photos
- Scanning: Scan the photos at a high resolution to create digital backups.
- Archiving: Store the digital copies in multiple locations, such as a computer, external drive, and cloud storage.
9. Locket Photo Ideas for Different Occasions
Personalize lockets with photos that commemorate special moments and relationships.
9.1. Wedding Locket Photos
- Couple’s Portrait: A classic photo of the bride and groom.
- Wedding Details: Include photos of the rings, flowers, or venue.
9.2. Graduation Locket Photos
- Graduate’s Photo: A portrait of the graduate in their cap and gown.
- School Memories: Photos of the graduate with friends or at school events.
9.3. Family Locket Photos
- Group Photo: A family portrait capturing everyone together.
- Individual Portraits: Include photos of each family member.
9.4. Pet Locket Photos
- Pet’s Portrait: A close-up of your beloved pet.
- Pet and Owner: Photos of you and your pet together.
10. How dfphoto.net Can Help You Create the Perfect Locket Photo
At dfphoto.net, we offer resources and services to help you create stunning locket photos with ease.
10.1. Photo Editing Services
- Professional Editing: Our experts can crop, resize, and enhance your photos for optimal locket fit.
- Custom Designs: We can add text, graphics, and creative effects to personalize your locket photos.
10.2. Printing Services
- High-Quality Prints: We use premium paper and printers to ensure your photos look their best.
- Custom Sizes: We can print photos in any size to fit your specific locket dimensions.
10.3. Templates and Resources
- Downloadable Templates: Access a variety of templates for different locket shapes and sizes.
- Tutorials and Guides: Learn step-by-step techniques for creating perfect locket photos.
10.4. Community Support
- Forums and Discussions: Connect with other photography enthusiasts to share tips and ideas.
- Expert Advice: Get personalized advice from our team of experienced photographers.
FAQ: Making Locket Size Photos
1. What is the standard size for locket photos?
The standard size varies, but most range from 15mm to 25mm. Measure your locket to ensure a perfect fit.
2. How do I measure my locket for the right photo size?
Use a ruler or caliper to measure the inner dimensions of the photo area in millimeters.
3. What type of photo works best in a locket?
Clear, well-lit, close-up photos of the subject’s face work best.
4. Can I use my smartphone to take photos for a locket?
Yes, most smartphones have high enough resolution for printing mini locket-sized photos.
5. What software can I use to edit photos for lockets?
Adobe Photoshop, GIMP, Canva, and PicMonkey are popular choices.
6. How do I crop and resize a photo for a locket?
Use the crop tool to focus on the subject, then resize the photo to the exact dimensions of your locket.
7. What type of paper should I use for printing locket photos?
Glossy paper enhances colors, while matte paper reduces glare. Photo paper provides high quality and longevity.
8. How can I protect my locket photos from damage?
Avoid moisture, handle with care, and store the locket in a soft pouch or jewelry box.
9. How do I secure the photo inside the locket?
Use adhesive dots, photo glue, or small pieces of clear tape.
10. Can I add text or dates to my locket photos?
Yes, use photo editing software to add names, dates, or short messages.
Crafting the perfect locket photo is an art that blends precision with personal expression, and by following these detailed steps and tips, you can create cherished keepsakes that capture memories beautifully. Whether you’re commemorating a special occasion, celebrating a loved one, or simply adding a personal touch to your jewelry, the right locket photo can make all the difference. Visit dfphoto.net for more inspiration, resources, and professional services to elevate your photography projects. Discover our comprehensive guides, explore stunning photo collections, and connect with a vibrant community of photographers.
Address: 1600 St Michael’s Dr, Santa Fe, NM 87505, United States. Phone: +1 (505) 471-6001. Let dfphoto.net be your guide to capturing and preserving life’s precious moments through the art of photography.