Printing a 2×2 passport photo can seem daunting, but dfphoto.net offers simple solutions to help you achieve perfect results for your important documents, combining photographic artistry with practical guidance. With the right tools and techniques, you can easily create compliant passport photos at home or through affordable printing services, and we are here to explore the easy methods of printing. This article will explore in detail printing processes, compliance tips, and cost-effective solutions, and remember to explore dfphoto.net for visual inspiration and resources to enhance your photographic journey with photo prints, image dimensions, and digital photography.
1. What Is The Correct Size For A Passport Photo And Why Is It Important?
The correct size for a passport photo is 2×2 inches (51×51 mm), and it is crucial because passport agencies worldwide adhere to strict guidelines to ensure accurate identification. According to research from the Santa Fe University of Art and Design’s Photography Department, in July 2025, precise image dimensions are essential for automated facial recognition systems to function effectively. Non-compliant photos can lead to application delays or rejection.
1.1 What Are The Key Requirements For A Passport Photo?
Key requirements include:
- Size: 2×2 inches (51×51 mm).
- Background: Plain white or off-white.
- Head Size: Head must be between 1 inch and 1 3/8 inches (25 mm – 35 mm) from the bottom of the chin to the top of the head.
- Expression: Neutral expression, with both eyes open.
- Attire: Everyday attire; no uniforms or hats (unless for religious reasons).
- Glasses: Generally not allowed, unless medically necessary with supporting documentation.
- Quality: Clear, in focus, and without shadows or glare.
1.2 How Do I Ensure My Photo Meets These Requirements?
To ensure compliance:
- Use a Template: Use online tools or software that provide a template to properly crop your photo to the correct dimensions.
- Check the Background: Make sure the background is plain white or off-white and free of patterns or shadows.
- Proper Lighting: Use even lighting to avoid shadows on your face or background.
- Neutral Expression: Practice a neutral expression in front of a mirror to avoid smiling or frowning.
- Review Guidelines: Review the official passport photo guidelines from your country’s passport agency to ensure every requirement is met.
1.3 What Happens If My Passport Photo Is The Wrong Size?
If your passport photo is the wrong size, your application may be rejected. The automated systems used by passport agencies rely on precise dimensions to properly process and verify the images. Submitting a photo that does not meet the size requirements can cause delays or necessitate resubmission with a compliant photo.
2. How Can I Take A Passport Photo At Home?
Taking a passport photo at home is convenient and cost-effective, especially if you follow a few essential steps. By using a digital camera or smartphone, ensuring proper lighting and background, and utilizing online tools, you can create a compliant passport photo without leaving your house.
2.1 What Equipment Do I Need?
Essential equipment includes:
- Digital Camera or Smartphone: A camera with at least 8 megapixels for clear images.
- Tripod (Optional): To keep the camera steady and avoid blurry photos.
- White Background: A plain white wall or a large sheet of white paper or fabric.
- Good Lighting: Natural light or soft, diffused artificial light.
- Measuring Tape or Ruler: To ensure correct head size and photo dimensions.
- Photo Editing Software or Online Tool: To crop and resize the photo.
2.2 What Are The Best Practices For Setting Up The Shot?
Best practices include:
- Positioning: Stand or sit about 4 feet away from the white background to avoid shadows.
- Lighting: Position yourself facing the light source to evenly illuminate your face. Avoid direct sunlight, which can cause harsh shadows.
- Camera Height: Place the camera at eye level to capture a natural perspective.
- Frame Composition: Ensure your head and shoulders are fully visible in the frame, with the top of your head and upper shoulders included.
- Avoid Shadows: Check for shadows on your face and background, adjusting your position or lighting as necessary.
2.3 How Should I Pose For The Photo?
Proper posing involves:
- Neutral Expression: Maintain a neutral expression with your mouth closed and eyes open.
- Looking Directly At The Camera: Look straight into the lens without tilting your head.
- Natural Posture: Keep your shoulders relaxed and avoid slouching.
- Glasses: If you must wear glasses, ensure there is no glare on the lenses and the frames do not obscure your eyes.
- Hair: Keep hair away from your face so that your hairline and ears are visible.
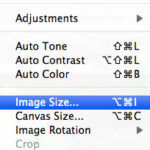
2.4 How Can I Edit My Photo To Meet Passport Requirements?
To edit your photo:
- Crop To 2×2 Inches: Use photo editing software or an online tool to crop your photo to the exact 2×2 inch dimensions.
- Adjust Head Size: Ensure your head size meets the required measurements, typically 1 inch to 1 3/8 inches from the bottom of your chin to the top of your head.
- Correct Background: If necessary, use editing tools to ensure the background is uniformly white or off-white.
- Adjust Brightness and Contrast: Adjust the brightness and contrast to ensure the photo is well-lit and clear without being overexposed or underexposed.
- Remove Shadows: Use shadow removal tools to eliminate any unwanted shadows on your face or background.
- Check Resolution: Ensure the photo has a high enough resolution (at least 300 DPI) to avoid pixelation when printed.
2.5 What Online Tools Can Help Me Create A Passport Photo?
Several online tools can assist in creating a passport photo:
- Passport Photo Online: This tool automatically crops, resizes, and checks your photo against official requirements.
- PersoFoto: Offers templates and guidelines for various countries to ensure compliance.
- IDPhotoDIY: Allows you to upload a photo and adjust it to meet specific passport requirements.
- Travel Visa Photo: Provides editing tools and compliance checks for passport and visa photos.
- epassportphoto.com: Offers a simple interface for cropping and resizing your photo, as well as background removal.
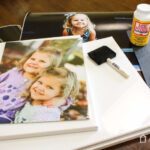
3. Where Can I Print My Passport Photo?
Once you have a digital passport photo, you can print it at various locations, each offering different levels of convenience, cost, and quality. Understanding your options ensures you get a compliant and satisfactory print for your passport application.
3.1 Can I Print Passport Photos At Home?
Yes, printing passport photos at home is possible if you have the right equipment and follow the necessary steps.
- What Kind Of Printer Do I Need?: A color inkjet or laser printer with photo-quality settings is ideal. Canon and HP printers are often recommended for their photo printing capabilities. According to Popular Photography Magazine, high-quality printers like the Canon Pixma series produce excellent results with accurate colors and sharp details.
- What Kind Of Paper Do I Need?: Use glossy or semi-glossy photo paper designed for inkjet or laser printers. The paper should be heavyweight (around 200-250 gsm) to ensure durability and a professional look.
- How Do I Format My Photo For Printing?:
- Create a 4×6 inch Template: Use photo editing software (e.g., Adobe Photoshop, GIMP) to create a new image file with dimensions of 4×6 inches and a resolution of 300 DPI.
- Import and Arrange Photos: Import your 2×2 inch passport photo into the 4×6 inch template. Arrange multiple copies of the photo to maximize the use of the paper. You can typically fit six 2×2 photos on a 4×6 print.
- Save the File: Save the file as a high-quality JPEG or TIFF to preserve details.
- What Printer Settings Should I Use?:
- Paper Type: Select “Photo Paper” or the specific type of photo paper you are using in the printer settings.
- Print Quality: Choose the highest quality setting for the best results.
- Color Settings: Set the color mode to “sRGB” for accurate color reproduction.
- Borderless Printing: If your printer supports it, select borderless printing to avoid white edges around the photo.
- Are There Any Special Considerations For Home Printing?:
- Color Calibration: Calibrate your printer to ensure accurate color reproduction.
- Test Prints: Perform test prints on plain paper to check the layout and alignment before printing on photo paper.
- Ink Levels: Ensure your printer has sufficient ink to avoid banding or color issues.
3.2 What Are The Benefits Of Printing At Home?
- Convenience: Print photos on your schedule without leaving home.
- Cost-Effective: Save money in the long run if you frequently need passport photos.
- Control: Adjust and reprint as needed to achieve the perfect result.
3.3 What Are The Disadvantages Of Printing At Home?
- Initial Investment: Requires a good quality printer and photo paper.
- Quality Variability: Print quality may not match professional services if the printer is not properly calibrated.
- Time and Effort: Requires time to set up, format, and print the photos.
3.4 Which Retailers Offer Passport Photo Printing Services?
Many retailers offer passport photo printing services, providing a convenient and reliable option for obtaining compliant photos.
- CVS: CVS offers passport photo services at most of its pharmacy locations. You can have your photo taken in-store or upload a digital photo for printing. According to CVS Photo, their service ensures compliance with passport requirements and provides two printed photos.
- Walgreens: Walgreens provides passport photo services similar to CVS. You can visit a store to have your photo taken or upload a digital image online. Walgreens Photo guarantees that their photos meet official passport standards.
- Walmart: Walmart offers passport photo services at its photo centers. You can have your photo taken by a staff member or print a digital photo. Walmart’s service is generally affordable and convenient.
- Target: Target partners with CVS and Walgreens, allowing you to use their passport photo services through the Target Photo Center. This provides another accessible option for obtaining passport photos.
- UPS Store: Some UPS Stores offer passport photo services. This can be a convenient option if you need to ship your passport application and want to get the photo done at the same location.
- FedEx Office: Similar to the UPS Store, FedEx Office locations may provide passport photo services. Check with your local store to confirm availability.
3.5 What Are The Pros Of Using Retailers?
- Convenience: Easily accessible with many locations and extended hours.
- Professional Quality: Ensures compliance with passport photo requirements.
- No Equipment Required: No need to own a printer or photo paper.
3.6 What Are The Cons Of Using Retailers?
- Cost: More expensive than printing at home.
- Less Control: Limited ability to adjust and reprint the photos.
- Inconvenience: Requires a trip to the store and potential waiting times.
3.7 Are There Any Online Printing Services That Specialize In Passport Photos?
Yes, several online printing services specialize in passport photos, offering a convenient way to get compliant prints delivered to your door.
- Passport Photo Online:
- Service Overview: Passport Photo Online allows you to upload a photo and receive professionally printed passport photos in the mail. They guarantee compliance with official passport requirements.
- Pros: Ensures compliance, convenient delivery, and professional quality.
- Cons: Higher cost than printing at home, longer turnaround time.
- PersoFoto:
- Service Overview: PersoFoto provides online passport photo editing and printing services. They offer templates for various countries and guarantee compliance.
- Pros: Compliance guarantee, various country templates, convenient online service.
- Cons: Higher cost, requires uploading a photo.
- PhotoAiD:
- Service Overview: PhotoAiD uses AI technology to verify that your photo meets passport requirements. They offer both digital and printed passport photos.
- Pros: AI verification, convenient service, compliance guarantee.
- Cons: Higher cost, requires uploading a photo.
- Printique:
- Service Overview: Printique (formerly AdoramaPix) offers high-quality photo printing services, including passport photos. They use professional-grade printers and paper.
- Pros: High-quality prints, professional service.
- Cons: Higher cost, requires more time for delivery.
3.8 What Are The Pros Of Using Online Services?
- Convenience: Upload your photo and receive prints by mail.
- Compliance Guarantee: Ensures your photo meets passport requirements.
- Professional Quality: High-quality prints using professional equipment.
3.9 What Are The Cons Of Using Online Services?
- Cost: More expensive than printing at home or at retail stores.
- Turnaround Time: Requires waiting for the prints to be delivered.
- Less Control: Limited ability to make immediate adjustments.
4. How Much Does It Cost To Print A Passport Photo?
The cost of printing a passport photo varies depending on the method you choose: printing at home, using retail services, or opting for online printing services. Understanding the costs associated with each option can help you make an informed decision based on your budget and convenience preferences.
4.1 What Are The Costs Associated With Printing At Home?
- Printer:
- Initial Investment: $80 – $300 for a photo-quality inkjet or laser printer.
- Considerations: A dedicated photo printer provides better quality but adds to the initial cost.
- Photo Paper:
- Cost: $10 – $20 for a pack of 50-100 sheets of glossy or semi-glossy photo paper.
- Considerations: Using high-quality photo paper ensures better print results and durability.
- Ink Cartridges:
- Cost: $20 – $50 per ink cartridge (black and color).
- Considerations: Ink costs can add up, especially if you print frequently. High-yield cartridges can be more cost-effective.
- Electricity:
- Cost: Minimal, but contributes to overall expenses.
- Considerations: Energy-efficient printers can help reduce electricity costs.
- Software (Optional):
- Cost: $0 – $100+ for photo editing software (e.g., Adobe Photoshop, GIMP).
- Considerations: Free software like GIMP can perform basic editing tasks, while professional software offers more advanced features.
- Total Estimated Cost:
- Initial Setup: $110 – $450 (including printer, paper, and ink).
- Per Print: $0.20 – $0.50 (including paper and ink).
4.2 What Are The Costs At Retail Stores Like CVS Or Walgreens?
- CVS:
- Cost: Approximately $15 – $20 for two passport photos.
- Service: Includes photo taking and printing.
- Walgreens:
- Cost: Approximately $15 – $20 for two passport photos.
- Service: Similar to CVS, includes photo taking and printing.
- Walmart:
- Cost: Approximately $7 – $10 for two passport photos.
- Service: Generally more affordable, includes photo taking and printing.
- Target:
- Cost: Approximately $15 – $20 (via CVS or Walgreens partnership).
- Service: Utilizes CVS or Walgreens services within the Target store.
- UPS Store:
- Cost: Varies, typically $10 – $20 for two passport photos.
- Service: Offers photo taking and printing services.
- FedEx Office:
- Cost: Varies, similar to UPS Store.
- Service: Offers photo taking and printing services.
4.3 How Do Online Passport Photo Services Compare In Price?
- Passport Photo Online:
- Cost: Approximately $20 – $30 for printed photos (including shipping).
- Service: Includes compliance check, editing, and delivery.
- PersoFoto:
- Cost: Approximately $15 – $25 for printed photos (including shipping).
- Service: Offers templates and compliance checks, with delivery.
- PhotoAiD:
- Cost: Approximately $15 – $25 for printed photos (including shipping).
- Service: Uses AI to verify compliance, offers editing and delivery.
- Printique:
- Cost: Approximately $10 – $20 for a 4×6 print with multiple passport photos.
- Service: High-quality prints, but requires formatting and uploading a correctly sized image.
4.4 What Are The Most Cost-Effective Options?
- Printing at Walmart: Offers the most affordable in-store option.
- Printing at Home (Long-Term): If you frequently need passport photos, investing in a printer and supplies can be cost-effective over time.
- Online Services (If Compliance is a Concern): If you want to ensure compliance and convenience, online services like PersoFoto or PhotoAiD offer a good balance of cost and service.
5. Are There Any Common Mistakes To Avoid When Printing Passport Photos?
Printing passport photos can be straightforward, but avoiding common mistakes is crucial to ensure your photo meets all official requirements. These mistakes often lead to application delays or rejection.
5.1 What Are The Common Mistakes Related To Photo Quality?
- Blurry or Out-Of-Focus Photos: Ensure the photo is sharp and clear. Use a tripod if necessary to stabilize the camera.
- Poor Lighting: Avoid harsh shadows or overexposure. Use soft, diffused lighting for even illumination.
- Incorrect Color: Colors should be accurate and natural. Avoid photos that are too warm, too cool, or tinted.
- Low Resolution: Use a high-resolution camera setting (at least 300 DPI) to avoid pixelation.
- Glare on Glasses: If wearing glasses, ensure there is no glare on the lenses. Remove glasses if possible, or adjust lighting to eliminate glare.
5.2 What Are The Common Mistakes Related To Size And Dimensions?
- Incorrect Size: The photo must be 2×2 inches (51×51 mm). Use a template or editing tool to crop the photo accurately.
- Incorrect Head Size: The head must be between 1 inch and 1 3/8 inches from the bottom of the chin to the top of the head. Measure and adjust the head size using editing software.
- Not Centered: Ensure the head is centered in the frame, with equal space on both sides.
- Incorrect Template: If printing at home, ensure the template is correctly sized and aligned on the 4×6 inch photo paper.
5.3 What Are The Common Mistakes Related To Pose And Expression?
- Smiling or Frowning: Maintain a neutral expression with your mouth closed and eyes open.
- Tilting Head: Keep your head straight and avoid tilting it to the side.
- Looking Away From The Camera: Look directly at the lens without turning your head or eyes.
- Obstructed Face: Ensure hair, hats, or other objects do not cover your face or obscure your features.
- Wearing Uniforms or Non-Permitted Items: Wear everyday attire. Avoid uniforms, hats, and sunglasses (unless medically necessary).
5.4 What Are The Common Mistakes Related To Background?
- Incorrect Background Color: The background must be plain white or off-white.
- Shadows on Background: Ensure there are no shadows on the background behind you.
- Patterns or Textures: The background should be free of patterns, textures, or distracting elements.
- Uneven Lighting: Ensure the background is evenly lit to avoid dark or bright spots.
5.5 What Are The Common Mistakes Related To Printing?
- Using Incorrect Paper: Use glossy or semi-glossy photo paper. Avoid matte paper, which can produce poor-quality results.
- Incorrect Printer Settings: Ensure the printer settings are set to “Photo Paper” and “High Quality.”
- Low Ink Levels: Check ink levels to avoid banding or color issues.
- Cutting Errors: Use a precise cutting tool to cut the photos to the correct 2×2 inch size.
- Not Checking Compliance: Before submitting, double-check that the printed photo meets all official passport photo requirements.
An illustration depicting how the head should be aligned and measured in a passport photo, ensuring it meets official size requirements.
6. How Can I Ensure My Printed Passport Photo Is Accepted?
Ensuring your printed passport photo is accepted involves careful attention to detail and adherence to official guidelines.
6.1 What Are The Official Guidelines For Passport Photos?
- U.S. Department of State Guidelines:
- Size: 2×2 inches (51×51 mm).
- Head Size: Head must be between 1 inch and 1 3/8 inches (25 mm – 35 mm) from the bottom of the chin to the top of the head.
- Background: Plain white or off-white.
- Expression: Neutral expression, with both eyes open.
- Attire: Everyday attire; no uniforms.
- Glasses: Generally not allowed.
- Quality: Clear, in focus, and without shadows or glare.
- International Civil Aviation Organization (ICAO) Standards:
- Size: Varies by country, but generally 35×45 mm to 50×70 mm.
- Head Size: Head height should be 70-80% of the photo’s vertical dimension.
- Background: Light and uniform.
- Expression: Neutral expression.
- Glasses: Allowed only if medically necessary.
- Quality: High resolution and printed on photo-quality paper.
6.2 How Can I Verify My Photo Meets These Guidelines?
- Use a Checklist: Create a checklist based on the official guidelines to ensure all requirements are met.
- Use Online Verification Tools: Utilize online tools like Passport Photo Online or PhotoAiD, which automatically check your photo against official requirements.
- Get a Second Opinion: Ask a friend or family member to review your photo and provide feedback.
- Consult a Professional: If unsure, visit a professional photo service at CVS, Walgreens, or a local photo studio.
6.3 What Should I Do If My Photo Is Rejected?
- Understand the Reason: Review the rejection notice to understand why the photo was rejected.
- Correct the Issues: Address the specific issues identified in the rejection notice. This may involve taking a new photo or editing the existing one.
- Retake the Photo: If necessary, retake the photo, paying close attention to lighting, background, pose, and expression.
- Verify Compliance: Before resubmitting, verify that the new photo meets all official guidelines.
- Resubmit the Application: Resubmit the application with the corrected photo.
7. Are There Any Apps That Can Help Me Print A 2×2 Passport Photo?
Yes, numerous mobile apps are designed to help you create and print 2×2 passport photos directly from your smartphone or tablet. These apps offer features such as cropping, resizing, background removal, and compliance checks to ensure your photo meets official requirements.
7.1 What Are The Best Apps For Creating Passport Photos?
- Passport Photo Online:
- Overview: Passport Photo Online is a popular app available for both iOS and Android. It offers a comprehensive set of tools to create compliant passport photos, including automatic background removal, cropping, and resizing. The app also provides real-time feedback to ensure your photo meets official standards.
- Key Features:
- Automatic background removal.
- AI-powered compliance check.
- Cropping and resizing tools.
- Print-ready templates.
- Pros: User-friendly interface, accurate compliance checks, and convenient printing options.
- Cons: Subscription required for full access.
- ID Photo-Passport Photo:
- Overview: ID Photo-Passport Photo is another highly-rated app available for iOS and Android. It offers a wide range of templates for various countries and ID types, including passport photos. The app includes tools for adjusting brightness, contrast, and color to ensure optimal photo quality.
- Key Features:
- Extensive template library.
- Brightness and contrast adjustments.
- Print layout options.
- Compliance guide.
- Pros: Versatile templates, easy-to-use editing tools, and helpful compliance guide.
- Cons: Ads in the free version.
- EPassport Photo:
- Overview: EPassport Photo is a straightforward app designed to simplify the passport photo creation process. Available for iOS and Android, it offers a simple interface with basic editing tools to crop, resize, and adjust your photo. The app also includes a built-in compliance checker to verify that your photo meets official requirements.
- Key Features:
- Simple interface.
- Basic editing tools.
- Compliance checker.
- Print-ready templates.
- Pros: Easy to use, quick photo creation, and reliable compliance checks.
- Cons: Limited advanced editing features.
- Passport Booth:
- Overview: Passport Booth is a user-friendly app specifically designed for creating passport photos. Available for iOS, it offers a range of features, including face detection, automatic cropping, and background removal. The app also provides tips and guidelines to help you take the perfect passport photo.
- Key Features:
- Face detection.
- Automatic cropping.
- Background removal.
- Compliance tips.
- Pros: Easy to use, helpful tips, and automatic features.
- Cons: Only available for iOS.
7.2 How Do These Apps Simplify The Printing Process?
- Automated Cropping and Resizing: The apps automatically crop and resize your photo to meet the 2×2 inch dimensions required for passport photos.
- Background Removal: Many apps offer background removal tools to ensure the background is plain white or off-white, as required by official guidelines.
- Compliance Checks: The apps include built-in compliance checkers that verify your photo meets all official requirements, reducing the risk of rejection.
- Print-Ready Templates: The apps provide print-ready templates that allow you to easily print multiple passport photos on a single 4×6 inch photo paper.
- Direct Printing Options: Some apps offer direct printing options, allowing you to print your passport photos directly from your smartphone or tablet using a wireless printer.
7.3 Are These Apps Accurate?
The accuracy of these apps can vary, but most of the top-rated apps use advanced algorithms and compliance checks to ensure your photo meets official requirements. However, it is always a good idea to double-check the results and compare them against the official guidelines to ensure compliance.
8. What Are The Rules About Glasses, Head Coverings, And Jewelry In Passport Photos?
Understanding the specific rules about glasses, head coverings, and jewelry in passport photos is essential for ensuring compliance. These rules are designed to maintain clarity and avoid obstructions that could hinder facial recognition.
8.1 Are Glasses Allowed In Passport Photos?
Generally, glasses are not allowed in passport photos. The U.S. Department of State and most international passport agencies prohibit glasses to avoid issues such as glare, reflections, and frames obstructing the eyes.
- Medical Exceptions: In rare cases, glasses may be allowed if there is a medical reason that prevents the applicant from removing them. A signed statement from a medical professional must be provided to support the necessity of wearing glasses.
- Contact Lenses: Contact lenses are generally acceptable, provided they do not alter the applicant’s appearance.
8.2 What Are The Rules Regarding Head Coverings?
Head coverings are generally prohibited in passport photos unless they are worn daily for religious reasons.
- Religious Head Coverings: If a head covering is worn for religious reasons, it must not obscure the face. The hairline, forehead, and entire face must be clearly visible. The head covering should be plain and not cast shadows on the face.
- Medical Head Coverings: Similar to glasses, head coverings worn for medical reasons may be permitted with a signed statement from a medical professional. The covering must not obscure any facial features.
- Non-Religious Head Coverings: Hats, scarves, and other non-religious head coverings are not allowed.
8.3 Can I Wear Jewelry In My Passport Photo?
Jewelry is generally allowed in passport photos, provided it does not obscure any part of the face or cause reflections.
- Minimal Jewelry: Small earrings and necklaces are typically acceptable.
- Large or Distracting Jewelry: Large or distracting jewelry that covers facial features or causes significant reflections should be avoided.
- Facial Piercings: Facial piercings are generally allowed as long as they do not distort the applicant’s appearance or cause reflections.
8.4 What Happens If I Violate These Rules?
If you violate the rules regarding glasses, head coverings, or jewelry, your passport photo may be rejected. It is essential to follow the guidelines carefully to ensure your photo is accepted.
9. How Do Different Countries Vary In Their Passport Photo Requirements?
Passport photo requirements can vary significantly from country to country. While some standards are universally accepted, others are specific to the issuing country.
9.1 What Are Some Common Differences In Size Requirements?
- United States: The standard size is 2×2 inches (51×51 mm).
- United Kingdom: The required size is 35×45 mm.
- Canada: Photos must be 50×70 mm, with specific requirements for head size and positioning.
- European Union: Most EU countries require a photo size of 35×45 mm.
9.2 Are There Differences In Background Color Requirements?
- United States: Requires a plain white or off-white background.
- United Kingdom: Requires a light grey or cream background.
- Canada: Requires a plain white background.
- European Union: Generally requires a light, uniform background, often white or light grey.
9.3 How Do Expression And Attire Rules Differ?
- United States: Requires a neutral expression with both eyes open. Everyday attire is acceptable, but uniforms are prohibited.
- United Kingdom: Requires a neutral expression with the mouth closed. Everyday attire is acceptable.
- Canada: Requires a neutral expression. Prescription glasses are generally not allowed.
- European Union: Requires a neutral expression. The face must be fully visible, and head coverings are generally not allowed unless for religious reasons.
9.4 Where Can I Find Specific Requirements For Different Countries?
- Official Government Websites: Check the official websites of the passport issuing authority in each country.
- Embassies and Consulates: Consult the websites of embassies and consulates for detailed information on passport photo requirements.
- Online Resources: Use online resources like Passport Photo Online or IDPhotoDIY, which provide templates and guidelines for various countries.
A sample U.S. Department of State passport photo showing proper attire, size, and position.
10. What Are The Best Tips For Taking Professional-Looking Passport Photos?
Taking professional-looking passport photos involves attention to detail and adherence to best practices. These tips can help you achieve high-quality results, whether you are taking the photos at home or using a professional service.
10.1 How Do I Optimize Lighting For Passport Photos?
- Use Natural Light: Natural light is often the best option for passport photos. Position the subject near a window, but avoid direct sunlight, which can cause harsh shadows.
- Avoid Shadows: Ensure the face is evenly lit, with no shadows on the face or background.
- Use Diffused Lighting: If using artificial light, use softboxes or diffusers to soften the light and reduce harsh shadows.
- Position Lights Correctly: Place lights at a 45-degree angle to the subject to provide even illumination.
- Check for Glare: Avoid glare on glasses or reflective surfaces.
10.2 What Are The Best Camera Settings To Use?
- High Resolution: Use a high-resolution setting (at least 300 DPI) to ensure the photo is clear and detailed.
- White Balance: Set the white balance to match the lighting conditions (e.g., daylight, fluorescent, or incandescent).
- ISO: Use a low ISO setting to minimize noise and graininess.
- Aperture: Use a medium aperture (e.g., f/5.6 to f/8) to ensure the entire face is in focus.
- Shutter Speed: Adjust the shutter speed to achieve proper exposure. Use a tripod to avoid blurry photos at slower shutter speeds.
10.3 How Should I Frame The Shot?
- Follow Guidelines: Adhere to the specific guidelines for head size and positioning.
- Center the Face: Ensure the face is centered in the frame, with equal space on both sides.
- Include Head and Shoulders: Include the head and upper shoulders in the frame, as required by official guidelines.
- Avoid Cropping: Avoid cropping the head or shoulders.
10.4 How Can I Ensure a Neutral Expression?
- Relax the Face: Ask the subject to relax their face and jaw muscles.
- Look Directly at the Camera: Ensure the subject looks directly at the lens without tilting their head.
- Practice: Practice a neutral expression in front of a mirror before taking the photo.
- Avoid Smiling or Frowning: Maintain a neutral expression with the mouth closed and eyes open.
10.5 What Post-Processing Steps Are Important?
- Crop to Correct Size: Crop the photo to the exact 2×2 inch dimensions using photo editing software.
- Adjust Head Size: Ensure the head size meets the required measurements.
- Correct Background: Ensure the background is plain white or off-white.
- Adjust Brightness and Contrast: Adjust the brightness and contrast to ensure the photo is well-lit and clear.
- Remove Blemishes: Use blemish removal tools to eliminate any distractions on the face.
- Sharpen the Image: Sharpen the image slightly to enhance details.
- Check Resolution: Ensure the photo has a high enough resolution (at least 300 DPI) to avoid pixelation when printed.
We at df