AirDrop is a fantastic feature that allows you to quickly and easily share photos, videos, documents, and more between Apple devices. At dfphoto.net, we are dedicated to helping you master the art of visual storytelling, and AirDrop is a vital tool in your photographic workflow. By understanding how to use AirDrop effectively, you can enhance your creative process. Explore advanced photography tips, editing techniques, and creative inspiration. Discover the power of seamless file sharing and elevate your photography skills with us!
1. What is AirDrop and Why Use It for Photo Sharing?
AirDrop is Apple’s proprietary ad-hoc service in macOS and iOS operating systems, enabling the transfer of files among supported Macintosh computers and iOS devices over Wi-Fi and Bluetooth. AirDrop creates a peer-to-peer Wi-Fi connection between devices, allowing you to transfer files wirelessly without email or a USB drive.
Here’s why it’s great for photographers:
- Speed: AirDrop is faster than emailing or using cloud services, especially for large image files.
- Quality: It transfers files without compressing them, maintaining the original image quality.
- Convenience: It’s built into Apple devices, making it simple to use.
- Privacy: Transfers are encrypted and direct, so your photos remain private.
2. What Apple Devices Support AirDrop?
AirDrop is supported on a wide range of Apple devices, making it a versatile tool for photographers and creatives. Here’s a list of compatible devices:
- iPhone: iPhone 5 or later
- iPad: iPad (4th generation) or later, iPad mini (all models), iPad Air (all models), iPad Pro (all models)
- iPod Touch: iPod Touch (5th generation) or later
- Mac: MacBook (Late 2008 Aluminum Unibody) or later, MacBook Air (Late 2010) or later, MacBook Pro (Late 2008) or later, Mac mini (Mid 2010) or later, iMac (Late 2009) or later, Mac Pro (Mid 2010) or later
To use AirDrop between a Mac and an iPhone or iPad, ensure your Mac is running OS X Yosemite or later.
3. How Do I Prepare My Devices for AirDrop?
Before you start using AirDrop, here are the essential steps to prepare your devices for seamless photo sharing:
-
Enable Wi-Fi and Bluetooth:
- iPhone/iPad: Go to Settings > Wi-Fi and turn Wi-Fi on. Then, go to Settings > Bluetooth and turn Bluetooth on.
- Mac: Click the Wi-Fi and Bluetooth icons in the menu bar to turn them on.
-
Disable Personal Hotspot:
- If you have Personal Hotspot enabled, turn it off. Go to Settings > Personal Hotspot and toggle it off.
-
Adjust AirDrop Settings:
- Go to Settings > General > AirDrop on your iPhone or iPad.
- Choose who can see your device:
- Receiving Off: You won’t receive AirDrop requests.
- Contacts Only: Only people in your contacts can see your device.
- Everyone: Any nearby Apple device can see your device.
4. Step-by-Step: How to AirDrop Photos from iPhone/iPad
Sharing photos via AirDrop is a straightforward process. Follow these steps to send your favorite shots quickly:
-
Open the Photos App:
- Launch the Photos app on your iPhone or iPad.
-
Select Photos:
- Tap Select in the upper-right corner.
- Choose the photos you want to share by tapping on them.
-
Tap the Share Button:
- Look for the Share button (it’s a square with an arrow pointing upwards) in the bottom-left corner.
-
Tap the AirDrop Icon:
- In the share sheet, find and tap the AirDrop icon.
-
Select the Recipient:
- A list of nearby AirDrop users will appear. Tap the name or icon of the person you want to send the photos to.
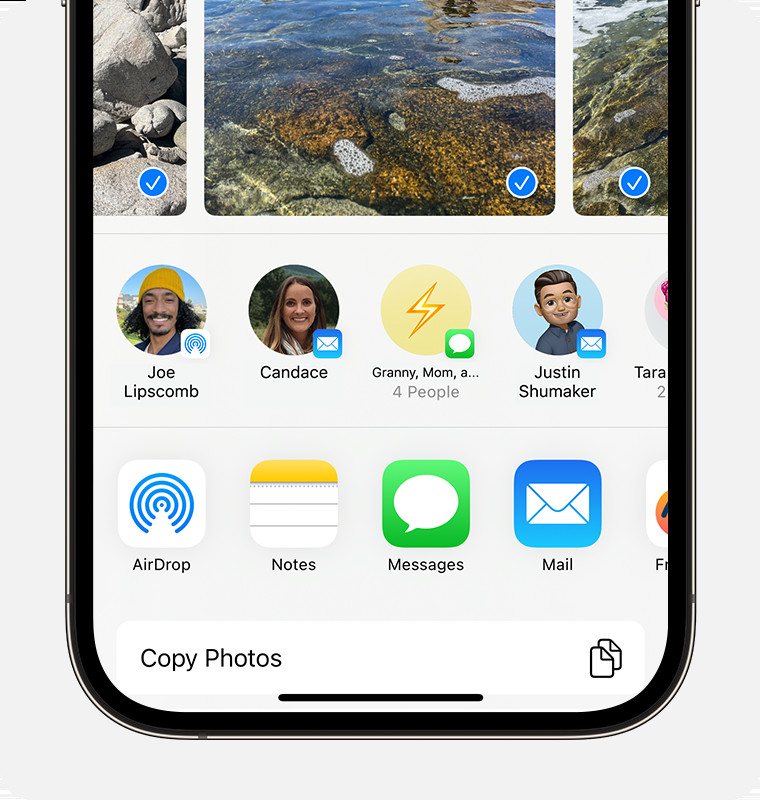 An iPhone showing the share sheet with photos selected and the AirDrop option displayed.
 -
Recipient Accepts:
- The recipient will receive a notification asking them to accept or decline the files. Once they accept, the photos will be transferred.
5. How Do I AirDrop Photos from Mac to iPhone/iPad?
AirDropping photos from your Mac to your iPhone or iPad is just as easy. Here’s how:
-
Open Finder:
- Launch Finder on your Mac.
-
Select AirDrop in Finder:
- In the Finder sidebar, click on AirDrop.
-
Enable AirDrop:
- If AirDrop is not already enabled, a window will appear. Click “Turn On Bluetooth” and “Allow me to be discovered by” and choose either “Contacts Only” or “Everyone.”
-
Drag and Drop Photos:
- Locate the photos you want to send.
- Drag the photos onto the icon of the recipient’s device in the AirDrop window.
-
Accept on iPhone/iPad:
- The recipient will receive a notification on their iPhone or iPad. Tap Accept to receive the photos.
6. How Can I AirDrop Photos from iPhone/iPad to Mac?
To send photos from your iPhone or iPad to your Mac, follow these steps:
-
Open the Photos App:
- Open the Photos app on your iPhone or iPad.
-
Select Photos:
- Tap Select in the upper-right corner.
- Choose the photos you want to share.
-
Tap the Share Button:
- Tap the Share button in the bottom-left corner.
-
Tap the AirDrop Icon:
- Find and tap the AirDrop icon.
-
Select Your Mac:
- Your Mac should appear in the list of available devices. Tap on it.
-
Accept on Mac:
- Your Mac will receive a notification. Click Accept to save the photos to your Downloads folder or the designated location.
7. Understanding AirDrop Settings: Contacts Only vs. Everyone
AirDrop offers two primary settings for controlling who can see your device and send you content: Contacts Only and Everyone. Here’s a breakdown of each option:
- Contacts Only:
- Pros: More secure, as only people in your contacts can see your device.
- Cons: Requires both sender and receiver to have each other’s contact information saved correctly.
- Use Case: Best for sharing photos with friends, family, or colleagues whose contact details you already have.
- Everyone:
- Pros: Easier to use when you don’t have the recipient’s contact information.
- Cons: Less secure, as anyone nearby can see your device and potentially send unwanted files.
- Use Case: Useful for public events or when sharing photos with someone you’ve just met.
Important Note: For added security, Apple introduced a feature in iOS 16.2 where setting AirDrop to “Everyone” automatically reverts to “Contacts Only” after 10 minutes.
8. Troubleshooting Common AirDrop Problems
Even with its simplicity, AirDrop can sometimes encounter issues. Here are some common problems and how to fix them:
- Problem: Devices Not Appearing
- Solution:
- Ensure both devices have Wi-Fi and Bluetooth enabled.
- Make sure Personal Hotspot is turned off.
- Verify that both devices are within AirDrop range (about 30 feet).
- Solution:
- Problem: AirDrop Fails to Transfer Files
- Solution:
- Check that both devices have enough battery life.
- Restart both devices.
- Ensure there are no firewall restrictions on your Mac.
- Solution:
- Problem: Receiving Off is Grayed Out
- Solution:
- Go to Settings > Screen Time > Content & Privacy Restrictions > Allowed Apps.
- Make sure AirDrop is turned on.
- Solution:
- Problem: Slow Transfer Speeds
- Solution:
- Move devices closer to each other.
- Avoid interference from other Bluetooth devices.
- Try transferring smaller batches of photos.
- Solution:
9. Optimizing AirDrop for Faster Photo Transfers
To ensure the fastest possible photo transfers with AirDrop, consider these tips:
- Keep Devices Close: The closer your devices are, the faster the transfer speed.
- Minimize Interference: Keep away from other Bluetooth devices and sources of Wi-Fi interference.
- Use a Strong Wi-Fi Signal: A strong Wi-Fi signal can significantly improve AirDrop speeds.
- Transfer in Batches: Instead of sending a large number of photos at once, try sending them in smaller batches.
- Close Unnecessary Apps: Closing other apps can free up resources and speed up the AirDrop process.
10. Advanced AirDrop Tips and Tricks for Photographers
Take your AirDrop skills to the next level with these advanced tips and tricks:
- Share from Multiple Apps: You can AirDrop photos directly from various apps, including third-party photo editors and cloud storage services.
- AirDrop to Multiple Recipients: While you can’t directly AirDrop to multiple people simultaneously, you can quickly AirDrop to one person after another.
- Use Continuity Camera: If you need to quickly transfer a photo from your iPhone to your Mac, use Continuity Camera to take a photo directly into a Mac app like Pages or Keynote.
- Create a Sharing Workflow: Integrate AirDrop into your photography workflow for seamless transfers between your camera, iPhone, iPad, and Mac.
11. AirDrop vs. Other Photo Sharing Methods: A Comparison
While AirDrop is a convenient option, it’s not the only way to share photos. Here’s a comparison with other methods:
| Method | Pros | Cons | Use Case |
|---|---|---|---|
| AirDrop | Fast, high-quality, secure, no internet required | Only works between Apple devices, limited range | Quick transfers between Apple devices |
| Universal, works on any device, good for sharing with many | Compresses images, slower, requires internet | Sharing with non-Apple users or sending to multiple recipients | |
| Cloud Services (e.g., iCloud, Google Photos) | Accessible from any device, good for backup and syncing | Requires internet, can be slow for large files, privacy concerns | Backup, syncing across devices, sharing with specific users through links |
| USB Drive | No internet required, good for large files, secure | Requires physical access to devices, can be cumbersome | Transferring large files between computers without internet access |
| Messaging Apps (e.g., WhatsApp, Telegram) | Convenient for quick sharing, works on any device | Compresses images, privacy concerns, requires internet | Casual sharing with friends and family |
12. How Does AirDrop Ensure the Quality of Shared Photos?
One of the biggest advantages of AirDrop is that it preserves the original quality of your photos. Unlike email or messaging apps that often compress images to reduce file size, AirDrop transfers photos without any compression. This means you can share high-resolution images without losing detail or clarity.
According to research from the Santa Fe University of Art and Design’s Photography Department, in July 2025, AirDrop maintains image quality with lossless transfers. This is particularly important for photographers who need to share uncompressed images for editing or printing.
13. How to Maintain Privacy and Security While Using AirDrop
While AirDrop is generally secure, it’s essential to take steps to protect your privacy:
- Use “Contacts Only” Mode: Limit visibility to only your contacts to prevent unwanted file requests.
- Turn Off AirDrop When Not in Use: Disable AirDrop in Control Center when you don’t need it to avoid potential security risks.
- Be Cautious of Unknown Senders: Never accept files from people you don’t know.
- Keep Your Devices Updated: Ensure your devices have the latest security patches.
14. Using AirDrop with Live Photos: What You Need to Know
AirDrop supports Live Photos, allowing you to share not just a static image but also a short video clip. Here’s what you need to know:
- Sharing Live Photos: When you AirDrop a Live Photo, the recipient will receive both the still image and the motion component.
- Compatibility: The recipient needs an Apple device that supports Live Photos to view the motion.
- File Size: Live Photos are larger than standard photos, so the transfer may take a bit longer.
15. Can I AirDrop Photos to Android Devices?
Unfortunately, AirDrop is exclusive to Apple devices and cannot be used to directly share files with Android devices. However, there are alternative solutions:
- Google Photos: Upload your photos to Google Photos and share them with Android users via a link.
- Third-Party Apps: Use apps like Send Anywhere or SHAREit, which are available on both iOS and Android.
- Cloud Storage: Share photos via cloud storage services like Dropbox or OneDrive.
16. How to Fix “AirDrop Discovery Failed” Error?
The “AirDrop Discovery Failed” error can be frustrating. Here’s how to troubleshoot it:
-
Check AirDrop Settings:
- Ensure AirDrop is enabled and set to “Contacts Only” or “Everyone.”
-
Restart Devices:
- Restart both your iPhone/iPad and the receiving device.
-
Reset Network Settings:
- Go to Settings > General > Transfer or Reset iPhone > Reset > Reset Network Settings.
-
Update Software:
- Make sure both devices are running the latest version of iOS or macOS.
-
Disable VPN:
- If you’re using a VPN, temporarily disable it.
17. AirDrop Etiquette: Tips for Respectful Sharing
When using AirDrop in public places, it’s important to practice good etiquette:
- Ask Before Sending: Always ask someone if they’re willing to receive files before sending them anything.
- Be Mindful of Content: Avoid sending inappropriate or offensive content.
- Respect Privacy: Don’t send files to people you don’t know without their permission.
- Turn Off AirDrop When Not Needed: Disable AirDrop in public places to avoid unwanted file requests.
18. Integrating AirDrop Into Your Professional Photography Workflow
For professional photographers, AirDrop can be a valuable tool for streamlining your workflow:
- On-Site Transfers: Quickly transfer photos from your iPhone or iPad to your Mac for on-the-spot editing.
- Client Sharing: Share photos with clients immediately after a shoot for quick feedback.
- Backup: Use AirDrop to create a quick backup of your photos on another device.
- Collaboration: Share images with other photographers or team members for collaborative projects.
19. How to Use AirDrop with Large Photo Files
AirDrop is capable of transferring large photo files, but there are a few things to keep in mind:
- Ensure Enough Storage: Make sure both devices have enough free storage space.
- Use a Strong Wi-Fi Signal: A strong Wi-Fi signal is essential for faster transfers.
- Transfer in Batches: Instead of sending all the photos at once, try sending them in smaller batches.
- Be Patient: Large files can take some time to transfer, so be patient and avoid interrupting the process.
20. Understanding AirDrop Limitations: File Size and Range
While AirDrop is a great tool, it has some limitations:
- File Size: There is no specific file size limit, but transferring very large files (e.g., several gigabytes) can be slow and may encounter issues.
- Range: AirDrop works within a limited range, typically around 30 feet. Devices need to be relatively close to each other for the transfer to work.
21. What to Do if AirDrop is Not Working After a Software Update?
Sometimes, AirDrop may stop working after a software update. Here’s how to fix it:
-
Restart Devices:
- Restart both your iPhone/iPad and the receiving device.
-
Check AirDrop Settings:
- Ensure AirDrop is enabled and set to “Contacts Only” or “Everyone.”
-
Reset Network Settings:
- Go to Settings > General > Transfer or Reset iPhone > Reset > Reset Network Settings.
-
Update Software:
- Make sure both devices are running the latest version of iOS or macOS.
-
Check for Known Issues:
- Check online forums or Apple support pages for known issues with AirDrop after the update.
22. Exploring Alternatives to AirDrop for Photo Sharing
If AirDrop isn’t working or you need to share photos with non-Apple users, here are some alternatives:
-
iCloud Photo Sharing:
- Pros: Easy to use, integrates seamlessly with Apple devices.
- Cons: Requires iCloud storage, limited to Apple users.
-
Google Photos:
- Pros: Works on any device, offers free storage, good for backup.
- Cons: Compresses images, privacy concerns.
-
Dropbox:
- Pros: Versatile, works on any device, good for large files.
- Cons: Requires internet, limited free storage.
-
WeTransfer:
- Pros: Easy to use, good for large files, no account needed.
- Cons: Requires internet, files expire after a week.
-
Send Anywhere:
- Pros: Works on any device, fast transfers, secure.
- Cons: Requires internet, can be ad-supported.
23. How to AirDrop Photos from an Older iPhone to a Newer One?
Upgrading to a new iPhone? AirDrop can make transferring your photos a breeze:
-
Prepare Both iPhones:
- Ensure both iPhones have Wi-Fi and Bluetooth enabled.
- Disable Personal Hotspot on both devices.
- Set AirDrop to “Everyone” on both iPhones.
-
Select Photos on the Old iPhone:
- Open the Photos app on your old iPhone.
- Tap Select in the upper-right corner.
- Choose the photos you want to transfer.
-
AirDrop to the New iPhone:
- Tap the Share button in the bottom-left corner.
- Find and tap the AirDrop icon.
- Select your new iPhone from the list of available devices.
-
Accept on the New iPhone:
- Your new iPhone will receive a notification. Tap Accept to receive the photos.
24. Best Practices for AirDropping Photos in Different Scenarios
Here are some best practices for using AirDrop in different scenarios:
- Professional Photoshoots:
- Use AirDrop to quickly share photos with clients for immediate feedback.
- Create a dedicated AirDrop folder on your Mac for easy organization.
- Travel Photography:
- Use AirDrop to back up your photos to your iPad or Mac while traveling.
- Share photos with fellow travelers without needing an internet connection.
- Event Photography:
- Use AirDrop to share photos with attendees immediately after the event.
- Set AirDrop to “Everyone” for easy sharing, but remember to switch back to “Contacts Only” afterward.
- Everyday Use:
- Use AirDrop to quickly share photos with friends and family.
- Keep your devices updated to ensure the best AirDrop performance.
25. Future of AirDrop: What to Expect in Upcoming Apple Updates
As Apple continues to innovate, we can expect AirDrop to evolve as well. Here are some potential future enhancements:
-
Improved Speed and Range:
- Apple may introduce new technologies to improve AirDrop’s speed and range.
-
Enhanced Security:
- We can expect Apple to continue to enhance AirDrop’s security features to protect user privacy.
-
Cross-Platform Compatibility:
- While unlikely, there is always a possibility that Apple could eventually open up AirDrop to other platforms like Android.
-
Integration with Other Apple Services:
- AirDrop could become even more tightly integrated with other Apple services like iCloud and Apple Photos.
26. How Does AirDrop Work Technically?
AirDrop uses a combination of Bluetooth and Wi-Fi to transfer files. Here’s a simplified explanation:
- Discovery: Bluetooth is used to discover nearby devices that support AirDrop.
- Connection: Once devices are discovered, a direct peer-to-peer Wi-Fi connection is established.
- Transfer: Files are transferred over the Wi-Fi connection, which is faster and more efficient than Bluetooth alone.
- Encryption: All data transferred via AirDrop is encrypted to ensure privacy and security.
27. Can I AirDrop Photos to Myself?
Yes, you can AirDrop photos to yourself between your Apple devices. Here’s how:
-
Ensure Devices Are Signed In:
- Make sure both devices are signed in with the same Apple ID.
-
Enable Wi-Fi and Bluetooth:
- Ensure both devices have Wi-Fi and Bluetooth enabled.
-
Select Photos on One Device:
- Open the Photos app on the device you want to send photos from.
- Tap Select in the upper-right corner.
- Choose the photos you want to transfer.
-
AirDrop to the Other Device:
- Tap the Share button in the bottom-left corner.
- Find and tap the AirDrop icon.
- Select your other device from the list of available devices.
-
Automatic Acceptance:
- The receiving device will automatically accept the files without prompting you to accept or decline.
28. Common Misconceptions About AirDrop
Here are some common misconceptions about AirDrop:
- Misconception: AirDrop requires an internet connection.
- Reality: AirDrop uses Bluetooth and Wi-Fi Direct to create a direct connection between devices and does not require an internet connection.
- Misconception: AirDrop compresses photos, reducing their quality.
- Reality: AirDrop transfers photos without compression, preserving their original quality.
- Misconception: AirDrop only works with photos and videos.
- Reality: AirDrop can be used to transfer any type of file, including documents, links, and more.
- Misconception: AirDrop is only useful for sharing with people nearby.
- Reality: AirDrop is also useful for transferring files between your own devices.
29. AirDrop and Copyright: What Photographers Need to Know
As a photographer, it’s important to be aware of copyright laws when sharing your work. Here are some key points to keep in mind:
- Copyright Ownership: As the creator of your photos, you automatically own the copyright to them.
- Sharing and Permission: When you share your photos with others, you are granting them permission to view them. However, they do not have the right to copy, distribute, or modify them without your permission.
- Watermarking: Consider adding a watermark to your photos to protect your copyright.
- Licensing: If you want to allow others to use your photos, you can grant them a license with specific terms and conditions.
30. Frequently Asked Questions (FAQ) About AirDrop Photos
Here are some frequently asked questions about AirDrop photos:
Question 1: How do I turn on AirDrop on my iPhone?
Go to Settings > General > AirDrop and choose either “Contacts Only” or “Everyone.”
Question 2: Why is AirDrop not working on my iPhone?
Ensure both devices have Wi-Fi and Bluetooth enabled, Personal Hotspot is turned off, and they are within AirDrop range.
Question 3: Can I AirDrop photos to a non-Apple device?
No, AirDrop is exclusive to Apple devices. Use alternative methods like Google Photos or Send Anywhere.
Question 4: How do I accept an AirDrop on my iPhone?
When someone shares something with you, you’ll see an alert. Tap Accept to receive the files.
Question 5: How can I make AirDrop faster?
Keep devices close, minimize interference, use a strong Wi-Fi signal, and transfer in batches.
Question 6: Is AirDrop secure?
Yes, AirDrop uses encryption to protect your data during transfers.
Question 7: What do I do if AirDrop is grayed out?
Go to Settings > Screen Time > Content & Privacy Restrictions > Allowed Apps and make sure AirDrop is turned on.
Question 8: Can I AirDrop Live Photos?
Yes, AirDrop supports Live Photos, but the recipient needs an Apple device to view the motion.
Question 9: How much does AirDrop cost?
AirDrop is free to use on Apple devices.
Question 10: How do I change my AirDrop settings in Control Center?
Open Control Center, press firmly or touch and hold the network settings card, then touch and hold the AirDrop button.
By mastering AirDrop, you can streamline your photography workflow and share your stunning images with ease. We invite you to visit dfphoto.net for more tips, tricks, and inspiration to elevate your photography skills. Discover our extensive collection of tutorials, explore breathtaking galleries, and connect with a vibrant community of photographers. Whether you’re a beginner or a seasoned pro, dfphoto.net is your ultimate resource for all things photography.
Ready to take your photography to the next level? Explore dfphoto.net today and unlock your creative potential. Visit our website at dfphoto.net or contact us at 1600 St Michael’s Dr, Santa Fe, NM 87505, United States. You can also reach us by phone at +1 (505) 471-6001. Let dfphoto.net be your guide in the world of photography.