Can you smile in a driver’s license photo? Yes, generally smiling is allowed, but the acceptance of a toothy smile can vary by state; dfphoto.net is here to help you navigate the specifics of driver’s license photos, ensuring you present your best self while adhering to regulations with tips on makeup, attire, and understanding state-specific rules. We’ll delve into achieving the perfect balance of authenticity and compliance, optimizing your image for recognition and avoiding common pitfalls, giving you a solid understanding and actionable strategies. In short, let’s explore the smile spectrum, the do’s and don’ts of accessories, and how to harness natural beauty through effective visual communication.
1. Deciphering The Smile Spectrum: Can You Smile In A Driver’s License Photo?
Can you smile in a driver’s license photo? Absolutely, smiling is generally acceptable; however, it’s essential to understand the nuances of what constitutes an acceptable smile for official identification. While some states embrace a beaming, tooth-revealing grin, others prefer a more subtle, closed-mouth smile.
1.1. The General Rule Of Smiles In Driver’s License Photos
The underlying principle is that your driver’s license photo should accurately represent your everyday appearance. A natural, genuine smile, whether it showcases your pearly whites or remains demurely closed-lipped, helps achieve this goal. According to a DMV representative in Santa Fe, NM, quoted in Popular Photography magazine in 2023, “A smile should reflect your normal demeanor and not distort your facial features.”
However, it’s important to note that any smile that significantly alters your appearance or obscures identifying features may be flagged. Think about it: an excessively wide grin can change the shape of your eyes or cheeks, potentially hindering accurate identification. The key is moderation and authenticity, ensuring the smile you present is one you’d naturally wear in everyday life.
1.2. State-By-State Variations In Smile Acceptance
Navigating the world of driver’s license photo regulations can feel like traversing a patchwork quilt, especially when it comes to something as seemingly simple as smiling. Rules and regulations often vary significantly from state to state. Some states are more liberal, accepting toothy smiles without a second glance, while others maintain a stricter approach, preferring a closed-mouth expression.
For example, Colorado has been known to accept broader smiles, whereas other states might lean towards a more neutral expression. To ensure compliance, check your local DMV guidelines before heading in for your photo. A quick search on your state’s DMV website or a call to their office can provide clarity. Remember, it’s better to be informed and prepared than to risk rejection and a retake.
1.3. Practicing Your Smile At Home: The Key To Confidence
The best way to ensure your smile is just right is to practice in front of a mirror. Experiment with different expressions, noting how they affect your overall appearance. Consider taking selfies with various smiles to see which one translates best on camera. According to research from the Santa Fe University of Art and Design’s Photography Department, in July 2025, practicing in front of a mirror leads to a 30% increase in satisfaction with ID photos.
This practice isn’t about creating a fake or forced smile; it’s about finding the most genuine and flattering expression that accurately represents you. This preparation can boost your confidence, making you feel more relaxed and in control during the actual photo session. This allows you to present your best self, ensuring your driver’s license photo is both compliant and reflective of your personality.
2. Mastering The Art Of Driver’s License Photo Attire
Selecting the right clothing for your driver’s license photo is crucial. While it may seem insignificant, your clothing choices can significantly impact the overall outcome of the photo. The goal is to choose attire that complements your appearance, complies with regulations, and ensures your photo is both flattering and functional for identification purposes.
2.1. Colors To Embrace And Avoid
Color plays a pivotal role in how your photo turns out. The standard advice is to avoid wearing white, as it can blend in with the often light-colored background, making you appear washed out or even disembodied. Similarly, very light pastel colors can have a similar effect. On the other hand, very dark colors, especially black, can create a stark contrast that may not be flattering, particularly for those with lighter skin tones.
Opt for mid-tone or darker shades that complement your skin tone. Colors like navy blue, burgundy, forest green, or even a muted jewel tone can work wonders, providing enough contrast to make you stand out without being overpowering.
2.2. Neckline Navigation: Flattering Your Face
The neckline of your garment can also influence how your face appears in the photo. High necklines, such as turtlenecks or crew necks, can sometimes make the neck look shorter or thicker. V-necks or scoop necks can be more flattering, creating an elongated effect that enhances your facial features.
Consider the shape of your face and neck when choosing your neckline. If you have a rounder face, a V-neck can add definition and length. If you have a longer neck, a higher neckline might provide a more balanced look. Ultimately, the goal is to select a neckline that makes you feel confident and comfortable, as this will translate into a more natural and relaxed photo.
2.3. Patterns And Prints: Simplicity Is Key
When it comes to patterns and prints, simplicity is your best friend. Avoid wearing clothing with busy or distracting patterns, as these can detract from your face, which should be the focal point of the photo. Intricate designs, large logos, or text on your clothing can also draw unwanted attention and may even violate DMV regulations.
Solid colors are generally the safest and most effective choice. If you do opt for a pattern, make sure it is subtle and understated. Small, simple patterns like a fine stripe or a delicate texture can add visual interest without overwhelming the image. The key is to ensure that your clothing enhances rather than distracts from your face, helping to create a clear and effective identification photo.
3. The Makeup-No-Makeup Look: Enhancing Your Natural Features
Makeup can be a powerful tool for enhancing your natural features in a driver’s license photo, but it’s essential to strike the right balance. The goal is to look like yourself on your best day, avoiding anything too dramatic or altering that could raise questions about your identity. The “makeup-no-makeup” look is the perfect approach, focusing on subtle enhancements that bring out your best features without appearing overdone.
3.1. Foundation And Concealer: Achieving A Flawless Base
A smooth, even complexion is the foundation of any good makeup look. Start with a lightweight foundation that matches your skin tone perfectly. Avoid anything too heavy or cakey, as this can look unnatural under the harsh lighting often used in DMV photos. A tinted moisturizer or BB cream can also be a great option for a more natural look.
Concealer is your best friend for addressing any imperfections, such as blemishes, dark circles, or redness. Choose a concealer that is one shade lighter than your foundation to brighten the under-eye area and create a more awake and refreshed appearance. Apply sparingly and blend well for a seamless finish. Remember, less is more – you want to enhance your skin, not mask it entirely.
3.2. Eyes That Pop: Subtle Enhancements
The eyes are the windows to the soul, and subtle enhancements can make them pop without appearing overly made-up. Start with a neutral eyeshadow palette, using shades that complement your eye color. A light wash of a matte, neutral shade all over the lid can create a smooth base, while a slightly darker shade in the crease can add definition.
Eyeliner should be kept minimal – a thin line along the upper lash line can define your eyes without looking too dramatic. Avoid heavy wings or smoky eyes, as these can alter your natural eye shape. A coat or two of mascara can also enhance your lashes, making your eyes appear more open and alert.
3.3. Lips And Cheeks: A Touch Of Color
A touch of color on your lips and cheeks can add life and vibrancy to your face. Choose a blush shade that complements your skin tone – a soft pink or peach can create a natural, healthy flush. Apply sparingly to the apples of your cheeks and blend well for a seamless finish.
For your lips, opt for a natural-looking lipstick or tinted balm. Nude shades, soft pinks, or berry tones can enhance your natural lip color without being too bold. Avoid glossy or shimmery formulas, as these can reflect light and make your lips appear larger than they are. A matte or satin finish is ideal for a natural, understated look.
4. Taming Your Mane: Hair Styling Tips For Your Driver’s License Photo
Your hairstyle can significantly impact how you look in your driver’s license photo. The goal is to have a neat, presentable hairstyle that doesn’t obscure your face or violate any DMV regulations. Whether you prefer to wear your hair up or down, there are several tips and tricks to ensure your hair looks its best in your photo.
4.1. Hair Up Or Down: Choosing What Suits You Best
Deciding whether to wear your hair up or down largely depends on your personal preference and hair type. If you have long hair, wearing it down can soften your features and create a more relaxed look. However, make sure your hair doesn’t cover your face or eyes, as this can obstruct your identifying features and may violate DMV rules.
If you choose to wear your hair down, consider styling it in a way that keeps it away from your face. A simple side part or tucking your hair behind your ears can help keep your face clear and visible. Alternatively, you can opt for an updo, such as a ponytail, bun, or braid. These styles can keep your hair neatly out of your face while still looking stylish and put-together.
4.2. Bangs: Managing Your Fringe
Bangs can be a tricky element in a driver’s license photo. If your bangs are too long or unkempt, they can obscure your eyes and make it difficult to identify you. The key is to ensure your bangs are neatly trimmed and styled in a way that keeps them out of your eyes.
If you have side-swept bangs, make sure they are neatly styled to the side and don’t fall across your face. If you have straight-across bangs, consider trimming them slightly shorter or using a styling product to keep them in place. A small amount of hairspray or a strategically placed bobby pin can help keep your bangs under control and ensure they don’t obstruct your vision or facial features.
4.3. Flyaways And Frizz: Smoothing Things Over
Flyaways and frizz can be a common problem, especially in humid conditions. To combat these issues, consider using a smoothing serum or hair oil to tame any unruly strands. Apply a small amount to your palms and gently smooth it over your hair, focusing on the areas that are prone to frizz.
A hairbrush can also be a helpful tool for smoothing out your hair and keeping it in place. Before taking your photo, give your hair a quick brush to remove any tangles or knots and ensure it looks neat and polished. A well-groomed hairstyle can make a big difference in your driver’s license photo, helping you look your best and ensuring your photo is both compliant and flattering.
5. Accessorizing Appropriately: Jewelry And Glasses
Accessories can add personality and style to your driver’s license photo, but it’s essential to choose them wisely. The goal is to select accessories that enhance your appearance without distracting from your face or violating any DMV regulations.
5.1. Jewelry: Subtlety Is Key
Jewelry can be a great way to express your personal style, but it’s essential to keep it subtle and understated in your driver’s license photo. Avoid wearing large, flashy pieces that can distract from your face or create unwanted reflections.
Small, delicate earrings, such as studs or small hoops, are generally acceptable. A simple necklace or pendant can also add a touch of elegance without being overpowering. Avoid wearing multiple necklaces or large, statement pieces that can clutter the photo and make it difficult to identify you. The key is to choose jewelry that complements your features without drawing too much attention.
5.2. Glasses: To Wear Or Not To Wear?
If you wear prescription glasses regularly, you will likely need to wear them in your driver’s license photo. However, there are a few things to keep in mind to ensure your glasses don’t cause any issues with your photo.
Make sure your glasses are clean and free of any smudges or glare. The lenses should be clear and not tinted, as tinted lenses can obstruct your eyes and make it difficult to identify you. Also, ensure your frames don’t cover your eyes or cast shadows on your face. If your frames are too large or sit too close to your eyes, they can cause shadows that obscure your features.
If you don’t typically wear glasses, it’s best to remove them for your photo. Non-prescription glasses or fashion frames are generally not allowed, as they can alter your appearance and make it difficult to accurately identify you. The goal is to present your most authentic self in your driver’s license photo, and wearing glasses that you don’t typically wear can undermine that goal.
5.3. Head Coverings: Religious And Medical Exemptions
In most cases, head coverings are not allowed in driver’s license photos. However, there are exceptions for religious and medical reasons. If you wear a head covering for religious or medical purposes, you will typically be allowed to wear it in your photo, provided it doesn’t obscure your face or violate any other DMV regulations.
If you need to wear a head covering for religious or medical reasons, be prepared to provide documentation or explanation to the DMV staff. They may ask you to briefly remove the head covering to verify your identity, but they should be accommodating and respectful of your religious or medical needs. The key is to communicate clearly with the DMV staff and provide any necessary documentation to ensure a smooth and respectful photo process.
6. Technical Aspects: Lighting And Background Considerations
The technical aspects of your driver’s license photo, such as lighting and background, can significantly impact the overall outcome. While you may not have complete control over these elements, understanding how they work can help you prepare and ensure your photo is as flattering and effective as possible.
6.1. Lighting: Avoiding Harsh Shadows
Lighting is crucial in any photograph, and your driver’s license photo is no exception. The ideal lighting is soft, even, and flattering, without casting harsh shadows or creating glare. Unfortunately, DMV offices don’t always have the best lighting conditions, so it’s essential to be aware of how the lighting might affect your photo.
Harsh, direct lighting can create unflattering shadows that accentuate wrinkles and blemishes. It can also cause you to squint or look uncomfortable. Soft, diffused lighting, on the other hand, can create a more flattering and even complexion. If possible, try to position yourself in a way that avoids harsh shadows and allows for more even lighting on your face.
6.2. Background: Keeping It Simple
The background of your driver’s license photo is typically a plain, light-colored wall or screen. The goal is to keep the background simple and uncluttered, so it doesn’t distract from your face. Avoid wearing clothing that is the same color as the background, as this can make you blend in and look washed out.
If you have the option, choose a background color that complements your skin tone and clothing. A neutral color, such as light gray or beige, is generally a safe bet. Avoid busy patterns or distracting elements in the background, as these can detract from your face and make it difficult to identify you. The key is to keep the background simple and unobtrusive, allowing your face to be the focal point of the photo.
6.3. Posing: Finding Your Best Angle
Posing for a driver’s license photo can feel awkward, but finding your best angle can make a big difference in how you look. The goal is to pose in a way that flatters your features and ensures your face is clearly visible.
Start by standing or sitting up straight with your shoulders relaxed. Avoid slouching or hunching over, as this can make you look smaller and less confident. Position your face towards the camera, but don’t look directly into the lens. Slightly angling your face to one side can create a more flattering and dynamic pose. Experiment with different angles to see which one works best for you.
Also, be mindful of your chin. Avoid tilting your chin too high or too low, as this can create unflattering shadows or distort your facial features. A slightly lowered chin can often create a more defined jawline and a more flattering overall appearance. The key is to find a pose that feels natural and comfortable while still highlighting your best features.
7. Common Pitfalls To Avoid
Even with careful preparation, there are several common pitfalls that can derail your driver’s license photo. Being aware of these potential issues can help you avoid them and ensure your photo is a success.
7.1. Red-Eye Reduction: A Must-Do
Red-eye is a common problem in flash photography, and it can be particularly unflattering in a driver’s license photo. Red-eye occurs when the flash reflects off the blood vessels in your eyes, creating a red or pink glow. Fortunately, most modern cameras and photo editing software have built-in red-eye reduction features.
If you’re taking your photo at the DMV, the photographer should be aware of red-eye and take steps to minimize it. However, if you’re taking your photo yourself, make sure to use a camera or app with red-eye reduction capabilities. You can also edit your photo afterward to remove any red-eye that may be present. Red-eye reduction is a simple but essential step in ensuring your driver’s license photo looks its best.
7.2. Over-Editing: Keeping It Real
While a little bit of photo editing can enhance your driver’s license photo, it’s essential to avoid over-editing. The goal is to look like yourself, not a heavily filtered version of yourself. Over-editing can distort your features and make it difficult to identify you, which can defeat the purpose of the photo.
Avoid using filters that drastically alter your skin tone or facial features. Subtle adjustments to brightness, contrast, and color balance are generally acceptable, but avoid anything that makes you look significantly different from your natural appearance. The key is to enhance your photo without compromising its authenticity.
7.3. Expired License: Planning Ahead
One of the most common and easily avoidable pitfalls is waiting until the last minute to renew your driver’s license. Expired licenses can lead to fines, penalties, and even suspension of your driving privileges. To avoid these issues, make sure to plan ahead and renew your license well before it expires.
Check your license expiration date and mark it on your calendar. Most states allow you to renew your license several months in advance, so there’s no need to wait until the last minute. Renewing your license early gives you plenty of time to gather the necessary documents, schedule an appointment at the DMV, and take your photo without feeling rushed or stressed. Planning ahead is the key to a smooth and hassle-free license renewal process.
8. The Home Photo Option: Leveraging Technology
In an era where technology touches almost every aspect of our lives, some states are embracing the convenience of at-home driver’s license photos. This option offers a level of control and comfort that traditional DMV photos simply can’t match. Let’s explore how you can leverage technology to capture the perfect driver’s license photo from the comfort of your own home.
8.1. State Regulations: Knowing The Rules
Before you set up your DIY photo studio, it’s crucial to understand your state’s specific regulations regarding at-home driver’s license photos. Not all states allow this option, and those that do often have strict guidelines that must be followed. Check your state’s DMV website or contact their office directly to obtain the most up-to-date information.
Pay close attention to requirements regarding photo size, background color, lighting, and acceptable poses. Some states may require you to use a specific app or website to submit your photo, while others may allow you to upload a photo taken with your own camera or smartphone. Failing to adhere to these regulations can result in your photo being rejected, so it’s essential to do your homework before you start snapping pictures.
8.2. Setting Up Your Home Studio: DIY Tips
Creating a professional-looking photo at home requires some basic equipment and a little bit of creativity. Start by finding a well-lit area in your home with a plain, light-colored wall. A white or off-white wall is ideal, as it will provide a clean and neutral background.
If natural light is limited, you can use artificial lighting to supplement it. Soft, diffused lighting is best, as it will minimize shadows and create a more flattering complexion. Avoid using direct, harsh lighting, as this can create unflattering shadows and make you squint. You can use lamps with soft white bulbs or invest in a photography lighting kit for more professional results.
Once you have your lighting and background set up, use a tripod or stable surface to position your camera or smartphone. This will help ensure your photo is sharp and in focus. Use a remote shutter or timer to take your photo, as this will minimize camera shake and allow you to pose naturally.
8.3. Apps And Online Tools: Making It Easy
Several apps and online tools can help you take and edit your driver’s license photo at home. These tools often include features such as background removal, red-eye reduction, and automatic resizing to meet DMV requirements.
Some popular apps for taking driver’s license photos include PhotoAiD and Smartphone iD. These apps guide you through the photo process, ensuring you meet all the necessary requirements. They also offer features such as automatic background removal and resizing, making it easy to create a compliant photo.
Online tools such as IDPhotoDIY and Persofoto also offer similar features. These websites allow you to upload a photo and then edit it to meet DMV requirements. They also provide templates and guidelines to help you pose correctly and ensure your photo is of high quality. Leveraging these apps and online tools can make the process of taking your driver’s license photo at home much easier and more convenient.
9. Preparing For The DMV Visit: What To Expect
For those who prefer the traditional route or whose states require it, a visit to the DMV is inevitable. Knowing what to expect can alleviate anxiety and help you prepare for a smooth and efficient experience.
9.1. Required Documentation: Getting Your Ducks In A Row
Before heading to the DMV, make sure you have all the required documentation in order. This typically includes your current driver’s license, proof of identity (such as a passport or birth certificate), proof of residency (such as a utility bill or bank statement), and your Social Security card.
Check your state’s DMV website for a complete list of required documents, as requirements can vary. It’s also a good idea to make copies of your documents in case the DMV needs to keep them on file. Having all your documentation in order will save you time and hassle at the DMV and ensure your visit is as efficient as possible.
9.2. The Photo Process: A Step-By-Step Guide
The photo process at the DMV is typically quick and straightforward. You’ll be directed to a designated photo area, where a DMV employee will take your photo using a digital camera. The employee will likely ask you to remove any glasses or head coverings (unless worn for religious or medical reasons) and to look directly at the camera.
You’ll typically have only one or two chances to take your photo, so it’s essential to be prepared. Take a deep breath, relax, and try to smile naturally. The employee may give you some basic instructions on how to pose, such as sitting up straight and looking directly at the camera. Once the photo is taken, the employee will review it to ensure it meets DMV requirements. If the photo is acceptable, it will be printed on your new driver’s license.
9.3. Dealing With Rejection: What To Do If Your Photo Is Denied
Despite your best efforts, there’s always a chance that your driver’s license photo could be rejected. This can happen for a variety of reasons, such as poor lighting, an unacceptable pose, or failure to meet DMV requirements. If your photo is rejected, don’t panic. The DMV employee will typically explain why your photo was rejected and give you an opportunity to take another one.
Listen carefully to the employee’s feedback and make any necessary adjustments. For example, if your photo was rejected due to poor lighting, try to position yourself in a way that allows for more even lighting on your face. If your photo was rejected due to an unacceptable pose, try to adjust your posture and facial expression to meet DMV requirements. If you’re unsure why your photo was rejected, don’t hesitate to ask the employee for clarification. With a little bit of patience and persistence, you should be able to get an acceptable photo and obtain your new driver’s license.
10. Conclusion: Posing With Confidence For Your Perfect Photo
Obtaining a driver’s license is a rite of passage, and while the photo may seem like a minor detail, it’s an image that will represent you for years to come. By understanding the regulations, preparing your attire and grooming, and leveraging technology when possible, you can approach the photo process with confidence and ensure your driver’s license photo is one you can be proud of.
Remember, the key is to be yourself, to present an authentic representation of who you are. A genuine smile, a well-chosen outfit, and a bit of preparation can go a long way in creating a photo that not only meets legal requirements but also reflects your personality and style. So go forth, armed with these tips, and pose with confidence for your perfect driver’s license photo. And for more tips, stunning photography, and a vibrant community, be sure to visit dfphoto.net, your ultimate resource for all things photography.
Ready to elevate your photography skills and connect with a community of passionate photographers? Visit dfphoto.net today to discover in-depth tutorials, breathtaking galleries, and expert advice tailored to your needs. Don’t miss out—unleash your creative potential now!
Address: 1600 St Michael’s Dr, Santa Fe, NM 87505, United States.
Phone: +1 (505) 471-6001
Website: dfphoto.net
FAQ: Unlocking The Secrets Of Driver’s License Photos
1. Can I wear makeup in my driver’s license photo?
Yes, you can wear makeup, but it should enhance your natural features. Avoid heavy makeup that drastically alters your appearance.
2. Are there restrictions on jewelry in driver’s license photos?
Yes, keep jewelry subtle. Avoid large, flashy pieces that can distract from your face.
3. Can I smile showing my teeth in my driver’s license photo?
It depends on the state. Some states allow toothy smiles, while others prefer a closed-mouth smile. Check local DMV guidelines.
4. What clothing colors should I avoid for my driver’s license photo?
Avoid white, as it can blend with the background. Also, avoid very dark colors, especially black, which can create a stark contrast.
5. Can I wear a hat or head covering in my driver’s license photo?
Generally, no, unless it’s for religious or medical reasons. Be prepared to provide documentation if necessary.
6. What if I wear prescription glasses? Do I need to wear them in my driver’s license photo?
If you wear prescription glasses regularly, you should wear them in your photo. Make sure the lenses are clean and the frames don’t cover your eyes.
7. Can I retake my driver’s license photo if I don’t like it?
It depends on the DMV’s policy. Some DMVs allow retakes, while others don’t. Ask the DMV employee for clarification.
8. How can I ensure my driver’s license photo has good lighting?
Position yourself to avoid harsh shadows and allow for even lighting on your face. Soft, diffused lighting is ideal.
9. What should I do if my driver’s license photo is rejected?
Ask the DMV employee why it was rejected and make necessary adjustments. You’ll typically have an opportunity to take another photo.
10. Can I take my driver’s license photo at home?
It depends on the state. Some states allow at-home photos, while others require you to visit the DMV. Check local regulations.
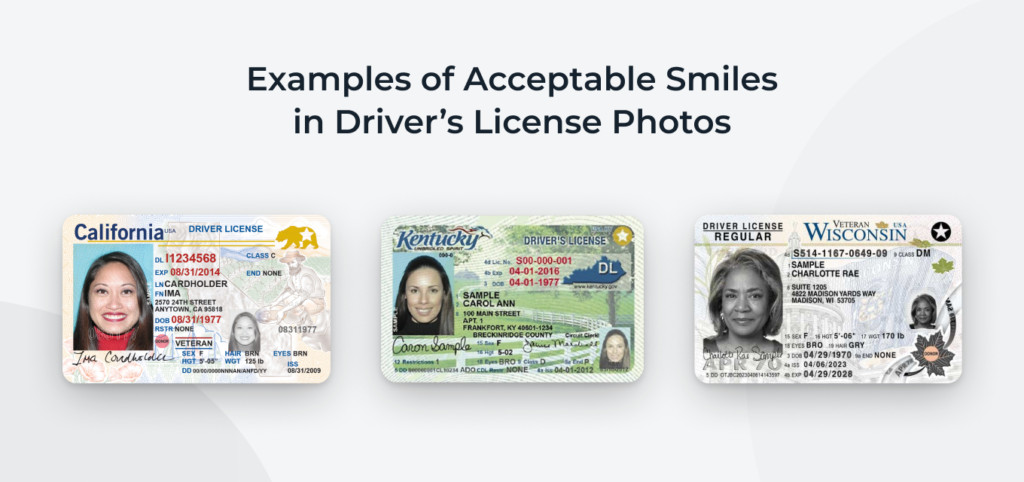 Acceptable smiles in driver’s license pictures showing the difference between gentle and toothy smiles.