Resizing photos on your Mac is a common task, whether you’re preparing images for social media, emailing them, or simply saving storage space. Large image files can be cumbersome to share and upload, and are often unnecessary for many online uses. Thankfully, macOS offers several built-in and efficient ways to resize your photos, and there are also third-party applications available for more advanced needs. This guide will walk you through the best methods to resize your photos on a Mac, ensuring you maintain quality while achieving the desired file size.
One of the simplest and most readily available tools for resizing images on macOS is Preview. This versatile application is pre-installed on every Mac and is capable of handling a wide range of image editing tasks, including resizing.
To resize images using Preview, follow these straightforward steps:
-
Open your image(s) in Preview: You can do this in several ways. The easiest is to select the image files in Finder, right-click, and choose Open with > Preview. You can select multiple images to open them all at once in Preview for batch processing.
-
Select images for batch resizing (if needed): If you’ve opened multiple images, you’ll see them displayed in the left-hand sidebar of the Preview window. To resize multiple images simultaneously, ensure all the thumbnails in the sidebar are selected. You can select all by clicking on the first thumbnail, then scrolling to the last one and pressing Shift while clicking on it.
-
Access the Adjust Size tool: Once your image or images are open and selected, navigate to the menu bar at the top of your screen and click on Tools, then select Adjust Size… from the dropdown menu.
-
Enter your desired dimensions: The “Adjust Size” window will appear, offering various options for resizing. You can resize by:
- Dimensions: Specify the desired width and height in pixels, inches, centimeters, millimeters, or points. Ensure the “Scale proportionally” checkbox is ticked if you want to maintain the original aspect ratio of your image and avoid distortion.
- Percentage: Resize your image by a percentage of its current size. For example, entering 50% will reduce both width and height to half their original values.
Figure 1: Adjust Size options in Preview app on macOS for resizing images.
 Adjust Size options in Preview app on macOS for resizing images
 -
Choose Resolution (optional): You can also adjust the resolution (DPI – Dots Per Inch) of your image. For web use, 72 DPI is generally sufficient. Higher resolutions like 300 DPI are better suited for printing.
-
Resample Image (optional): The “Resample image” option, when checked, will actually change the number of pixels in your image. Unchecking it will only change the print size without altering the pixel data, which is useful if you only want to change the DPI without affecting the image dimensions.
-
Click OK: After setting your desired resizing options, click OK. Preview will resize your image(s).
-
Export or Save Resized Images: To save the resized image(s), go to File > Export Selected Images… if you resized multiple images, or File > Export… or File > Save As… for a single image. Choosing “Export” allows you to specify a new filename, format (like JPEG, PNG, etc.), and quality settings.
Another built-in method for resizing photos on your Mac is through the Photos app. While primarily designed for photo management and organization, Photos also offers resizing capabilities when exporting images.
Here’s how to resize photos using the Photos app:
-
Open the Photos app and select your image(s): Launch the Photos application and select the photo or photos you wish to resize. You can select multiple photos by holding down the Shift or Command key while clicking on images.
-
Initiate Export: Once you’ve selected your images, go to File > Export > Export Photos… from the menu bar.
-
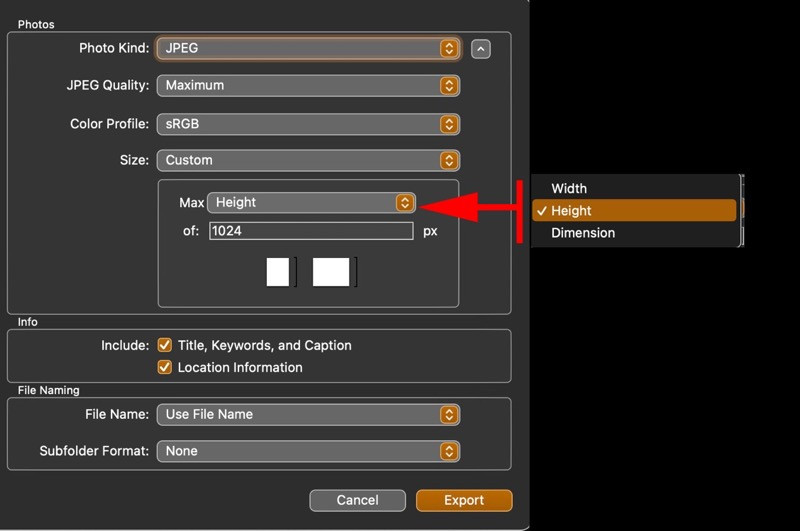
Choose Export Size: In the export dialog box, you’ll see a “Size” dropdown menu. Click on it to reveal preset size options:
- Small, Medium, Large: These options automatically resize your images to predefined smaller sizes, suitable for web sharing and reducing file size.
- Actual Size: This option exports the images without resizing, maintaining their original dimensions.
- Custom: This allows you to set a maximum dimension (either width or height). Photos will then scale the image down to fit within that dimension while maintaining the aspect ratio.
Figure 2: Export options in Photos app on macOS showing size selection for image resizing.
 Export options in Photos app on macOS showing size selection for image resizing
 -
Adjust Quality and Format (optional): In the same export dialog, you can also adjust the “JPEG Quality” if you are exporting as JPEG, or choose a different format like PNG. Lowering the quality will further reduce the file size.
-
Click Export: Choose a location to save your resized images and click the Export button. The Photos app will then export resized versions of your selected photos to the chosen location.
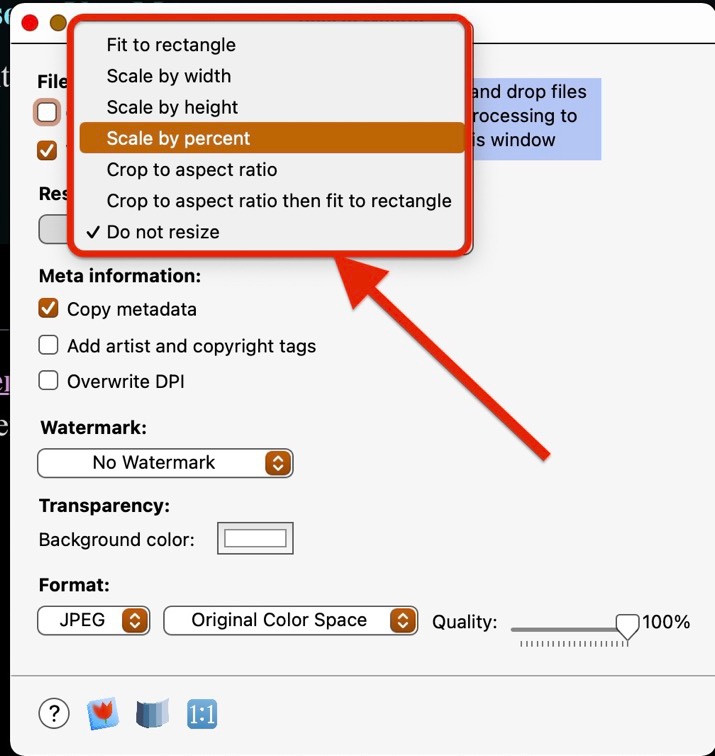
For users who need more advanced resizing options or frequently resize large batches of images, third-party applications can offer enhanced features and efficiency. One such app mentioned in online communities is Resize Master.
Resize Master (available on the App Store) is designed specifically for batch image resizing and offers a drag-and-drop interface for ease of use. You can simply drag a folder of images into the app window, configure your resizing options, and let Resize Master process them quickly. It often provides more granular control over resizing parameters and output settings compared to Preview and Photos.
Figure 3: Resize Master app interface on macOS for batch image resizing.
 Resize Master app interface on macOS for batch image resizing
In conclusion, resizing photos on a Mac is a straightforward process thanks to the built-in tools like Preview and the Photos app. For most users, these applications offer sufficient functionality for everyday resizing needs. Preview is excellent for quick adjustments and batch processing, while Photos provides easy export options with preset sizes. If you require more specialized features or handle very large volumes of images, dedicated third-party apps like Resize Master can provide additional power and flexibility. By utilizing these methods, you can efficiently manage your image sizes on your Mac, optimizing them for various purposes without sacrificing image quality.
