Lockets are timeless keepsakes, allowing you to carry cherished memories close to your heart. But how do you perfectly capture those memories in such a small space? This guide provides a comprehensive walkthrough on How To Make A Locket Photo, from choosing the right image to precisely fitting it into your pendant.
 Heart Shaped Locket with Photo
Choosing the Perfect Locket Photo
The photo you select for your locket should be meaningful and visually appealing in a miniature format. Consider these factors:
- Simplicity: Opt for a clear, well-lit image without excessive detail. Tiny details will be lost in the small scale.
- Close-Up Shots: Prioritize headshots or images where the subject’s face is prominent.
- Subject Placement: Ensure crucial elements are centered and away from the edges to avoid cropping during trimming.
- Image Quality: Use high-resolution photos for optimal print clarity. Most smartphones meet these requirements.
- Locket Shape: Consider how the locket’s shape (heart, oval, round) will impact the photo composition. A heart-shaped locket, for instance, will have an inverted point at the top center of your photo.
Measuring Your Locket for Photo Printing
Locket sizes vary, so accurate measurement is crucial for a perfect fit.
- Using a Template: If your locket includes a paper template, measure its widest and highest points in millimeters.
- Measuring the Locket: If you don’t have a template, carefully measure the photo area within the locket, adding half the rim’s width to each dimension if applicable. A typical locket rim is about 2mm thick.
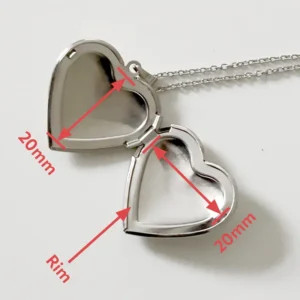 Heart Shaped Locket Measurements
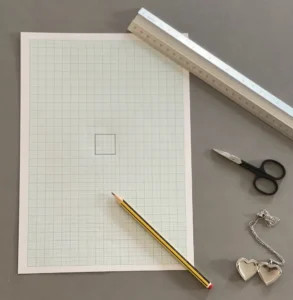
- Creating a Template: If no template is provided, create one by tracing the locket’s photo area onto graph paper and then cutting out the shape. This homemade template will aid in accurate trimming later.
Printing Your Locket Photos
Utilizing online photo printing services specifically designed for lockets simplifies the process:
- Input Dimensions: Enter the measured width and height (in millimeters) into the online locket photo service.
- Select Print Options: Choose color or black and white, and a matte or gloss finish (matte often works best for lockets).
- Upload and Crop: Upload your chosen photo and use the online cropping tool to perfectly frame your subject.
- Enable Tiling: Select the “tiling” option to create multiple copies of your cropped image on a single print. This provides extra copies for trimming and ensures a perfect fit.
 Locket Photo Uploaded to PostSnap
Trimming and Fitting Your Locket Photo
- Trace and Trim: Place your template over one of the tiled photos and carefully trace around it with a pencil. Trim along the traced line using sharp, curved scissors for clean edges.
- Insert and Adjust: Carefully insert the trimmed photo into the locket. Use tweezers to gently nudge it into place under the rim. If necessary, secure the photo with a tiny dot of photo-safe glue.
 locket photo template
By following these steps, you can create perfectly sized photos that beautifully showcase your cherished memories within your locket. Enjoy the process of personalizing this timeless piece of jewelry.
