In today’s visually-driven world, the clarity and quality of your photos can significantly impact their effectiveness, whether for personal memories, professional portfolios, or engaging social media content. Common issues like blurriness, low resolution, or dull colors can detract from even the most compelling subjects. Fortunately, Adobe Photoshop offers a suite of powerful tools designed to elevate your images and address these quality concerns effectively.
This guide will walk you through essential Photoshop techniques to enhance your photo quality, transforming ordinary snapshots into visually stunning images. Discover how to leverage Photoshop to bring out the best in your photographs and make them truly shine.
Understanding Key Photoshop Tools for Image Enhancement
Photoshop provides a range of features specifically designed to improve image quality. We’ll focus on some of the most impactful, including:
- Super Resolution: An AI-powered feature to dramatically increase image resolution without significant quality loss.
- Adjustment Layers: Non-destructive tools for fine-tuning brightness, contrast, color balance, and more.
- Sharpening Filters: To enhance detail and clarity, making images appear crisper.
- Noise Reduction Filters: To minimize grain and artifacts, resulting in smoother images.
- Crop Tool: For perfecting image composition and removing unwanted elements.
- Healing Tools: To seamlessly remove blemishes and imperfections.
Step-by-Step Guide: How to Improve Photo Quality in Photoshop
Let’s dive into the practical steps you can take to enhance your photos using Photoshop.
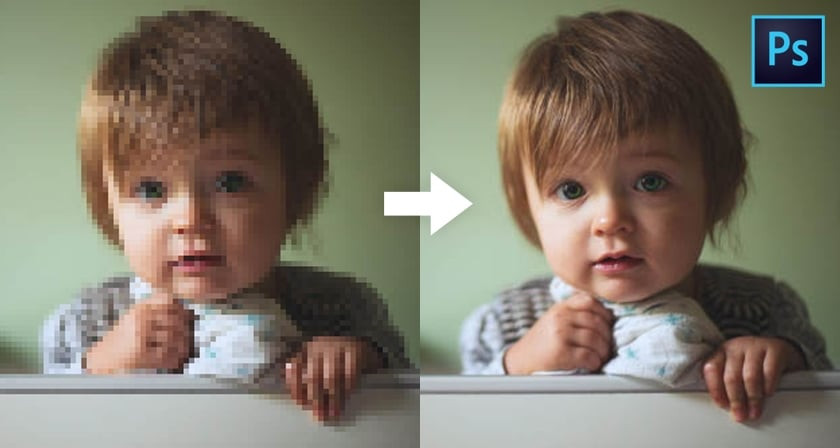
1. Increase Resolution with Super Resolution
Super Resolution, powered by Adobe Sensei AI, is a game-changer for increasing image resolution. It intelligently doubles the linear resolution of your image (both height and width) while preserving details and minimizing artifacts.
To use Super Resolution:
-
Open your image in Adobe Camera Raw (ACR): In Photoshop, go to
File > Open Asand choose Camera Raw from the format dropdown if your file is not already a raw format, otherwise just open your image normally. Raw formats are preferred for maximum flexibility. -
Right-click on the image: In the ACR interface or in the Layers panel in Photoshop, right-click on your image layer.
-
Select “Enhance”: From the context menu, choose the “Enhance” option.
-
Check “Super Resolution”: In the Enhance dialog box, ensure the “Super Resolution” box is checked. You can preview the effect.
-
Click “Enhance”: Photoshop will process the image, creating a new, higher-resolution version.
Super Resolution is ideal for enlarging images for print or for improving the quality of images that need to be significantly scaled up.
2. Adjusting Color and Clarity
Color balance and clarity are crucial for high-quality photos. Photoshop’s Adjustment Layers offer non-destructive ways to fine-tune these aspects.
To adjust color and clarity:
-
Add Adjustment Layers: In Photoshop, go to the
Layerspanel and click theCreate new fill or adjustment layericon at the bottom. Select from options likeBrightness/Contrast,Hue/Saturation,Levels, orCurves. -
Make Color Adjustments:
- Brightness/Contrast: Adjust the overall lightness and tonal range of the image.
- Hue/Saturation: Modify the color intensity and individual color hues.
- Levels and Curves: For more advanced tonal adjustments, offering precise control over shadows, midtones, and highlights.
-
Enhance Clarity and Sharpness:
- Sharpen Filter: Go to
Filter > Sharpenand choose from options likeSharpen,Sharpen More, orUnsharp Maskfor controlled sharpening. Start withUnsharp Maskfor more customization. - Noise Reduction: If your image has excessive noise (grain), go to
Filter > Noise > Reduce Noise. Adjust the sliders to balance noise reduction with detail preservation.
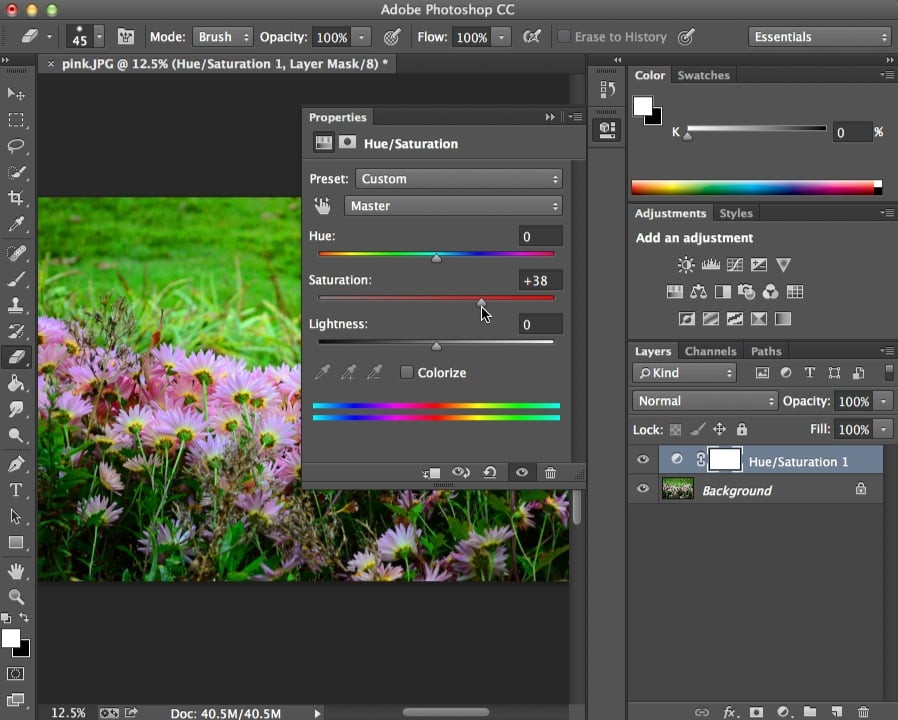 Adjusting color balance and clarity in Photoshop using adjustment layers and filter tools.
 - Sharpen Filter: Go to
Experiment with these adjustments subtly to achieve natural-looking enhancements. Over-adjusting can lead to unnatural or artificial results.
3. Refining Composition and Removing Blemishes
Composition and the removal of distracting blemishes are essential for a polished, high-quality photo.
To refine composition and remove blemishes:
-
Crop for Better Composition:
- Select the Crop Tool (
Ckey). - Adjust the crop handles to frame your subject effectively, removing distracting background elements. Consider using the rule of thirds or other composition guidelines.
- Select the Crop Tool (
-
Remove Blemishes and Imperfections:
- Spot Healing Brush Tool: For small blemishes like spots or dust marks. Simply click on the blemish to remove it.
- Healing Brush Tool: For larger or more complex blemishes. Sample a clean area adjacent to the blemish (Alt-click) and then paint over the blemish.
- Patch Tool: For replacing larger sections. Draw a selection around the area you want to replace and then drag the selection to a clean area to source replacement texture.
 Refining photo composition with the crop tool and removing blemishes using Photoshop's healing tools.
These tools allow you to clean up your images, drawing focus to the intended subject and improving overall visual appeal.
Bonus Tip: Adjusting Image Size and Resolution for Specific Needs
Sometimes, improving quality means adjusting the image size and resolution for specific purposes like printing or web display.
To adjust image size and resolution:
-
Go to Image Size: Navigate to
Image > Image Size. -
Adjust Resolution and Dimensions:
- Uncheck “Resample”: To change resolution without altering the pixel dimensions and thus the image quality itself (useful for print adjustments).
- Enter Desired Resolution: For printing, 300 DPI is standard. For web, 72 DPI is common.
- Alternatively, Check “Resample”: To change pixel dimensions. Choose a resampling method (like “Bicubic Smoother” for enlargement or “Bicubic Sharper” for reduction) and enter your desired width or height. Be cautious when increasing dimensions significantly as it can lead to quality loss unless combined with Super Resolution.
Refining photo composition with the crop tool and removing blemishes using Photoshop's healing tools.
Adjusting image size correctly ensures your photos are displayed or printed at the optimal quality for their intended use.
Considering Alternatives: Online Photo Enhancers like Fotor
While Photoshop is incredibly powerful, online photo enhancers like Fotor offer quicker, AI-driven solutions for basic image enhancements. These tools often provide one-click enhancement options for users seeking fast results without the complexity of Photoshop.
Fotor, for example, utilizes AI to automatically improve color, brightness, and clarity, and even upscale images with minimal effort. These online tools are excellent for rapid improvements, especially for users who are new to photo editing or need to process images quickly.
 Fotor online AI photo enhancer interface offering quick image quality improvements.
However, for nuanced control and professional-level results, Photoshop remains the industry standard.
Conclusion
Enhancing photo quality in Photoshop involves a range of techniques, from leveraging AI-powered Super Resolution to fine-tuning color, clarity, and composition. By mastering these step-by-step methods, you can significantly improve your photographs, making them more impactful and visually appealing. Whether you aim for subtle refinements or dramatic transformations, Photoshop provides the tools to achieve your desired image quality. Start experimenting with these techniques today and unlock the full potential of your photos!