Cropping photos to specific shapes in PowerPoint can enhance your presentations, making them visually appealing and engaging. This guide provides a step-by-step approach to cropping images into various shapes directly within PowerPoint. Whether you need a circular profile picture or a star-shaped image for emphasis, PowerPoint’s cropping tools make it easy.
Cropping an Image to a Predefined Shape in PowerPoint
PowerPoint offers a variety of built-in shapes for cropping your images. Here’s how:
-
Insert Your Image: Start by inserting the picture you want to crop into your PowerPoint slide. Go to the “Insert” tab and click on “Pictures.” Choose your image source and select the picture.
-
Access the Crop Tool: Once your image is inserted, click on it to select it. The “Picture Format” tab will appear in the ribbon. In this tab, click the arrow below the “Crop” button.
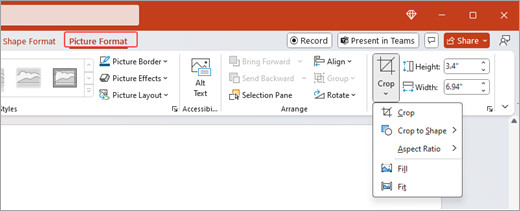 PowerPoint Ribbon Showing Picture Format and Crop Tool
 -
Choose Your Shape: In the drop-down menu, select “Crop to Shape.” A gallery of shapes will appear, ranging from basic geometric shapes like circles and squares to more complex shapes like stars and arrows. Choose the shape you desire. PowerPoint will instantly crop your image to that shape.
-
Adjust the Crop: Black crop handles will appear around your newly shaped image. You can adjust how the picture fits within the shape by dragging these handles. Dragging a corner handle will crop two sides simultaneously. Holding Ctrl while dragging a side handle will crop two parallel sides evenly.
-
Finalize Your Crop: Click the “Crop” button again to finalize the changes.
Filling or Fitting Your Image within the Shape
PowerPoint offers two options for how your image fits inside the chosen shape:
- Fill: This option stretches and expands your image to completely fill the shape, potentially cropping out some parts of the image’s edges.
- Fit: This option ensures your entire image is visible within the shape, potentially leaving empty space within the shape’s boundaries.
To access these options, follow steps 1-2 above. Then, instead of immediately clicking “Crop” after choosing a shape, go to “Crop” > “Fill” or “Crop” > “Fit” in the drop-down menu before making further adjustments with the crop handles.
Creating Copies for Multiple Shapes
If you need the same image cropped into different shapes, duplicate the original image before cropping. This ensures you retain the original uncropped image. Right-click the image and select “Copy,” then right-click again and choose “Paste.” Now you can crop each copy into a different shape.
Conclusion
Cropping photos on PowerPoint is a straightforward process that can significantly enhance the visual impact of your presentations. By utilizing the built-in cropping tools and understanding the “Fill” and “Fit” options, you can easily customize your images to perfectly complement your slides. Experiment with different shapes and cropping adjustments to achieve your desired visual effect.