AirDrop is a fantastic feature on Apple devices that allows you to quickly share and receive photos, documents, and more with nearby iPhones, iPads, and Macs. If you’re new to the Apple ecosystem or just starting to use AirDrop, you might be wondering, “Where do AirDrop photos go on my iPhone?” This guide will walk you through everything you need to know about finding your AirDrop photos and using AirDrop effectively.
Before You Begin AirDropping Photos
To ensure a smooth AirDrop experience for sending and receiving photos, there are a few preliminary checks to make:
- Proximity is Key: Make sure that the person you are sending photos to is physically close to you, within the range of Bluetooth and Wi-Fi.
- Wi-Fi and Bluetooth Enabled: Both you and the recipient need to have Wi-Fi and Bluetooth turned on. If either of you has Personal Hotspot activated, it should be turned off temporarily.
- AirDrop Reception Settings: If the person sending you photos has their AirDrop set to “Contacts Only,” and you are in their contacts, they must have your Apple ID email address or mobile number saved in your contact card for AirDrop to function.
- Receiving from Everyone: If you are not in the sender’s contacts, they will need to adjust their AirDrop receiving setting to “Everyone” temporarily to successfully share photos with you.
You can always adjust your AirDrop receiving settings to “Contacts Only” or “Receiving Off” to manage who can see your device and send you content.
How to AirDrop Photos from Your iPhone
Sending photos via AirDrop is straightforward. Here’s how to do it:
-
Open the Photos App: Navigate to the Photos app on your iPhone and select the photo(s) you wish to share. You can select multiple photos by tapping the “Select” button and choosing each image, or by swiping across multiple images after selecting the first one.
-
Tap the Share Button: Once you have selected your photos, tap the Share button (it looks like an upward-pointing arrow in a box) located in the bottom left corner of the screen.
-
Select AirDrop: In the share sheet that appears, look for the AirDrop icon and tap it.
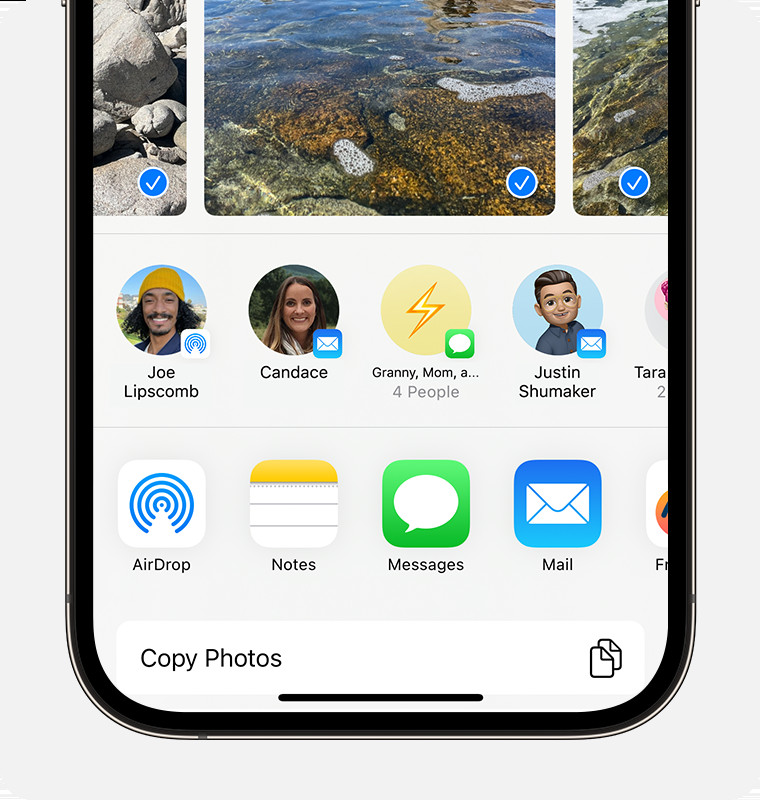 An iPhone displaying the share sheet with multiple photos selected and the AirDrop option highlighted.
 -
Choose the Recipient: Your iPhone will now search for nearby AirDrop-enabled devices. You will see a list of available users. Tap on the name of the AirDrop user you want to send photos to. You can also use AirDrop to share photos between your own Apple devices.
For users with iOS 17 and later, there’s an even quicker method. If you are near someone in your Contacts, you can simply bring your iPhones close together to initiate sharing.
Where to Find AirDrop Photos on Your iPhone
When someone AirDrops photos to your iPhone, they are automatically saved to your Photos app. Here’s exactly where to find them:
- Open the Photos App: Tap on the Photos app icon on your home screen.
- Navigate to Your Library: The AirDropped photos will be placed in your main photo library, typically in the “Recents” album or “Library” tab depending on your iOS version and how you organize your photos.
- Check “Recents” Album: In most cases, the quickest way to find your AirDrop photos is to check the “Recents” album. This album chronologically displays your most recently added photos and videos, including those received via AirDrop.
- Browse Your Library: If you are organizing your photos into different albums, you can also browse through your entire library. AirDrop doesn’t place photos in a separate, dedicated “AirDrop” album, but integrates them directly into your existing photo collection.
Accepting AirDrop Photos
When someone shares photos with you via AirDrop, an alert will pop up on your iPhone screen. You have two choices: “Accept” or “Decline.”
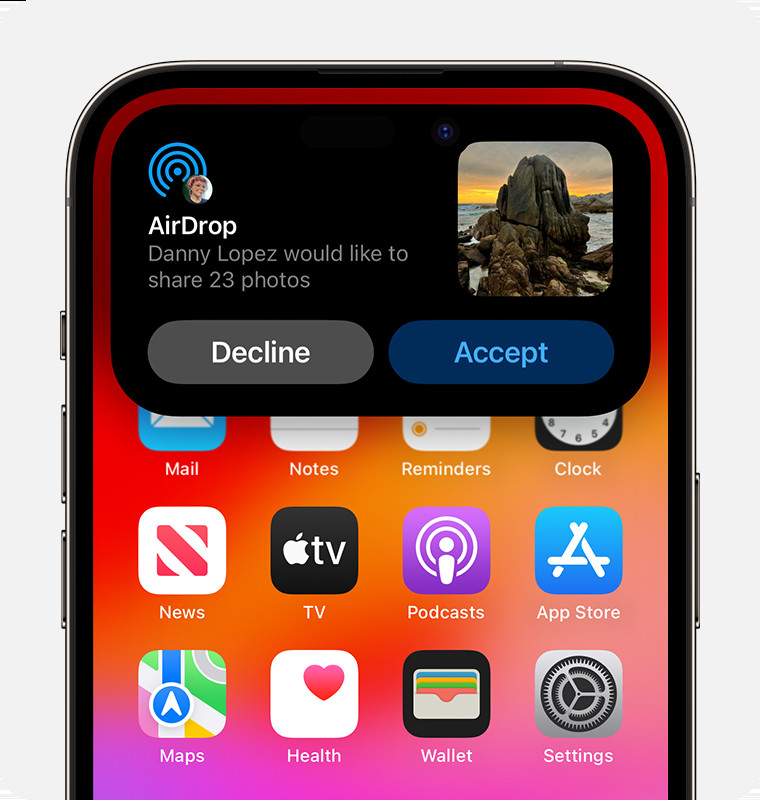 An iPhone showing an AirDrop alert with options to accept or decline the incoming transfer.
- Tap “Accept”: To receive the photos, simply tap “Accept.” The photos will then be transferred to your Photos app as described above.
- Automatic Acceptance for Your Devices: If you AirDrop photos between your own Apple devices (for example, from your iPhone to your iPad or Mac) that are logged in with the same Apple ID, you won’t see the “Accept” or “Decline” prompt. The photos will be automatically sent and saved to the receiving device.
Adjusting Your AirDrop Receiving Settings
You can customize who can see your device and send you content via AirDrop by adjusting your receiving settings:
-
Open Settings: Go to the Settings app on your iPhone home screen.
-
Tap General: Scroll down and tap on “General.”
-
Select AirDrop: Tap on “AirDrop.”
-
Choose Your Preference: You will see three options:
- Receiving Off: You will not receive any AirDrop requests.
- Contacts Only: Only people in your contacts list can see your device and AirDrop to you.
- Everyone: All nearby Apple devices using AirDrop can see your device. In iOS 16.2 and later, when you choose “Everyone” this setting will revert to “Contacts Only” after 10 minutes as a security feature.
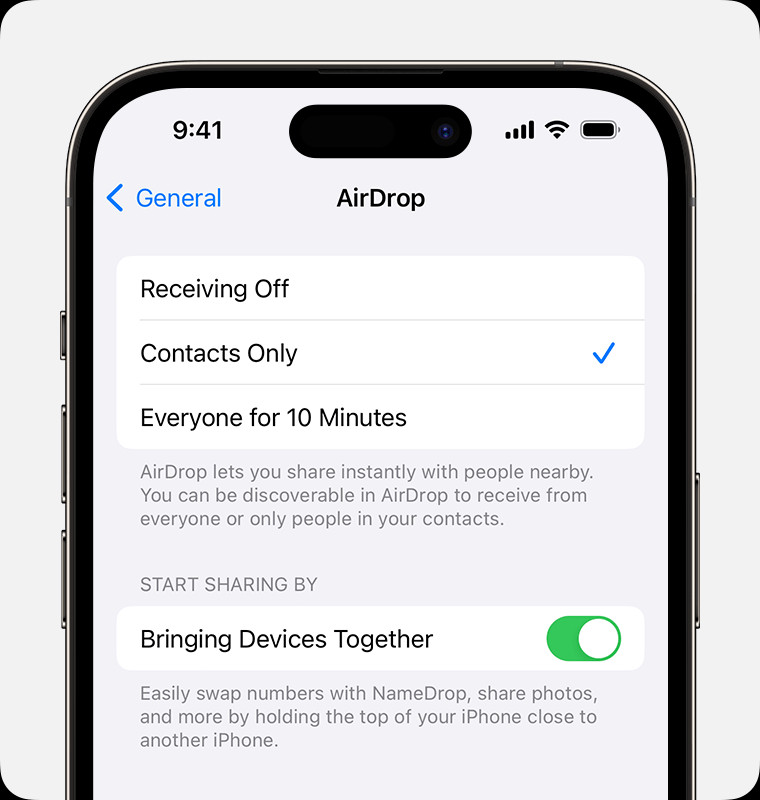 An iPhone displaying AirDrop settings with "Contacts Only" selected as the preferred receiving option.
You can also quickly access and change these settings from the Control Center:
- Open Control Center:
- iPhone X and later: Swipe down from the top-right corner of your screen.
- iPhone 8 and earlier: Swipe up from the bottom of the screen.
- Force Touch or Touch and Hold Network Settings Card: In the upper-left corner of the Control Center, press firmly or touch and hold the network settings card (the card with Wi-Fi, Bluetooth, and Cellular icons).
- Touch and Hold AirDrop Button: Touch and hold the AirDrop button.
- Select Your Option: Choose “Receiving Off,” “Contacts Only,” or “Everyone” from the options that appear.
By following these steps, you’ll be able to confidently use AirDrop to share and find your photos on your iPhone. Enjoy the seamless sharing experience that AirDrop provides within the Apple ecosystem!