Live Photos on iPhone bring your still images to life by capturing a few moments of motion and sound just before and after you snap a picture. This feature transforms your photos from static images into short, engaging videos, allowing you to relive memories in a more immersive way. With Live Photos, you don’t just capture a moment; you capture an experience.
Understanding Live Photos: More Than Just a Photo
Introduced by Apple, Live Photos is designed to record what happens 1.5 seconds before and 1.5 seconds after you press the shutter button on your iPhone camera. When you later view a Live Photo, pressing and holding on the image brings it to life, playing back those precious few seconds. This adds depth and context to your photos, capturing fleeting smiles, subtle movements, and ambient sounds that a traditional still photo would miss.
Live Photos are compatible with iPhone 6s and later, iPad (5th generation) and later, iPad Air (3rd generation) and later, iPad mini (5th generation) and later, and iPad Pro models from 2016 or later. This widespread compatibility ensures that a vast majority of Apple users can take advantage of this feature.
How to Take Live Photos on Your iPhone
Taking a Live Photo is as simple as taking a regular photo. Here’s how to ensure you’re capturing moments in motion:
-
Open the Camera app: Locate and tap the Camera app icon on your iPhone’s home screen.
-
Select Photo Mode: Make sure your camera is set to photo mode. Swipe left or right on the camera interface to navigate through the different camera modes like Video, Portrait, etc., and ensure you are in “Photo” mode.
-
Verify Live Photos is Enabled: Look for the Live Photo button, which resembles a series of concentric circles, typically located at the top right or left of your screen in portrait or landscape mode respectively. If the icon is yellow (or highlighted) and not crossed out, Live Photos is turned on. If it’s white with a slash through it, tap the button to activate Live Photos. Live Photos is often the default setting, so it might already be active.
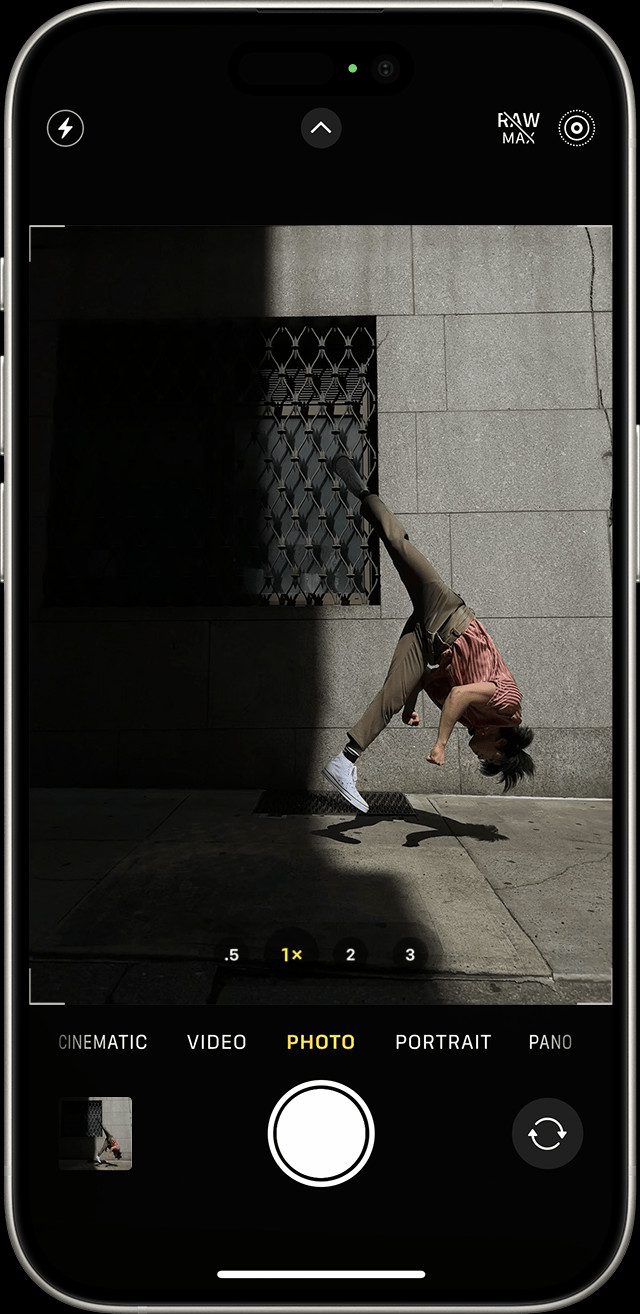 An iPhone displaying the Camera app with the Live Photos feature activated.
Make sure the Live Photos icon is active (not crossed out) in the Camera app to capture motion.
-
Hold Your iPhone Steady: Just like with regular photos, maintaining a steady hand is crucial, especially during the capture window of a Live Photo. This helps prevent blurry or shaky results in the motion part of the Live Photo.
-
Press the Shutter Button: Tap the white circle button at the bottom center of your screen to take your photo. Your iPhone will capture the still image along with the preceding and succeeding moments as a Live Photo.
Finding and Playing Your Live Photos
Once you’ve captured Live Photos, accessing and playing them is straightforward through the Photos app:
-
Open the Photos App: Tap the Photos app icon on your iPhone’s home screen.
-
Navigate to the “Live Photos” Album: Scroll down within the “Albums” tab until you find the “Media Types” section. Tap on “Live Photos.” This album automatically collects all the Live Photos you’ve taken, making them easy to find.
 Accessing the Live Photos album within the Photos app on an iPhone.
Locate the dedicated “Live Photos” album in the Photos app under Media Types for easy access.
-
Select a Live Photo: Tap on any photo in the “Live Photos” album to open it in full screen.
-
Play the Live Photo: To bring the photo to life, simply press and hold anywhere on the photo. You’ll see the image animate, playing the recorded motion and sound. Release your finger, and the photo returns to its still state.
Editing Your Live Photos: Key Photo, Effects, and More
Live Photos are not just about capturing motion; they also offer editing capabilities to enhance your dynamic images.
Changing the Key Photo
The “key photo” is the still frame that represents your Live Photo when it’s not playing. You can change this to select the best still image from within your Live Photo:
-
Open and Edit: Open the Live Photo you want to adjust in the Photos app and tap “Edit” in the top right corner.
-
Access Live Photo Edit Tools: Tap the Live Photos button (the concentric circles icon) in the edit interface. This will display the film strip of your Live Photo at the bottom.
-
Select a New Frame: Drag the white frame in the film strip slider left or right to browse through the different frames of your Live Photo.
-
Set as Key Photo: Once you’ve found the frame you want to use as the key photo, release your finger and tap “Make Key Photo.” This selected frame will now be the still image displayed for your Live Photo.
-
Save Changes: Tap “Done” in the bottom right corner to save your changes.
Adjust the key photo of your Live Photo by selecting a preferred frame from the filmstrip in edit mode.
Adding Fun Live Photo Effects: Loop, Bounce, and Long Exposure
Beyond changing the key photo, you can also apply creative effects to your Live Photos:
-
Open a Live Photo.
-
Access Effects Menu: Tap the “Live” dropdown menu at the top left of the screen (it may initially say “Live” or display the current effect if one is applied).
-
Choose an Effect: Select from the following effects:
- Loop: This effect turns your Live Photo into a repeating video loop, continuously playing the motion back and forth. It’s great for capturing ongoing actions like waves crashing or a person dancing.
- Bounce: Bounce makes your Live Photo play forward and then immediately in reverse, creating a back-and-forth “bouncing” effect. This is fun for actions with a clear start and end, such as jumping or a pet playing.
- Long Exposure: This effect simulates a long exposure shot, blurring motion in your Live Photo while keeping static elements sharp. It’s particularly effective for capturing light trails, smoothing water in waterfalls, or creating artistic motion blurs. This was previously an effect only achievable with professional DSLR cameras, now available on your iPhone.
Advanced Editing Adjustments
Like standard photos, you can also apply a range of adjustments to your Live Photos, including:
-
Open the Live Photo you wish to refine.
-
Tap “Edit.”
-
Use Editing Tools: Utilize the standard iPhone photo editing tools to adjust brightness, contrast, color, filters, and more. Tap “Done” to save your edits. Be aware that editing in third-party apps might remove Live Photo effects.
The Edit button, represented by slider icons, allows access to standard photo adjustments for Live Photos.
Sharing Your Live Photos
Sharing Live Photos allows others to experience your dynamic memories. Here’s how to share them effectively:
- Select a Live Photo you want to share and tap the “Share” button (the upward-pointing arrow in a box).
- Choose Sharing Options: You’ll see various sharing options like Messages, Mail, social media platforms, and more.
- Sharing as Still Photo (Optional): If you want to share only the still image and not the Live Photo motion, tap “Live” in the top left corner of the photo in the share sheet before selecting your sharing method. This will convert it to a static image for sharing. Note that sharing via email (Mail) typically sends Live Photos as still images by default.
- Sharing via Messages: When you send or receive Live Photos via iMessage, the recipient can view the motion by pressing and holding the photo within the Messages app.
- Sharing on Mac: If you’re using Messages on a Mac, double-clicking a Live Photo will play it once. To replay it, click the “LIVE” button in the bottom-left corner of the photo.
Turning Off Live Photos: Temporary and Permanent Options
While Live Photos is a fantastic feature, there might be times when you want to disable it, either temporarily or permanently, to save storage space or for specific photography needs.
Temporarily Disabling Live Photos
To turn off Live Photos temporarily for your next photos:
-
Open the Camera app.
-
Tap the Live Photos button (the concentric circles icon). Tapping it once will disable Live Photos for the current session. The icon will turn white with a slash through it, indicating it’s off. However, Live Photos will likely turn back on the next time you open the Camera app.
The Live Photos button with a slash indicates that the feature is currently disabled.
Permanently Preserving Live Photos Off Setting
To keep Live Photos turned off across camera sessions:
- Open the Settings app on your iPhone.
- Scroll down and tap “Camera.”
- Tap “Preserve Settings.”
- Toggle “Live Photo” to On (Green): Ensure the switch next to “Live Photo” is turned on (green). This setting tells your iPhone to remember whether Live Photos was on or off the last time you used the Camera app and to maintain that setting for future sessions. If you want Live Photos to remain off persistently, turn it off in the Camera app once, and with this setting enabled, it will stay off until you manually turn it back on.
Live Photos offer a unique way to capture and relive your memories with motion and sound, adding an extra dimension to your iPhone photography. Experiment with taking, editing, and sharing Live Photos to fully appreciate this dynamic feature and bring your photos to life.