Have you ever been captivated by a stunning landscape, only to find your camera unable to capture the scene as vividly as your eyes perceived it? Perhaps you’ve photographed a sunset where the sky blazes with color, but the foreground is plunged into darkness. This common frustration stems from the limitations of digital cameras in capturing the full range of light our eyes can see. Last year, while driving through the breathtaking Rocky Mountains, I witnessed a sunset that stopped me in my tracks. Determined to capture its beauty, I raised my camera, only to be met with disappointment. The single shot I took failed to represent the scene; the sky was acceptable, but the majestic mountains were rendered as mere silhouettes. Armed with just my camera and a reliable tripod, I knew I needed a different approach. That’s when I turned to High Dynamic Range (HDR) photography. The result was an image that finally did justice to the scene:
 Combined in Software
HDR image created from multiple exposures showcasing a balanced scene, displaying detail in both the bright sky and dark mountains.
HDR photography can be polarizing. Some photographers adore the often surreal and detailed look it provides, while others find it unnatural or over-processed. Regardless of personal taste, understanding what HDR photography is and how it works is a valuable skill for any photographer. Let’s delve into the world of HDR and explore how it can help you capture scenes closer to how you see them.
Understanding Dynamic Range in Photography
To understand HDR, it’s crucial to first grasp the concept of dynamic range. Dynamic range refers to the spectrum of light intensities a camera sensor can record, from the deepest shadows to the brightest highlights. Think of it as the range of tones and colors your camera can differentiate within a single photograph. Human vision possesses an incredibly wide dynamic range, allowing us to see details in both brightly lit and dimly lit areas simultaneously. Unfortunately, digital camera sensors, while constantly improving, still have a narrower dynamic range than our eyes.
This limitation becomes apparent in high-contrast scenes, like the sunset I described. When you photograph such a scene with a standard camera setting, you’ll often find that either the bright areas (like the sky) are correctly exposed, but the shadows are too dark and lack detail, or vice versa. You might have experienced this yourself: tweaking camera settings in manual mode to brighten the dark areas only results in overexposing the bright parts, and darkening the highlights crushes the shadows further. This is because the scene’s dynamic range exceeds the camera’s ability to capture it in a single exposure.
To illustrate this, consider these two images I captured of the same scene, attempting to prioritize different areas for exposure:
 Metered to Sky
Image metered for the sky, resulting in a well-exposed sky but underexposed and dark foreground.
Metered to Ground
Image metered for the ground, resulting in a well-exposed foreground but overexposed or “blown out” sky.
The images clearly demonstrate the challenge. In the first image, exposing for the sky leaves the foreground detail lost in shadows. In the second, exposing for the foreground sacrifices the sky, which becomes overexposed and loses its color and detail. My camera, despite its capabilities, couldn’t capture the full dynamic range of the scene in a single shot. This is where HDR photography steps in to bridge the gap.
What Exactly is HDR Photography?
HDR, or High Dynamic Range, photography is a post-processing technique designed to overcome the dynamic range limitations of cameras. It works by combining multiple images of the same scene, each captured at a different exposure level. These varying exposures capture details in the shadows, mid-tones, and highlights of the scene. Software then merges these images into a single HDR image, aiming to reproduce a broader tonal range that more closely resembles what the human eye perceives.
While ideally created from multiple exposures, HDR images can also be generated from a single RAW file. RAW files contain significantly more image data than JPEGs, offering greater flexibility in post-processing to recover shadow and highlight detail. Therefore, there are primarily two methods for creating HDR images:
- Multiple Exposures: Capturing several images of the same scene with varying shutter speeds to cover a range of exposures.
- Single Image (RAW): Utilizing the extensive dynamic range information within a single RAW file to simulate an HDR effect.
In this guide, we will explore both techniques to help you understand and create HDR images.
 HDR Image ExampleExample of an HDR image showing enhanced detail and tonal range across the entire scene, from shadows to highlights.
Essential Tools for HDR Photography
To embark on your HDR photography journey, you’ll need a few key tools. While the specific requirements might vary slightly depending on the method you choose (single or multiple exposures), here’s a general list of essential equipment and software:
- Digital Camera (DSLR or Mirrorless Preferred): While some smartphones offer HDR modes, for the best quality and control, a DSLR or mirrorless camera with manual mode capabilities is recommended. The ability to shoot in RAW format is also highly beneficial, especially for single-image HDR processing.
- Tripod (Crucial for Multiple Exposures): When capturing multiple exposures for HDR, a tripod is essential. It ensures that each image is perfectly aligned, preventing ghosting and alignment issues when the images are merged. While some HDR software can automatically align handheld shots, using a tripod yields superior results and avoids cropping due to alignment adjustments.
- Image Editing Software (e.g., Adobe Photoshop): Basic image editing software like Adobe Photoshop is necessary for some post-processing steps, such as final adjustments to color, contrast, and sharpness. Photoshop also has built-in HDR merging capabilities.
- Dedicated HDR Software (e.g., Photomatix Pro – Optional but Recommended): While Photoshop offers HDR functionality, dedicated HDR software like Photomatix Pro provides more advanced features, greater control over the HDR look, and often produces superior results, especially for achieving natural-looking HDR images. Other options exist, including free and open-source software, but Photomatix Pro is widely regarded as a leading option.
- Noise Reduction Software (e.g., Nik Dfine, Noise Ninja – Optional): HDR processing can sometimes amplify noise, particularly in shadow areas. Noise reduction software can be helpful in cleaning up these artifacts and ensuring a smooth final image.
Water Wheel HDR Example
HDR image of a water wheel, demonstrating the enhanced detail and texture achievable with HDR techniques.
Camera Settings for Optimal HDR Photography
To maximize the quality of your HDR images, especially when using multiple exposures, paying attention to camera settings is crucial. Here are recommended settings for HDR photography:
- Shoot in RAW Format: Always shoot in RAW format. RAW files capture significantly more data than JPEGs, providing much greater latitude for adjusting exposure and recovering details in post-processing, essential for both single and multiple image HDR. Refer to resources on “RAW vs JPEG” for a deeper understanding of the benefits of RAW.
- Use Aperture Priority Mode (Mode A or Av): Set your camera to Aperture Priority mode. This allows you to maintain a consistent aperture across all bracketed shots, ensuring a uniform depth of field throughout your HDR sequence. Consistency in aperture is important for a seamless HDR merge.
- Set Metering Mode to Matrix/Evaluative Metering: Use Matrix Metering (Nikon) or Evaluative Metering (Canon). These metering modes analyze the entire scene to determine an appropriate overall exposure. This will serve as your base exposure (0 EV) in your bracketed sequence. For more information on metering modes, consult articles explaining “understanding metering modes”.
- Utilize Bracketing Function for Multiple Exposures: Engage your camera’s bracketing function. This feature automatically captures a series of images at different exposure levels. For three-image HDR, use 2 EV (Exposure Value) steps (e.g., -2, 0, +2). For five-image HDR, use 1 EV step increments (-2, -1, 0, +1, +2). Experiment to find what works best for your style and typical scenes.
- Minimize Movement: Be mindful of movement in your scene. Wind can cause foliage, trees, and clouds to shift between exposures, leading to ghosting artifacts in your final HDR image. Shoot bracketed frames as quickly as possible, especially in windy conditions or when clouds are moving rapidly.
- Burst Mode Shooting: Use your camera’s continuous burst mode to capture bracketed exposures rapidly. This minimizes the time between shots, reducing the chance of unwanted movement affecting the alignment of your HDR images.
- Watch for Moving Objects: Be aware of any moving objects within your frame, such as cars or people. While HDR software offers ghost reduction features, minimizing movement during capture is always preferable. Motion can be challenging to completely eliminate in post-processing.
Creating HDR Photos from a Single Image (RAW File)
You can create an HDR-like image from a single, well-exposed RAW file, especially if the scene’s dynamic range isn’t excessively extreme. This method works because RAW files contain a vast amount of tonal information that isn’t immediately visible in standard image viewers. The key is to ensure your original RAW image is properly exposed, with neither highlights completely blown out nor shadows entirely clipped to black. A well-exposed RAW file holds recoverable detail in both bright and dark areas.
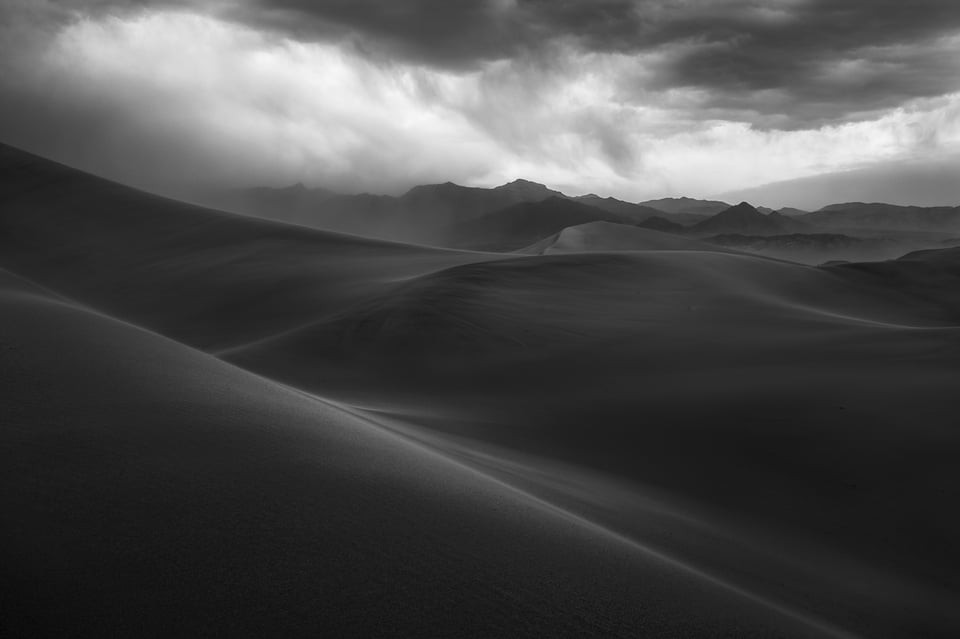
Consider this image taken at the Sand Dunes National Park:
Single Image HDR Sample 1Original single RAW image, seemingly underexposed but containing recoverable shadow and highlight detail.
Initially, the image appears underexposed. However, within the RAW file, there’s ample data in both the sky and the dunes. By adjusting the exposure in software like Lightroom or Photoshop, we can reveal these details. Decreasing the exposure to -1 EV brings out sky detail, while increasing it to +3 EV recovers detail in the darker sand dunes:
 Single Image HDR Exposure -1EV
Exposure adjusted to -1 EV, revealing details in the sky.
Single Image HDR Exposure +3EV
Exposure adjusted to +3 EV, recovering details in the sand dunes.
From this single RAW file, we can extract multiple “virtual exposures” by adjusting the exposure settings. In this example, we can create five virtual exposures: -1 EV, 0 EV (original), +1 EV, +2 EV, and +3 EV. These virtual exposures can then be merged in HDR software to create an HDR image. Here’s the result after processing these five virtual exposures in Photomatix Pro:
Single Image HDR ResultHDR image created from a single RAW file, demonstrating improved dynamic range and detail.
Step-by-Step Guide for Single Image HDR in Photomatix Pro:
-
Extract Virtual Exposures: Open your RAW file in Lightroom, Photoshop, or your preferred RAW editor. Create multiple TIFF (16-bit) files, each with a different exposure adjustment (e.g., -1, 0, +1, +2, +3 EV). Export these as 16-bit TIFF files to preserve maximum tonal range.
-
Generate HDR Image in Photomatix Pro:
- Launch Photomatix Pro and click “Generate HDR image.”
- Click “Browse…” and select the extracted TIFF files. Click “OK.”
- Photomatix Pro will prompt you to confirm the exposure values of each file. Ensure the base exposure is set to 0, and the others reflect the exposure adjustments you made (e.g., -1, +1, +2, +3).
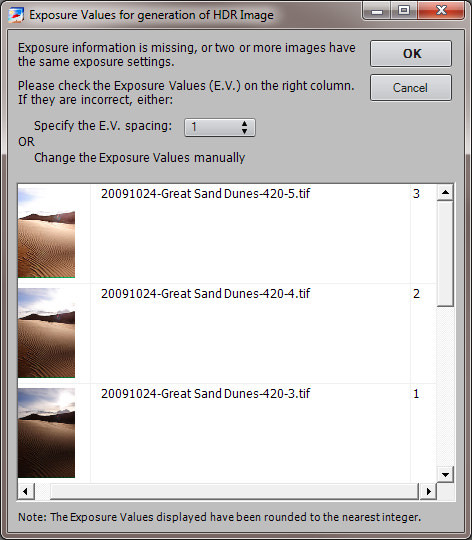 Photomatix EV Spacing SettingsPhotomatix Pro dialog box for setting Exposure Value (EV) spacing between images.
- Click “OK.”
- In the next window, uncheck “Align source images” and “Attempt to reduce ghosting artifacts” as these are not necessary when using virtual exposures from a single image.
 Photomatix Generate HDR SettingsPhotomatix Pro settings for generating HDR from multiple exposures, with alignment and ghost reduction options.
- Click “OK.” Photomatix Pro will merge the images and generate a default HDR image.
-
Tone Mapping: Click the “Tone Mapping” button on the left side of the Photomatix Pro window. The initial tone-mapped image may appear flat or unappealing, as default settings rarely produce optimal results.
Single Image HDR Default Tone Mapping
Example of a default tone-mapped HDR image which may appear flat or unrealistic. -
Adjust Tone Mapping Settings: Experiment with the tone mapping sliders to achieve your desired look. Settings will vary depending on the image and your artistic preference. For the Sand Dunes image, settings like those shown below can produce a more pleasing result:
 Single Image HDR Adjusted Tone Mapping
Example of an HDR image after adjusting tone mapping settings for a more natural or stylized look. -
Process and Save: Click “Process” to finalize the tone mapping. Then, go to “File -> Save As” (or Ctrl+S) to save your HDR image.
-
Final Touches in Photoshop: Open the saved HDR image in Photoshop. Apply noise reduction if needed, and subtly sharpen the image. You can also make further adjustments to color and curves to refine the final result.
While single-image HDR offers a convenient way to expand dynamic range, some argue that similar results can be achieved through careful RAW processing in Lightroom or Photoshop using techniques like graduated filters. However, HDR processing often imparts a distinct look and feel. Compare these two versions of the Sand Dunes image:
Single Image HDR Comparison
HDR image created from a single RAW file.
Single Image Grad Filter Comparison
Image adjusted with a graduated filter in Lightroom, simulating dynamic range adjustment.
The HDR version often exhibits a unique aesthetic compared to an image adjusted with standard editing tools, making it a stylistic choice as well as a technical solution.
Creating HDR Photos Using Multiple Images (Bracketed Exposures)
For the most comprehensive dynamic range expansion and highest quality HDR images, using multiple bracketed exposures is the preferred method. While single-image HDR can be effective, merging multiple images captured at different exposures captures a wider range of tonal information directly from the scene. Three bracketed exposures (e.g., -2 EV, 0 EV, +2 EV) are often sufficient, but using five exposures (-2 EV, -1 EV, 0 EV, +1 EV, +2 EV) can provide even more detail and smoother transitions.
Let’s explore the process of creating HDR images from multiple exposures.
-
Load Images into Photomatix Pro: Open Photomatix Pro and click “Generate HDR Image.” For optimal results, use the original RAW files (e.g., NEF for Nikon, CR2 for Canon) for merging. Alternatively, you can use 16-bit TIFF or DNG files exported from Lightroom. Photomatix Pro supports various image formats.
-
RAW File Options: When loading RAW files, Photomatix Pro presents options for white balance and color profiles.
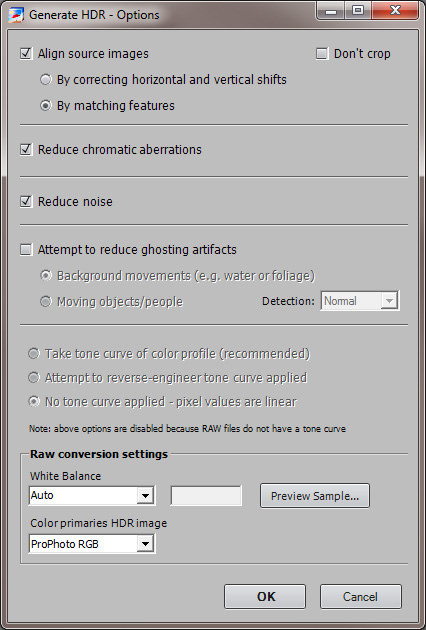 Photomatix RAW File OptionsPhotomatix Pro dialog box for setting white balance and color space when using RAW files for HDR.
Select the appropriate white balance and choose ProPhoto RGB as the color space to preserve the widest range of colors. Check the “Align source images” box, as slight misalignments can occur between bracketed shots, even when using a tripod. If there are moving elements in your scene (like foliage in wind), also check “Attempt to reduce ghosting artifacts.”
-
Generate HDR Image: Click “OK” to begin the HDR merging process. Processing multiple RAW files is more resource-intensive and will take longer than single-image HDR, so be patient.
-
Tone Mapping: Once the initial HDR image is generated, click the “Tone Mapping” button to begin adjusting the image’s appearance.
-
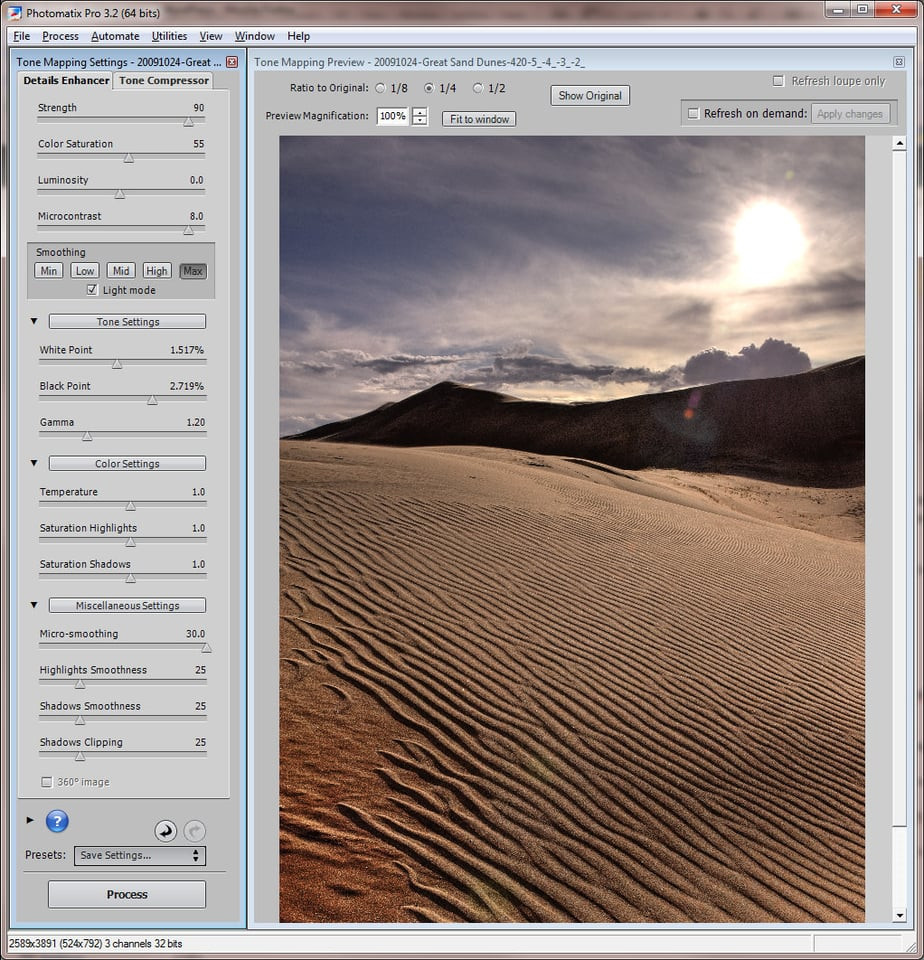
Adjust Tone Mapping Settings: Experiment with Photomatix Pro’s tone mapping sliders to achieve your desired aesthetic. Settings will vary based on the specific image and your creative vision. Here are example settings that worked well for the Sand Dunes image:
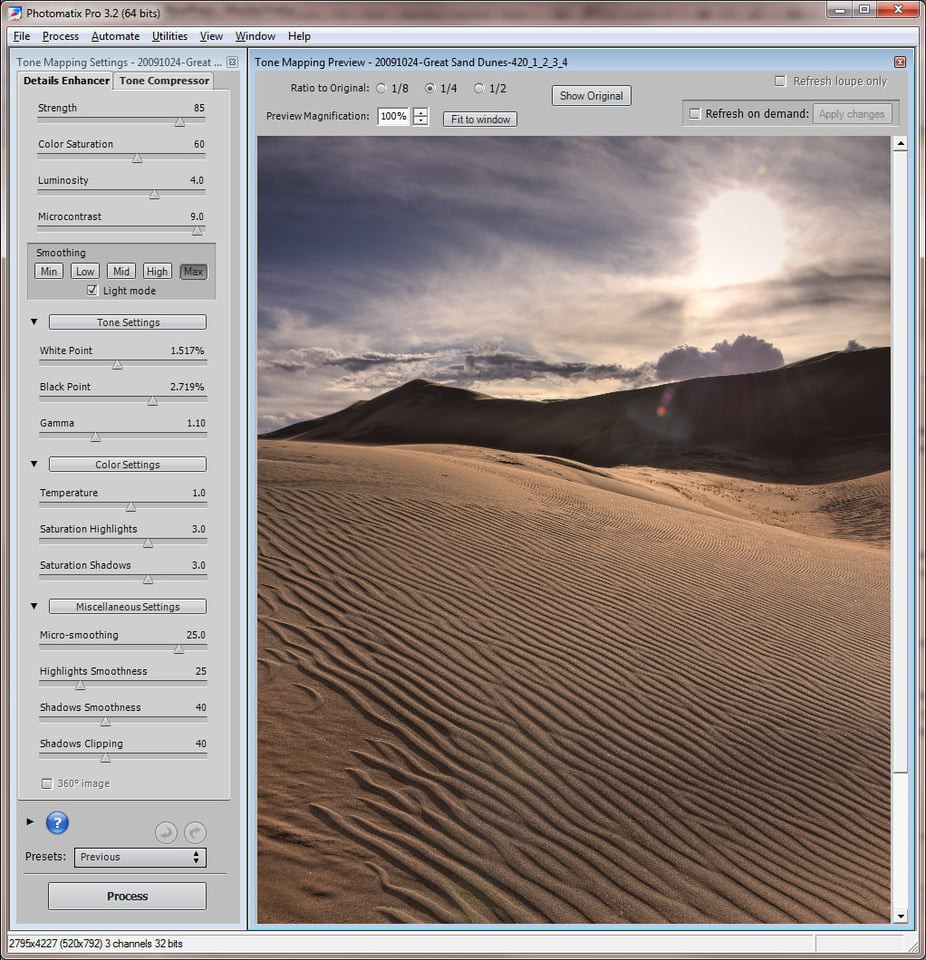 Multiple Image HDR Tone Mapping Settings
Example of tone mapping settings in Photomatix Pro for HDR image created from multiple exposures. -
Process and Save: Click “Process” to apply tone mapping. Save the HDR image using “File -> Save As” (or Ctrl+S).
-
Final Touches in Photoshop: Open the saved HDR image in Photoshop for final refinements. While noise levels are typically lower in multi-exposure HDR compared to single-image HDR, some noise reduction might still be beneficial. Apply subtle sharpening and adjust colors and curves as needed to finalize your image.
-
Final Result: Here’s the final HDR image created from multiple exposures of the Sand Dunes scene:
Multiple Image HDR ResultFinal HDR image created from multiple exposures, showcasing a natural look with enhanced shadow and highlight detail.
Notice how the shadows appear more natural and noise is minimized in this multi-exposure HDR image. This is because capturing detail from multiple exposures avoids extreme exposure adjustments in post-processing, which can amplify noise.
HDR Photography: Balancing Use and Avoiding Abuse
HDR photography has gained significant popularity, thanks to photographers and online communities showcasing its potential. While initially embraced primarily by amateur photographers, HDR is now widely used by professionals in landscape and architectural photography. HDR techniques can allow DSLR systems to achieve dynamic range and image quality comparable to more expensive medium or large format cameras, offering a cost-effective and versatile solution.
However, the accessibility of HDR has also led to its overuse and misuse. “HDR Surrealism,” often characterized by overly processed, cartoonish images, has become prevalent online. The line between effective HDR and overdone HDR can be subjective, but generally, the goal should be to enhance the scene naturally rather than create an artificial or garish look.
The key to effective HDR is moderation and skillful application. HDR is a powerful tool for capturing scenes with challenging dynamic range, allowing us to record details that would otherwise be lost. Ideally, a well-executed HDR image should appear natural, and viewers might not immediately recognize it as an HDR image. This “realistic HDR” approach aims to expand dynamic range subtly and tastefully, rather than creating an overly processed or artificial aesthetic.
Sunrise HDR Example
HDR sunrise image demonstrating a balanced and natural look, enhancing the scene without appearing overly processed.
Personally, I reserve HDR for situations where it’s essential – capturing sunrises, sunsets, and scenes with extreme contrast that are impossible to capture effectively with a single exposure.
In Conclusion:
HDR photography is a valuable technique for overcoming the dynamic range limitations of digital cameras and capturing scenes with a broader tonal range. Whether you choose single-image or multi-image HDR, understanding the principles and techniques outlined in this guide will empower you to create stunning images that more accurately represent the world as you see it. Experiment with different settings, software, and approaches to find your own HDR style, and remember that the most effective HDR is often subtle and enhances the scene naturally.
If you have any questions about HDR photography, please feel free to ask in the comments section below.