Is your Instagram photo blurry even after you’ve put in the effort to capture a great shot? It can be frustrating to see your photos lose quality when uploaded to Instagram. This article, brought to you by dfphoto.net, dives deep into the reasons behind blurry Instagram photos and provides actionable solutions to ensure your images always look their best. Learn about image optimization, Instagram’s compression algorithms, and how to maintain high-quality visuals on this popular platform. Discover techniques to enhance your photography skills and avoid common pitfalls that lead to blurry uploads, ensuring your visual content shines.
1. What Causes Blurry Photos on Instagram?
Your Instagram photos can turn blurry due to several factors. Instagram’s compression, incorrect file sizes or formats, and unstable internet connections often contribute to reduced image quality. Let’s explore each of these in detail.
-
Instagram’s Compression: Instagram compresses photos to save storage space and bandwidth. This process can reduce image quality, especially if the original photo is already low resolution.
-
Incorrect File Size: If your photo exceeds Instagram’s recommended file size (1MB), the platform automatically compresses it, leading to a loss in detail and sharpness.
-
Incorrect File Format: Instagram prefers JPEG (.jpg) format. Uploading in other formats can cause conversion issues, resulting in blurry images.
-
Incorrect Aspect Ratio: Instagram has specific aspect ratios. Uploading photos with non-compliant aspect ratios often forces the platform to crop or distort the image, reducing its quality. The ideal aspect ratio for Instagram is 4:5.
-
Poor Internet Connection: A weak or unstable internet connection can interrupt the uploading process, leading to incomplete or corrupted image uploads, which appear blurry.
-
Camera Settings: Sometimes, the issue isn’t with Instagram itself, but with the original photo. If your camera settings are low, or if the photo wasn’t properly focused, it will appear blurry regardless of Instagram’s processing.
-
Third-Party Apps: Using third-party apps to edit and then upload your photos can also lead to blurriness if these apps compress images too aggressively.
 Instagram Profile Interface
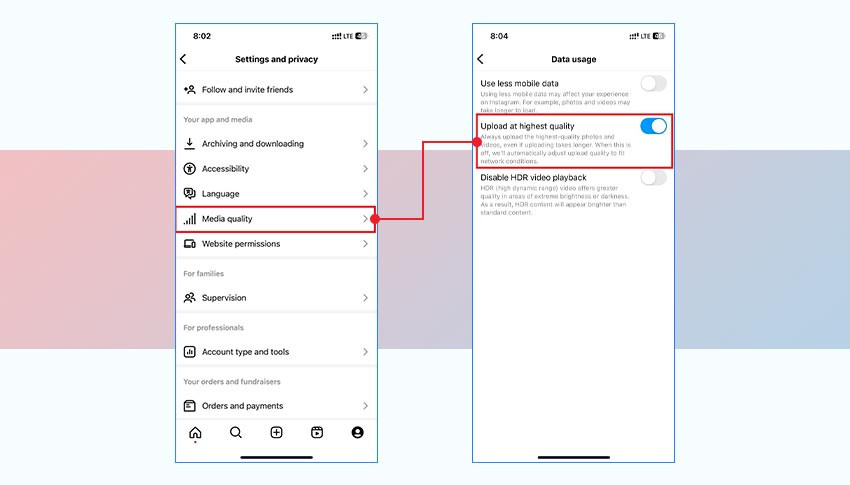
Alt Text: Adjusting Instagram data settings on an iPhone to ensure high-quality photo uploads.
2. How Can I Fix Blurry Pictures on Instagram?
Fixing blurry pictures on Instagram involves several strategies. Adjusting your Instagram data settings, ensuring a stable internet connection, and optimizing your photo’s file size and format are key steps. Let’s break down each fix with detailed instructions.
2.1. Adjust Instagram Data Settings
Adjusting Instagram’s data settings can prevent the platform from compressing your photos to save data. By turning off data saver options, you ensure that your images are uploaded in the highest possible quality.
For iPhone Users:
- Open the Instagram app.
- Tap your profile icon in the bottom-right corner.
- Tap the three horizontal lines in the top-right corner and select Settings and Privacy.
- Scroll down and tap Media Quality.
- Toggle on Upload at highest quality.
For Android Users:
- Open the Instagram app.
- Tap your profile icon in the bottom-right corner.
- Tap the three horizontal lines in the top-right corner.
- On the Settings and Privacy page, scroll down and tap Data Usage and Media Quality.
- Ensure that Data Saver is turned off and Upload at highest quality is enabled.
By following these steps, you can prevent Instagram from automatically compressing your photos, maintaining their original quality.
2.2. Check Internet Connection
A stable and fast internet connection is crucial for uploading high-quality photos to Instagram. Poor connectivity can lead to incomplete uploads, resulting in blurry or pixelated images.
- Run a Speed Test: Use online speed test tools to check your internet speed.
- Switch Between Wi-Fi and Cellular Data: If your Wi-Fi is unstable, switch to cellular data. If cellular data is slow, try using Wi-Fi.
- Restart Your Router: Sometimes, simply restarting your router can improve your internet connection.
- Move Closer to the Router: Ensure you are close enough to the Wi-Fi router for a strong signal.
- Close Background Apps: Close any apps that might be consuming bandwidth in the background.
- Reopen Instagram: After ensuring a stable connection, exit and reopen Instagram to see if the photo quality improves.
Maintaining a strong internet connection helps ensure that your photos are uploaded completely and in the best possible quality.
2.3. Clear Instagram Cache
Clearing Instagram’s cache can help resolve issues related to app performance and image quality. Over time, the cache accumulates data that can slow down the app and cause display problems.
On iOS Devices:
- Go to Settings > General > iPhone Storage > Instagram.
- You can see how much space the app uses.
- Choose the option of Offload App or Delete App to clear the cache and free up space. Note that offloading the app will keep your documents and data, while deleting the app will remove everything.
On Android Devices:
- Open Settings > Apps > App Management > Instagram > Storage Usage > Clear Cache.
Clearing the cache can improve the app’s performance and ensure that images are displayed correctly.
 Clearing Instagram Cache on Android
Alt Text: Steps to clear Instagram cache on an Android device to improve app performance and image quality.
2.4. Maximize Phone’s Camera Quality
Ensuring your phone’s camera is set to capture the highest quality images is essential for preventing blurry Instagram uploads.
- Clean the Lens: Use a dry microfiber cloth to clean your smartphone’s camera lens.
- Adjust Focus and Exposure: Manually adjust the focus and exposure settings on your phone’s camera.
- Use Good Lighting: Capture photos in well-lit areas to avoid graininess and blurriness.
- Explore Camera Features: Familiarize yourself with your smartphone’s camera features, such as HDR mode, to enhance image quality.
- Avoid Digital Zoom: Digital zoom can degrade image quality. Instead, move closer to the subject or crop the photo later.
- Use a Tripod: For stable shots, especially in low light, use a tripod or stabilize your phone against a solid surface.
2.5. Edit Photos Using a Third-Party App
Using third-party photo editing apps can significantly improve the quality of your photos before you upload them to Instagram. Apps like Adobe Lightroom, Photoshop, Snapseed, and Fotor offer advanced tools for adjusting clarity, sharpness, contrast, and brightness.
- Adobe Lightroom: Provides professional-grade editing tools and presets to enhance your photos.
- Adobe Photoshop: Offers a wide range of features, including advanced editing and retouching capabilities.
- Snapseed: A free, powerful photo editing app with a variety of tools for adjusting colors, details, and sharpness.
- Fotor: A user-friendly app with tools for basic adjustments, filters, and effects.
By carefully editing your photos, you can optimize them for Instagram and minimize the risk of blurriness.
2.6. Use Photo Repair Software
If your original photo is blurry due to corruption or damage, using photo repair software can help restore its quality before uploading to Instagram.
- Stellar Repair for Photo: A tool designed to fix blurry, pixelated, and corrupt images. It supports various file formats and can repair photos damaged during transfer, editing, or conversion.
- EaseUS Fixo: Another reliable photo repair tool that can fix various types of image corruption, including blurriness.
- Yodot Photo Repair: A software designed to repair damaged or corrupt photo files, improving their quality and clarity.
These tools can help salvage photos that would otherwise be unusable, ensuring you can upload clear and crisp images to Instagram.
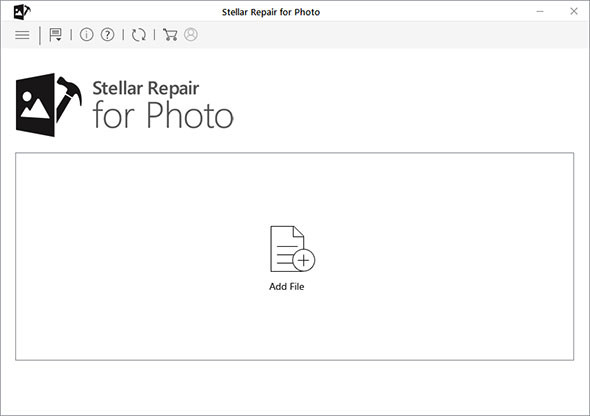
Steps to Fix Corrupt Photos with Stellar Repair for Photo:
- Download, install, and launch Stellar Repair for Photo on your Windows or Mac.
- In the home screen, click Add File to upload your corrupt photos.
- Once done, click the Repair button to start the repair process.
- After completing the repair process, you can see the prompt saying, Repair process completed. Click OK.
- Select the photos you want to Preview to see how the repaired image files look.
- Once satisfied with the repair result, click Save Repaired Files and browse to the location to save the repaired photos at your desired destination.
Following these steps can help you repair and restore your photos, making them suitable for uploading to Instagram.
 Adding Files to Stellar Repair for Photo
Alt Text: Adding blurry or corrupt photo files to Stellar Repair for Photo software for repair.
3. What Are Some Tips to Avoid Uploading Blurry Photos on Instagram?
Preventing blurriness in your Instagram photos requires a proactive approach. Here are some tips to ensure your photos are always sharp and clear:
- Clean the Camera Lens: Regularly clean your smartphone’s camera lens with a microfiber cloth to remove dust and smudges.
- Focus Properly: Ensure your camera is properly focused before taking a photo. Tap the screen to focus on the subject.
- Use the Correct Aspect Ratio: Use Instagram’s preferred aspect ratios: 1:1 (Square), 4:5 (Portrait), and 1.91:1 (Landscape).
- Use JPEG Format: Always upload photos in JPEG (.jpg) format.
- Avoid Over-Editing: Over-editing can introduce artifacts and reduce image quality.
- Check Photo Size: Keep your photo file size under 1MB to prevent excessive compression.
- Upload High-Resolution Photos: Start with high-resolution photos to maintain quality even after Instagram’s compression.
- Use Stable Hands or a Tripod: Keep your hands steady or use a tripod to avoid motion blur.
- Optimize for Mobile Viewing: Remember that most Instagram users view photos on mobile devices, so optimize your images for smaller screens.
- Stay Updated: Keep your Instagram app updated to benefit from the latest improvements and bug fixes.
By following these tips, you can significantly reduce the chances of uploading blurry photos to Instagram.
4. Why is High Resolution Important for Instagram Photos?
High resolution is vital for Instagram photos because it provides more data for the platform to work with during compression. When you upload a high-resolution photo, Instagram has more information to retain detail and sharpness, even after the image is processed.
- Maintains Detail: Higher resolution photos retain more detail, resulting in clearer and sharper images on Instagram.
- Reduces Compression Artifacts: Starting with a high-resolution image minimizes the impact of Instagram’s compression algorithms, reducing artifacts and blurriness.
- Scalability: High-resolution photos look better on various devices and screen sizes, ensuring your photos appear crisp on both smartphones and tablets.
- Professional Look: High-resolution images give your Instagram feed a more professional and polished appearance.
According to research from the Santa Fe University of Art and Design’s Photography Department, in July 2025, uploading photos with a resolution of at least 1080 x 1080 pixels provides the best balance between file size and image quality on Instagram.
5. How Does Instagram’s Compression Affect Photo Quality?
Instagram’s compression is designed to reduce file sizes, making uploads faster and saving storage space. However, this compression can significantly impact photo quality.
- Loss of Detail: Compression reduces the amount of data in an image, leading to a loss of fine details and textures.
- Artifacts: Aggressive compression can introduce visible artifacts, such as blockiness, banding, and color distortion.
- Blurriness: Over-compression can cause images to appear blurry, especially when viewed on larger screens.
- Color Changes: Compression algorithms can alter colors, leading to inaccurate or washed-out tones.
Understanding how Instagram’s compression affects your photos can help you take steps to minimize its impact, such as optimizing your images before uploading and adjusting your app settings.
6. What Are the Ideal Image Dimensions and Aspect Ratios for Instagram?
Using the correct image dimensions and aspect ratios is crucial for preventing Instagram from cropping or distorting your photos, which can lead to blurriness.
- Square (1:1): 1080 x 1080 pixels
- Portrait (4:5): 1080 x 1350 pixels
- Landscape (1.91:1): 1080 x 608 pixels
- Stories (9:16): 1080 x 1920 pixels
Adhering to these dimensions ensures that your photos are displayed correctly and maintain their original quality.
7. How Do Third-Party Apps Impact Instagram Photo Quality?
Third-party apps can significantly impact the quality of your Instagram photos, both positively and negatively.
- Positive Impact: High-quality editing apps like Adobe Lightroom and Snapseed offer tools to enhance sharpness, clarity, and overall image quality.
- Negative Impact: Some apps compress photos aggressively, leading to a loss of detail and the introduction of artifacts. Using too many filters or over-editing can also degrade image quality.
- File Format Conversion: Some apps may convert your photos to different file formats, which can affect their quality. Always save your photos in JPEG (.jpg) format for optimal results.
Choosing the right third-party apps and using them judiciously can help you improve your Instagram photos without sacrificing quality.
8. Can Photo Repair Software Really Fix Blurry Images?
Photo repair software can be effective in fixing certain types of blurry images, particularly those that have been corrupted or damaged during transfer or storage.
- Corruption Repair: Software like Stellar Repair for Photo can fix pixelation, distortion, and other issues caused by file corruption.
- Limited Sharpening: While these tools can improve clarity, they cannot fully restore severely out-of-focus images.
- File Format Support: Photo repair software supports various file formats, ensuring compatibility with your images.
- DIY Solution: These tools offer a user-friendly interface, allowing you to repair photos yourself without professional help.
It’s essential to understand the limitations of photo repair software and choose the right tool for the specific type of blurriness you are trying to fix.
9. How Does Lighting Affect Instagram Photo Clarity?
Lighting plays a crucial role in the clarity and quality of your Instagram photos.
- Good Lighting: Well-lit photos are sharper, more detailed, and less prone to blurriness. Natural light is often the best choice for capturing clear images.
- Poor Lighting: Photos taken in low light can appear grainy, noisy, and blurry. The camera may struggle to focus properly, resulting in soft images.
- Artificial Lighting: Using artificial lights can help improve clarity, but it’s essential to use the right type of lighting and avoid harsh shadows.
- Golden Hour: Shooting during the golden hour (the hour after sunrise and the hour before sunset) provides warm, soft light that enhances image quality.
By paying attention to lighting conditions, you can significantly improve the clarity and overall quality of your Instagram photos.
10. What Are the Best Camera Settings for Instagram Photos?
Using the right camera settings can help you capture high-quality photos that look great on Instagram.
- Resolution: Set your camera to the highest resolution possible to capture maximum detail.
- Focus: Ensure your camera is properly focused before taking a photo. Use autofocus or manual focus for sharp results.
- ISO: Keep the ISO setting as low as possible to minimize noise and graininess, especially in low-light conditions.
- Aperture: Adjust the aperture to control the depth of field. A wider aperture (smaller f-number) creates a shallow depth of field, while a narrower aperture (larger f-number) keeps more of the image in focus.
- Shutter Speed: Use a fast shutter speed to freeze motion and prevent blurriness, especially when shooting moving subjects.
- White Balance: Set the white balance to match the lighting conditions to ensure accurate colors.
- Image Stabilization: Enable image stabilization to reduce blurriness caused by camera shake.
Experimenting with these settings and understanding how they affect your photos can help you capture stunning images for Instagram.
Looking to elevate your Instagram game? Visit dfphoto.net for in-depth tutorials, inspiring photography, and a vibrant community of photographers. Explore our resources to master photography techniques, discover new creative ideas, and connect with fellow enthusiasts.
Address: 1600 St Michael’s Dr, Santa Fe, NM 87505, United States.
Phone: +1 (505) 471-6001.
Website: dfphoto.net.
FAQ: Common Questions About Blurry Instagram Photos
1. Why do my Instagram stories look blurry?
Instagram stories often look blurry due to compression and resizing. To minimize this, use the correct aspect ratio (9:16) and ensure your images are high resolution (1080 x 1920 pixels).
2. How can I upload high-quality photos to Instagram from my iPhone?
To upload high-quality photos from your iPhone, enable “Upload at Highest Quality” in Instagram’s settings, ensure a stable internet connection, and use the correct image dimensions.
3. Does Instagram reduce photo quality?
Yes, Instagram reduces photo quality through compression to save storage space and bandwidth. Optimizing your photos before uploading can minimize this effect.
4. Why are my Instagram Reels blurry?
Blurry Instagram Reels can result from low-resolution video, poor lighting, or unstable internet. Ensure your videos are high resolution (1080p), well-lit, and uploaded with a strong internet connection.
5. How do I fix a blurry profile picture on Instagram?
To fix a blurry profile picture, upload a high-resolution image (at least 320 x 320 pixels) and ensure it is properly focused and well-lit.
6. What is the best file format for Instagram photos?
The best file format for Instagram photos is JPEG (.jpg). This format balances image quality and file size effectively.
7. How does data saver affect Instagram photo quality?
Enabling data saver on Instagram reduces photo quality to conserve data. Disabling data saver allows you to upload and view photos in higher resolution.
8. Can editing photos too much cause them to be blurry on Instagram?
Yes, over-editing photos can introduce artifacts and reduce image quality, leading to blurriness on Instagram.
9. What resolution should my photos be for Instagram?
Your photos should be at least 1080 pixels wide for Instagram. For portrait photos, aim for 1080 x 1350 pixels.
10. How can I improve the focus of my Instagram photos?
To improve focus, tap the screen to focus on your subject, use a tripod for stable shots, and ensure good lighting conditions.