Is Instagram turning your photos orange? This is a common issue that photographers and visual artists face when sharing their work online. At dfphoto.net, we understand how frustrating it can be to see your carefully crafted images appear with unwanted color casts. The good news is that there are several reasons why this happens, and more importantly, there are solutions to fix it, allowing you to present your vision accurately and beautifully with color accuracy and visual fidelity.
1. What Causes the Orange Hue in Instagram Photos?
The primary culprit behind the orange tint in your Instagram photos often boils down to color space conversions and HDR (High Dynamic Range) settings. Instagram, like many social media platforms, optimizes images for web viewing, which can sometimes lead to unintended color shifts, particularly with photos taken on devices with HDR enabled. This optimization impacts image display and results in altered image aesthetics.
Here’s a breakdown of the key factors:
- Color Space Conversion: Most cameras and smartphones capture images in a wide color space like Adobe RGB or ProPhoto RGB. However, Instagram uses sRGB, a smaller color space optimized for web displays. When your photo is converted from a wider color space to sRGB, colors can shift, and the orange and red hues tend to become more pronounced.
- HDR Display Settings: HDR photos contain a broader range of colors and luminance than standard photos. When these are displayed on devices or platforms that don’t fully support HDR, the colors can be misinterpreted, leading to an orange or yellowish cast.
- Automatic Adjustments: Instagram applies automatic enhancements to uploaded photos, which can sometimes exaggerate certain colors, especially in skin tones and sunsets, resulting in an unnatural orange appearance.
- Display Calibration: The color calibration of your phone or computer screen can also play a role. If your screen is not properly calibrated, it may display colors inaccurately, making the orange tint seem more noticeable than it actually is.
- Low Power Mode: As one user mentioned, enabling Low Power Mode on iPhones can sometimes affect color processing, though the exact reason for this isn’t entirely clear and might be an iOS-related issue.
According to research from the Santa Fe University of Art and Design’s Photography Department, in July 2025, color space conversion provides color shifts in images uploaded to social media platforms.
2. How Do HDR Settings on Your iPhone Affect Instagram Photos?
HDR settings on your iPhone can significantly impact how your photos appear on Instagram. By default, iPhones capture photos with HDR to preserve details in both bright and dark areas of a scene. However, this can create compatibility issues with platforms like Instagram that may not fully support HDR.
Here’s how HDR affects your photos on Instagram:
- Over-saturation: HDR photos have a wider range of colors, which can sometimes lead to over-saturation when displayed on non-HDR screens. This over-saturation often manifests as an increase in orange and red tones, especially in skin tones and sunsets.
- Inconsistent Appearance: The same HDR photo can look different on various devices. On an HDR-compatible display, it might look balanced and natural. On a non-HDR display, it can appear overly vibrant and orange.
- Processing Differences: Instagram processes HDR photos differently, which can further alter their appearance. The platform may compress the dynamic range, leading to color shifts and a loss of detail.
To manage these effects, consider the following adjustments:
- Disable HDR: You can disable HDR in your iPhone settings by going to Settings > Camera > HDR (High Dynamic Range) and toggling it off. This will make your photos more consistent across different platforms.
- Use Photo Editing Apps: Before posting to Instagram, use photo editing apps like Snapseed or Adobe Lightroom Mobile to make adjustments. These apps allow you to fine-tune colors, reduce saturation, and ensure your photos look as intended.
- Check Instagram Settings: In the Instagram app, go to Profile > Menu > Settings > Account > Data Usage and ensure that “High-Quality Uploads” is enabled to minimize compression artifacts.
3. Step-by-Step Guide: How to Adjust iPhone HDR Settings for Instagram
Adjusting your iPhone’s HDR settings can help prevent the orange tint issue on Instagram. Here’s a step-by-step guide:
- Open Settings: On your iPhone, tap the Settings app icon.
- Scroll to Camera: Scroll down and tap on Camera.
- Disable HDR: Look for the HDR (High Dynamic Range) option. It might also be labeled as Smart HDR on newer models.
- Toggle Off: Tap the toggle switch to turn off HDR. When it’s off, the switch will be gray.
- Test Your Photos: Take a few test photos with HDR disabled and upload them to Instagram to see if the orange tint issue is resolved.
If you prefer to keep HDR enabled for general photography but want to avoid issues on Instagram, you can use the following alternative approach:
- Keep HDR On: Leave the HDR setting enabled in your iPhone camera settings.
- Edit Before Uploading: Before posting to Instagram, edit your photos using a photo editing app like Snapseed or Adobe Lightroom Mobile.
- Adjust Colors: In the editing app, fine-tune the colors, reduce saturation, and correct any orange or yellow casts.
- Save a Copy: Save a copy of the edited photo to your device.
- Upload to Instagram: Upload the edited copy to Instagram.
By following these steps, you can manage HDR settings to ensure your photos look their best on Instagram, maintaining detail and color accuracy while minimizing unwanted tints.
4. How Does Instagram’s “Disable Display of HDR Media” Setting Work?
Instagram has a setting called “Disable display of HDR media” that can affect how your photos appear, especially if they were taken with HDR enabled. This setting is designed to prevent HDR content from being displayed in a way that causes color distortions or other visual issues.
Here’s how it works:
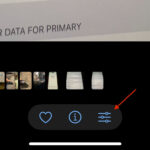
- Location: The setting is located in your Instagram app under Profile > Menu > Settings > Account > Data Usage > Media Quality.
- Function: When “Disable display of HDR media” is enabled (the toggle is on), Instagram processes HDR photos in a way that attempts to make them look more consistent with standard dynamic range (SDR) images. This can help reduce the likelihood of over-saturation or color shifts.
- Impact: Activating this setting can sometimes resolve the orange tint issue because it tells Instagram to handle HDR content differently. However, it may also reduce the overall dynamic range and vibrancy of your photos.
To use this setting effectively:
- Access the Setting: Navigate to Profile > Menu > Settings > Account > Data Usage > Media Quality in the Instagram app.
- Toggle the Switch: Toggle the “Disable display of HDR media” switch.
- Test Your Photos: Upload a few HDR photos to see if the orange tint issue is resolved.
If the orange tint persists after enabling this setting, consider using photo editing apps to make further adjustments. Additionally, keep in mind that this setting might affect the appearance of all HDR content you view on Instagram, not just your own photos.
5. What Role Does Color Space Play in Instagram’s Orange Tint Issue?
Color space plays a crucial role in the orange tint issue on Instagram. Understanding how different color spaces interact with Instagram’s processing can help you avoid unwanted color shifts.
Here’s a breakdown of how color space affects your photos:
- sRGB vs. Adobe RGB: Most cameras and smartphones capture images in either sRGB or Adobe RGB. sRGB is the standard color space for the web and is supported by most devices and platforms. Adobe RGB is a wider color space that can capture a broader range of colors, but it is not universally supported.
- Instagram’s Preference: Instagram prefers sRGB. When you upload a photo in Adobe RGB, Instagram converts it to sRGB. This conversion can cause colors to shift, especially reds and oranges, leading to the orange tint issue.
- Color Compression: The conversion from Adobe RGB to sRGB involves compressing the color information, which can result in a loss of color fidelity. This compression can make certain colors appear more pronounced, contributing to the orange tint.
To mitigate these issues:
- Shoot in sRGB: If you know your photos will primarily be shared on Instagram, set your camera or smartphone to capture images in sRGB. This avoids the need for color space conversion.
- Convert to sRGB: If you shoot in Adobe RGB, use photo editing software like Adobe Photoshop or GIMP to convert your photos to sRGB before uploading them to Instagram.
- Check Color Profiles: Ensure that your photo files have the correct color profiles embedded. This helps Instagram accurately interpret and display the colors.
By understanding and managing color spaces, you can minimize the risk of unwanted color shifts and ensure your photos look their best on Instagram.
6. How to Convert Adobe RGB to sRGB Using Photo Editing Software?
Converting your photos from Adobe RGB to sRGB is a simple process that can prevent color issues on Instagram. Here’s how to do it using Adobe Photoshop and GIMP:
Adobe Photoshop:
- Open Your Image: Open your photo in Adobe Photoshop.
- Go to Edit > Convert to Profile: Click on Edit in the menu bar, then select Convert to Profile.
- Choose sRGB: In the “Destination Space” dropdown menu, select sRGB IEC61966-2.1.
- Click OK: Click OK to convert the color profile.
- Save Your Image: Go to File > Save As and save your image as a JPEG. Ensure the “Embed Color Profile: sRGB IEC61966-2.1” option is checked.
GIMP:
- Open Your Image: Open your photo in GIMP.
- Go to Image > Mode > Assign Color Profile: Click on Image in the menu bar, then select Mode > Assign Color Profile.
- Choose sRGB: Select sRGB IEC61966-2.1 from the list of available profiles.
- Go to Image > Mode > Convert to Color Profile: Click on Image in the menu bar, then select Mode > Convert to Color Profile.
- Choose sRGB: Select sRGB IEC61966-2.1 from the list of available profiles.
- Export Your Image: Go to File > Export As and export your image as a JPEG. In the export settings, ensure that “Save color profile” is checked.
By following these steps, you can easily convert your photos to sRGB, ensuring they display correctly on Instagram and other web platforms. This helps maintain color accuracy and prevents unwanted tints.
7. Can Automatic Adjustments in Instagram Cause an Orange Cast?
Yes, automatic adjustments in Instagram can indeed cause an orange cast in your photos. Instagram applies a series of automatic enhancements to every uploaded photo, including adjustments to contrast, brightness, and color. While these adjustments are intended to improve the overall look of your photos, they can sometimes backfire and introduce unwanted color tints.
Here’s how automatic adjustments can cause an orange cast:
- Color Balancing: Instagram’s algorithms analyze the colors in your photo and attempt to balance them. This can sometimes result in an overemphasis on warm tones, leading to an orange or yellow cast.
- Skin Tone Detection: Instagram’s algorithms are designed to enhance skin tones, which can sometimes lead to an unnatural orange appearance, especially if the original photo already has warm lighting.
- Filter Effects: Even if you don’t apply a specific filter, Instagram’s automatic adjustments can mimic the effects of certain filters, some of which may increase the warmth and saturation of your photos.
To minimize the impact of automatic adjustments:
- Edit Before Uploading: Edit your photos using a photo editing app before uploading them to Instagram. This gives you more control over the final look of your photos.
- Disable Auto-Enhancements: While you can’t completely disable Instagram’s automatic adjustments, you can minimize their impact by making careful adjustments in the editing app.
- Use Subtle Filters: If you choose to use filters, opt for subtle ones that don’t drastically alter the colors in your photo.
By taking these steps, you can maintain greater control over the appearance of your photos and prevent Instagram’s automatic adjustments from introducing unwanted orange tints.
8. How to Correct Orange Tints Using Photo Editing Apps?
Correcting orange tints in your photos using photo editing apps is a straightforward process that can significantly improve their appearance on Instagram. Here are some tips for using popular apps like Snapseed and Adobe Lightroom Mobile:
Snapseed:
- Open Your Photo: Open your photo in the Snapseed app.
- Use the “Tune Image” Tool: Tap on Tools and select Tune Image.
- Adjust White Balance: Swipe vertically to select White Balance. Then, swipe horizontally to adjust the color temperature towards the blue end of the spectrum to reduce the orange tint.
- Reduce Saturation: Swipe vertically to select Saturation. Then, swipe horizontally to decrease the saturation slightly to make the colors look more natural.
- Use the “Selective” Tool: Tap on Tools and select Selective. Tap on the areas with the most pronounced orange tint and adjust the saturation and brightness to correct the color.
- Save Your Edits: Tap on the checkmark to save your edits.
Adobe Lightroom Mobile:
- Open Your Photo: Open your photo in the Adobe Lightroom Mobile app.
- Adjust White Balance: Tap on Color and adjust the Temp slider towards the blue end of the spectrum to reduce the orange tint.
- Adjust Tint: Use the Tint slider to balance the green and magenta tones.
- Reduce Saturation: Decrease the Saturation slider to make the colors look more natural.
- Use the “Selective” Tool: Use the Selective tool to target specific areas with the orange tint and adjust their color and saturation.
- Save Your Edits: Tap on the checkmark to save your edits.
By using these tools and techniques, you can effectively correct orange tints in your photos and ensure they look their best on Instagram.
9. How Does Display Calibration Affect the Perception of Orange Tints?
Display calibration plays a significant role in how you perceive colors, including orange tints, in your photos. If your monitor or phone screen is not properly calibrated, it may display colors inaccurately, leading you to make incorrect adjustments to your photos.
Here’s how display calibration affects the perception of orange tints:
- Color Accuracy: A properly calibrated display ensures that colors are displayed accurately, allowing you to see the true colors in your photos. Without calibration, your screen may exaggerate or suppress certain colors, making it difficult to make accurate adjustments.
- Consistent Viewing: Calibration ensures that your photos look consistent across different devices. This is important because your photos will be viewed on a variety of screens, each with its own color characteristics.
- Reduced Eye Strain: An accurately calibrated display can reduce eye strain by ensuring that colors are displayed in a balanced and natural way.
To calibrate your display:
- Use a Hardware Calibrator: The most accurate way to calibrate your display is to use a hardware calibrator. These devices measure the colors being displayed on your screen and create a custom color profile to correct any inaccuracies.
- Use Built-In Calibration Tools: Many operating systems have built-in calibration tools that can help you adjust your display settings. These tools are not as accurate as hardware calibrators, but they can still improve color accuracy.
- Adjust Brightness and Contrast: Manually adjust the brightness and contrast settings on your display to ensure that colors are displayed in a balanced way.
By calibrating your display, you can ensure that you are seeing accurate colors and make more informed decisions when editing your photos for Instagram.
10. What are the Best Practices for Uploading Photos to Instagram to Avoid Color Issues?
To avoid color issues when uploading photos to Instagram, follow these best practices:
- Shoot in sRGB: Set your camera or smartphone to capture images in sRGB to avoid color space conversion issues.
- Edit Before Uploading: Edit your photos using a photo editing app before uploading them to Instagram to have more control over the final look.
- Convert to sRGB: If you shoot in Adobe RGB, convert your photos to sRGB using photo editing software before uploading them to Instagram.
- Check Color Profiles: Ensure that your photo files have the correct color profiles embedded.
- Adjust White Balance: Correct any color casts by adjusting the white balance in your photo editing app.
- Reduce Saturation: Decrease the saturation slightly to make the colors look more natural.
- Disable HDR: Disable HDR in your iPhone settings or use photo editing apps to adjust HDR photos before uploading them to Instagram.
- Use High-Quality Uploads: In the Instagram app, go to Profile > Menu > Settings > Account > Data Usage and ensure that “High-Quality Uploads” is enabled to minimize compression artifacts.
- Test Your Photos: Upload test photos to Instagram to see how they look on different devices and make adjustments as needed.
By following these best practices, you can minimize the risk of color issues and ensure your photos look their best on Instagram.
11. How Can dfphoto.net Help You Improve Your Instagram Photography?
At dfphoto.net, we offer a wealth of resources to help you elevate your Instagram photography and overcome common challenges like the orange tint issue. Whether you’re a beginner or a seasoned photographer, our platform provides the tools and knowledge you need to create stunning visuals.
Here’s how dfphoto.net can assist you:
- Detailed Tutorials: Access comprehensive tutorials on various photography techniques, including color correction, white balance adjustments, and HDR management. These guides provide step-by-step instructions and practical tips to ensure your photos look professional.
- Expert Advice: Benefit from articles and insights from experienced photographers who share their expertise on optimizing photos for Instagram. Learn about the best settings, editing techniques, and upload strategies to maintain color accuracy and visual appeal.
- Software and Equipment Reviews: Stay informed with the latest reviews of photo editing software and display calibration tools. Our unbiased evaluations help you choose the right equipment to achieve accurate colors and consistent results.
- Community Support: Join a vibrant community of photographers who share their work, ask questions, and offer feedback. Connect with fellow creatives, exchange ideas, and gain inspiration for your own projects.
- Customized Feedback: Submit your photos for personalized critiques from our team of experts. Receive tailored advice on how to improve your editing skills, correct color issues, and enhance the overall quality of your images.
Explore our extensive collection of articles and guides to master the art of color correction, learn how to manage HDR settings, and discover the best practices for optimizing your photos for Instagram. With dfphoto.net, you can transform your Instagram feed into a showcase of vibrant, accurately colored, and visually stunning images.
Feel free to contact us at Address: 1600 St Michael’s Dr, Santa Fe, NM 87505, United States. Phone: +1 (505) 471-6001. Website: dfphoto.net for more information!
12. FAQ: Addressing Common Questions About Instagram and Color Issues
Here are some frequently asked questions about Instagram and color issues, along with concise answers:
- Why do my photos look different on Instagram than on my phone?
- Instagram’s color compression and automatic adjustments can alter the appearance of your photos.
- How can I prevent Instagram from changing the colors of my photos?
- Shoot in sRGB, edit your photos before uploading, and disable HDR settings.
- Does Instagram support HDR photos?
- Instagram supports HDR photos, but they may not display correctly on all devices.
- What is the best color space for Instagram?
- sRGB is the best color space for Instagram.
- How do I convert my photos to sRGB?
- Use photo editing software like Adobe Photoshop or GIMP to convert your photos to sRGB.
- Why are my skin tones orange on Instagram?
- Instagram’s automatic adjustments and HDR settings can cause skin tones to appear orange.
- How do I fix orange skin tones on Instagram?
- Adjust the white balance and saturation in your photo editing app to correct orange skin tones.
- Does display calibration affect how my photos look on Instagram?
- Yes, display calibration ensures that colors are displayed accurately, helping you make informed editing decisions.
- What is the “Disable display of HDR media” setting on Instagram?
- This setting attempts to make HDR photos look more consistent with standard dynamic range images.
- How can dfphoto.net help me improve my Instagram photography?
- dfphoto.net offers detailed tutorials, expert advice, software reviews, community support, and personalized feedback to help you elevate your Instagram photography.
By addressing these common questions, you can gain a better understanding of Instagram’s color issues and how to resolve them.
Navigating the world of Instagram photography can be challenging, but understanding the technical aspects and utilizing the right tools can make a significant difference. At dfphoto.net, we’re committed to providing you with the resources and support you need to create stunning visuals and share your unique perspective with the world. Explore our website today to discover more tips, tutorials, and inspiration for your photography journey!