Instagram is a visual platform, and sharing your photos in their full glory is essential. However, you might have noticed that Instagram often crops your photos, cutting off important parts of the image. You’re not alone in wondering, “Why Is Instagram Cropping My Photos?” This guide will explain why Instagram crops photos and, more importantly, provide you with simple steps to post your pictures without unwanted cropping, ensuring you always share the complete picture.
Understanding Instagram’s Aspect Ratio and Cropping
Instagram’s cropping issue stems from its aspect ratio requirements. To maintain a consistent and visually appealing feed for its billions of users, Instagram enforces specific aspect ratios for images. Essentially, Instagram prefers a maximum aspect ratio of 4:5 for portrait posts. This means for every four units of width, the image can be a maximum of five units tall. While square (1:1) and landscape ratios closer to 1.91:1 are also accommodated, images exceeding these vertical or horizontal dimensions are automatically cropped by Instagram to fit within these boundaries.
This automatic cropping is Instagram’s way of ensuring uniformity and optimizing image display, especially for mobile viewing, as over 98% of users access the platform via mobile devices. While this standardization is beneficial for platform consistency, it can be frustrating for users who want to share their photos as originally composed, without losing crucial elements.
 Instagram crop example showing a photo being cropped to fit the aspect ratio
How to Post Full Photos on Instagram Without Cropping
The key to avoiding Instagram’s automatic cropping is to resize your photos before you upload them. Instagram itself only offers cropping tools, not resizing. Therefore, you need to use a third-party tool to adjust your image dimensions to fit within Instagram’s acceptable aspect ratios.
While many resizing tools require app downloads, Kapwing’s image resizing tool provides a convenient, browser-based solution, eliminating the need for downloads. Whether you have a tall portrait photo (like 9:16) or a wide landscape shot (16:9), you can ensure your entire picture fits perfectly on Instagram by following these steps using Kapwing:
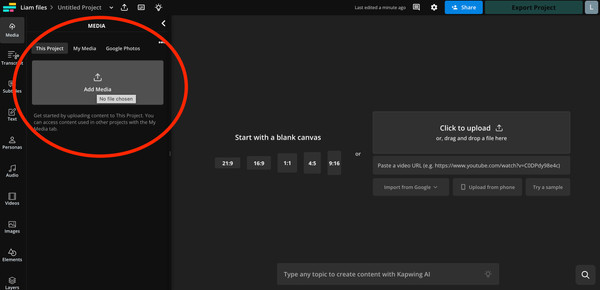
Step 1) Start with a 4:5 Canvas in Kapwing
Begin by opening Kapwing.com in your web browser, whether on your phone or computer. From the options provided, select the “4:5” preset aspect ratio under the “Start with a blank canvas” section. This creates the ideal canvas size for Instagram portrait posts.
 Selecting the 4:5 aspect ratio canvas in Kapwing
Step 2) Upload Your Photo to Resize
Next, locate the “Media” tab, usually found on the menu bar within Kapwing’s interface. Click on “Add Media” to upload the photo you wish to post on Instagram. You can upload directly from your device’s camera roll, import via URL, or even connect to cloud services like Google Photos or Google Drive if your image is stored there. Once selected, your photo will appear in the Media tab, ready for resizing.
Selecting the 4:5 aspect ratio canvas in Kapwing
Step 3) Center Your Photo on the 4:5 Canvas
Click the blue “+” icon that appears over your uploaded image. This action adds the photo to the 4:5 canvas you created. Kapwing automatically centers your image on the canvas, which will likely result in white borders appearing on either side of your photo if its original aspect ratio was wider or taller than 4:5. These borders are essential to ensure the entire image is visible without cropping.
 Centering the photo on the Kapwing 4:5 canvas
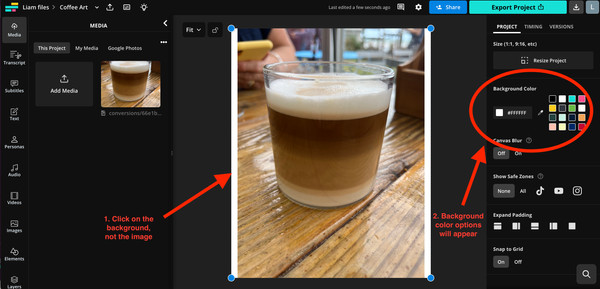
Step 4) Customize the Background Color
To refine the look of the borders, click anywhere outside of your image but still within the canvas area. This will select the background canvas, and you should see an “Edit background” button appear. Click this button to access background customization options.
Scroll down in the background editing menu until you find the “Background Color” options. Here, you can choose any color you prefer using the color picker tools. However, for Instagram, a black background is often recommended because it subtly blends with Instagram’s dark mode interface, making the borders less noticeable.
Centering the photo on the Kapwing 4:5 canvas
Step 5) Download and Post to Instagram
Once you’ve centered your photo and set your preferred background color (ideally black), click the “Export” button, usually located in the top right corner of the Kapwing interface. Export your resized photo as a JPEG file for optimal Instagram compatibility.
After exporting, look for the “Download file” button and click it to save the resized image to your device. Now, you can open the Instagram app and post your photo as you normally would. By resizing beforehand, you’ve ensured your entire photo is displayed without any cropping, preserving your original composition.
Why a Black Background is a Smart Solution for Instagram Posts
Opting for a black background when resizing photos for Instagram is a strategic choice to minimize the visual impact of borders. The reason black works so well is the widespread use of dark mode. Studies show that over 80% of smartphone users enable dark mode, and Instagram, by default, often mirrors your phone’s system settings. This means a large majority of Instagram users view content in dark mode, especially on mobile.
In dark mode, a white border around your resized photo would stand out starkly, potentially distracting viewers from your image. Conversely, a black background seamlessly integrates with Instagram’s dark interface, making the added borders virtually disappear. This creates a cleaner, more integrated look for your posts, whether they are portrait or landscape.
While ideally, transparent backgrounds (PNGs) would solve this perfectly, Instagram automatically converts PNGs to JPEGs, replacing any transparency with black pixels. Therefore, using a black background during resizing is the most effective workaround to achieve a borderless appearance on Instagram within the platform’s current limitations.
Instagram Image Size and Quality Guidelines
Instagram is known for compressing images, which can sometimes reduce photo quality. According to Instagram’s official guidelines, optimal photo dimensions for the best resolution are:
- Height: 566 to 1350 pixels
- Width: 320 to 1080 pixels
 Instagram image dimension guidelines for optimal display
If you upload a photo smaller than 320 pixels wide, Instagram will enlarge it, potentially leading to pixelation. Conversely, images wider than 1080 pixels will be resized down, which, along with Instagram’s compression, can cause loss of detail and graininess. To maintain the best possible image quality on Instagram, resizing your photos to these recommended dimensions using a tool like Kapwing with lossless compression is advisable before uploading.
Here are further tips to maximize your photo quality on Instagram:
- Use the latest Instagram app version: Ensure you have the most updated app for the latest features and optimizations.
- Upload within recommended dimensions: Aim for a width of 1080 pixels and an aspect ratio between 1.91:1 and 4:5.
- Utilize a high-quality phone camera: Starting with a high-resolution image from a good camera provides more detail to preserve even after Instagram’s compression.
For more detailed information on optimal sizes for Instagram Reels, Threads, and videos, refer to comprehensive guides on social media dimensions.
Frequently Asked Questions
1. Why do my pictures not fit on Instagram?
Instagram enforces aspect ratio limits, primarily a maximum of 4:5 for portrait posts. If your photo’s aspect ratio is taller or wider than Instagram’s allowed range, the platform will automatically crop it to fit within these dimensions.
2. How do I stop Instagram from cropping my photos?
For 4:5 images cropped to square, tap the expand arrows in the bottom left of the preview to revert to 4:5. For images taller than 4:5 or wider than Instagram’s landscape limits, use a resizing tool like Kapwing to add borders and fit your entire photo within a 4:5 canvas before uploading.
3. What are the aspect ratio rules for Instagram?
Instagram supports various aspect ratios, including up to 4:5 for vertical images and 1:1 for square posts. For Reels, the aspect ratio is 9:16, designed for full-screen vertical mobile viewing.
4. Why does Instagram crop photos?
Instagram crops photos to maintain a consistent visual style across its platform, used by over 1.4 billion monthly users. Standardizing to 4:5 and 1:1 aspect ratios optimizes viewing on mobile devices and ensures a uniform feed appearance.
5. Why won’t Instagram upload my high-res image in full quality?
Instagram compresses uploaded images to manage the massive volume of daily uploads—over 95 million photos and videos. To improve upload quality, enable “Upload at Highest Quality” in your account’s “Data Usage” settings. This helps preserve more of your image’s original resolution.
For more helpful tips and tutorials, explore resources and visual guides available online. By understanding Instagram’s cropping behavior and using resizing techniques, you can confidently share your photos in their entirety, exactly as you intend.
