Is your crisp, stunning photograph turning into a blurry mess when you upload it to Instagram? At dfphoto.net, we understand how frustrating it can be to see your hard work diminished by the platform’s processing. This guide dives deep into the common culprits behind blurry Instagram photos and provides actionable solutions to ensure your images look their best. We’ll cover everything from file sizes and aspect ratios to data settings and editing tips, empowering you to maintain the quality of your visual storytelling. Learn how to optimize your photography, enhance your visual artistry, and prevent photo degradation for captivating imagery on Instagram.
1. Understanding the Culprits Behind Blurry Instagram Photos
Why do your photos sometimes lose their sharpness and clarity when uploaded to Instagram? Several factors can contribute to this frustrating issue, and understanding them is the first step toward resolving it.
1.1. The Impact of File Size on Instagram Quality
Is your file size too big? Instagram compresses photos to optimize storage and bandwidth. Large image files (over 1MB) undergo significant compression, which results in a noticeable loss of detail and sharpness.
1.2. Aspect Ratio and Cropping Effects on Image Clarity
Does the aspect ratio affect my images? Instagram has specific aspect ratio requirements. Uploading images with incorrect dimensions often forces the platform to crop or distort them, which degrades image quality and makes the final result blurry. The ideal aspect ratio for Instagram is 4:5 for portrait photos.
1.3. The Role of File Format in Instagram’s Processing
Is the image format causing problems? Instagram prefers JPEG (.jpg) files. While other formats might look fine on your device, Instagram automatically converts them to .jpg. This conversion can introduce artifacts and reduce image quality, leading to a blurry appearance.
2. Actionable Solutions to Fix Blurry Pictures on Instagram
Now that you understand the primary reasons behind blurry Instagram photos, let’s explore practical solutions to ensure your images appear sharp and clear.
2.1. Optimizing Instagram Data Settings for High-Quality Uploads
Want to change your settings? Instagram’s data-saving settings can reduce image quality to conserve data. Disabling these settings will allow the app to upload photos at their highest possible quality. Here’s how to adjust these settings on both iPhone and Android devices:
2.1.1. Adjusting Data Settings on iPhone
- Open the Instagram app and tap your profile icon in the bottom-right corner.
- Tap the three horizontal lines in the top-right corner, then select Settings and Privacy.
- Scroll down and tap Media Quality.
- Toggle the button next to Upload at highest quality to ensure your photos are uploaded in the best possible resolution.
 adjust Instagram data setting in iPhone
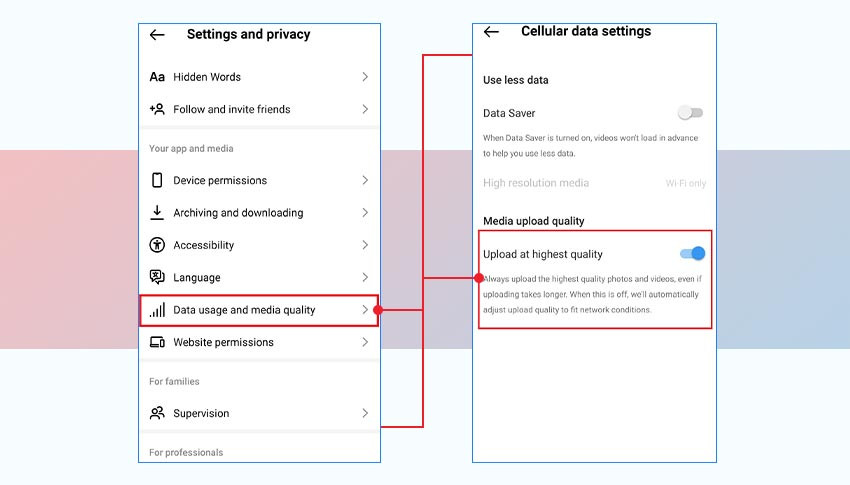
2.1.2. Adjusting Data Settings on Android
- Open the Instagram app and tap your profile icon in the bottom-right corner.
- Tap the three horizontal lines in the top-right corner.
- In Settings and Privacy, scroll down and tap Data Usage and Media Quality.
- Ensure Upload at highest quality is enabled.
 adjust data settings Android
2.2. The Importance of a Stable Internet Connection
Why is a stable internet connection vital? A weak or unstable internet connection can disrupt the upload process, causing Instagram to compress your photos further, which results in blurriness. Make sure you have a strong and reliable connection before uploading. Here are some tips:
- Run a speed test: Verify your internet speed to ensure it meets the requirements for uploading high-quality images.
- Switch between Wi-Fi and cellular data: Experiment to see which connection provides a more stable and faster upload speed.
- Restart the Instagram app: Close and reopen the app to refresh the connection and improve upload quality.
2.3. Clearing Instagram Cache to Improve Performance
Is Instagram’s cache affecting image quality? Instagram uses cached data to load content faster, but an excessive amount of cached data can slow down the app and cause performance issues, including reduced image quality. Clearing the cache can help resolve these problems. Here’s how to clear the Instagram cache on iOS and Android devices:
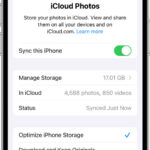
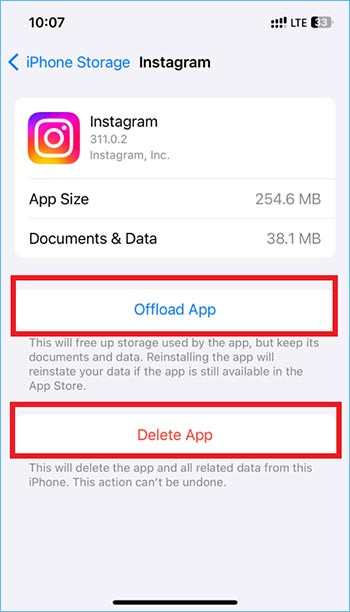
2.3.1. Clearing Cache on iOS
- Go to Settings > General > iPhone Storage > Instagram.
- You’ll see how much space the app is using.
- Select Offload App or Delete App to clear the cache and free up space. Offloading the app removes the app but keeps its documents and data, while deleting the app removes everything.
 offload app in iPhone
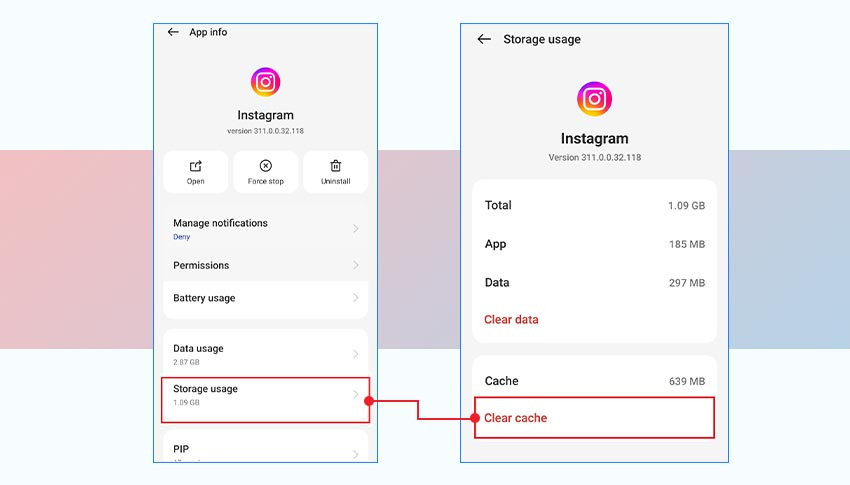
2.3.2. Clearing Cache on Android
- Open Settings > Apps > App Management > Instagram > Storage usage > Clear cache.
 clear Instagram cache in Android
2.4. Maximizing Your Phone’s Camera Quality for Sharper Images
Is your phone’s camera set up correctly? The quality of your original photo significantly impacts the final result on Instagram. Maximizing your phone’s camera quality will help you capture sharper and more detailed images. Consider these tips:
- Clean the lens: Use a microfiber cloth to gently clean your smartphone’s camera lens and remove any dust or smudges.
- Adjust focus and exposure: Use the focus and exposure controls on your phone’s camera app to ensure your subject is sharp and well-lit.
- Shoot in good lighting: Capture photos in well-lit environments to minimize noise and maximize detail.
- Explore camera features: Familiarize yourself with your smartphone’s camera features, such as HDR mode, to enhance image quality.
2.5. Enhancing Photos with Third-Party Editing Apps
Why use third-party apps? While Instagram offers basic editing tools, third-party apps provide more advanced features and control over your images. Use apps like Adobe Lightroom, Snapseed, or Fotor to fine-tune your photos before uploading them to Instagram.
Here’s a simple comparison table of the mentioned apps:
| Feature | Adobe Lightroom | Snapseed | Fotor |
|---|---|---|---|
| Cost | Paid (Subscription) | Free | Freemium (Basic free, advanced features paid) |
| Complexity | Advanced, best for professionals | Moderate, user-friendly for enthusiasts | Beginner-friendly, easy for quick edits |
| Key Tools | Color correction, presets, detailed adjustments | Selective editing, healing, perspective correction | Filters, beauty tools, collage maker |
| Use Case | Professional photo editing, detailed adjustments | Quick and effective photo enhancements | Quick edits, collages, and graphic design |
These apps allow you to adjust clarity, sharpness, contrast, and brightness to optimize your images for Instagram.
2.6. Repairing Corrupted Photos with Photo Repair Software
Is your photo corrupted? Sometimes, blurriness isn’t due to Instagram’s processing but to corruption in the original photo file. File corruption can occur during photo transfer, downloading, editing, or conversion. In such cases, photo repair software can be a lifesaver. Stellar Repair for Photo is a powerful tool designed to fix blurry, pixelated, and damaged photos.
2.6.1. About Stellar Repair for Photo
Stellar Repair for Photo can repair various types of image corruption, including pixelation, distortion, and greyed-out areas. Its user-friendly interface makes it easy to repair corrupt photos in three simple steps: Add, Repair, and Save.
2.6.2. How to Use Stellar Repair for Photo
- Download and Install: Download, install, and launch Stellar Repair for Photo on your Windows or Mac.
- Add File: In the home screen, click Add File to upload your corrupt photos.
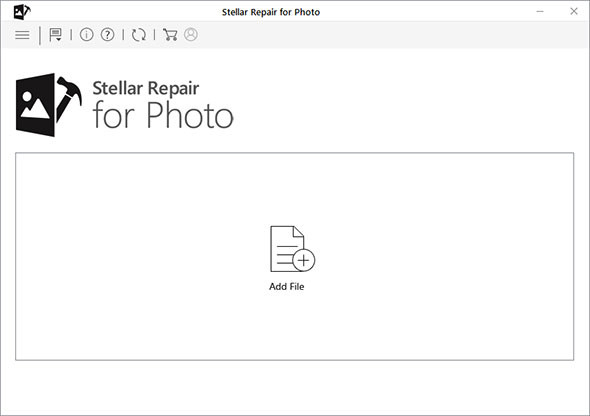 add files
- Repair: Click the Repair button to start the repair process.
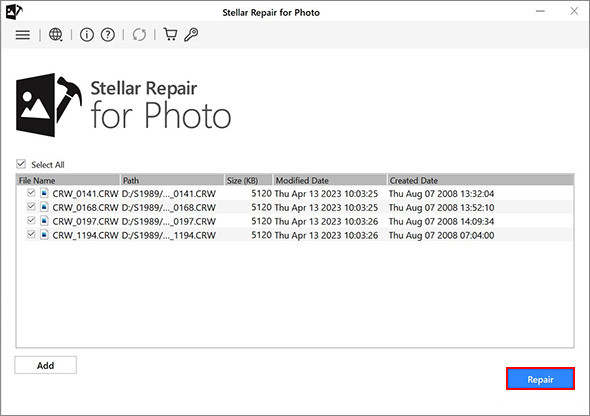 click repair button
- Wait for Completion: After completing the repair process, you will see a prompt saying, Repair process completed. Click OK.
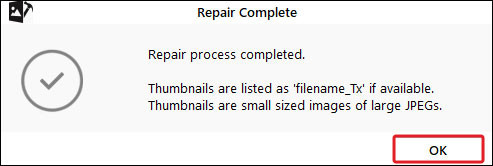 repair process complete
- Preview: Select the photos you want to Preview to see how the repaired image files look.
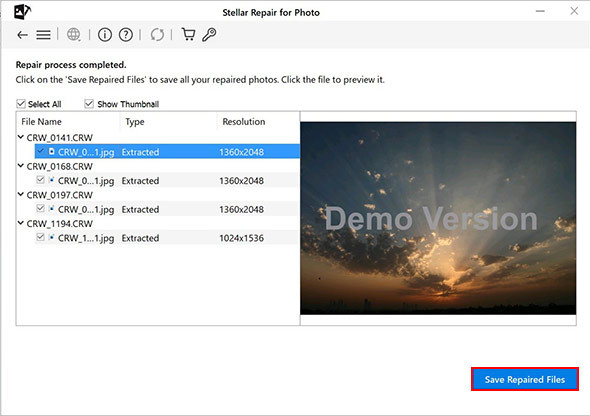 preview repaired files
- Save Repaired Files: Once satisfied with the repair result, click Save Repaired Files and browse to select the destination to save the repaired photos.
2.6.3. Download Stellar Repair for Photo
To see how the software works on Mac, download the free version from here.
To see how the software works on Windows, download the free version from here.
3. Preventing Blurry Photos on Instagram: Proactive Tips
Now that you know how to fix blurry photos, let’s focus on preventing the issue from occurring in the first place. By following these tips, you can ensure your photos consistently look their best on Instagram.
3.1. Cleaning Your Camera Lens Regularly
Is a dirty lens affecting image sharpness? A dirty or smudged camera lens can significantly reduce image sharpness. Make it a habit to clean your smartphone’s camera lens before taking photos, especially if you notice any blurriness or smudges. Use a soft, microfiber cloth to gently wipe the lens.
3.2. Mastering Focus and Exposure
Are you focusing correctly? Proper focus and exposure are crucial for capturing sharp and well-defined photos. Tap on your smartphone screen to focus on the subject, and adjust the exposure slider to achieve the desired brightness. Avoid taking photos in low-light conditions, as this can lead to increased noise and blurriness.
3.3. Choosing the Right Aspect Ratio
Which aspect ratio should you use? Instagram supports various aspect ratios, but using the recommended ratios will prevent unwanted cropping and distortion. The ideal aspect ratios for Instagram are:
- 1:1 (Square): Suitable for general posts and profile pictures.
- 4:5 (Portrait): Ideal for showcasing portraits and vertical compositions.
- 1.91:1 (Landscape): Best for landscape shots and wide compositions.
3.4. Using the Correct File Format
Is the file format optimized? Always upload photos in JPEG (.jpg) format. This format is widely supported and optimized for web use, ensuring the best possible image quality on Instagram. Avoid using other formats, as Instagram will convert them to .jpg, which can degrade image quality.
3.5. Understanding Instagram’s Compression
How does compression work? Instagram compresses images to reduce file sizes and optimize loading times. To minimize the impact of compression, start with high-quality images that are slightly smaller than Instagram’s maximum dimensions (1080 pixels wide). This will give Instagram less room to compress your photos, preserving more detail and sharpness.
3.6. Optimizing Image Size
What is the ideal size? While Instagram does compress images, you can optimize your images before uploading to minimize quality loss. Aim for an image size around 1080 pixels in width, which is the maximum resolution Instagram displays. This ensures your photos are detailed without being excessively large.
3.7. Checking Image Sharpness
How do I check sharpness? Before posting, zoom in on your image to check for sharpness and clarity. If it looks blurry zoomed in, it will definitely look blurry once uploaded. Adjust focus or retake the photo if necessary.
4. The Science Behind Digital Image Quality
To truly understand why photos become blurry, it’s helpful to delve into the technical aspects of digital image quality. Understanding these concepts can give you more control over your images and help you avoid common pitfalls.
4.1. Resolution and Pixel Density
What is image resolution? Resolution refers to the number of pixels in an image, typically measured in width and height (e.g., 1920×1080). Higher resolution means more pixels, which translates to more detail and sharper images. Pixel density, measured in pixels per inch (PPI), also affects image quality. Higher PPI results in finer details and less pixelation.
4.2. Compression Algorithms
How does image compression work? Compression algorithms reduce the file size of an image by removing redundant or less important data. There are two main types of compression:
- Lossy Compression: This method permanently removes data, resulting in smaller file sizes but some loss of quality. JPEG is a lossy compression format.
- Lossless Compression: This method reduces file size without losing any data. PNG and TIFF are lossless compression formats.
Instagram uses lossy compression to optimize images for web use, which can result in some quality loss.
4.3. Color Spaces and Bit Depth
What is a color space? Color spaces define the range of colors that can be represented in an image. Common color spaces include sRGB, Adobe RGB, and ProPhoto RGB. sRGB is the standard color space for the web and is recommended for Instagram. Bit depth refers to the number of bits used to represent each color channel (red, green, and blue). Higher bit depth allows for more colors and smoother tonal gradations.
5. Real-World Examples and Case Studies
Let’s examine some real-world examples and case studies to illustrate how these tips can be applied in practice.
5.1. Case Study 1: Improving Landscape Photography on Instagram
A landscape photographer struggled with blurry images on Instagram, despite capturing stunning scenes. By optimizing image size, using the correct aspect ratio (1.91:1), and editing photos in Adobe Lightroom to enhance sharpness and clarity, they saw a significant improvement in image quality.
5.2. Case Study 2: Enhancing Portrait Photography on Instagram
A portrait photographer noticed that their images looked soft and lacked detail on Instagram. By cleaning their camera lens regularly, mastering focus and exposure, and uploading photos in the correct file format (JPEG), they were able to achieve sharper and more detailed portraits.
5.3. Common Mistakes and How to Avoid Them
Many photographers make common mistakes that lead to blurry images on Instagram. These include:
- Uploading low-resolution images: Always start with high-resolution images to minimize quality loss.
- Using incorrect aspect ratios: Crop or resize your images to the correct aspect ratio before uploading.
- Ignoring data-saving settings: Disable data-saving settings to allow Instagram to upload photos at their highest quality.
6. Instagram’s Algorithm and Image Quality
Instagram’s algorithm plays a role in how your photos are displayed and perceived by your audience. Understanding how the algorithm works can help you optimize your images for maximum impact.
6.1. Factors Affecting Visibility
Several factors influence the visibility of your photos on Instagram, including:
- Engagement: Photos with high levels of engagement (likes, comments, shares) are more likely to be seen by a wider audience.
- Relevance: Instagram’s algorithm prioritizes content that is relevant to each user’s interests and preferences.
- Timeliness: Recent posts are more likely to be shown to users than older posts.
6.2. Optimizing for the Algorithm
To optimize your images for Instagram’s algorithm, consider these tips:
- Post high-quality images: Visually appealing images are more likely to attract engagement.
- Use relevant hashtags: Hashtags help Instagram understand the content of your photos and show them to interested users.
- Engage with your audience: Respond to comments and messages to build relationships and increase engagement.
7. Frequently Asked Questions (FAQs)
Let’s address some common questions related to blurry photos on Instagram.
7.1. Why do my Instagram stories look blurry?
Instagram stories often appear blurry due to the platform’s compression and resizing algorithms. To minimize blurriness, use high-resolution images or videos, and ensure they are properly sized for the story format (1080×1920 pixels).
7.2. How can I upload high-quality videos to Instagram?
To upload high-quality videos to Instagram, use a resolution of 1080p, a frame rate of 30fps, and a bit rate of around 3,500 kbps. Also, make sure your internet connection is stable during the upload process.
7.3. Does Instagram compress photos more on Android or iPhone?
Instagram’s compression algorithms are generally the same on both Android and iPhone. However, the quality of the original photo can vary depending on the camera capabilities of the device.
7.4. What is the best photo editing app for Instagram?
Popular photo editing apps for Instagram include Adobe Lightroom, Snapseed, VSCO, and Fotor. Each app offers unique features and tools to enhance your photos.
7.5. How do I fix a blurry photo after uploading to Instagram?
Unfortunately, you cannot directly fix a blurry photo after it has been uploaded to Instagram. The best approach is to delete the blurry photo and re-upload a corrected version.
7.6. Why are my Instagram Reels blurry?
Blurry Instagram Reels can be caused by low-resolution video files, poor lighting, or unstable internet connections. Ensure your videos meet Instagram’s recommended specifications and are uploaded with a strong internet connection.
7.7. How can I improve the quality of my Instagram profile picture?
To improve the quality of your Instagram profile picture, use a high-resolution image (at least 320×320 pixels), and ensure it is well-lit and sharply focused.
7.8. Does Instagram reduce the quality of photos from professional cameras?
Yes, Instagram reduces the quality of photos from all cameras, including professional ones, due to its compression algorithms. However, starting with high-quality images from a professional camera will result in a better final result on Instagram.
7.9. Can using Instagram filters make my photos blurry?
Some Instagram filters can introduce artifacts or reduce image quality, leading to blurriness. Use filters sparingly and always check the final result to ensure it looks sharp and clear.
7.10. What are the best settings for taking photos directly in the Instagram app?
While taking photos directly in the Instagram app can be convenient, it often results in lower-quality images compared to using your phone’s native camera app. If you do use the Instagram camera, ensure good lighting and a steady hand to minimize blurriness.
8. dfphoto.net: Your Resource for Photography Excellence
At dfphoto.net, we are committed to helping you elevate your photography skills and achieve stunning results. Whether you’re an amateur enthusiast or a seasoned professional, our website offers a wealth of resources, including:
- Detailed tutorials: Learn essential photography techniques, from mastering exposure to perfecting composition.
- Gear reviews: Stay up-to-date on the latest cameras, lenses, and accessories with our in-depth reviews.
- Inspirational galleries: Discover breathtaking images from talented photographers around the world.
- Community forums: Connect with fellow photographers, share your work, and exchange ideas.
8.1. Discover the dfphoto.net Advantage
Why should you choose dfphoto.net? Here are just a few reasons:
- Expert guidance: Our team of experienced photographers and educators provides expert advice and guidance.
- Comprehensive resources: We cover a wide range of topics, from basic photography principles to advanced techniques.
- Engaging community: Connect with a vibrant community of passionate photographers.
- Practical tips: Learn actionable tips and tricks that you can apply to your own photography.
8.2. Explore Our Resources
Ready to take your photography to the next level? Explore our resources today:
- Visit our website: dfphoto.net
- Address: 1600 St Michael’s Dr, Santa Fe, NM 87505, United States
- Phone: +1 (505) 471-6001
9. Conclusion: Mastering Instagram Image Quality
Ensuring your photos look their best on Instagram requires a combination of technical knowledge, proactive measures, and creative editing. By understanding the factors that contribute to blurry images and implementing the solutions outlined in this guide, you can consistently showcase your work with clarity and impact. Remember to optimize your camera settings, use appropriate editing tools, and maintain a stable internet connection for uploading. At dfphoto.net, we are here to support your photographic journey and help you achieve your creative goals.
9.1. A Call to Action
Are you ready to transform your Instagram feed with stunning, high-quality images? Visit dfphoto.net today to explore our comprehensive resources, discover new techniques, and connect with a vibrant community of photographers. Let us help you unlock your full potential and share your vision with the world.
9.2. Final Thoughts
Photography is an art form that deserves to be showcased in its best light. By following the tips and techniques outlined in this guide, you can ensure your images on Instagram capture the essence of your creative vision. Embrace the power of technology, learn from the experiences of others, and never stop exploring the endless possibilities of photography. Remember, the world is waiting to see your unique perspective – let’s make sure it’s crystal clear. Visit dfphoto.net to dive deeper into the world of photography and visual artistry.