Your photos take up a lot of space because they are stored in high resolution to capture every detail, but dfphoto.net can help you manage and optimize your photo storage effectively. We’ll explore the reasons behind large photo file sizes, how to manage them, and introduce practical solutions for photographers and visual artists seeking to balance quality and storage efficiency. By optimizing your photo storage, you can free up space while maintaining the quality of your images, and discover digital asset management.
1. Understanding Photo File Size
Why are my photo files so large? It’s a common question among photographers, whether you’re shooting with a smartphone or a high-end DSLR. Understanding the factors that contribute to large photo file sizes is the first step in managing your storage effectively.
1.1. Megapixels and Image Resolution
Do megapixels affect the file size of my photos? Yes, the number of megapixels in your camera directly impacts the resolution of your images and, consequently, the file size.
- More Megapixels, Larger Files: A higher megapixel count means your camera captures more detail, resulting in larger files. For instance, a 12-megapixel photo will be smaller than a 24-megapixel one.
- Resolution and Detail: High-resolution images are essential for large prints and detailed editing. However, for online sharing or viewing on smaller screens, the extra detail might be unnecessary and just consume more storage space.
- Practical Example: If you primarily share photos on social media, you might not need the highest resolution your camera offers. Reducing the resolution can significantly decrease file size without visibly affecting the image quality on these platforms.
1.2. Image File Formats
What image file formats contribute to large photo sizes? The file format in which you save your images also plays a crucial role in determining file size.
- JPEG (JPG): JPEGs are compressed files, making them smaller but at the cost of some image data. The compression level can be adjusted, but higher compression leads to more noticeable loss of quality. JPEGs are great for sharing.
- RAW: RAW files contain all the data captured by the camera’s sensor, offering maximum flexibility for editing. However, they are significantly larger than JPEGs. RAW files are great for editing.
- TIFF: TIFF files are uncompressed or use lossless compression, preserving all image data. They are ideal for archival purposes and professional editing but result in very large file sizes. TIFF files are great for archiving.
- Format Comparison:
| Format | Compression | File Size | Use Case |
|---|---|---|---|
| JPEG | Lossy | Small | General use, sharing online, everyday photography |
| RAW | Uncompressed/Lossless | Large | Professional editing, when you need to do heavy color correction |
| TIFF | Uncompressed/Lossless | Very Large | Archiving, professional printing, when image quality matters most |
1.3. Color Depth and Bit Depth
How does color depth affect photo file size? The color depth, or bit depth, determines the number of colors an image can contain, which also affects file size.
- Higher Bit Depth, More Colors: Images with a higher bit depth (e.g., 16-bit) can store more color information than those with a lower bit depth (e.g., 8-bit). This results in smoother color transitions and finer details.
- File Size Impact: A 16-bit image will be twice the size of an 8-bit image because it stores twice as much color data for each pixel.
- Editing Considerations: For extensive editing, especially color correction and adjustments, a higher bit depth is preferable to avoid banding and other artifacts.
1.4. Metadata and Embedded Data
Why does metadata increase photo file size? Metadata, such as camera settings, date, time, and GPS information, is embedded in image files and contributes to their size.
- Types of Metadata: EXIF data includes camera settings, while IPTC data contains descriptive information like captions and keywords.
- File Size Impact: While metadata doesn’t significantly increase file size compared to image data, it still adds to the overall storage footprint.
- Metadata Management: You can use software to remove unnecessary metadata to reduce file size, especially when sharing images online.
2. Assessing Your Photography Needs
How do I know what photo storage is right for me? Determining the right photo storage solution requires a careful assessment of your photography needs. Consider how you use your photos, the level of quality you require, and your budget.
2.1. Professional vs. Amateur Use
What are the storage requirements for professional photographers? Professional photographers often require high-resolution images and RAW files, necessitating robust storage solutions.
- Professional Needs: Professionals need to archive high-quality images for potential client requests, large prints, and extensive editing. This demands significant storage capacity and backup systems.
- Amateur Needs: Amateurs who primarily share photos online or make small prints may find that lower-resolution JPEGs and smaller storage solutions suffice.
- Storage Volume: Professionals might shoot thousands of images per project, quickly filling up storage drives. Amateurs may have fewer images and less frequent shooting sessions.
- Archival Requirements: Professionals need long-term archival solutions to ensure client work is preserved, while amateurs may have less stringent archival needs.
2.2. Intended Use of Photos
How does the intended use affect photo storage needs? The intended use of your photos—whether for print, web, or personal use—impacts the required resolution and storage.
- Print: High-resolution images are essential for producing detailed prints. The larger the print, the higher the resolution needed.
- Web: Web images can be lower resolution to reduce loading times. Optimizing images for web use involves reducing file size and resolution.
- Personal Use: For personal viewing on devices, moderate resolution images are usually sufficient.
- Resolution Table:
| Intended Use | Recommended Resolution | File Format |
|---|---|---|
| Large Prints | 300 DPI or higher | TIFF, RAW |
| Website Display | 72 DPI | JPEG |
| Social Media | Varies (optimize for platform) | JPEG |
| Personal Viewing | 150-200 DPI | JPEG |
2.3. Frequency of Shooting
Does the frequency of taking photos affect my storage? Yes, how often you shoot directly affects how quickly your storage fills up and the type of storage solution you need.
- High-Frequency Shooters: Photographers who shoot daily or weekly need to consider expandable storage options like external hard drives or cloud storage.
- Occasional Shooters: Those who shoot less frequently may find smaller storage solutions adequate.
- Backup Strategy: Regular shooters need a robust backup strategy to prevent data loss.
- Archival Planning: Frequent shooters should have a clear archival plan to manage and organize their growing photo library.
2.4. Editing Workflow
How does my editing affect photo storage requirements? Your editing workflow, particularly whether you work with RAW files or JPEGs, influences your storage needs.
- RAW Editing: RAW files offer the most flexibility for editing but require significant storage space.
- JPEG Editing: JPEGs are smaller but can degrade with extensive editing.
- Software Needs: Editing software like Adobe Photoshop or Lightroom requires additional storage space for temporary files and backups.
- Workflow Efficiency: Streamlining your editing workflow can help reduce the number of versions and backups you need to store.
3. Optimizing Camera Settings
Can camera settings help reduce photo file sizes? Adjusting your camera settings can significantly reduce photo file sizes without compromising quality for most uses.
3.1. Shooting in JPEG vs. RAW
When should I shoot in JPEG versus RAW? The decision to shoot in JPEG or RAW depends on your editing needs and storage capacity.
- JPEG Advantages: JPEGs are smaller, making them ideal for everyday shooting and sharing. They require less storage and are processed by the camera, saving time.
- RAW Advantages: RAW files capture all the data from the sensor, providing maximum flexibility for editing and preserving details.
- Use Case Scenarios:
- JPEG: Use for casual shooting, social media, and when storage is limited.
- RAW: Use for professional work, critical editing, and when you need to preserve maximum image quality.
- Considerations:
- Editing Time: RAW files require more editing time.
- Storage Needs: RAW files demand more storage.
3.2. Adjusting Image Quality Settings
How do I adjust image quality settings to save space? Most cameras allow you to adjust the quality settings for JPEGs, balancing image quality and file size.
- Quality Levels: Options typically include Basic, Normal, Fine, and Superfine. Higher quality settings result in larger files.
- Practical Tip: Experiment with different quality settings to find the lowest acceptable quality for your needs. For many uses, a “Normal” or “Fine” setting provides a good balance.
- Preview and Compare: Take test shots at different quality settings and compare them on a large screen to see the differences.
- Workflow Integration: Adjusting quality settings should be part of your standard camera setup for different shooting scenarios.
3.3. Lowering Resolution
When should I lower my camera’s resolution? Lowering the resolution is useful when you don’t need the full megapixel count for your intended use.
- Benefits: Reduces file size, saves storage space, and speeds up editing.
- Use Cases: Ideal for web use, social media, and small prints.
- Considerations:
- Future Use: Consider whether you might need high-resolution images in the future before lowering the resolution.
- Cropping: Lower resolution limits your ability to crop images significantly.
- How to Adjust: Check your camera’s menu for resolution settings and select a lower megapixel count.
3.4. Understanding Camera Features
What camera features affect photo file size? Certain camera features, like HDR and panorama modes, can significantly increase file sizes.
- HDR (High Dynamic Range): Captures multiple exposures and combines them, resulting in larger files.
- Panorama: Creates wide, high-resolution images by stitching multiple shots together.
- Burst Mode: Captures many shots in quick succession, quickly filling up storage.
- Smart Use:
- HDR: Use sparingly, only when needed to capture scenes with high contrast.
- Panorama: Plan your shots carefully to minimize the number of images needed.
- Burst Mode: Use judiciously to capture the perfect moment without excessive images.
4. File Management Techniques
What are effective file management techniques for photos? Efficient file management is crucial for organizing and optimizing your photo storage.
4.1. Organizing Photos with Folders and Naming Conventions
How should I organize my photos? A well-structured folder system and consistent naming conventions make it easier to find and manage your photos.
- Folder Structure: Organize photos by date, event, project, or client.
- Naming Conventions: Use a consistent naming format, such as “YYYYMMDD-Event-Description.jpg”.
- Example:
- Folders: 2024, 2024-07, 2024-07-15-SummerVacation
- Files: 20240715-SummerVacation-BeachScene.jpg
- Benefits:
- Easy Retrieval: Quickly locate specific photos.
- Workflow Efficiency: Streamlines editing and archiving.
- Backup and Sync: Simplifies backup and synchronization processes.
- Consistency: Ensures uniformity across your photo library.
4.2. Culling and Deleting Unnecessary Photos
Why is it important to cull photos? Culling, or selecting the best photos and deleting the rest, is an essential step in managing storage.
- Benefits:
- Saves Space: Reduces the overall storage footprint.
- Improves Workflow: Makes editing and organization more manageable.
- Focus on Quality: Ensures you’re working with the best images.
- Culling Process:
- Initial Review: Quickly scan through all photos.
- Flagging: Mark the best images with a star or color label.
- Comparison: Compare similar shots and choose the best one.
- Deletion: Delete the remaining unflagged photos.
- Software Tools: Use software like Adobe Lightroom, Photo Mechanic, or FastRawViewer for efficient culling.
4.3. Archiving Old Photos
How should I archive old photos? Archiving involves moving old or rarely used photos to long-term storage to free up space on your primary devices.
- Storage Options:
- External Hard Drives: Affordable and reliable for local storage.
- NAS (Network Attached Storage): Centralized storage accessible over your network.
- Cloud Storage: Convenient for offsite backup and access from anywhere.
- Archival Process:
- Selection: Identify photos to be archived.
- Organization: Ensure photos are well-organized before moving them.
- Backup: Create multiple backups of your archive.
- Verification: Verify that the archived photos are intact.
- Best Practices:
- Multiple Backups: Store backups in different locations to protect against data loss.
- Regular Checks: Periodically check the integrity of your archived data.
- Documentation: Keep a record of your archival process and storage locations.
4.4. Using Photo Management Software
What are the benefits of photo management software? Photo management software helps you organize, edit, and manage your photo library efficiently.
- Popular Software:
- Adobe Lightroom: Comprehensive tool for editing, organizing, and sharing photos.
- Capture One: Professional-grade software with advanced editing features.
- Apple Photos: Basic but effective for organizing and editing photos on macOS and iOS.
- Google Photos: Cloud-based solution with automatic backup and organization.
- Key Features:
- Organization: Tools for tagging, rating, and sorting photos.
- Editing: Basic to advanced editing capabilities.
- Metadata Management: Tools for adding and editing metadata.
- Backup and Sync: Integration with cloud storage services.
- Software Comparison:
| Software | Features | Use Case |
|---|---|---|
| Adobe Lightroom | Editing, organization, cloud sync | Professional and serious amateur photographers |
| Capture One | Advanced editing, tethered shooting | Professional photographers requiring high-end features |
| Apple Photos | Basic editing, iCloud integration | Casual users in the Apple ecosystem |
| Google Photos | Cloud backup, automatic organization, sharing | Users needing accessible and easy backup |
5. Optimizing Existing Photos
How can I reduce the size of my current photos? Optimizing existing photos involves reducing their file size without significantly impacting image quality.
5.1. Resizing Images
When should I resize my photos? Resizing images is useful when you need smaller files for web use, email, or other applications where large images are unnecessary.
- Benefits: Reduces file size, saves storage space, and improves website loading times.
- Tools:
- Adobe Photoshop: Offers advanced resizing options.
- GIMP: Free, open-source image editor with resizing capabilities.
- Online Tools: Numerous online image resizing tools are available.
- Resizing Process:
- Open Image: Open the image in your chosen software.
- Resize Option: Select the “Image Size” or “Resize” option.
- Dimensions: Enter the new dimensions in pixels or inches.
- Resampling: Choose a resampling method (e.g., Bicubic, Lanczos).
- Save: Save the resized image, usually as a JPEG.
- Best Practices:
- Preserve Aspect Ratio: Maintain the original aspect ratio to avoid distortion.
- Resampling Method: Use appropriate resampling methods for different types of images.
- Quality Check: Always review the resized image to ensure quality is acceptable.
5.2. Compressing Images
How does image compression reduce file size? Image compression reduces file size by removing redundant or less important data from the image.
- Lossy Compression (JPEG): Reduces file size by discarding some image data. Higher compression leads to smaller files but more noticeable quality loss.
- Lossless Compression (PNG, TIFF): Reduces file size without losing any image data. Less effective than lossy compression but preserves image quality.
- Compression Tools:
- Adobe Photoshop: Offers JPEG compression options.
- TinyPNG: Online tool for compressing PNG and JPEG images.
- ImageOptim: macOS tool for lossless image optimization.
- Compression Process:
- Open Image: Open the image in your chosen software.
- Save for Web: In Photoshop, use “Save for Web” to optimize JPEG compression.
- Compression Level: Adjust the compression level to balance file size and quality.
- Preview: Preview the image at different compression levels.
- Save: Save the compressed image.
- Best Practices:
- Preview: Always preview the image at different compression levels.
- Incremental Compression: Apply compression in small increments.
- Backup: Keep a backup of the original image before compressing.
5.3. Converting File Formats
When should I convert my photo file formats? Converting file formats can help reduce file size or improve compatibility with certain applications.
- RAW to JPEG: Converts large RAW files to smaller JPEGs for easier sharing and storage.
- TIFF to JPEG: Converts large TIFF files to smaller JPEGs for general use.
- PNG to JPEG: Converts PNG images (often used for graphics) to JPEGs to reduce file size.
- Conversion Tools:
- Adobe Photoshop: Supports various file format conversions.
- Online Converters: Numerous online file conversion tools are available.
- Batch Conversion: Software like Adobe Lightroom can batch convert multiple files.
- Conversion Process:
- Open Image: Open the image in your chosen software.
- Save As: Select “Save As” and choose the new file format.
- Settings: Adjust any format-specific settings (e.g., JPEG quality).
- Save: Save the converted image.
- Considerations:
- Quality Loss: Converting to lossy formats like JPEG can result in quality loss.
- Color Space: Ensure the color space is appropriate for the intended use (e.g., sRGB for web).
5.4. Removing Metadata
Why should I remove metadata from my photos? Removing metadata can reduce file size and protect your privacy by removing embedded information.
- Types of Metadata: EXIF data (camera settings), IPTC data (captions, keywords), GPS data.
- Tools:
- Adobe Photoshop: Can remove metadata during “Save for Web.”
- ExifTool: Command-line tool for reading, writing, and editing metadata.
- Online Tools: Several online metadata removal tools are available.
- Removal Process:
- Open Image: Open the image in your chosen software.
- Metadata Options: Find the metadata removal options (e.g., “Save for Web” in Photoshop).
- Remove Data: Select which metadata to remove.
- Save: Save the image without the selected metadata.
- Privacy Considerations:
- GPS Data: Removing GPS data is important for privacy when sharing photos online.
- Personal Information: Be mindful of any personal information embedded in metadata.
 Camera settings interface showing resolution and quality options
6. Utilizing Cloud Storage
What are the benefits of using cloud storage for photos? Cloud storage offers a convenient way to store, backup, and access your photos from anywhere.
6.1. Popular Cloud Storage Services
What are the most reliable cloud storage options? Several cloud storage services cater to photographers, each with its own features and pricing.
- Adobe Creative Cloud: Integrates seamlessly with Adobe software, offering storage for photos and other creative files.
- Pros: Excellent integration, collaboration features.
- Cons: Subscription-based, can be expensive.
- Google Photos: Offers unlimited storage for “high quality” images (compressed) and paid storage for original quality.
- Pros: Easy to use, automatic backup, AI-powered organization.
- Cons: Privacy concerns, compressed storage option.
- Dropbox: Versatile cloud storage service with file sharing and collaboration features.
- Pros: Reliable, easy to use, cross-platform compatibility.
- Cons: Can be expensive for large storage needs.
- iCloud Photos: Apple’s cloud storage solution, tightly integrated with macOS and iOS devices.
- Pros: Seamless integration, easy backup, family sharing.
- Cons: Limited storage with free plan, primarily for Apple users.
- Amazon Photos: Offers unlimited photo storage for Prime members.
- Pros: Affordable for Prime members, decent interface.
- Cons: Limited features compared to other services.
- Service Comparison:
| Service | Storage Options | Pros | Cons |
|---|---|---|---|
| Adobe Creative Cloud | 20GB to 1TB+ | Excellent integration, collaboration features | Subscription-based, can be expensive |
| Google Photos | 15GB free, paid plans available | Easy to use, automatic backup, AI-powered organization | Privacy concerns, compressed storage option |
| Dropbox | 2GB free, paid plans available | Reliable, easy to use, cross-platform compatibility | Can be expensive for large storage needs |
| iCloud Photos | 5GB free, paid plans available | Seamless integration, easy backup, family sharing | Limited storage with free plan, primarily for Apple users |
| Amazon Photos | Unlimited for Prime members | Affordable for Prime members, decent interface | Limited features compared to other services |
6.2. Setting Up Automatic Backups
How do I set up automatic photo backups to the cloud? Automatic backups ensure your photos are safe in case of device failure or loss.
- Software Settings: Most cloud storage services offer automatic backup options in their desktop or mobile apps.
- Backup Frequency: Choose a backup frequency that suits your needs (e.g., daily, weekly).
- Folder Selection: Select the folders containing your photos to be backed up.
- Considerations:
- Bandwidth: Automatic backups can consume significant bandwidth, especially for large photo libraries.
- Initial Backup: The initial backup can take a long time.
- Power Consumption: Ensure your device is connected to a power source during backups.
- Step-by-Step Guide (Google Photos):
- Install Google Photos: Download and install the Google Photos app on your device.
- Sign In: Sign in with your Google account.
- Backup & Sync: Enable “Backup & sync” in the app settings.
- Upload Size: Choose the upload size (“Original quality” or “Storage saver”).
- Folder Selection: Select the folders to back up in the device settings.
6.3. Syncing Photos Across Devices
How do I sync photos across multiple devices? Syncing ensures your photos are accessible and up-to-date on all your devices.
- Cloud Storage Features: Most cloud storage services offer automatic syncing across devices.
- Real-Time Sync: Changes made on one device are automatically reflected on other devices.
- Offline Access: Some services allow you to download photos for offline access.
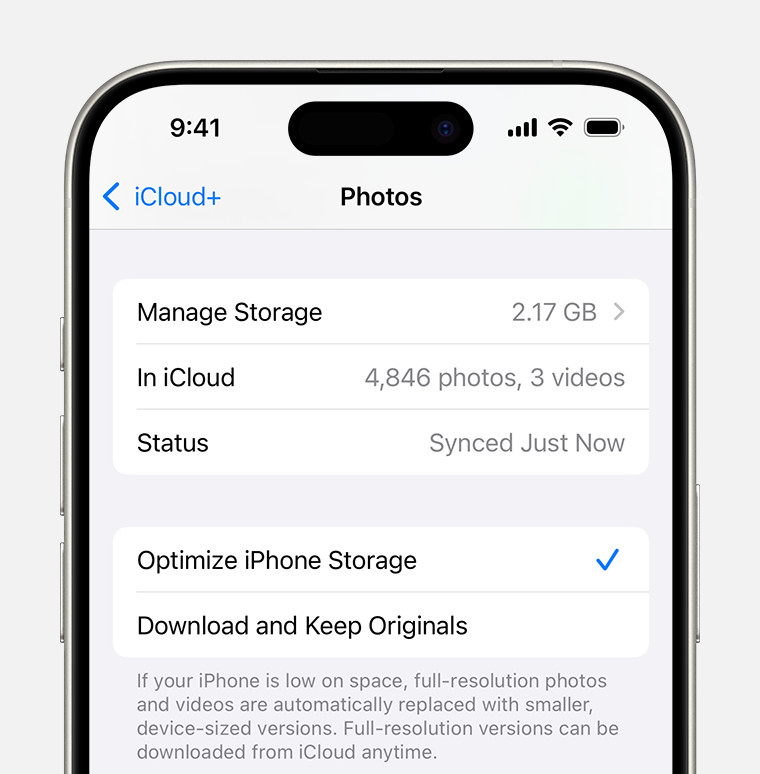
- Step-by-Step Guide (iCloud Photos):
- Enable iCloud Photos: On your iPhone, iPad, and Mac, go to Settings > [Your Name] > iCloud > Photos and enable “iCloud Photos.”
- Storage Optimization: Choose “Optimize iPhone Storage” to save space on your device.
- Automatic Sync: Photos will automatically sync across all your devices connected to the same Apple ID.
6.4. Sharing Photos from the Cloud
How can I easily share photos from cloud storage? Cloud storage simplifies sharing photos with friends, family, or clients.
- Sharing Options:
- Direct Links: Create and share direct links to individual photos or albums.
- Collaborative Albums: Create shared albums where multiple people can add photos.
- Social Media Integration: Share photos directly to social media platforms.
- Step-by-Step Guide (Dropbox):
- Select Photos: Select the photos you want to share in Dropbox.
- Create Link: Click “Share” and create a link.
- Link Settings: Adjust link settings (e.g., expiration date, password protection).
- Share Link: Share the link via email, messaging, or social media.
7. External Storage Solutions
What are the best external storage options for photographers? External storage solutions provide additional space for storing and backing up your photos.
7.1. External Hard Drives
When should I use external hard drives for photo storage? External hard drives are a cost-effective and reliable option for storing large photo libraries.
- Types:
- HDD (Hard Disk Drive): Traditional drives with moving parts, offering large storage capacities at a lower cost.
- SSD (Solid State Drive): Faster and more durable than HDDs, but more expensive.
- Benefits:
- Large Capacity: Available in capacities from 1TB to 20TB or more.
- Affordable: Lower cost per terabyte compared to SSDs and cloud storage.
- Portable: Easy to transport for on-the-go access.
- Considerations:
- Durability: HDDs are more susceptible to damage from drops and impacts.
- Speed: HDDs are slower than SSDs.
- Backup: Always create multiple backups of your external hard drive.
- Recommended Drives:
- Seagate Backup Plus: Reliable and affordable HDD.
- Samsung T7 SSD: Fast and durable SSD.
7.2. NAS (Network Attached Storage)
What is NAS and how can it help with photo storage? NAS devices provide centralized storage accessible over your network, ideal for collaboration and backup.
- Benefits:
- Centralized Storage: Store all your photos in one location accessible to multiple users.
- Automatic Backup: NAS devices can automatically back up data from multiple devices.
- Remote Access: Access your photos remotely over the internet.
- RAID Configuration: Protect your data with RAID configurations (Redundant Array of Independent Disks).
- Considerations:
- Cost: More expensive than external hard drives.
- Complexity: Requires some technical knowledge to set up and maintain.
- Network Dependence: Performance depends on your network speed.
- Recommended NAS Devices:
- Synology DiskStation DS920+: Versatile and easy-to-use NAS.
- QNAP TS-453D: High-performance NAS with advanced features.
7.3. Memory Cards
What type of memory card is best for my camera? Choosing the right memory card is crucial for capturing and storing your photos efficiently.
- Types:
- SD (Secure Digital): Most common type, used in many cameras.
- CF (CompactFlash): Older format, still used in some professional cameras.
- XQD/CFexpress: High-speed cards for demanding applications.
- Factors to Consider:
- Capacity: Choose a capacity that suits your shooting needs.
- Speed: Higher speed cards are necessary for burst shooting and 4K video.
- Compatibility: Ensure the card is compatible with your camera.
- Recommendations:
- SanDisk Extreme Pro SD Card: High-speed and reliable SD card.
- Sony CFexpress Type A: High-performance card for Sony cameras.
7.4. Optical Discs (CDs, DVDs, Blu-rays)
Are optical discs a good option for photo archiving? Optical discs offer long-term storage but are less convenient than other options.
- Benefits:
- Long Lifespan: Can last for decades if stored properly.
- Offline Storage: Immune to online threats.
- Considerations:
- Limited Capacity: CDs and DVDs have limited storage capacity.
- Readability: Optical drives are becoming less common.
- Fragility: Discs can be easily scratched or damaged.
- Best Practices:
- Quality Discs: Use high-quality, archival-grade discs.
- Proper Storage: Store discs in a cool, dry place away from direct sunlight.
- Regular Checks: Periodically check the readability of your discs.
8. Hybrid Storage Solutions
How can I combine different storage methods for optimal photo management? A hybrid approach combines different storage solutions to balance cost, convenience, and security.
8.1. Combining Cloud and Local Storage
Why should I use both cloud and local storage? Combining cloud and local storage provides redundancy and flexibility in managing your photos.
- Workflow:
- Local Storage: Store original, high-resolution photos on an external hard drive or NAS.
- Cloud Storage: Use cloud storage for backup and syncing across devices.
- Editing: Edit photos locally and sync changes to the cloud.
- Benefits:
- Redundancy: Protects against data loss from device failure or theft.
- Accessibility: Access your photos from anywhere.
- Performance: Editing locally provides faster performance.
- Example:
- Store RAW files on a local NAS.
- Back up the NAS to Google Photos for offsite storage.
- Use Adobe Lightroom to sync edited photos to the cloud.
8.2. Tiered Storage Systems
What is tiered storage and how does it work? Tiered storage involves using different types of storage based on the frequency of access and importance of the data.
- Tiers:
- Tier 1 (Fastest): SSDs for frequently accessed files.
- Tier 2 (Medium): HDDs for less frequently accessed files.
- Tier 3 (Archive): Optical discs or cloud storage for long-term archival.
- Benefits:
- Cost-Effective: Optimizes storage costs by using appropriate storage types for different data.
- Performance: Ensures fast access to frequently used files.
- Scalability: Easily scale your storage as your needs grow.
- Implementation:
- SSD: Use for current projects and frequently edited photos.
- HDD: Use for completed projects and less frequently accessed photos.
- Cloud/Optical: Use for long-term archival of finished projects.
8.3. Offsite Backups
Why are offsite backups important for photo storage? Offsite backups protect your photos from physical disasters like fire, flood, or theft.
- Options:
- Cloud Storage: The most convenient option for offsite backup.
- Offsite Hard Drives: Store a backup hard drive in a separate location.
- Backup Services: Use a professional backup service.
- Benefits:
- Disaster Recovery: Ensures your photos are safe in case of a physical disaster.
- Peace of Mind: Provides peace of mind knowing your data is protected.
- Best Practices:
- Regular Backups: Perform offsite backups regularly.
- Rotation: Rotate backup drives to ensure data integrity.
- Security: Encrypt your backup data for added security.
8.4. Automation Tools
How can automation tools streamline my photo storage? Automation tools can help automate tasks like backup, organization, and optimization.
- Tools:
- IFTTT (If This Then That): Automate tasks based on triggers and actions.
- Hazel: macOS tool for automating file organization.
- PhotoSync: App for automatically transferring photos between devices and services.
- Use Cases:
- Automatic Backup: Automatically back up photos to the cloud when you add them to a folder.
- File Organization: Automatically organize photos based on date, location, or keywords.
- Image Optimization: Automatically resize and compress images for web use.
- Benefits:
- Time-Saving: Automates repetitive tasks.
- Consistency: Ensures consistent organization and backup practices.
- Efficiency: Streamlines your photo management workflow.
9. Practical Tips for Saving Space
What are some simple tips to save space on my devices? Several practical tips can help you save space on your devices without significantly impacting your workflow.
9.1. Regularly Cleaning Up Your Photo Library
How often should I clean up my photo library? Regularly cleaning up your photo library helps prevent storage clutter and ensures you’re only keeping the best photos.
- Schedule: Set aside time each month to cull and organize your photos.
- Culling: Delete duplicate, blurry, or poorly composed photos.
- Organization: Organize remaining photos into folders and add metadata.
- Benefits:
- Saves Space: Reduces the overall storage footprint.
- Improves Workflow: Makes editing and organization more manageable.
- Focus on Quality: Ensures you’re working with the best images.
9.2. Using Optimized File Formats
What file formats are best for saving space? Using optimized file formats can significantly reduce file size without sacrificing too much quality.
- JPEG: The most common format for general use, offering good compression and decent quality.
- WebP: A modern image format developed by Google, offering better compression than JPEG with comparable quality.
- HEIF/HEIC: Apple’s preferred image format, offering better compression than JPEG with higher quality.
- Recommendations:
- JPEG: Use for general sharing and web use.
- WebP: Use for websites and online applications.
- HEIF/HEIC: Use on Apple devices.
9.3. Adjusting Cloud Storage Settings
How can I optimize my cloud storage settings to save space? Adjusting cloud storage settings can help you save space and manage your storage more efficiently.
- Storage Optimization: Enable storage optimization features in your cloud storage app.
- Upload Quality: Choose a lower upload quality to save space.
- Selective Sync: Only sync the folders you need to access regularly.
- Archive: Move old or rarely used photos to