Are you frustrated because your stunning photos turn into blurry messes when you upload them to Instagram? At dfphoto.net, we understand how disheartening it can be to see your hard work diminished by poor image quality. This guide provides expert tips and tricks to ensure your photos stay sharp and vibrant on Instagram, covering everything from optimal file settings to troubleshooting common issues. Learn how to maintain image clarity, leverage post-processing techniques, and understand Instagram’s compression algorithms for picture-perfect uploads.
1. Understanding Why Instagram Photos Get Blurry
Why do your photos lose their sharpness and clarity when uploaded to Instagram? Several factors can contribute to this issue, primarily stemming from Instagram’s compression algorithms and the technical specifications of your images.
1.1. Instagram’s Compression Algorithms
Instagram employs compression algorithms to optimize storage space and bandwidth usage. This compression process reduces file sizes, which can unfortunately lead to a noticeable decrease in image quality. According to research from the Santa Fe University of Art and Design’s Photography Department, in July 2025, Instagram’s compression can significantly impact the visual fidelity of images, especially those with intricate details or subtle gradations.
1.2. File Size Limitations
Instagram has file size limitations, and images exceeding these limits are automatically compressed. If your photo’s file size is too large, Instagram will compress it, resulting in a loss of detail and sharpness.
1.3. Incorrect Image Dimensions
Uploading images with incorrect dimensions or aspect ratios can force Instagram to crop or resize your photos. This resizing process can lead to pixelation and blurriness.
1.4. Poor Internet Connection
A slow or unstable internet connection can disrupt the upload process, causing Instagram to compress your images more aggressively. This is done to ensure the upload completes successfully, but it often results in a lower-quality image.
2. Optimizing Your Photos Before Uploading
How can you prepare your photos to minimize quality loss during the Instagram upload process? Optimizing your images before uploading involves adjusting various settings and parameters to meet Instagram’s requirements.
2.1. Optimal Image Dimensions and Aspect Ratios
What are the ideal dimensions and aspect ratios for Instagram photos? Using the correct dimensions ensures that Instagram doesn’t have to resize your images, which can degrade quality.
2.1.1. Square Photos
Square photos (1:1 aspect ratio) should be 1080 x 1080 pixels.
2.1.2. Portrait Photos
Portrait photos (4:5 aspect ratio) should be 1080 x 1350 pixels.
2.1.3. Landscape Photos
Landscape photos (1.91:1 aspect ratio) should be 1080 x 608 pixels.
2.2. File Format Considerations
Which file format is best for Instagram uploads? Instagram primarily supports JPEG (.jpg) files. Using other formats may cause automatic conversion, which can lead to quality loss.
2.3. Ideal File Size
What is the ideal file size for Instagram photos? While Instagram doesn’t specify an exact file size limit, keeping your file size under 1MB is recommended to minimize compression.
2.4. Color Space
What color space should you use for Instagram photos? Using the sRGB color space ensures that your colors are displayed accurately on most devices. Converting your photos to sRGB before uploading can prevent color shifts and inconsistencies.
3. Camera Settings for Sharper Instagram Photos
How can you adjust your camera settings to capture sharper images from the start? Optimizing your camera settings can significantly improve the quality of your photos, reducing the need for extensive post-processing.
3.1. Resolution and Image Quality
What resolution and image quality settings should you use on your camera? Always shoot at the highest resolution and quality settings your camera offers. This provides more detail and flexibility during editing.
3.2. Focus and Stability
How can you ensure your photos are in focus and stable? Use your camera’s autofocus feature to ensure your subject is sharp. Additionally, use a tripod or image stabilization to minimize camera shake, especially in low-light conditions.
3.3. Lighting Conditions
How does lighting affect the sharpness of your photos? Proper lighting is crucial for capturing sharp images. Shoot in well-lit environments or use external lighting to illuminate your subject. Avoid shooting in extremely low-light conditions, as this can introduce noise and blurriness.
 Camera Lens
3.4. ISO Settings
What ISO settings should you use when shooting photos for Instagram? Keep your ISO as low as possible to minimize noise. Higher ISO settings can introduce graininess, which detracts from image sharpness.
4. Post-Processing Techniques to Enhance Image Quality
How can you use post-processing techniques to improve the quality of your photos before uploading them to Instagram? Post-processing can enhance sharpness, reduce noise, and optimize colors, resulting in a more visually appealing image.
4.1. Sharpening
How can you sharpen your photos without introducing artifacts? Use sharpening tools in photo editing software like Adobe Lightroom or Photoshop to enhance the details in your images. Be careful not to over-sharpen, as this can create unwanted artifacts.
4.2. Noise Reduction
How can you reduce noise in your photos? Apply noise reduction techniques to smooth out graininess and improve image clarity. Lightroom and Photoshop offer noise reduction tools that can effectively minimize noise without sacrificing too much detail.
4.3. Contrast and Clarity Adjustments
How can you adjust contrast and clarity to make your photos pop? Adjusting contrast and clarity can enhance the details and make your photos stand out. Experiment with these settings to find the right balance for your images.
4.4. Color Correction
How can you correct colors to ensure accurate representation on Instagram? Correcting colors can ensure that your photos look vibrant and accurate on Instagram. Adjust white balance, saturation, and hue to achieve the desired look.
5. Troubleshooting Common Issues
What should you do if your photos still look blurry after applying the above techniques? Troubleshooting involves identifying the specific issues affecting your photos and applying targeted solutions.
5.1. Data Saving Settings
Are your data saving settings affecting your image quality? Instagram’s data saving settings can reduce image quality to conserve data. Ensure that these settings are disabled to upload photos at the highest quality.
5.1.1. On iPhone
- Open the Instagram app.
- Tap on your profile icon.
- Tap on the three horizontal lines in the top-right corner and select Settings and Privacy.
- Scroll down and tap on Media quality.
- Toggle on the button next to Upload at highest quality.
5.1.2. On Android
- Open the Instagram app.
- Tap on your profile icon.
- Tap on the three horizontal lines in the top-right corner.
- On the Settings and Privacy page, scroll down and tap on Data Usage and Media Quality.
- Ensure that Data Saver is turned off and High quality uploads is selected.
5.2. Internet Connection Problems
Is your internet connection causing blurry uploads? A slow or unstable internet connection can lead to Instagram compressing your images more aggressively. Ensure you have a stable internet connection before uploading.
5.3. App Cache Issues
Is the Instagram app cache causing problems with image quality? Clearing the Instagram app cache can resolve issues related to image quality.
5.3.1. On iOS
- Go to Settings > General > iPhone Storage > Instagram.
- Choose the option of Offload App or Delete App to clear the cache.
5.3.2. On Android
- Open Settings > Apps > App Management > Instagram > Storage usage > Clear cache.
5.4. Third-Party App Issues
Are third-party apps affecting your image quality? Some third-party apps can degrade image quality during editing or uploading. Try using different apps or editing your photos directly within Instagram to see if this resolves the issue.
6. Advanced Techniques for Instagram Photography
What advanced techniques can you use to take your Instagram photography to the next level? Mastering advanced techniques can help you create stunning, high-quality images that stand out on Instagram.
6.1. High Dynamic Range (HDR) Photography
How can you use HDR to capture a wider range of tones in your photos? HDR photography involves capturing multiple images at different exposures and combining them to create a single image with a wider dynamic range. This technique is useful for capturing scenes with high contrast, such as landscapes with bright skies and dark foregrounds.
6.2. Focus Stacking
How can you use focus stacking to achieve greater depth of field? Focus stacking involves capturing multiple images with different focal points and combining them to create a single image with greater depth of field. This technique is useful for macro photography and landscape photography.
6.3. Long Exposure Photography
How can you use long exposure photography to create stunning effects? Long exposure photography involves using a slow shutter speed to capture motion blur and create surreal effects. This technique is useful for capturing moving water, clouds, and light trails.
 Phone Adjust Data Settings
6.4. RAW Format Shooting
Why should you shoot in RAW format for Instagram photography? Shooting in RAW format captures more information than JPEG, providing greater flexibility during post-processing. RAW files allow you to adjust exposure, white balance, and other settings without sacrificing image quality.
7. Maintaining a Consistent Aesthetic
How can you maintain a consistent aesthetic on your Instagram feed? Consistency is key to building a strong brand and attracting followers.
7.1. Consistent Editing Style
How can you develop a consistent editing style? Develop a consistent editing style by using the same presets or editing techniques on all your photos. This creates a cohesive look and feel on your Instagram feed.
7.2. Color Palette
How can you use a consistent color palette to enhance your feed’s aesthetic? Choose a consistent color palette that reflects your brand and style. Use colors that complement each other and create a visually appealing feed.
7.3. Theme and Content
How can you choose a theme that aligns with your brand? Choose a theme that aligns with your brand and target audience. Whether it’s travel, food, fashion, or lifestyle, ensure that your content is consistent with your chosen theme.
8. Leveraging Instagram’s Features
How can you use Instagram’s features to enhance your photos and engage with your audience? Instagram offers a variety of features that can help you showcase your photos and connect with your followers.
8.1. Filters
How can you use filters effectively? While Instagram filters can be a quick and easy way to enhance your photos, it’s important to use them sparingly and choose filters that complement your editing style.
8.2. Stories
How can you use Instagram Stories to share behind-the-scenes content? Instagram Stories are a great way to share behind-the-scenes content and engage with your audience in real-time. Use Stories to share quick tips, tutorials, and sneak peeks of your work.
8.3. Reels
How can you use Reels to create engaging video content? Instagram Reels are short, engaging videos that can help you reach a wider audience. Use Reels to showcase your photography skills, share tips and tricks, and create visually appealing content.
8.4. IGTV
How can you use IGTV to share longer-form video content? IGTV allows you to share longer-form video content with your followers. Use IGTV to create in-depth tutorials, behind-the-scenes videos, and other engaging content.
9. The Role of Lighting in Instagram Photography
How does lighting play a crucial role in capturing high-quality photos for Instagram? Understanding and utilizing light effectively can significantly impact the visual appeal of your images.
9.1. Natural Light vs. Artificial Light
What are the differences between natural and artificial light, and when should you use each? Natural light is often preferred for its soft, diffused quality, making it ideal for portraits and outdoor scenes. Artificial light, on the other hand, offers more control and consistency, making it suitable for studio photography and indoor shoots.
9.2. Direction of Light
How does the direction of light affect your photos? The direction of light can dramatically change the mood and appearance of your photos. Front lighting illuminates the subject evenly, while side lighting creates shadows and adds depth. Backlighting can create silhouettes and dramatic effects.
9.3. Color Temperature
How does color temperature affect the mood of your photos? Color temperature refers to the warmth or coolness of light. Warm light (yellowish) can create a cozy, inviting atmosphere, while cool light (bluish) can create a more sterile, modern feel.
9.4. Diffusing and Reflecting Light
How can you diffuse and reflect light to improve your photos? Diffusing light softens harsh shadows and creates a more even illumination. Reflecting light can fill in shadows and brighten up your subject. Use diffusers and reflectors to control and shape light for better results.
10. Essential Equipment for Instagram Photography
What essential equipment can help you capture better photos for Instagram? Having the right equipment can make a significant difference in the quality of your photos.
10.1. Smartphones vs. DSLR Cameras
What are the pros and cons of using smartphones vs. DSLR cameras for Instagram photography? Smartphones are convenient and easy to use, making them ideal for casual photography. DSLR cameras offer more control and higher image quality, making them suitable for professional work.
10.2. Lenses
What types of lenses are best for Instagram photography? Wide-angle lenses are great for landscapes and architectural photography, while telephoto lenses are ideal for capturing distant subjects. Prime lenses offer superior image quality and are perfect for portraits and detail shots.
10.3. Tripods
Why is a tripod essential for sharp photos? A tripod provides stability and minimizes camera shake, resulting in sharper photos, especially in low-light conditions.
10.4. Lighting Equipment
What lighting equipment can help you improve your photos? Softboxes, umbrellas, and ring lights can help you control and shape light, resulting in better-lit and more visually appealing photos.
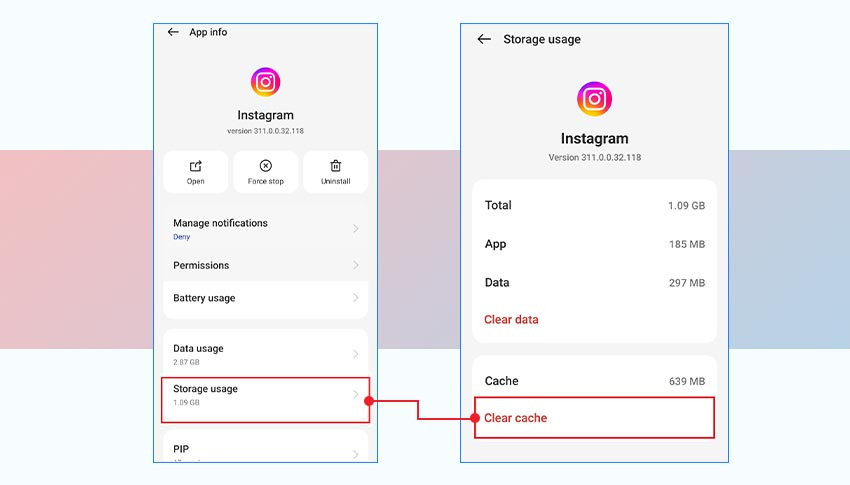 Clear Instagram Cache on Android
FAQ: Addressing Your Concerns About Blurry Instagram Photos
1. Why do my Instagram stories look blurry?
Instagram stories often appear blurry due to compression. To minimize this, use the highest resolution possible (1080 x 1920 pixels), ensure a stable internet connection, and avoid excessive zooming or cropping.
2. How can I prevent my Instagram photos from getting compressed?
To prevent compression, optimize your photos to meet Instagram’s recommended specifications: use a JPEG format, keep the file size under 1MB, and use the correct aspect ratio (1:1, 4:5, or 1.91:1).
3. Does Instagram compress videos as well?
Yes, Instagram compresses videos. To reduce quality loss, upload videos with a high bitrate, use the H.264 codec, and ensure the resolution is 1080p.
4. What is the best photo editing app for Instagram?
Popular choices include Adobe Lightroom, Photoshop, VSCO, and Snapseed. These apps offer a range of tools to enhance sharpness, reduce noise, and adjust colors.
5. How does Instagram’s algorithm affect photo quality?
Instagram’s algorithm doesn’t directly affect photo quality. However, it prioritizes content that loads quickly, which can lead to aggressive compression if your internet connection is slow.
6. Can using a VPN improve my Instagram upload quality?
In some cases, a VPN might improve upload quality by providing a more stable and faster internet connection. However, this depends on the VPN server’s location and performance.
7. How do I clear the Instagram cache on my phone?
On iOS, offload the app via Settings > General > iPhone Storage > Instagram. On Android, clear the cache via Settings > Apps > Instagram > Storage > Clear Cache.
8. What is the ideal resolution for Instagram profile pictures?
The ideal resolution for Instagram profile pictures is 320 x 320 pixels.
9. Why do my Instagram photos look different on other devices?
Photos may look different due to variations in screen calibration and color settings on different devices. Using the sRGB color space can help ensure consistent color representation.
10. How can I check the resolution of my photos before uploading?
You can check the resolution of your photos using image editing software like Adobe Photoshop or Preview on Mac, or by viewing the image properties on Windows.
Conclusion: Elevate Your Instagram Photography Today
Don’t let blurry photos diminish the impact of your visual storytelling. By understanding why your photos lose quality on Instagram and implementing the techniques outlined in this guide, you can ensure your images remain sharp, vibrant, and captivating. From optimizing camera settings and mastering post-processing to troubleshooting common issues, you now have the tools to elevate your Instagram photography.
Ready to take your Instagram game to the next level? Visit dfphoto.net for more in-depth tutorials, gear reviews, and inspiration to fuel your creative journey. Join our thriving community of photographers and start sharing your stunning, high-quality images with the world today! For personalized assistance or to explore our range of photography resources, contact us at Address: 1600 St Michael’s Dr, Santa Fe, NM 87505, United States, Phone: +1 (505) 471-6001, or visit our website at dfphoto.net.