Are you experiencing the frustrating issue of deleted photos reappearing on your iPhone? At dfphoto.net, we understand how annoying it can be when your carefully curated photo library seems to defy your efforts to organize it. We’ll explore the common causes behind this problem and provide detailed, step-by-step solutions to help you regain control of your iPhone’s photo storage. You’ll learn how to troubleshoot software glitches, manage iCloud settings, and optimize your device for seamless photo management. Get ready to dive deep into the world of iOS photo management, covering topics like data recovery, cloud storage, and digital privacy.
1. Understanding Why Deleted Photos Reappear on Your iPhone
Why do deleted photos reappear on your iPhone? There are several reasons your deleted photos might be staging a comeback on your iPhone. Understanding these reasons is the first step in resolving the issue.
1.1. Software Bugs
Are software bugs the culprit behind reappearing photos on your iPhone? Like any complex operating system, iOS can sometimes harbor glitches that cause unexpected behavior. According to Apple Support forums, software bugs can occasionally interfere with the photo deletion process, leading to deleted photos reappearing in your library.
1.2. iCloud Sync Issues
Could iCloud synchronization problems be responsible for your photos’ unexpected return? iCloud Photos is designed to keep your photo library consistent across all your Apple devices. However, synchronization hiccups can occur, causing previously deleted photos to reappear. This can happen if the deletion wasn’t properly synced across all devices connected to your iCloud account.
1.3. Recently Deleted Album
Are you aware of the “Recently Deleted” album feature on your iPhone? When you delete a photo, it doesn’t immediately vanish from your device. Instead, it’s moved to the “Recently Deleted” album, where it remains for 30 days before being permanently removed. If you don’t manually clear this album, those photos will continue to occupy storage space and might give the impression that they’re reappearing.
1.4. Third-Party Apps
Could third-party apps be messing with your iPhone’s photo management? Certain apps that access or manage your photo library might interfere with the deletion process. These apps might create their own backups or caches of your photos, leading to their reappearance even after you’ve deleted them from the Photos app.
1.5. iOS Update Issues
Can iOS updates sometimes cause photo-related problems on your iPhone? While updates usually bring improvements and bug fixes, they can occasionally introduce new issues. In some cases, users have reported that deleted photos reappeared after updating to a new version of iOS. For example, the iOS 17.5 update was found to have a bug that caused deleted photos to reappear.
2. Quick Fixes: Basic Troubleshooting Steps
How can you quickly address the issue of deleted photos reappearing on your iPhone? Before diving into more complex solutions, try these simple troubleshooting steps:
2.1. Restart Your iPhone
Will a simple restart solve the mystery of reappearing photos? Restarting your iPhone can often resolve minor software glitches that might be causing the problem.
2.1.1. How to Restart Your iPhone
The method for restarting your iPhone varies depending on the model:
- iPhone X and later: Press and hold either volume button and the side button until the power-off slider appears. Drag the slider, then wait 30 seconds for your iPhone to turn off. Press and hold the side button until the Apple logo appears.
- iPhone 6, 7, 8, or SE (2nd generation): Press and hold the side button until the power-off slider appears. Drag the slider, then wait 30 seconds for your iPhone to turn off. Press and hold the side button to turn your device back on.
- iPhone SE (1st generation) or earlier: Press and hold the top button until the power-off slider appears. Drag the slider, then wait 30 seconds for your iPhone to turn off. Press and hold the top button to turn your device back on.
2.2. Check the “Recently Deleted” Album
Are you diligently clearing the “Recently Deleted” album on your iPhone? As mentioned earlier, photos you delete are moved to this album for 30 days before being permanently removed.
2.2.1. How to Clear the “Recently Deleted” Album
Here’s how to clear the “Recently Deleted” album:
2.2.1.1. Option 1: Clear Through the Photos App
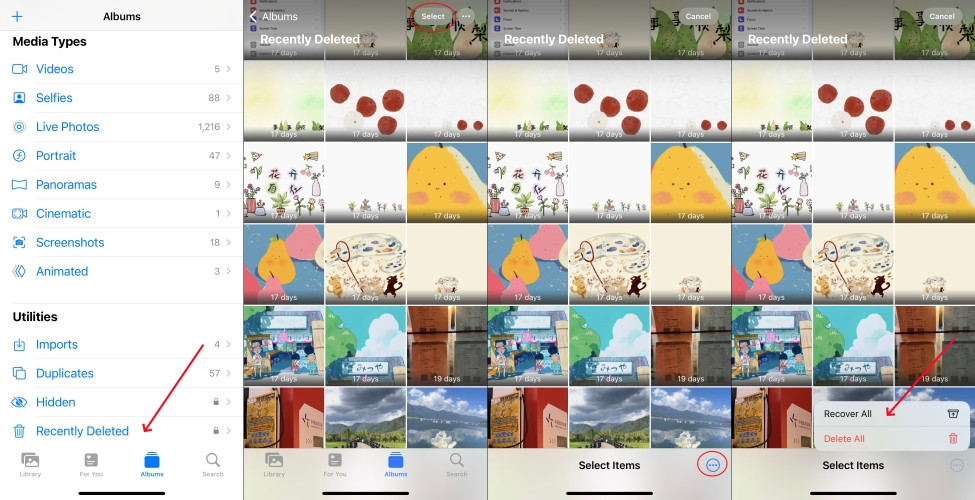
 Clear recently deleted album in photos
- Open the Photos app on your iPhone and tap the Albums tab.
- Scroll down and tap the Recently Deleted album.
- Unlock the album using Face ID or Touch ID.
- Tap Select, then tap the Delete All option in the bottom right corner.
- Confirm by tapping Delete From This iPhone.
2.2.1.2. Option 2: Clear Through Settings
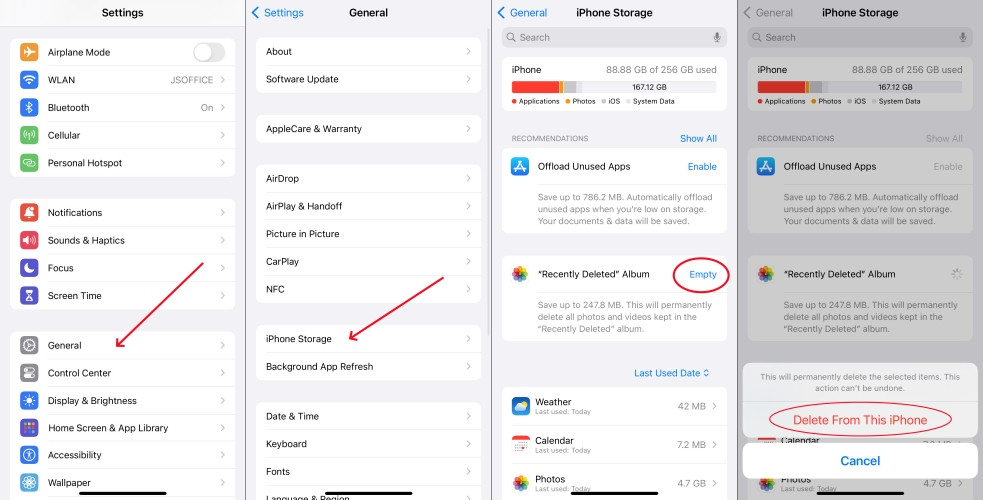 Clear recently deleted album in settings
- Open the Settings app on your iPhone and tap General.
- Tap iPhone Storage.
- Scroll down and tap Photos.
- Tap Empty next to “Recently Deleted” Album.
- Confirm by tapping Delete From This iPhone.
2.3. Disable and Re-enable iCloud Photos
Can toggling iCloud Photos help resolve photo reappearance issues? Turning iCloud Photos off and then back on can reset the synchronization process and potentially fix glitches.
2.3.1. How to Disable and Re-enable iCloud Photos
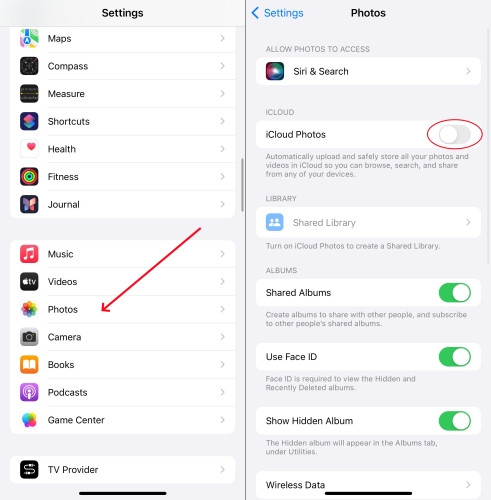 Disable icloud photos on iphone
- Open the Settings app on your iPhone and tap Photos.
- Toggle off iCloud Photos.
- Wait a few minutes, then toggle it back on.
2.4. Manage iCloud Photo Storage
Is your iCloud storage full, potentially causing photo syncing issues? When your iCloud storage is nearing its limit, it can disrupt the synchronization process, leading to unexpected behavior like deleted photos reappearing.
2.4.1. How to Manage iCloud Storage
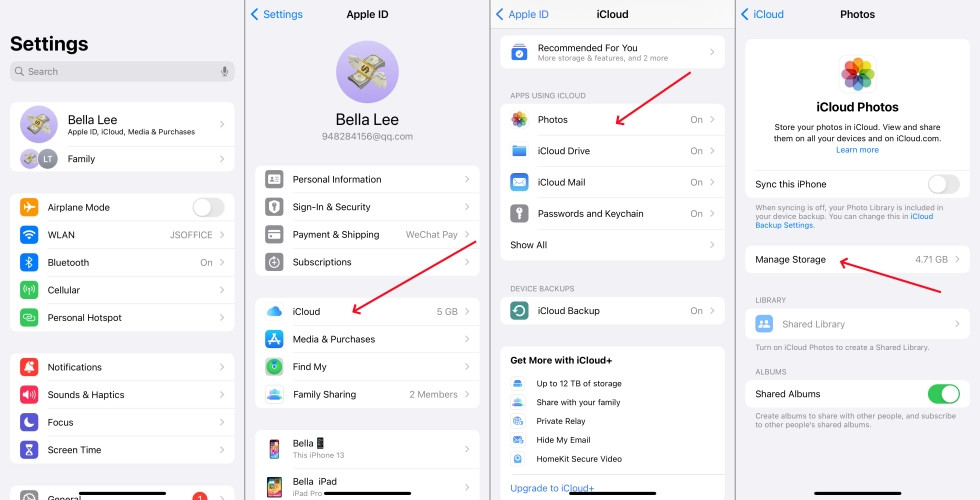 Manage storage for icloud photos on iphone
- Open the Settings app and tap your Apple ID name at the top.
- Select iCloud and tap Manage Storage.
- From here, you can see how your storage is being used and delete unnecessary files or upgrade your storage plan.
2.5. Sign Out and Back Into Your Apple ID
Could a simple Apple ID sign-out and sign-in resolve photo sync problems? Signing out of your Apple ID and then signing back in can refresh your iCloud connection and potentially clear out glitches.
2.5.1. How to Sign Out and Back Into Your Apple ID
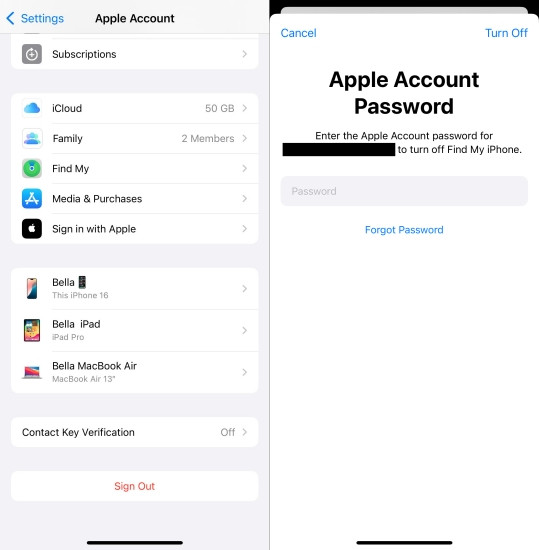 Sign out apple id on iphone
- Go to Settings > Your Apple ID name on your iPhone.
- Scroll down and tap Sign Out.
- Enter your Apple ID password and tap Turn Off to confirm.
- Wait a few minutes, then sign back in using your Apple ID and password.
2.6. Check the Hidden Album
Are you aware of the Hidden album and its potential impact on photo visibility? The Hidden album is a feature that allows you to hide photos from your main library. However, if the “Show Hidden Album” setting is enabled, these photos will still appear in your Photo Library.
2.6.1. How to Check and Manage the Hidden Album
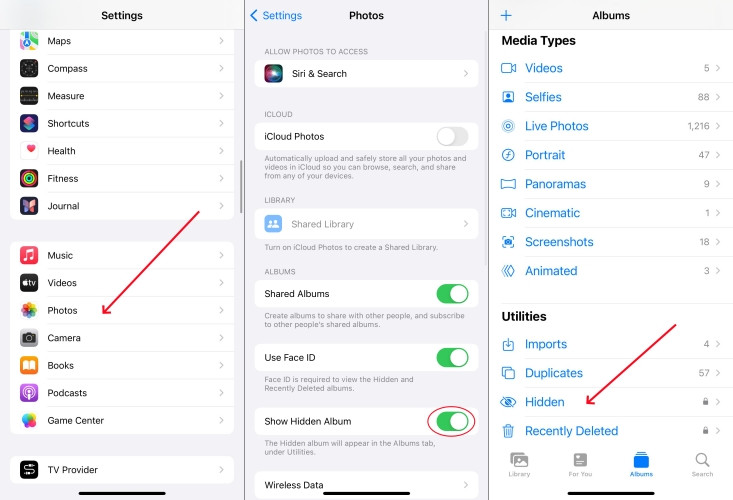 Delete photos in hidden album on iphone
- Navigate to Settings > Photos and toggle on Show Hidden Album.
- Open the Photos app and tap Albums > Hidden to view your hidden album.
- Select any unwanted photos and delete them.
- Go back to Settings > Photos and disable Show Hidden Album to hide the album again.
3. Advanced Solutions: Deeper Troubleshooting
What if the basic fixes don’t solve the problem? Let’s explore more advanced solutions to tackle stubborn photo reappearance issues.
3.1. Update to the Latest Version of iOS
Is your iPhone running the latest version of iOS? Updating to the latest version of iOS can resolve software bugs that might be causing the problem.
3.1.1. How to Update Your iPhone
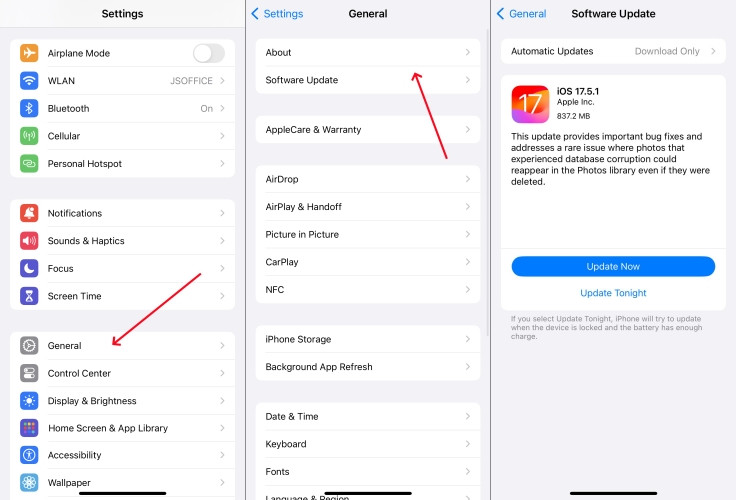 Update ios 17.5.1
- Go to Settings and tap General > Software Update.
- If an update is available, tap Download and Install.
- Enter your passcode if prompted.
- Tap Update to install the latest version of iOS.
3.2. Reset All Settings
Could resetting all settings on your iPhone resolve underlying conflicts? Resetting all settings can clear out any configurations that might be causing the issue. Note that this won’t delete your data, but it will reset your system settings to their defaults.
3.2.1. How to Reset All Settings
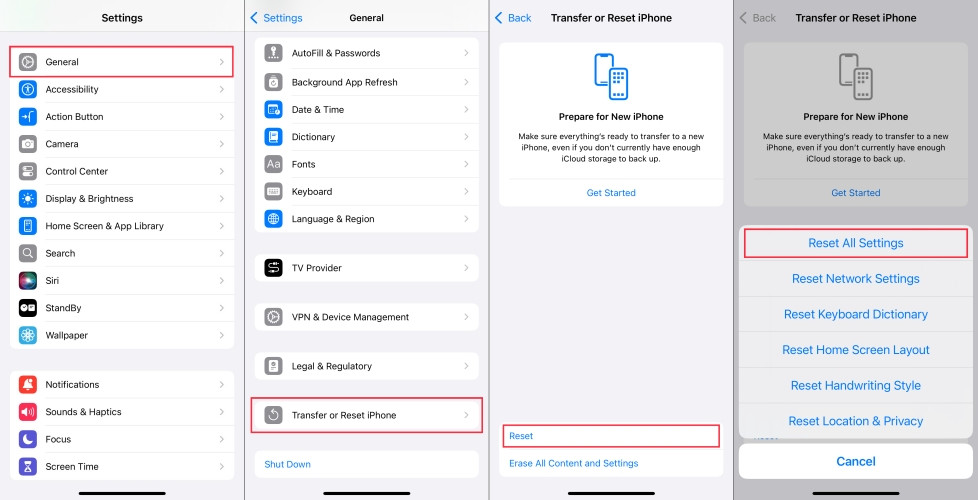 Reset all settings on iphone
- Go to Settings > General > Transfer or Reset iPhone.
- Tap Reset and select Reset All Settings.
- Enter your passcode if prompted.
- Tap Reset All Settings to confirm.
3.3. Remove and Reinstall the Photos App
Can reinstalling the Photos app help fix persistent photo problems? A problematic app might be interfering with your photos. If there’s an issue with the Photos app itself, removing and reinstalling it can resolve the problem.
3.3.1. How to Remove and Reinstall the Photos App
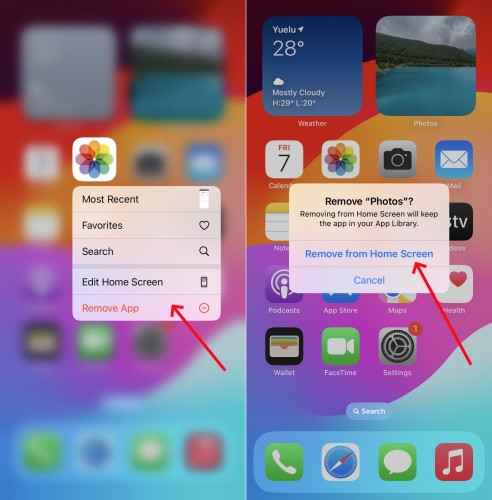 Remove the photos app on iphone
- Locate the Photos app on your home screen.
- Tap and hold the app icon until a menu appears.
- Tap Remove App > Delete App.
- Confirm by tapping Delete.
- To reinstall the app, open the App Store and search for “Photos.”
- Tap the download icon to reinstall the app.
4. Ultimate Solutions: Last Resort Options
When all other solutions fail, consider these ultimate options to resolve the issue. Important: These methods may result in data loss, so be sure to back up your iPhone first.
4.1. Use MagFone iOS System Recovery (No Data Loss)
Are you looking for a data-loss-free solution to fix your iPhone’s photo problems? MagFone iOS System Recovery is a tool designed to resolve various iOS system issues without data loss.
4.1.1. Key Features of MagFone iOS System Recovery
- Fixes various iOS issues like screen stuck, mode stuck, and more.
- Supports upgrading and downgrading iOS without iTunes/Finder.
- Offers two modes for resetting iPhone, iPad, and iPod touch.
- Assists in entering and exiting recovery mode for free.
4.1.2. How to Use MagFone iOS System Recovery
- Step 1: Connect your iPhone to your computer using a USB cable.
- Step 2: Launch MagFone iOS System Recovery and select iOS System Repair.
- Step 3: Select Standard Mode to fix the issue without data loss.
- Step 4: Follow the on-screen instructions to put your iPhone into recovery mode.
- Step 5: Download the appropriate firmware package for your device.
- Step 6: Click the Repair button to start the repair process.
4.2. Factory Reset Your iPhone (Data Loss)
Will a factory reset completely wipe away the photo reappearance problem? A factory reset returns your iPhone to its original state, erasing all data and settings.
4.2.1. How to Factory Reset Your iPhone
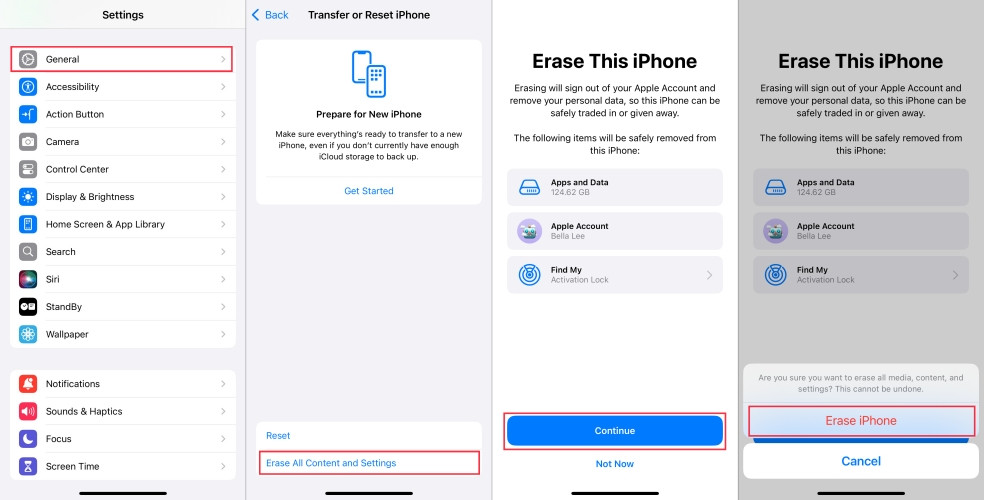 Factory reset iphone in settings
- On your iPhone, tap Settings > General > Transfer or Reset iPhone.
- Tap Erase All Content and Settings.
- Tap Continue.
- Enter your passcode or Apple ID password if prompted.
- Tap Erase to confirm.
4.3. Restore Your iPhone via iTunes/Finder (Data Loss)
Could restoring your iPhone through iTunes or Finder be the ultimate solution? Restoring your iPhone via iTunes on a PC or Finder on a Mac can help resolve deeper software issues.
4.3.1. How to Restore Your iPhone via iTunes/Finder
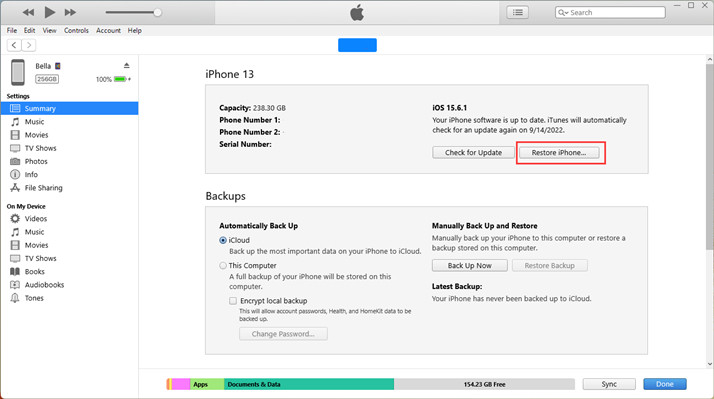 Restore iphone via itunes
- Connect your iPhone to your computer using a USB cable.
- Open iTunes (or Finder on macOS Catalina and later).
- Select your iPhone when it appears in iTunes/Finder.
- Click Restore iPhone.
- Follow the on-screen instructions to complete the process.
4.4. Repair Your iPhone in Recovery Mode (Data Loss)
Is recovery mode the key to fixing your iPhone’s photo woes? Restoring your iPhone in recovery mode is a more advanced method that can fix complex issues.
4.4.1. How to Restore Your iPhone in Recovery Mode
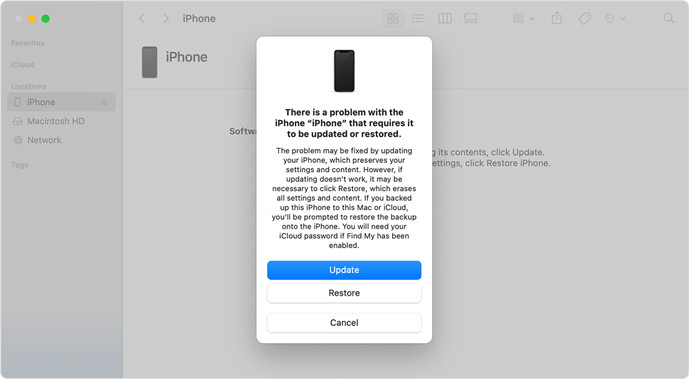 Restore iphone in recovery mode
- Power off your iPhone and connect it to a computer.
- Put your iPhone into recovery mode:
- iPhone 8 or later: Press and quickly release the volume up button. Press and quickly release the volume down button. Then, press and hold the side button until you see the Connect to computer screen.
- iPhone 7 and 7 Plus: Press and hold the top and volume down buttons at the same time. Keep holding them until you see the Connect to computer screen.
- iPhone 6s or earlier: Press and hold both the Home and the top buttons at the same time. Keep holding them until you see the Connect to computer screen.
- Open iTunes or Finder on your computer.
- A message will appear saying that your iPhone needs to be updated or restored.
- Click Restore and follow the on-screen instructions.
4.5. Contact Apple Support
When should you seek professional help from Apple Support? If you’ve tried all the above solutions and the problem persists, contacting Apple Support is your best option.
4.5.1. How to Contact Apple Support
 Contact official apple support
- Visit the Apple Support website: support.apple.com
- Call Apple Support: Find the phone number for your region on the Apple Support website.
- Visit an Apple Store: Schedule an appointment at your local Apple Store.
5. Frequently Asked Questions (FAQs)
Let’s address some common questions about managing photos on your iPhone.
5.1. How Do I Access Deleted Photos on My iPhone?
How can you find photos you’ve deleted on your iPhone? You can access deleted photos in the “Recently Deleted” album within the Photos app. These photos remain in the album for 30 days before being permanently deleted.
5.2. Where Do Deleted Photos Go on My iPhone?
Where do your photos go after you hit the delete button? When you delete a photo, it’s moved to the “Recently Deleted” album. If you don’t manually delete it from that album, it will be permanently deleted after 30 days.
5.3. How Do I Delete a Photo Album on My iPhone?
How can you remove an entire photo album from your iPhone? To delete a photo album, open the Photos app, tap the Albums tab, and tap “See All.” Tap “Edit” in the upper-right corner, then tap the minus sign on the album you want to delete. Tap “Delete Album” to confirm.
5.4. How Do I Recover Recently Deleted Photos on My iPhone?
How can you retrieve photos you’ve recently deleted? You can recover recently deleted photos from the “Recently Deleted” album.
5.4.1. Steps to Recover Recently Deleted Photos
 Recover recently deleted photos on iphone
- Open the Photos app and tap the Albums tab.
- Scroll down to the Recently Deleted album.
- Unlock the album using Face ID or Touch ID.
- Tap Select and choose the photos you want to recover.
- Tap Recover > Recover Photo to confirm.
6. Conclusion: Mastering Your iPhone Photo Library
Dealing with deleted photos reappearing on your iPhone can be frustrating, but with the right knowledge and tools, you can resolve the issue effectively. From basic troubleshooting steps to advanced solutions, this guide has provided you with a comprehensive set of tools to regain control of your photo library.
Remember, maintaining a well-organized photo library is essential for both storage management and personal enjoyment. If you continue to experience issues, don’t hesitate to seek assistance from Apple Support.
Explore more photography tips, tricks, and resources at dfphoto.net. Join our community of passionate photographers and take your skills to the next level!
Ready to enhance your photography skills and explore stunning visuals? Visit dfphoto.net today for in-depth tutorials, inspiring galleries, and a vibrant community of photographers! Whether you’re a beginner or a seasoned pro, dfphoto.net has something for everyone. Don’t miss out – start your photographic journey with us now! Reach out to us at Address: 1600 St Michael’s Dr, Santa Fe, NM 87505, United States. Phone: +1 (505) 471-6001.