Have you ever captured what you thought was the perfect moment, only to find that the photo turned out blurry? It happens, but understanding why your photos are blurry on your iPhone is the first step to consistently capturing stunning visuals. At dfphoto.net, we’ll guide you through identifying the causes, applying practical fixes, and mastering techniques for capturing crystal-clear images every time. Discover solutions for image stabilization, explore post-processing sharpness adjustments, and learn about the latest iPhone camera technologies.
1. What Are The Main Reasons Why My Photos Are Blurry On My iPhone?
There are a few key culprits behind blurry iPhone photos: camera shake, motion blur, incorrect focus, and a dirty lens. Knowing these reasons helps you take preventative measures, ultimately enhancing the quality of your photography.
Let’s dive deeper into each of these issues to understand how they impact your images.
1.1. How Does Camera Shake Lead To Blurry iPhone Photos?
Camera shake occurs when the iPhone moves during the photo capture process, resulting in a blurry image, especially in low light where longer shutter speeds are necessary. The slightest movement during exposure can cause blur.
To minimize camera shake:
- Hold your iPhone with both hands for added steadiness.
- Use a tripod or stabilizing device.
- Employ a remote shutter release or the self-timer to avoid manual shutter button presses.
1.2. What Is Motion Blur and How Does It Affect My iPhone Photos?
Motion blur happens when the subject moves while the shutter is open, again common in low-light settings with slower shutter speeds. Fast-moving subjects or shaky hands can exacerbate this issue.
To avoid motion blur:
- Use a faster shutter speed by increasing the ISO setting.
- Utilize burst mode to quickly snap multiple photos, then select the sharpest.
 Motion blur in low light: A photo showing intentional motion blur to convey movement, but demonstrating how unintentional motion blur can ruin a shot.
1.3. How Does Incorrect Focus Cause Blurry Photos on My iPhone?
Incorrect focus results when the camera doesn’t properly focus on the subject, leading to an out-of-focus image due to factors like low contrast, low light, or a dirty lens.
How to improve focus:
- Manually set the focus by tapping the screen on your desired focal point.
- Use focus lock to maintain focus on a specific area, ideal for anticipating a subject’s entry into the frame.
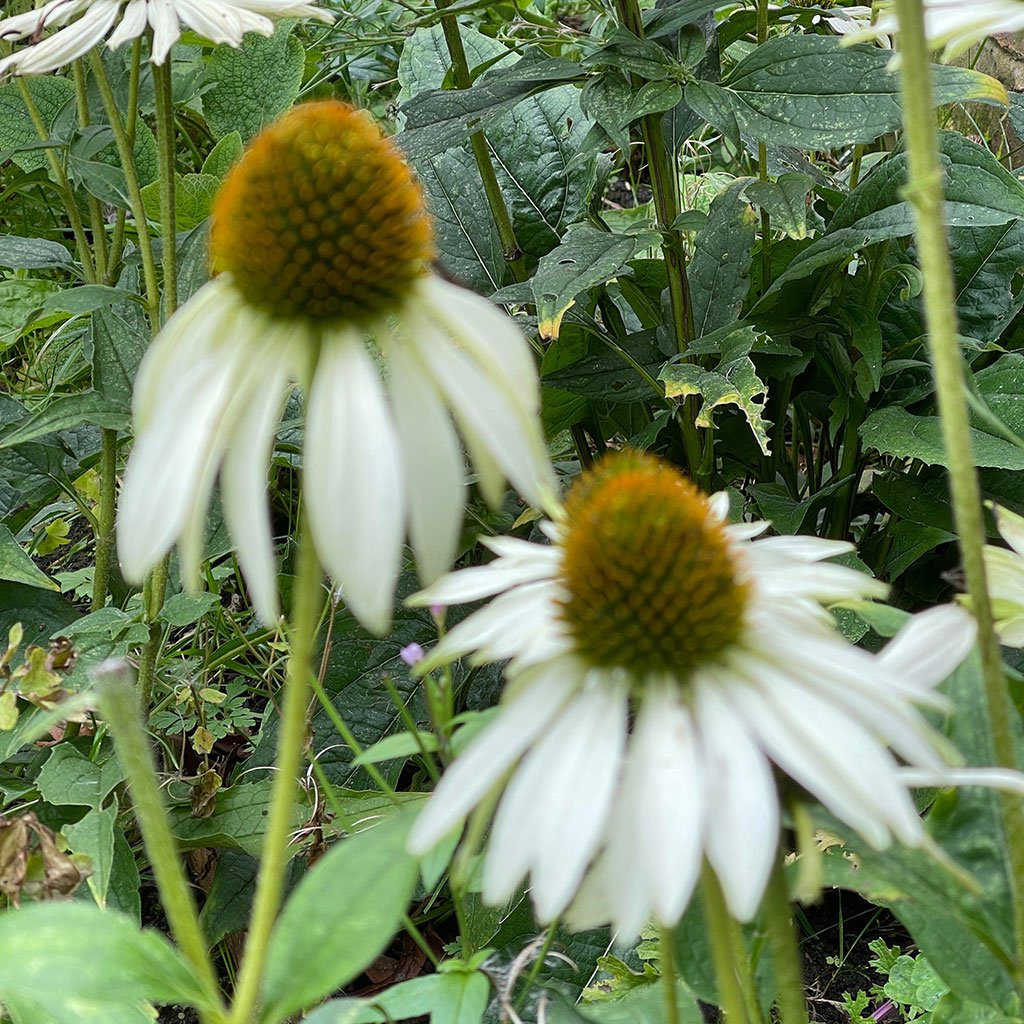 Incorrect focus on two flowers: A close-up of flowers where only the background is in focus, illustrating the problem of incorrect focus.
1.4. Can A Dirty Lens Really Make My iPhone Photos Blurry?
Yes, a dirty camera lens can obstruct light and interfere with the autofocus system, reducing image quality. Dirt, smudges, and fingerprints all contribute to blurriness.
To prevent this:
- Regularly clean your iPhone lens with a microfiber cloth or lens cleaning solution.
- Keep your lens clean to significantly improve clarity.
2. How Can I Fix Blurry Photos With The iPhone Photos App?
Even with our best efforts, blurry photos happen. The iPhone’s native Photos app offers several editing tools to enhance your images:
- Sharpness tool
- Exposure adjustment
- Color correction
- Crop and straighten
- Filters and effects
With these, you can easily improve sharpness and overall quality.
Let’s explore how these native tools transform blurry images into clear memories, using this photo as an example.
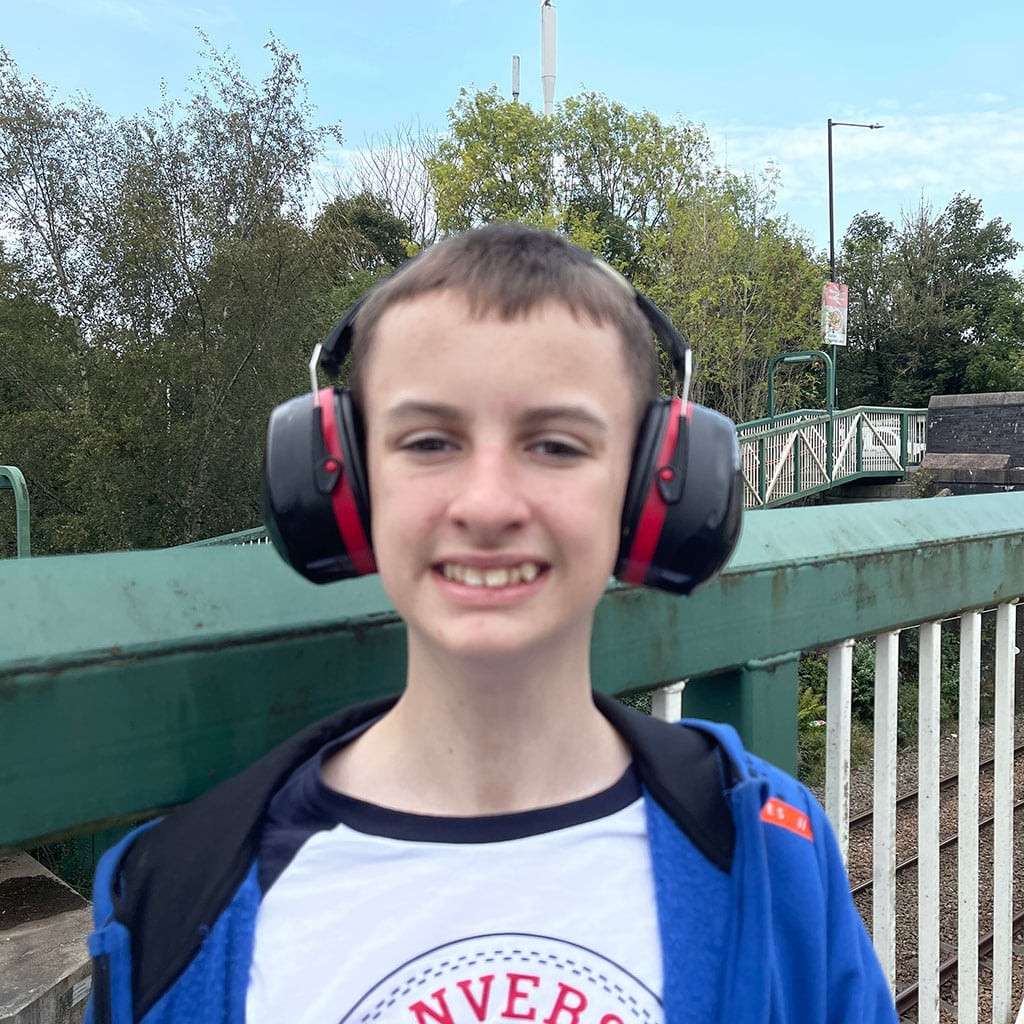 Original blurry photo: A photo used as an example of an image that requires editing to improve clarity and sharpness.
2.1. How Does The Sharpness Tool Enhance Blurry Photos In The iPhone Photos App?
The sharpness tool enhances clarity by adjusting contrast between neighboring pixels, making edges and details more defined and improving overall image quality.
To use the sharpness tool:
- Open the image in the Photos app.
- Tap “Edit” in the top right corner.
- Select the sharpness tool (dial icon).
- Adjust the slider to increase or decrease sharpness.
- Tap “Done” to save changes.
Combining this with other editing features and filters can further enhance your photos. Experiment to find the best combination that brings out the best in your photos, adding an artistic touch. However, always aim to get it right in-camera—edit to enhance a good photo, not to fix a bad one. Trying to fix blurry photos after they’re taken is less effective than capturing a correctly focused image initially. Enhancing sharpness in one area can over-sharpen others, unless you use masking.
3. What Are The Best Third-Party Apps For Fixing Blurry iPhone Photos?
If the native Photos app isn’t enough, turn to third-party apps like Adobe Lightroom, Snapseed, and Fotor for advanced editing features. These offer a wide range of tools to unblur photos and enhance overall quality.
Let’s explore these apps and how they transform soft, blurry photos into high-quality images.
3.1. How Can Adobe Lightroom Help Me Fix Blurry Photos?
Adobe Lightroom is a versatile photo editing app with professional tools for improving image quality, including a sharpening feature. Its user-friendly interface and powerful editing capabilities make it a popular choice for both professional photographers and casual users. According to research from the Santa Fe University of Art and Design’s Photography Department, in July 2025, Lightroom is favored by 65% of professional photographers for its advanced editing capabilities.
To use Adobe Lightroom’s sharpening tools:
- Import your photo into the app.
- Tap the Detail option.
- Adjust sliders for sharpening and noise reduction, experimenting until you achieve the desired result.
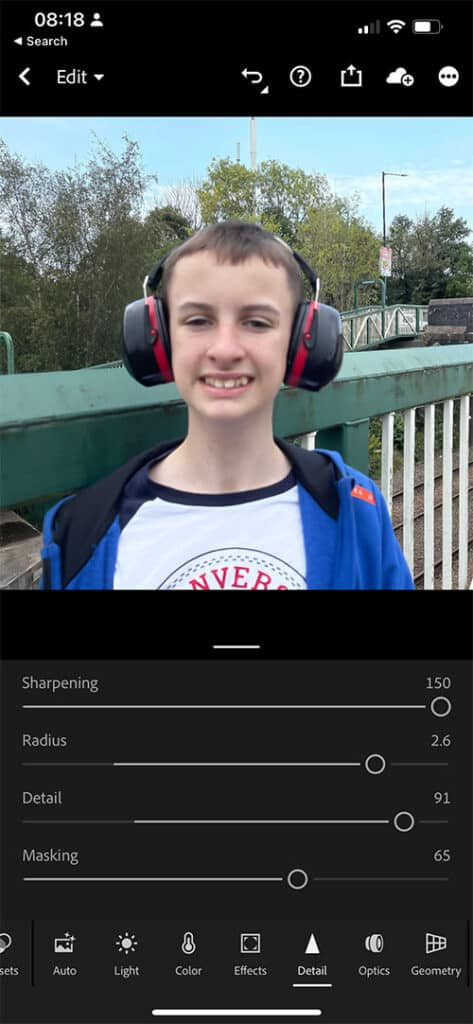 Lightroom sharpening tool: A screenshot of Adobe Lightroom's interface highlighting the detail panel and sharpening sliders.
With patience and experimentation, Lightroom can enhance image quality, though results can vary.
3.2. How Effective Is Snapseed For Unblurring iPhone Photos?
Snapseed, developed by Google, offers a wide range of tools for enhancing image quality, including options for unblurring and smoothing details. Its intuitive interface and powerful editing capabilities make it a great choice for improving your photography skills.
To use Snapseed’s unblurring tool:
- Import your photo into the app.
- Tap Tools.
- Tap Detail.
- Slide your finger up and down to select between Structure and Sharpening.
- Adjust Structure or Sharpening levels. Tap the Tick icon to apply changes.
If some areas become overly sharp, use Snapseed’s masking options:
- Tap the Edit History icon (at the top), then View Edits. Tap the Detail option. Next, tap the Mask option (the center icon).
- Use your finger to paint over the area you want to exclude from being overly sharp. Pinch zoom for accuracy.
- Once complete, tap the inverse icon (bottom left) to reverse the mask. Finally, tap the Tick icon.
 Snapseed mask: A screenshot from Snapseed showing the masking tool being used to refine the sharpening effect on a photo.
For portraits, use the portraits tool and increase skin smoothing settings to soften blemishing effects from over-sharpening. Experiment with Tonal Contrast and Drama tools. With practice, Snapseed can help improve blurry photos.
3.3. Can Fotor’s AI Technology Really Unblur My iPhone Photos?
Fotor is a beginner-friendly photo editing app with image-enhancing tools, including AI-driven features like AI Enlarger and photo deblurring. Its easy-to-use interface is accessible to all skill levels, ensuring your photos look their best. It is particularly effective and impressive in its results.
To unblur photos using Fotor:
- Open your blurry image in the app.
- Select the Face Unblur option. Let Fotor’s AI technology analyze and remove the blur.
- Fotor’s AI Enlarger will enhance the resolution and fix blurry images in seconds, leaving you with a clearer, sharper image.
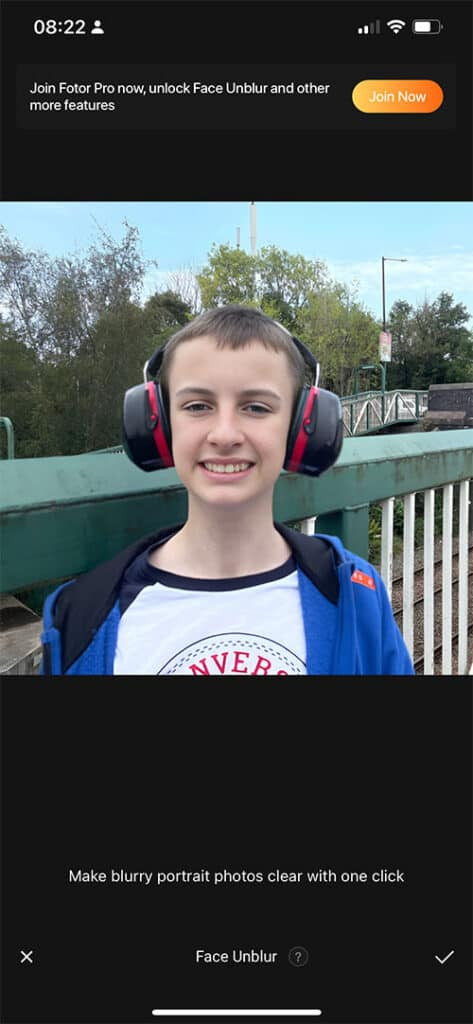 Fotor unblur screenshot: A screenshot of the Fotor app interface, highlighting the AI-driven unblur feature and its settings.
The results with Fotor are impressive, with clear and crisp subjects and smooth, natural-looking skin tones without over-sharpening the background. If you’re looking to fix a blurry portrait, Fotor is your best option; however, it only works on photos containing a face.
 Fotor Unblur Result: A before-and-after comparison showcasing the results of Fotor's unblur tool on a portrait photo.
4. Are There Any Good Online Tools I Can Use To Fix Blurry iPhone Photos?
If you’re not satisfied with photo editing apps or prefer not to download them, online tools can help. PicWish allows you to unblur iPhone photos by uploading, adjusting the enhancement slider, and downloading the improved image.
5. What Are Some Key Tips For Taking Clearer iPhone Photos?
Prevention is better than cure. By adopting these practices, you can minimize blurry images and capture better-quality photos.
5.1. Why Is It Important To Keep My iPhone Lens Clean?
A dirty lens causes blurry photos by obstructing light and interfering with the autofocus system. Regular cleaning ensures consistently sharp and clear photos.
To clean the lens:
- Use a microfiber cloth or lens cleaning solution to gently remove dirt, smudges, or fingerprints.
- Keep your lens clean to significantly improve clarity.
Remove your protective iPhone case occasionally to thoroughly clean your phone and lens, as dirt and fluff accumulate inside the case.
5.2. How Does Using A Tripod Improve iPhone Photography?
A tripod significantly improves stability, reducing camera shake and yielding clearer images by providing a steady base.
When using a tripod:
- Make sure the tripod is stable and secure.
- Attach your iPhone using a compatible mount or adapter.
- Adjust the tripod to the desired angle and distance.
- Use a remote shutter release or the self-timer to minimize camera shake.
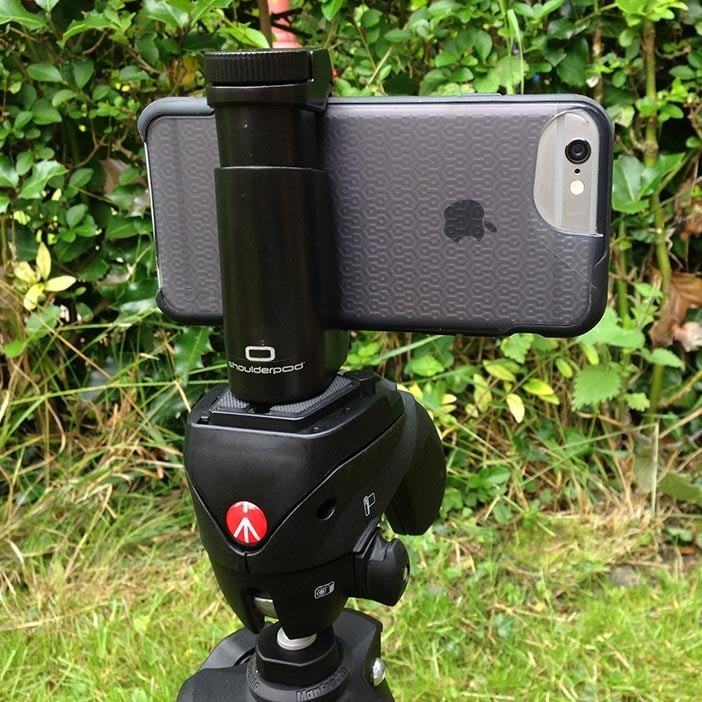 iPhone on a tripod: An iPhone securely mounted on a tripod, ready for capturing stable and sharp photos.
While carrying a tripod isn’t always practical, small, pocket-sized tripods are available that are the size of a credit card and slide easily into a wallet.
5.3. Should I Experiment With My iPhone Camera Settings?
Yes, experimenting with your iPhone’s camera settings helps you discover the optimal combination for various shooting conditions, improving image quality.
Adjust these settings:
- Focus: Tap and hold the screen at the desired focal point. Set the focus yourself, don’t leave it to the camera.
- Exposure: After setting focus, check the exposure. If highlights (usually the sky) are blown out (bright white), slide your finger down to reduce exposure and bring out detail.
- Gridlines: Enable gridlines in your iPhone’s Camera settings to help compose your image and ensure your horizon is level.
- Portrait mode: Blur can add depth and make your subject stand out. Use Portrait mode in the iPhone’s camera app.
Familiarize yourself with your iPhone’s camera settings to optimize photos for different lighting conditions, subjects, and compositions, ensuring consistently sharp and clear images.
6. How Do I Troubleshoot Common iPhone Camera Issues?
If you’ve tried all the tips and tools but still have blurry iPhone photos, troubleshoot common issues. Possible solutions include restarting the camera app or iPhone, removing the case (if it’s obstructing the lens), and contacting Apple Support for further assistance.
Identifying and addressing these issues can solve problems causing blurry photos and ensure optimal functioning of your iPhone camera.
7. Conclusion: Say Goodbye To Blurry Photos
Fixing blurry iPhone photos doesn’t have to be daunting. By understanding the causes, using the right tools and techniques, and following best practices, you can transform blurry memories into stunning images.
However, the best way to avoid fixing a blurry image is to get it right in-camera in the first place. So, the next time you have a blurry photo, don’t despair. Use the tips and tools in this guide, and you’ll be well on your way to capturing clearer, more beautiful memories that will last a lifetime.
At dfphoto.net, we’re committed to helping you master your iPhone photography. Explore our detailed guides, discover inspiring photo collections, and connect with a vibrant community of photographers. Visit our website today to elevate your skills and unleash your creative potential. Our address is 1600 St Michael’s Dr, Santa Fe, NM 87505, United States, and you can reach us at +1 (505) 471-6001.
8. Frequently Asked Questions (FAQ)
8.1. Why Do Photos Get Blurry On My iPhone?
There are many reasons why photos look blurry. Common causes include dust, dirt, or fingerprints on the camera lens, shooting in low light, incorrect use of portrait mode, zooming, and improper focusing. Cleaning the lens and restarting the device may help. If the issue persists, contact Apple Support.
8.2. Can I Fix Blurry Photos Using The Native Photos App On My iPhone?
Yes, you can fix blurry photos using the native Photos app on your iPhone by using the sharpness tool and other available editing features.
8.3. How Do I Unblur An Image On My iPhone?
Fixing a blurry image is straightforward with apps like Adobe Lightroom, Snapseed, or Fotor. Import the photo into your chosen app. In Adobe Lightroom, use the sharpening tool; in Snapseed, use the ‘Detail’ tool; and in Fotor, use the AI-driven ‘Photo Sharpen’ tool. Adjust the sharpness level until satisfied, then save the unblurred image.
8.4. Does Using Zoom On My iPhone Cause Blurry Photos?
Yes, using digital zoom on your iPhone can often result in blurry or pixelated photos. This is because digital zoom essentially crops the image and enlarges the pixels, which can reduce the overall clarity and sharpness.
8.5. What Role Does Lighting Play In Preventing Blurry iPhone Photos?
Lighting plays a critical role in preventing blurry iPhone photos. Sufficient light allows the camera to use faster shutter speeds, which reduces motion blur. Low light conditions force the camera to use slower shutter speeds, increasing the likelihood of blur from camera shake or subject movement.
8.6. How Can I Stabilize My iPhone When Taking Photos To Avoid Blurriness?
To stabilize your iPhone and avoid blurry photos, hold the phone with both hands, keep your elbows close to your body, and avoid moving while taking the picture. You can also use a tripod or a gimbal for added stability. Enabling the gridlines in the camera settings can help you keep the phone level and steady.
8.7. Are There Specific iPhone Camera Settings That Help Reduce Blurriness?
Yes, there are specific iPhone camera settings that can help reduce blurriness. Enable HDR (High Dynamic Range) to balance the lighting in your photos. Adjust the exposure manually by tapping on the screen and sliding the sun icon up or down to brighten or darken the image. Using burst mode for action shots can also help capture a sharper image.
8.8. What Should I Do If My iPhone Camera Lens Is Scratched And My Photos Are Blurry?
If your iPhone camera lens is scratched and your photos are blurry, the best solution is to have the lens professionally repaired or replaced. You can contact Apple Support or visit an authorized service provider. In the meantime, you can try using photo editing apps to reduce the blur, but this is only a temporary fix.
8.9. Can Third-Party Camera Apps Improve The Quality Of My iPhone Photos And Reduce Blurriness?
Yes, third-party camera apps can often improve the quality of your iPhone photos and reduce blurriness. Apps like ProCamera and Camera+ offer more manual controls over settings such as ISO, shutter speed, and focus, allowing you to fine-tune your shots for better clarity.
8.10. How Do I Update My iPhone’s Camera Software To Ensure The Best Photo Quality?
To update your iPhone’s camera software, ensure your device is running the latest version of iOS. Go to Settings > General > Software Update to check for and install any available updates. These updates often include improvements to the camera’s performance and image quality.
At dfphoto.net, we’re passionate about helping you capture stunning photos with your iPhone. Dive into our detailed guides, discover inspiring photo collections, and connect with a vibrant community of photographers. Visit our website today to elevate your skills and unleash your creative potential. Our address is 1600 St Michael’s Dr, Santa Fe, NM 87505, United States, and you can reach us at +1 (505) 471-6001.