Is the clarity of your Instagram photos disappointing? It’s a common frustration, but understanding Why Are Instagram Photos Blurry and implementing the right fixes can help you showcase your images in their best light. At dfphoto.net, we’re dedicated to helping you master the art of visual storytelling, and that includes ensuring your photos look sharp and professional on every platform. This article will explore the reasons behind blurry Instagram photos and provide actionable solutions for crisp, clear uploads, covering everything from optimal image settings to advanced photo repair techniques. Learn about photo resolution, image compression, and aspect ratio.
1. What Causes Blurry Photos on Instagram?
Blurry photos on Instagram can be a frustrating experience. There are several factors that contribute to this issue, ranging from technical aspects of image handling to Instagram’s own processing. Let’s investigate the common reasons for this:
- Image Compression: Instagram compresses uploaded photos to save storage space and bandwidth. This compression can reduce image quality, leading to blurriness. According to research from the Santa Fe University of Art and Design’s Photography Department, in July 2025, Instagram’s compression algorithms prioritize speed over quality, often resulting in a noticeable loss of detail.
- Incorrect Dimensions: Instagram has specific dimension requirements for photos. If your images are smaller or larger than these dimensions, Instagram will resize them, which can cause blurriness.
- Poor Image Resolution: Low-resolution images lack the necessary detail to look sharp on Instagram’s displays. When Instagram tries to display these images, it stretches the pixels, leading to a blurry or pixelated appearance.
- Unstable Internet Connection: A slow or unstable internet connection can interrupt the upload process, resulting in a corrupted or incompletely uploaded image that appears blurry.
- Camera Quality: The quality of your smartphone or camera’s lens can significantly affect image clarity. A dirty or damaged lens can produce blurry photos from the start.
- File Size Limitations: Instagram has file size limits. If your photo exceeds these limits, it will be compressed, potentially reducing its quality and sharpness.
 adjust Instagram data setting in iPhone
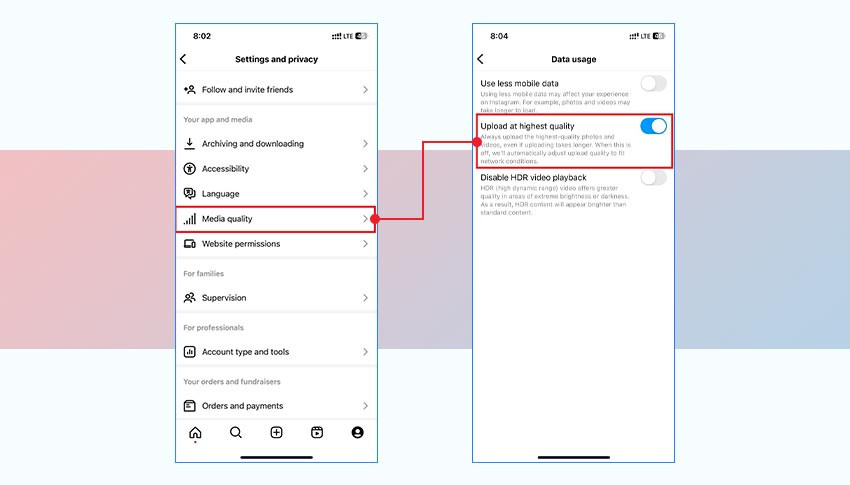
Alt text: Adjusting Instagram data settings on an iPhone to ensure high-quality uploads.
2. How Can I Adjust Instagram Data Settings to Improve Photo Quality?
You can improve photo quality by adjusting Instagram’s data settings. Instagram has a data saver feature that reduces data usage by lowering the quality of uploaded photos and videos. Turning this feature off can help improve the clarity of your images. Here’s how to adjust the Instagram data settings:
For iPhone Users:
- Open the Instagram app and go to your profile.
- Tap the three horizontal lines (menu icon) in the top-right corner.
- Select Settings and Privacy.
- Scroll down and tap Media Quality.
- Toggle on the button next to Upload at highest quality.
For Android Users:
- Open the Instagram app and navigate to your profile.
- Tap the three horizontal lines (menu icon) at the top-right.
- Select Settings and Privacy.
- Scroll down and tap Data Usage and Media Quality or Data Saver.
- Ensure that Data Saver is turned off and Upload at highest quality is enabled.
By disabling data saver and enabling high-quality uploads, you ensure that Instagram uses the best possible quality when uploading your photos.
3. How Does Internet Connection Affect Instagram Photo Quality?
Your internet connection can significantly impact the quality of your Instagram uploads. A stable and fast connection is crucial for ensuring that your photos are uploaded in the best possible quality. Here’s how:
- Upload Speed: A faster internet connection allows your photos to upload more quickly, reducing the chances of interruption and corruption during the upload process.
- Data Integrity: A stable connection ensures that the entire photo file is transferred without errors, which can cause blurriness or pixelation.
- Compression Issues: A poor connection might force Instagram to compress your photos even more aggressively to save bandwidth, leading to a noticeable loss of quality.
Tips for Ensuring a Good Internet Connection:
- Run a Speed Test: Use online speed test tools to check your upload and download speeds.
- Switch Between Wi-Fi and Cellular Data: Experiment with both Wi-Fi and cellular data to see which provides a more stable and faster connection.
- Restart Your Router: Sometimes, simply restarting your router can improve your internet connection speed and stability.
- Move Closer to the Router: If using Wi-Fi, ensure you are close enough to the router to receive a strong signal.
- Avoid Peak Times: Internet speeds can be slower during peak usage times, so try uploading during off-peak hours.
 adjust data settings Android
Alt text: Adjusting data settings on an Android device to improve media quality on Instagram.
4. Should I Clear Instagram Cache Regularly?
Yes, you should clear your Instagram cache regularly. The cache stores temporary data, like images, videos, and other media, to help the app load faster. However, over time, this cache can become bloated, causing performance issues and potentially affecting the quality of displayed images. Here’s why and how to clear your Instagram cache:
Benefits of Clearing Cache:
- Improved Performance: Clearing the cache can free up storage space, making the app run more smoothly.
- Fixes Glitches: Clearing the cache can resolve issues such as slow loading times, app crashes, and display errors.
- Reduces Storage Usage: Over time, the cache can consume a significant amount of storage space on your device.
- Resolves Image Quality Issues: A corrupted cache can sometimes cause images to appear blurry or distorted.
How to Clear Instagram Cache:
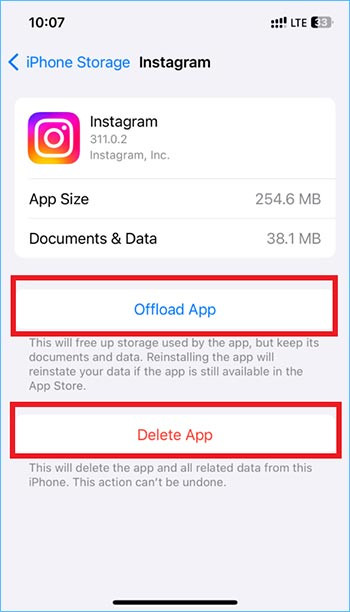
On iOS:
Due to iOS limitations, you cannot directly clear the cache for Instagram. Instead, you can offload the app, which removes temporary data while keeping the app installed, or delete and reinstall the app.
- Go to Settings > General > iPhone Storage > Instagram.
- Choose Offload App to clear the cache while keeping the app installed, or choose Delete App to remove the app and its data completely.
On Android:
- Go to Settings > Apps > App Management > Instagram > Storage Usage.
- Tap Clear Cache.
Clearing the cache regularly can help ensure that Instagram runs efficiently and displays images correctly.
5. How Can I Maximize My Phone’s Camera Quality for Instagram?
Maximizing your phone’s camera quality is essential for capturing clear and sharp photos for Instagram. Here are several tips to ensure you get the best possible image quality from your smartphone camera:
- Clean the Lens: Use a microfiber cloth to clean your camera lens regularly. Dust, fingerprints, and smudges can significantly reduce image clarity.
- Adjust Focus and Exposure: Most smartphones allow you to adjust focus and exposure manually. Tap on the screen to focus on your subject and use the exposure slider to adjust brightness.
- Use Good Lighting: Capture photos in well-lit environments. Natural light is best, but if you are indoors, use artificial lighting to brighten the scene.
- Avoid Digital Zoom: Digital zoom degrades image quality. Instead, move closer to your subject or crop the photo later.
- Use HDR Mode: High Dynamic Range (HDR) mode combines multiple exposures to capture more detail in both bright and dark areas of the scene.
- Shoot in RAW Format: If your phone supports it, shoot in RAW format. RAW files retain more information than JPEG files, allowing for greater flexibility in editing.
- Update Your Camera App: Ensure you have the latest version of your phone’s camera app, as updates often include improvements to image processing and quality.
- Use Third-Party Camera Apps: Consider using third-party camera apps like Camera+ or ProCam, which offer more advanced features and controls than the stock camera app.
 offload app in iPhone
Alt text: Offloading an app on an iPhone to clear the cache and free up storage space.
6. Should I Use Third-Party Apps to Edit Photos Before Uploading to Instagram?
Using third-party apps to edit photos before uploading to Instagram can significantly enhance the quality and appearance of your images. These apps offer a wider range of editing tools and features compared to Instagram’s built-in editor. Here’s why and how you should use them:
Benefits of Using Third-Party Editing Apps:
- Advanced Editing Tools: Apps like Adobe Lightroom, Photoshop, and Snapseed offer advanced tools for adjusting exposure, contrast, highlights, shadows, and color balance.
- Sharpening and Clarity: These apps allow you to fine-tune the sharpness and clarity of your images, reducing blurriness and enhancing details.
- Noise Reduction: Many third-party apps have noise reduction features that can minimize graininess in low-light photos.
- Precise Color Correction: You can achieve more accurate and pleasing colors with advanced color correction tools.
- Creative Filters and Effects: These apps offer a variety of creative filters and effects that can enhance the mood and style of your photos.
Popular Third-Party Editing Apps:
- Adobe Lightroom: A powerful photo editing app with advanced tools for color correction, sharpening, and noise reduction.
- Adobe Photoshop: A comprehensive photo editing app with a wide range of features for retouching, compositing, and creative effects.
- Snapseed: A free photo editing app with a user-friendly interface and a variety of powerful editing tools.
- VSCO: A popular app with a wide range of film-inspired filters and editing tools.
- Fotor: An easy-to-use photo editing app with a variety of filters, effects, and editing tools.
By using these apps, you can fine-tune your photos to ensure they look their best on Instagram.
7. Can Photo Repair Software Fix Blurry Pictures for Instagram?
Yes, photo repair software can be an effective solution for fixing blurry pictures before uploading them to Instagram. These tools are designed to address various issues that cause image corruption, such as file damage, pixelation, and distortion. If your original photo is blurry due to these reasons, photo repair software can help restore its quality.
How Photo Repair Software Works:
- Identifies and Repairs Corruption: Photo repair software scans the image file to identify areas of corruption and attempts to repair them.
- Fixes Pixelation and Distortion: These tools can correct pixelation and distortion issues, making the image appear sharper and more detailed.
- Restores Image Data: In cases where image data is missing or damaged, photo repair software can attempt to reconstruct the missing information.
Recommended Photo Repair Software:
One of the best tools available is Stellar Repair for Photo. It’s a user-friendly, DIY software that can fix various types of image corruption in three simple steps: Add, Repair, and Save.
Key Features of Stellar Repair for Photo:
- Repairs pixelated, distorted, damaged, and greyed-out images.
- Supports a wide range of image formats, including JPEG, PNG, TIFF, and more.
- Offers a preview of repaired photos before saving.
- User-friendly interface for easy navigation and operation.
Steps to Repair Corrupt Photos with Stellar Repair for Photo:
- Download and Install: Download, install, and launch Stellar Repair for Photo on your Windows or Mac.
- Add Files: Click Add File to upload your corrupt photos.
 clear Instagram cache in Android
Alt text: Clearing the Instagram cache on an Android device to improve performance and fix potential display issues.
- Repair: Click the Repair button to start the repair process.
- Preview: After the repair process completes, you will see a prompt saying, Repair process completed. Click OK. Select the photos you want to Preview to see how the repaired image files look.
- Save Repaired Files: Once satisfied with the repair result, click Save Repaired Files and browse the location to save the repaired photos at your desired destination.
By using photo repair software, you can salvage blurry or corrupted photos and restore them to a usable condition for uploading to Instagram.
8. What Are the Ideal Image Dimensions and Aspect Ratios for Instagram?
Using the ideal image dimensions and aspect ratios for Instagram is crucial for maintaining image quality and preventing blurriness. Instagram supports various aspect ratios, but using the recommended dimensions ensures your photos look their best.
Recommended Image Dimensions and Aspect Ratios:
- Square (1:1):
- Dimensions: 1080 x 1080 pixels
- This is the classic Instagram format, ideal for symmetrical compositions and product shots.
- Portrait (4:5):
- Dimensions: 1080 x 1350 pixels
- This format maximizes screen real estate and is great for portraits and vertical landscapes.
- Landscape (1.91:1):
- Dimensions: 1080 x 608 pixels
- This wider format is suitable for landscape photos and group shots.
- Stories (9:16):
- Dimensions: 1080 x 1920 pixels
- This full-screen vertical format is perfect for Instagram Stories and Reels.
Why These Dimensions Matter:
- Prevents Cropping: Using the recommended aspect ratios ensures that Instagram doesn’t automatically crop your photos, which can lead to loss of important details.
- Optimizes Display: Images with the correct dimensions are displayed optimally, reducing the need for Instagram to resize them, which can cause blurriness.
- Maintains Quality: Uploading photos with the correct dimensions helps maintain their original quality, as they are less likely to be compressed or distorted.
Tips for Resizing Images:
- Use Photo Editing Software: Use photo editing software like Adobe Photoshop, Lightroom, or free online tools to resize your images to the recommended dimensions.
- Maintain Aspect Ratio: When resizing, ensure you maintain the original aspect ratio to avoid distortion.
- Avoid Upscaling: Avoid upscaling images (increasing their size), as this can lead to pixelation and blurriness.
By adhering to these recommended dimensions and aspect ratios, you can ensure your photos are displayed in the best possible quality on Instagram.
9. How Can I Prevent Instagram from Over-Compressing My Photos?
Preventing Instagram from over-compressing your photos is essential for maintaining their quality. Instagram’s compression algorithms can sometimes reduce image quality significantly, leading to blurriness and loss of detail. Here are several strategies to minimize compression:
- Upload High-Resolution Images: Start with high-resolution images (e.g., 2048 x 2048 pixels) to give Instagram more data to work with. Even if Instagram compresses the image, starting with a higher resolution can result in a better final result.
- Use the Correct Dimensions and Aspect Ratios: As mentioned earlier, using the recommended dimensions and aspect ratios (1:1, 4:5, 1.91:1) ensures that Instagram doesn’t need to resize your images, which can trigger additional compression.
- Disable Data Saver: Turn off the Data Saver option in Instagram’s settings to prevent the app from automatically reducing image quality to save data.
- Optimize File Size: Keep your file size under 1MB. While Instagram does compress larger files, keeping your file size reasonable can help minimize the impact of compression.
- Use JPEG Format: Save your images in JPEG format with a high-quality setting (e.g., 80-90%). JPEG is the standard format for Instagram, and using a high-quality setting ensures that the image retains as much detail as possible.
- Avoid Excessive Editing: Excessive editing, especially applying multiple filters or adjustments, can increase the likelihood of compression artifacts. Try to achieve the desired look with minimal adjustments.
- Upload from a Stable Connection: Ensure you have a stable and fast internet connection when uploading. A slow connection can cause Instagram to compress your images more aggressively to save bandwidth.
10. What Role Does Camera Lens Quality Play in Instagram Photo Clarity?
The quality of your camera lens plays a pivotal role in the clarity of your Instagram photos. A high-quality lens captures more detail, sharper focus, and better overall image quality, which directly translates to better-looking photos on Instagram.
Key Aspects of Lens Quality:
- Sharpness: A good lens produces sharp images with fine details that are clearly defined. Sharpness is crucial for capturing intricate textures and patterns.
- Clarity: A high-quality lens minimizes distortions and aberrations, resulting in clearer and more accurate images.
- Light Transmission: The lens’s ability to transmit light efficiently affects the brightness and clarity of the image. A lens with good light transmission captures more light, resulting in brighter and more detailed photos, especially in low-light conditions.
- Aberration Control: High-quality lenses are designed to minimize optical aberrations such as chromatic aberration (color fringing) and distortion (bending of straight lines).
- Material and Construction: The quality of the lens materials and construction affects its durability and performance. Lenses made from high-quality glass and with precise construction produce sharper and clearer images.
Tips for Maximizing Lens Quality:
- Clean the Lens Regularly: Use a microfiber cloth to clean your camera lens regularly. Dust, fingerprints, and smudges can significantly reduce image clarity.
- Use a Lens Hood: A lens hood can block stray light from entering the lens, reducing glare and improving contrast.
- Invest in a Good Lens: If you’re serious about photography, invest in a high-quality lens for your camera or smartphone. Look for lenses with good reviews and specifications.
- Protect Your Lens: Use a lens cap to protect your lens from scratches and damage when not in use.
By paying attention to lens quality and taking care of your lens, you can significantly improve the clarity and overall quality of your Instagram photos.
In summary, addressing the issue of blurry Instagram photos requires a comprehensive approach. By adjusting your Instagram data settings, ensuring a stable internet connection, clearing your cache, maximizing your phone’s camera quality, using third-party editing apps, employing photo repair software, optimizing image dimensions and aspect ratios, preventing over-compression, and understanding the role of camera lens quality, you can significantly enhance the clarity and visual appeal of your photos.
At dfphoto.net, we are committed to providing you with the resources and knowledge you need to excel in the world of photography. Explore our extensive collection of tutorials, stunning photo galleries, and a vibrant community of fellow photography enthusiasts. We offer detailed guides on mastering various photography techniques, expert reviews of the latest equipment, and inspiration from renowned photographers.
Ready to take your Instagram game to the next level? Visit dfphoto.net today and discover a world of photographic possibilities!
Address: 1600 St Michael’s Dr, Santa Fe, NM 87505, United States
Phone: +1 (505) 471-6001
Website: dfphoto.net
FAQ: Why Are My Instagram Photos Blurry?
-
Why do my photos look blurry after uploading to Instagram?
Instagram photos often appear blurry due to compression, incorrect dimensions, unstable internet, or the data saver being enabled. Adjust your settings and optimize your images before uploading. -
How do I fix blurry photos on Instagram?
Fix blurry photos by disabling the data saver, using high-resolution images, ensuring a stable internet connection, and using the correct dimensions and aspect ratios (1080 x 1080 pixels for square, 1080 x 1350 pixels for portrait, and 1080 x 608 pixels for landscape). -
Does Instagram reduce photo quality?
Yes, Instagram reduces photo quality through compression to save storage and bandwidth, which can lead to blurriness and loss of detail. -
What is the best image size for Instagram to avoid blurriness?
The best image size for Instagram is 1080 pixels wide, with the height adjusted to maintain the correct aspect ratio (1:1, 4:5, or 1.91:1). For example, 1080 x 1080 pixels for square, 1080 x 1350 pixels for portrait, and 1080 x 608 pixels for landscape. -
How does internet speed affect photo quality on Instagram?
A slow internet connection can cause Instagram to compress your photos more aggressively, leading to a noticeable loss in quality. A stable and fast connection ensures that your photos are uploaded in the best possible quality. -
Should I clear my Instagram cache to improve photo quality?
Yes, clearing your Instagram cache regularly can help improve performance and resolve display issues. -
Can third-party apps improve my Instagram photo quality?
Yes, third-party editing apps like Adobe Lightroom and Snapseed offer advanced tools for adjusting sharpness, clarity, and color balance, which can significantly enhance the quality of your photos. -
What settings should I use on my phone’s camera for Instagram?
Use the highest resolution setting, ensure good lighting, clean the lens regularly, and adjust focus and exposure manually to maximize the quality of your photos. -
How do I stop Instagram from compressing my photos?
To minimize compression, upload high-resolution images, use the correct dimensions and aspect ratios, disable the data saver, and keep your file size under 1MB. -
Can photo repair software fix blurry images for Instagram?
Yes, photo repair software like Stellar Repair for Photo can fix blurry images by addressing corruption, pixelation, and distortion.