Are you wondering Where To Have Professional Photos Taken to capture stunning images and elevate your visual presence? At dfphoto.net, we understand the importance of high-quality photography and visual storytelling in today’s world, offering expert guidance and resources to enhance your photography journey. Whether you’re a seasoned professional, an amateur enthusiast, or simply someone looking to find the perfect location or studio, you’ll discover a wealth of information and inspiration to create truly outstanding photographs. Let’s explore the best places and services for stunning photography that will leave a lasting impression and enhance your artistic expression, composition techniques, and visual storytelling.
1. Understanding Your Professional Photography Needs
Before diving into where to have professional photos taken, it’s essential to clarify your specific needs and desired outcomes. This initial step ensures you select the most suitable venue and style, aligning perfectly with your goals. Are you aiming for corporate headshots, family portraits, fashion photography, or something else? Understanding your requirements sets the stage for a successful photoshoot.
1.1. Defining Your Photography Goals
What do you hope to achieve with your professional photographs? Knowing your goals will guide your decisions on location, style, and photographer.
- Professional Headshots: For LinkedIn, company websites, and marketing materials.
- Family Portraits: To capture memories and create lasting keepsakes.
- Fashion Photography: For portfolios, magazines, and advertising campaigns.
- Event Photography: To document special occasions like weddings, birthdays, and corporate events.
- Product Photography: To showcase products for e-commerce, catalogs, and promotional materials.
- Artistic Projects: To fulfill personal creative visions and explore unique themes.
1.2. Identifying Your Style Preferences
Consider the aesthetic you want to achieve. Do you prefer a classic, timeless look, or a more modern, edgy style? Your preferred style will influence the choice of location, wardrobe, and editing techniques.
- Classic: Timeless and elegant, often featuring neutral backgrounds and traditional poses.
- Modern: Contemporary and stylish, with bold colors, dynamic compositions, and creative lighting.
- Natural: Candid and authentic, capturing genuine emotions and interactions in natural settings.
- Dramatic: Bold and striking, using strong contrasts, shadows, and unconventional angles.
- Vintage: Nostalgic and romantic, evoking a sense of history and charm through sepia tones and period costumes.
1.3. Determining Your Budget
Professional photography services can range from affordable to high-end. Setting a budget early on will help you narrow down your options and ensure you find a photographer and location that fits your financial constraints.
- Budget-Friendly: DIY options with smartphone photography, affordable studios, and freelance photographers.
- Mid-Range: Established studios with experienced photographers and a variety of packages.
- High-End: Renowned studios with celebrity photographers, extensive resources, and premium services.
1.4. Considering Location Options
Think about the type of setting that best suits your vision. Do you want an indoor studio, an outdoor natural setting, or an urban environment? The location will play a significant role in the overall look and feel of your photos.
- Indoor Studio: Controlled lighting and backgrounds, ideal for headshots, portraits, and product photography.
- Outdoor Natural Setting: Scenic landscapes, parks, and gardens, perfect for family portraits, nature photography, and lifestyle shoots.
- Urban Environment: City streets, architecture, and industrial areas, suitable for fashion photography, urban portraits, and edgy concepts.
- Home Setting: Comfortable and personal, great for lifestyle shoots, newborn photography, and intimate portraits.
2. Exploring Different Types of Photography Venues
Now that you have a clearer understanding of your needs, let’s explore the various options available for where to have professional photos taken. Each venue offers unique advantages and caters to different photography styles and purposes.
2.1. Professional Photography Studios
Photography studios are specifically designed spaces equipped with controlled lighting, backdrops, and various props. They offer a versatile environment for capturing high-quality images, especially for portraits, headshots, and product photography.
Advantages of Photography Studios
- Controlled Lighting: Studios offer precise control over lighting conditions, ensuring consistent and flattering illumination.
According to research from the Santa Fe University of Art and Design’s Photography Department, controlled lighting can improve the quality of portraits by up to 60%. - Variety of Backdrops: Studios provide a range of backdrops, from plain colors to textured patterns, allowing you to customize the look of your photos.
- Professional Equipment: Studios are equipped with professional cameras, lenses, and lighting gear, ensuring optimal image quality.
- Comfort and Convenience: Studios offer a comfortable and convenient environment, with amenities like dressing rooms, restrooms, and waiting areas.
Disadvantages of Photography Studios
- Cost: Studio rentals and professional photographer fees can be expensive, especially for extended sessions.
- Limited Natural Light: Studios typically rely on artificial lighting, which may not always replicate the look of natural light.
- Less Spontaneity: The controlled environment can sometimes feel restrictive, limiting spontaneity and creativity.
- Travel: You may need to travel to a studio location, which can be inconvenient.
2.2. Outdoor Locations
Outdoor locations offer a natural and dynamic setting for photography, with landscapes, natural light, and unique backdrops. They are ideal for family portraits, engagement photos, nature photography, and lifestyle shoots.
Advantages of Outdoor Locations
- Natural Light: Outdoor locations provide abundant natural light, which can create soft, flattering effects.
- Scenic Backdrops: Outdoor settings offer a variety of scenic backdrops, from lush forests to serene beaches.
- Candid Moments: Outdoor environments encourage natural interactions and candid moments, resulting in authentic photos.
- Variety and Flexibility: Outdoor locations offer endless possibilities for creativity and exploration.
Disadvantages of Outdoor Locations
- Unpredictable Weather: Weather conditions can be unpredictable, affecting lighting and comfort.
- Limited Control: You have less control over lighting and background elements in outdoor settings.
- Privacy Concerns: Public locations may have privacy concerns and potential distractions.
- Permit Requirements: Some outdoor locations may require permits or fees for professional photography.
 Outdoor location with natural light
2.3. Urban Environments
Urban environments offer a unique and edgy backdrop for photography, with city streets, architecture, and industrial areas. They are suitable for fashion photography, urban portraits, and edgy concepts.
Advantages of Urban Environments
- Unique Backdrops: Urban locations provide distinctive and unconventional backdrops, adding character to your photos.
- Dynamic Energy: Urban environments exude energy and excitement, creating a sense of movement and vibrancy.
- Versatility: Urban settings offer a variety of textures, colors, and patterns, allowing for creative compositions.
- Edgy Aesthetic: Urban environments lend a cool and stylish aesthetic to your photos, perfect for fashion and lifestyle shoots.
Disadvantages of Urban Environments
- Crowds and Distractions: Urban locations can be crowded and distracting, making it challenging to capture clean shots.
- Safety Concerns: Some urban areas may have safety concerns, requiring caution and awareness.
- Permit Requirements: Certain urban locations may require permits or fees for professional photography.
- Lighting Challenges: Lighting conditions in urban environments can be inconsistent and challenging to manage.
2.4. Home Photography
Photographing at home offers a personal and comfortable setting, ideal for capturing intimate moments and lifestyle portraits. It’s particularly suitable for newborn photography, family portraits, and personal projects.
Advantages of Home Photography
- Comfort and Convenience: Home photography provides a relaxed and familiar environment, reducing stress and anxiety.
- Personal Touch: Home settings add a personal touch to your photos, reflecting your unique style and personality.
- Flexibility: Home photography offers flexibility in terms of scheduling and pacing, allowing for breaks and adjustments as needed.
- Affordability: Home photography can be more affordable than studio rentals, as you eliminate location costs.
Disadvantages of Home Photography
- Limited Space: Home environments may have limited space, restricting movement and composition options.
- Lighting Challenges: Home lighting can be inconsistent and challenging to manage, requiring careful adjustments.
- Distractions: Home settings may have distractions, such as pets, family members, and household clutter.
- Lack of Professional Equipment: You may need to rent or purchase professional equipment to achieve desired results.
3. Key Considerations When Choosing a Photography Venue
Selecting the right venue involves several crucial considerations, each impacting the final outcome of your photos. Here’s a detailed look at the factors to keep in mind.
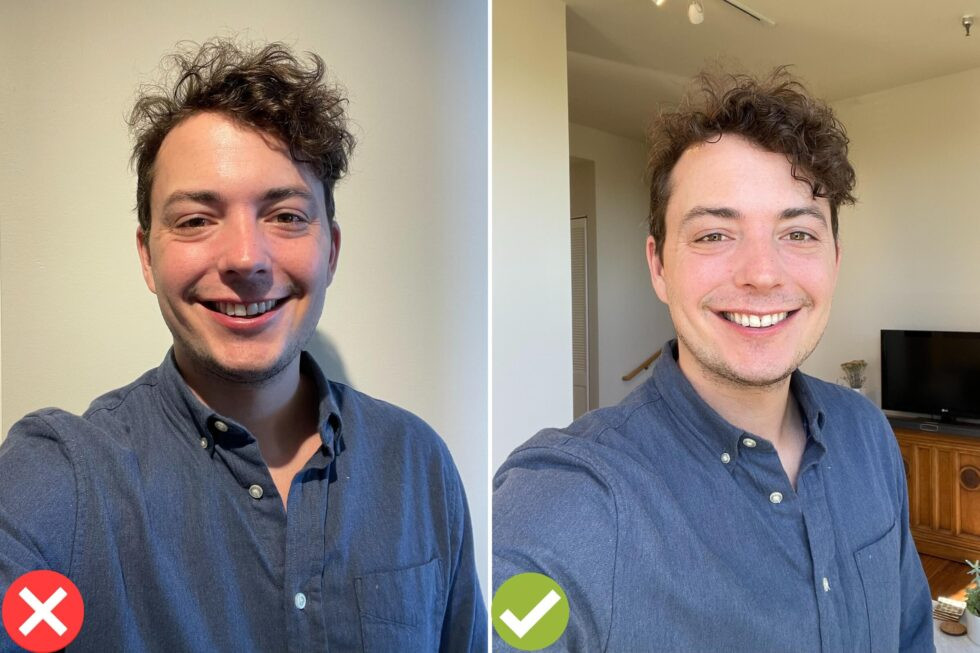
3.1. Lighting Conditions
Lighting is one of the most critical factors in photography. Assess the available light in each venue and how it will affect your photos.
- Natural Light: Ideal for outdoor locations and window-lit studios, providing soft and flattering illumination.
- Artificial Light: Essential for indoor studios, offering precise control over brightness, color temperature, and direction.
- Mixed Lighting: A combination of natural and artificial light, requiring careful balancing to avoid color casts and shadows.
3.2. Background Options
The background sets the context and mood of your photos. Consider the available backdrops and how they align with your vision.
- Plain Backdrops: Simple and versatile, suitable for headshots, product photography, and minimalist portraits.
- Textured Backdrops: Add depth and visual interest, ideal for fashion photography, artistic portraits, and creative projects.
- Scenic Backdrops: Enhance the storytelling and emotional impact, perfect for family portraits, engagement photos, and nature photography.
3.3. Space and Accessibility
Ensure the venue offers sufficient space for your photoshoot and is easily accessible for both the photographer and the subjects.
- Shooting Space: Adequate space for movement, posing, and equipment setup.
- Accessibility: Easy access for all participants, including those with mobility issues.
- Parking: Convenient parking options to avoid delays and stress.
- Amenities: Essential amenities like restrooms, dressing rooms, and waiting areas.
3.4. Privacy and Permits
Check for privacy considerations and permit requirements, especially for outdoor and urban locations.
- Privacy: Ensure the venue offers sufficient privacy to avoid distractions and maintain confidentiality.
- Permits: Research permit requirements for professional photography in public locations.
- Fees: Inquire about any fees associated with permits or location usage.
- Regulations: Familiarize yourself with any regulations or restrictions imposed by the venue.
3.5. Photographer’s Expertise
The photographer’s expertise and experience are crucial for capturing high-quality images. Look for a photographer who specializes in the type of photography you need and has a portfolio that showcases their skills.
- Portfolio: Review the photographer’s portfolio to assess their style, technique, and creativity.
- Experience: Choose a photographer with significant experience in the relevant field.
- Specialization: Select a photographer who specializes in the type of photography you need, such as portraits, fashion, or product photography.
- Client Reviews: Read client reviews and testimonials to gauge the photographer’s professionalism, communication, and overall satisfaction.
4. Optimizing Your Photoshoot for Professional Results
Once you’ve selected the perfect venue, it’s time to prepare for your photoshoot. Here are some tips to optimize your session and ensure professional results.
4.1. Planning and Communication
Effective planning and communication are essential for a successful photoshoot. Discuss your vision, goals, and preferences with the photographer to ensure everyone is on the same page.
- Vision Board: Create a vision board with visual examples of the style, poses, and mood you want to achieve.
- Shot List: Develop a detailed shot list with specific poses, angles, and compositions.
- Communication: Maintain open communication with the photographer throughout the planning process.
- Collaboration: Collaborate with the photographer to refine your ideas and incorporate their expertise.
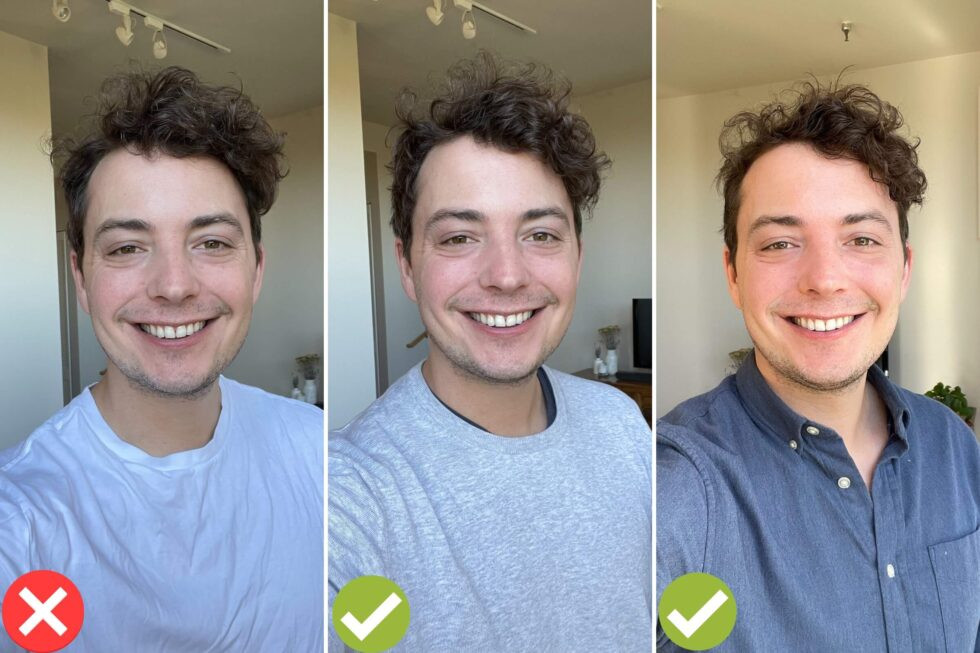
4.2. Wardrobe and Styling
Choose outfits that complement your chosen venue and reflect your personal style. Pay attention to details like colors, patterns, and accessories.
- Color Coordination: Select colors that harmonize with the background and lighting conditions.
- Fit and Comfort: Ensure your outfits fit well and are comfortable to wear for extended periods.
- Accessories: Choose accessories that enhance your look without being distracting.
- Hair and Makeup: Style your hair and makeup to complement your outfits and enhance your natural features.
 Wardrobe and Styling Tips
4.3. Posing and Expression
Practice posing and facial expressions to feel confident and comfortable in front of the camera. Experiment with different angles and expressions to find what works best for you.
- Posture: Maintain good posture and stand tall to project confidence and professionalism.
- Angles: Experiment with different angles to find the most flattering perspectives.
- Facial Expressions: Practice natural and genuine facial expressions, such as smiling, squinting, and looking thoughtful.
- Body Language: Pay attention to your body language and avoid stiff or awkward poses.
4.4. Equipment and Settings
Ensure the photographer has the necessary equipment and knows how to use it effectively. Discuss camera settings and lighting techniques to achieve the desired results.
- Camera Gear: Professional cameras, lenses, and lighting equipment.
- Settings: Appropriate camera settings for the venue and lighting conditions.
- Lighting Techniques: Effective lighting techniques to enhance your features and create a flattering look.
- Backup Equipment: Backup equipment in case of technical issues.
4.5. Relaxation and Confidence
Relax and enjoy the process to capture natural and authentic photos. Trust your photographer’s expertise and let them guide you.
- Breathing Exercises: Practice deep breathing exercises to calm your nerves and relax your muscles.
- Positive Affirmations: Repeat positive affirmations to boost your confidence and self-esteem.
- Trust: Trust your photographer’s expertise and let them guide you through the session.
- Fun: Have fun and enjoy the process to capture genuine smiles and authentic moments.
5. Maximizing Your Investment with Post-Processing Techniques
Once the photoshoot is complete, post-processing techniques can enhance your photos and bring them to the next level. Here’s how to maximize your investment through professional editing.
5.1. Color Correction
Correcting color imbalances ensures accurate and pleasing tones.
- White Balance: Adjust white balance to eliminate color casts and ensure accurate skin tones.
- Color Grading: Enhance colors to create a specific mood or style.
- Saturation: Adjust color saturation to make colors more vibrant or subdued.
- Hue Adjustments: Fine-tune individual colors to achieve desired results.
5.2. Retouching and Blemish Removal
Retouching removes imperfections while maintaining a natural look.
- Skin Smoothing: Reduce blemishes, wrinkles, and skin imperfections for a flawless complexion.
- Stray Hair Removal: Remove stray hairs to create a neat and polished appearance.
- Teeth Whitening: Whiten teeth for a brighter and more confident smile.
- Eye Enhancement: Enhance eyes to make them more vibrant and captivating.
5.3. Background Adjustments
Refining backgrounds to eliminate distractions and enhance focus.
- Blurring: Blur backgrounds to create a shallow depth of field and emphasize the subject.
- Object Removal: Remove distracting objects from the background.
- Background Replacement: Replace backgrounds with different scenes or textures.
- Adding Gradients: Add gradients to create visual interest and depth.
5.4. Sharpening and Noise Reduction
Enhancing details and reducing unwanted grain.
- Sharpening: Sharpen images to enhance details and create a crisp look.
- Noise Reduction: Reduce noise and grain to improve image clarity.
- Detail Enhancement: Enhance details in specific areas of the image.
- Texture Adjustments: Adjust texture to create a smoother or more rugged look.
5.5. Cropping and Composition
Adjusting the frame to improve visual impact.
- Cropping: Crop images to improve composition and eliminate distractions.
- Straightening: Straighten images to correct tilted horizons or vertical lines.
- Resizing: Resize images for different platforms and purposes.
- Aspect Ratio Adjustments: Adjust aspect ratios to fit different display formats.
6. Showcasing Your Professional Photos Online
Once you have your professionally edited photos, it’s time to showcase them online. Here are some tips for presenting your images effectively.
6.1. Website Portfolio
Create a dedicated portfolio on your website to display your best work.
- High-Quality Images: Use high-resolution images that are optimized for web viewing.
- Organization: Organize your portfolio into categories based on themes or projects.
- Descriptions: Add descriptions to provide context and insights into each photo.
- SEO Optimization: Optimize your portfolio for search engines to attract more visitors.
6.2. Social Media Platforms
Share your photos on social media platforms to reach a wider audience.
- Instagram: Ideal for visual storytelling and showcasing your creativity.
- Facebook: Great for engaging with your audience and sharing behind-the-scenes content.
- LinkedIn: Suitable for professional headshots and career-related photos.
- Pinterest: Perfect for creating mood boards and sharing inspiration.
6.3. Online Galleries
Utilize online galleries to sell prints and digital downloads.
- SmugMug: A popular platform for selling prints and digital downloads.
- Flickr: A community-based platform for sharing and discovering photos.
- 500px: A premium platform for showcasing high-quality photography.
- Etsy: A marketplace for selling handmade and vintage items, including photography prints.
6.4. Print and Display Options
Consider printing and displaying your photos for personal enjoyment or professional exhibitions.
- Prints: High-quality prints on various paper types and sizes.
- Canvas Wraps: Modern and stylish canvas prints that are ready to hang.
- Framed Prints: Classic and elegant framed prints for a timeless look.
- Photo Albums: Create personalized photo albums to preserve your memories.
6.5. dfphoto.net Community
Share your photos and connect with other photographers on dfphoto.net.
- Community Forums: Participate in discussions and share your expertise.
- Photo Galleries: Showcase your work and receive feedback from peers.
- Workshops and Events: Attend workshops and events to learn new skills and network with other photographers.
- Inspiration and Resources: Access a wealth of inspiration and resources to enhance your photography journey.
7. Understanding Search Intent
When considering where to have professional photos taken, it’s helpful to understand the various search intents behind this query. This allows you to tailor your approach and find the most relevant resources.
7.1. Finding Local Photography Studios
Users often search for “where to have professional photos taken” to find photography studios in their local area.
- Local SEO: Optimize your website and online profiles for local search to attract nearby customers.
- Google My Business: Create and manage your Google My Business listing to appear in local search results.
- Online Directories: List your business in online directories to increase visibility.
- Local Advertising: Run local advertising campaigns to target potential customers in your area.
7.2. Comparing Different Photography Venues
Some users are looking to compare different types of photography venues, such as studios, outdoor locations, and urban environments.
- Informative Content: Provide detailed information about the pros and cons of each type of venue.
- Comparison Tables: Create comparison tables to highlight the key differences between venues.
- Visual Examples: Include visual examples of photos taken in different venues.
- User Reviews: Share user reviews and testimonials to provide social proof.
7.3. Learning About Photography Techniques
Others may be interested in learning about photography techniques and tips for taking professional photos themselves.
- Educational Content: Create educational content about lighting, composition, posing, and editing.
- Tutorials: Provide step-by-step tutorials on various photography techniques.
- Case Studies: Share case studies of successful photoshoots and the techniques used.
- Expert Interviews: Interview professional photographers to share their insights and tips.
7.4. Finding Affordable Photography Options
Many users are looking for affordable photography options, such as DIY solutions or budget-friendly studios.
- DIY Guides: Provide DIY guides on how to take professional photos at home using smartphones and simple equipment.
- Budget-Friendly Tips: Share budget-friendly tips on saving money on professional photography services.
- Affordable Studios: List affordable photography studios in your area.
- Promotions and Discounts: Offer promotions and discounts to attract budget-conscious customers.
7.5. Seeking Inspiration and Ideas
Some users are simply seeking inspiration and ideas for their next photoshoot.
- Inspirational Content: Share inspirational photos and stories from other photographers.
- Mood Boards: Create mood boards with visual examples of different themes and styles.
- Theme Ideas: Provide theme ideas for various types of photoshoots, such as vintage, modern, or natural.
- Creative Concepts: Share creative concepts and ideas to spark imagination.
8. Frequently Asked Questions (FAQ)
Here are some frequently asked questions related to where to have professional photos taken, providing quick and informative answers.
8.1. What is the best location for a professional headshot?
The best location for a professional headshot is typically a studio with controlled lighting and a neutral background. However, a well-lit indoor space with a simple backdrop can also work.
8.2. How much does a professional photoshoot cost?
The cost of a professional photoshoot varies depending on the photographer, location, and services included. Expect to pay anywhere from $100 to $500 or more for a basic session.
8.3. What should I wear for a professional photoshoot?
Choose outfits that are comfortable, well-fitting, and reflect your personal style. Solid colors, classic styles, and minimal patterns are generally recommended.
8.4. How can I find a good photographer near me?
Search online directories, ask for referrals from friends and colleagues, and review portfolios and client testimonials before making a decision.
8.5. What are the benefits of hiring a professional photographer?
Professional photographers have the expertise, equipment, and experience to capture high-quality images that meet your specific needs and goals.
8.6. Can I take professional photos with my smartphone?
While it’s possible to take decent photos with a smartphone, a professional camera and photographer will generally produce better results due to superior equipment and expertise.
8.7. How long does a professional photoshoot usually last?
A typical professional photoshoot can last anywhere from one hour to several hours, depending on the type of session and the number of outfits and locations involved.
8.8. What is post-processing and why is it important?
Post-processing is the process of editing and enhancing photos after they have been taken. It’s important for color correction, retouching, and overall image quality improvement.
8.9. How far in advance should I book a professional photographer?
It’s recommended to book a professional photographer several weeks or months in advance, especially for popular times of the year or special events.
8.10. What should I expect during a professional photoshoot?
Expect to collaborate with the photographer on poses, angles, and expressions, and to receive guidance and feedback throughout the session.
9. Elevate Your Photography with dfphoto.net
At dfphoto.net, we’re dedicated to providing you with the resources, inspiration, and guidance you need to excel in the world of photography. Whether you’re searching for the perfect venue, seeking expert advice, or looking to connect with a vibrant community of photographers, we’re here to support you every step of the way. Visit dfphoto.net today to discover a wealth of knowledge, stunning visual content, and a community that shares your passion for capturing the world through the lens.
Ready to take your photography to the next level? Explore our comprehensive guides, browse our curated collections of stunning images, and connect with a community of passionate photographers at dfphoto.net. Discover new techniques, find inspiration for your next project, and unlock your full potential as a visual storyteller.
Address: 1600 St Michael’s Dr, Santa Fe, NM 87505, United States.
Phone: +1 (505) 471-6001.
Website: dfphoto.net.